TIS MA

From War Thunder Wiki
Jump to: navigation, search
TIS MA
tis_ma.png
GarageImage TIS MA.jpg
TIS MA
Show in game
MARKET

Description

Known originally as Polikarpov TIS, it was a heavy fighter developed during the 1940s competing with the Grushin Gr-1, Mikoyan-Gurevich DIS and the Tairov Ta-3. The TIS MA was the name given to the second prototype, this one featured a heavily modified armament. Two ShVAK cannon replaced the nose ShKAS machine guns and a UBT machine gun in a VUB-1 mount replaced the dorsal ShKAS, while the ventral machine gun was removed entirely. Two 37 mm (1.5 in) Shpitalny Sh-37 or 45 mm (1.8 in) 111P cannon replaced the wing root guns. The originally planed engines were not available and the AM-38F had to be used instead. The aircraft was tested in 1944 with successful test results. However, two accidents, one brake failure and a crash destroyed all hopes on the TIS program, and later, Polikarpov design bureau was closed.

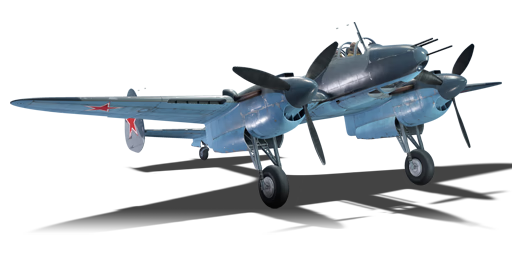
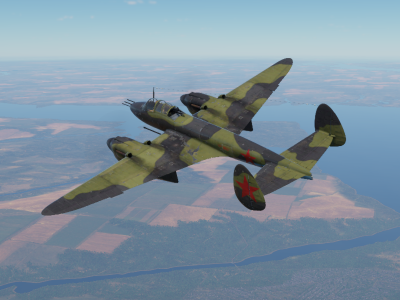
It was introduced during Update 1.95 "Northern Wind" in the Operation F.R.O.S.T. event. One of the last projects of the Polikarpov design bureau, the TIS MA is a unique and deadly aircraft. Its general configuration is similar to the famous Pe-2/3 "Peshka", having two inline engines slung under the wings, a gunner in the back of the cockpit, and twin vertical stabilizers mounted at the ends of the horizontal stabilizers. However the TIS MA is a different animal compared to the Pe-3 heavy fighter. While the Pe-3 was a hastily adapted variant of the Pe-2 dive bomber, the TIS MA was a purpose designed heavy fighter. It is smaller and slimmer, leading to a less bulbous and more insectoid appearance. More importantly, its flight characteristics and firepower are much improved; pilots who struggled with the Peshkas's poor manoeuvrability and mediocre armament will be pleasantly surprised by the TIS MA's decent handling and burning hatred for any enemies foolish enough to find themselves in front of it.

General info

Flight performance

Max speed
at 1 660 m534 km/h
Turn time24 s
Max altitude8 000 m
Engine2 х Mikulin AM-38F
TypeInline
Cooling systemWater
Take-off weight9 t

The TIS MA's speed is not very impressive for its rank, but it is still faster than the Pe-3bis and is quite speedy at low altitudes, where its twin AM-38F engines (the same type used on the IL-2s) have impressive power output. The engines are essentially immune to overheating when undamaged and WEP can be sustained indefinitely, which aids in recovering speed after diving and hard manoeuvres. The TIS MA has a good roll and turn rate for a twin engine fighter. This is helpful when attacking ground targets since the former makes it easier to line up strafing or bombing runs and the latter allows the pilot to recover and not strike the ground. Getting into extended dogfights with single engined fighters is not advisable, but with good energy management, use of combat flaps, and some teammate support, it is still possible to get a firing solution.

If using Manual Engine Controls, turn up the propeller pitch for maximum thrust and open the radiators by a tiny amount, no more than single digit percentages. This is all that the TIS MA needs in low altitude combat.

Note that like the IL-2s it shares engines with, the TIS MA only has good performance at low altitudes. The engines will quickly asphyxiate at more than 2,000 m and as a result the climb rate and acceleration will be impacted significantly. Avoid exceeding those altitudes when enemy attack is a concern.

Characteristics Max Speed
(km/h at 1,660 m)
Max altitude
(metres)
Turn time
(seconds)
Rate of climb
(metres/second)
Take-off run
(metres)
AB RB AB RB AB RB
Stock 512 494 8000 25.1 25.9 6.8 6.8 420
Upgraded 557 534 23.0 24.0 14.5 10.3

Details

Features
Combat flaps Take-off flaps Landing flaps Air brakes Arrestor gear
X X
Limits
Wings (km/h) Gear (km/h) Flaps (km/h) Max Static G
Combat Take-off Landing + -
740 320 386 367 270 ~10 ~8
Optimal velocities (km/h)
Ailerons Rudder Elevators Radiator
< 380 < 380 < 420 > 329

Survivability and armour

Crew2 people
Speed of destruction
Structural740 km/h
Gear320 km/h
  • 8.5 mm steel pilot seat

Fuel tanks are self sealing and located in the wing roots and middle fuselage.

The TIS MA is a fragile plane. The pilot's seat is the only armour available and the cockpit does not even have bulletproof glass, so enemies with rapid fire guns can often knock out the pilot. The fuel tanks are large, and although they are self sealing, they do not have the neutral gas pressurization system featured by the Pe-3bis and can be ignited by damage. The rest of the plane is decently sturdy and it can fly on one engine, so it can sustain considerable amounts of superficial damage and still return home.

Modifications and economy

Repair cost
AB642 Sl icon.png
RB910 Sl icon.png
SB1 990 Sl icon.png
Crew training10 000 Sl icon.png
Experts67 000 Sl icon.png
Aces400 Ge icon.png
Research Aces570 000 Rp icon.png
Reward for battleAB / RB / SB
Talisman.png 2 × 60 / 100 / 240 % Sl icon.png
Talisman.png 2 × 136 / 136 / 136 % Rp icon.png
Modifications
Flight performance Survivability Weaponry
Mods aerodinamic fuse.png
Fuselage repair
Mods radiator.png
Radiator
Mods armor frame.png
Airframe
Mods compressor.png
Compressor
Mods aerodinamic wing.png
Wings repair
Mods new engine.png
Engine
Mods armor cover.png
Cover
Mods metanol.png
Engine injection
Mods ammo.png
shvak_belt_pack
Mod arrow 0.png
Mods ammo.png
ns37_belt_pack
Mod arrow 0.png
Mods ammo.png
ns45_belt_pack
Mods pilon bomb.png
FAB-100
Mod arrow 0.png
Mods weapon.png
shvak_new_gun
Mods weapon.png
ns37_new_gun
Mods cannon.png
NS-45 cannon
Mod arrow 0.png
Mods pilon bomb.png
FAB-250
Mod arrow 0.png
Mods ammo.png
ub_turret_belt_pack
Mod arrow 0.png
Mods weapon.png
ns45_new_gun
Mods pilon bomb.png
FAB-500
Mod arrow 0.png
Mods turret gun.png
ub_turret_new_gun
Mods pilon rocket.png
RO-132

Armaments

Offensive armament

Weapon 12 x 37 mm NS-37 cannon
Ammunition150 rounds
Fire rate260 shots/min
Weapon 22 x 20 mm ShVAK cannon
Ammunition300 rounds
Fire rate800 shots/min

The TIS MA is armed with:

  • A choice between two presets:
    • 2 x 37 mm NS-37 cannons, wing-mounted (75 rpg = 150 total) + 2 x 20 mm ShVAK cannons, nose-mounted (150 rpg = 300 total)
    • 2 x 45 mm NS-45 cannons, wing-mounted (50 rpg = 100 total) + 2 x 20 mm ShVAK cannons, nose-mounted (150 rpg = 300 total)

The twin ShVAK guns are mounted right next to each other in the nose, and their tight clustering ensures that their accuracy is high and convergence is not an issue. While the ShVAK is a fairly weak weapon by itself, having two of them compensates for its faults. They are also unsynchronized since there is no central propeller to fire through, leading to a slightly higher burst mass than on the La-5 series. The best belts for the ShVAK are Default or Armoured Targets, though some players use Tracers. Avoid belts containing HE-I rounds, as those do little damage and often spark. Do not forget about the ShVAKs. While they are definitely not as powerful as the TIS MA's other cannons, their extreme accuracy means that in tail chase or head-on engagements where the convergence and bloom on the high calibre guns can be an issue, the ShVAKs can unload a laser beam of pain.

The high calibre guns are mounted in the wing roots and the convergence should be tailored towards these instead. They are still mounted more closely than on the IL-2-37, so players familiar with that aircraft will have an easier time.

The NS-37 cannons, famous for their use on the Yak-9T and several Soviet attacker aircraft, are very deadly weapons indeed. They have a high muzzle velocity of about 900 m/s and a good rate of fire for a large calibre weapon. They are accurate in short bursts but will easily overheat, lose accuracy, and jam if fired continuously. For ground striking the Armoured Targets belt is the best, as it consists entirely of AP-T rounds capable of penetrating 60 mm of armour at point-blank range. While in practice this maximum value is not achievable due to distance and angle issues, it is still capable of perforating light vehicles and going through the roofs and engine decks of medium or heavy tanks, sometimes even the sides as well. In Air RB it will take out Light Pillboxes in short order. The AP rounds are also highly effective against aircraft, capable of igniting fuel tanks and shearing off tails/wings (sometimes all at the same time), making it the best general purpose belt. On occasion, the AP-T rounds will pass through aircraft with little damage. For those who prefer more explosive effects, the Air Targets belt consists of only HEFI-T rounds and is somewhat more consistent versus aircraft, but since it is useless against armoured ground targets it is more situational. The Default belt has an even mix of AP-T and HEFI-T rounds but does not really offer any advantages and should be disregarded.

The alternative NS-45 cannons, as seen on the infamous Yak-9K, are ludicrously powerful against aircraft and certainly look intimidating when mounted, muzzle brake and all. A single good hit can destroy a heavy bomber and smaller aircraft will be dismembered. That said, the cannons have several unfavourable characteristics. The muzzle velocity is lower than the NS-37 and the accuracy can be truly abysmal, with anything besides single, paced shots being noticeably inaccurate and unlikely to hit. When fired too quickly the rounds can actually leave the barrel at impossible angles! Hits are not guaranteed kills either as there is a tendency for glancing shots to spark. Since the NS-37 is no slouch against aircraft and the NS-45 does not have any AP rounds available, it is best to use the NS-45s only for fun.

Another notable feature is the TIS MA's large ammunition capacity. The NS-37 cannons carry 75 rounds each, which is more than twice as much as the Yak-9T, and the NS-45 cannons carry 50 rounds each, still more than the Yak-9K's meager 29 rounds. This gives the TIS MA more staying power and one can afford to unload many rounds against difficult air targets.

Suspended armament

List of setups (5)
Setup 12 x 100 kg FAB-100sv (forged) bomb
Setup 22 x 250 kg FAB-250sv bomb
Setup 32 x 500 kg FAB-500sv (welded) bomb
Setup 48 x ROFS-132 rockets
Setup 58 x RBS-132 rockets

The TIS MA can be outfitted with the following ordnance:

  • Without load
  • 2 x 100 kg FAB-100sv bombs (200 kg total)
  • 2 x 250 kg FAB-250sv bombs (500 kg total)
  • 2 x 500 kg FAB-500sv bombs (1,000 kg total)
  • 8 x RS-132 rockets
  • 8 x RBS-132 rockets

The TIS MA's firepower is not limited to its gun armament. Its bomb and rocket armaments are actually better than the IL-2s and Pe-3s; unlike the former, it has access to the powerful FAB-500 bombs, and unlike the latter it can carry 2 more RS/RBS-132 rockets. The bombs are mounted externally under the center wing and drop individually, while the rockets are mounted outboard of the engines and can be tricky to aim as a result. External ordnance will affect the flight performance noticeably, but as a heavy twin engine fighter, it will not become a complete brick.

Defensive armament

Turret12.7 mm Berezin UBT machine gun
Ammunition200 rounds
Fire rate1027 shots/min
Main article: Berezin UB (12.7 mm)

The TIS MA is defended by:

  • 1 x 12.7 mm Berezin UB machine gun, dorsal turret (200 rpg)

The rear gunner has useful armament and should not be disregarded. Enemies tailing the TIS MA may be surprised with an onslaught of heavy machine gun fire. The Berezin UB is a good weapon, and when equipped with the Universal belt it can ignite enemies quite nicely. Alternatively the Armoured Targets belt includes cermet cored rounds that can knock out engines and pilots more easily. Both are good options.

Usage in battles

A versatile plane, the TIS MA lends itself to several roles, mainly limited by its bad high altitude performance and the fact that it's still a twin-engined, heavy aircraft. Throwing oneself incautiously at lightweight planes with superior turning or climbing capabilities will often not end well.

In Air RB, the TIS MA is best used in one of two ways:

Opportunistic Low-Level Interceptor

For this role, equip the NS-37s with the Air Targets belt. Take off, set throttle to WEP, and don't ever turn off WEP. Climb to around 2,000 m, and look for fighters, attackers, and bombers nearby that are nearby and at low altitudes, preferably near allies. When a suitable target is located, dive and try to deal crippling damage in the first pass. If they survive, there are 2 choices: if they are more manoeuvrable, then climb away, and if not, turn around and set up another shot. When the enemy is destroyed, regain altitude and repeat. Watch out for enemies diving from above and be prepared to break hard to dodge them. If an engagement is unfavourable, extend away towards allies and spray the target with the rear gunner if they pursue, making dodging fire if necessary.

Note that using the Air Targets belt for the NS-37s and not taking ordnance will make attacking ground targets difficult. Using the Armoured Targets belt for the ShVAKs offers a secondary weapon for taking out AAA and light vehicles, but the low ammo capacity makes this hard to sustain. Loading the NS-37s with Armoured Targets belts instead may be a better choice if the team is short on attackers.

Attacker

Though the TIS MA has the weaponry and performance for ground attack, its fragility and the lack of an airspawn pose some issues. The RBS-132 rockets are probably the best option, as with careful aim a single hit can destroy a Light Pillbox. Alternatively the FAB-500 bombs can destroy heavy and medium tanks, though since only two are available this may be better left to planes with more payload. Armoured Targets belts for the NS-37 are a must as they can destroy all sorts of vehicles and emplacements. ShVAK belts are up to personal preference but the Armoured Targets belt may be helpful in a pinch if the NS-37s run dry (though at that point it is usually a better idea to RTB and resupply).

Take off and stay at relatively low altitudes. One will likely arrive at the front lines not long after the IL-2s do. Use up the ordnance first to avoid being overburdened if attacked by enemies later on and keep an eye out for AAA emplacements, as the TIS MA's lack of armour and large size do it no favors. When enemy ground strikers arrive, it may be tempting to go for head-ons immediately, but since such engagements tend to be mutual kills, another option is to circle around, climb a bit, and attack from a less hazardous angle. Twin-engined aircraft are large targets and can be shredded by the NS-37s effectively. Around this time, furballs of fighters often will have developed. If an enemy fighter approaches from a high energy state, it can be fruitful to bait them into a head-on, fire a few cannon salvos from a distance, and then break off early to avoid the brunt of the incoming fire; unlike an IL-2, the TIS MA cannot afford to take hits. If the enemy is diving and head-ons are not possible, try to break hard and dodge them, then either dogfight or extend away towards teammates depending on the situation, as mentioned previously.

With the TIS MA it is tempting to bite off more than one can chew. Though the excellent armament means that risky moves can still yield kills, if one wishes to avoid becoming an additional flaming wreck on the battlefield, caution should still be exercised. Also, while the TIS MA can really dish out pain, there are some aircraft it can meet in uptiers that are equally good or better at this. The German He 219 A-7 has incredible burst mass and is far faster, and the Ta 154 A-1 still packs a huge punch while having all-round superior performance. Other twin-engined fighters that have tightly clustered armament are hazardous as well due to the TIS MA's lack of pilot protection. Think carefully before entering head-ons with aircraft like these.

Ground RB

In Ground RB, the TIS MA really shines. Here, it has an airspawn and there are fewer enemy fighters to worry about, allowing the user to focus on attacking enemy tanks. Definitely use the NS-37s loaded with Armoured Targets belts. The FAB-500 bombs are generally the best choice of ordnance since they have a large blast radius and drop individually. Those who have been disappointed by the FAB-250s mounted on the IL-2s will be happy with these, and they can take out multiple opponents clustered together at choke points, objective locations, or sniping zones. Be sure to set a generous fuse delay to avoid being caught in the blast radius. The RBS-132 rockets are also viable if one is comfortable with aiming them, as they theoretically offer up to 4 kills. They boast around 80 mm of penetration, which is enough to penetrate light tanks with ease, whereas medium or heavy tanks will usually require hits to the side, rear, or roof. A successful penetration will almost certainly annihilate the target because each rocket packs 1.35 kg of TNT. While the early IL-2s also have this rocket loadout, the TIS MA's flight performance is better and lining up good rocket salvos can be easier.

The NS-37s will chew up lightly armoured targets. Against medium and heavy tanks, the effects are less catastrophic, but good hits can still knock out engines and important crew members. Watch out for SPAAs when doing extended or repeated gun runs, as these behaviors will make the TIS MA a slower and more predictable target. Using rockets against SPAAs can be a good idea, as they are effective at a distance (though aiming is tricky) and the pilot can immediately break off after releasing them. Otherwise, do not attack SPAAs unless they are obviously distracted; an IL-2 can survive some incoming fire, the TIS MA will have a much harder time.

Keep an eye on the sky. If there are enemy attackers in the area, consider going after them after unloading ordnance. Freshly spawned enemies can be baited into head-ons, and opponents will often fall for this. Due to the lack of markers in Ground RB, they may see the silhouette of a Soviet twin-engine fighter, not notice the distinctive camouflage, and assume it is a Peshka or some other plane not known for powerful forward armament. Their mistake can be corrected promptly by ripping their aircraft apart with the NS-37s. Again, if a mutual kill is not desired, fly cautiously. The rear gunner is obviously useful for hosing down pursuing fighters, and another creative usage is to fire at a soft target like an SPAA after completing a gun run and pulling up.

Manual Engine Control

MEC elements
Mixer Pitch Radiator Supercharger Turbocharger
Oil Water Type
Controllable Controllable
Not auto controlled
Controllable
Auto control available
Controllable
Auto control available
Separate Not controllable
1 gear
Not controllable

Pros and cons

Pros:

  • Powerful armament layouts with decent ammo capacities
  • Both the 37 mm cannons and 45 mm cannons have high muzzle velocity are quite accurate in short bursts
  • Reasonable manoeuvrability and acceleration for a twin-engined fighter
  • Decent speed, but lower than most fighters it will encounter
  • Tightly clustered armament
  • Can mount bombs and rockets for ground-pounding, including a pair of powerful 500 kg bombs
  • Very good engine cooling, will almost never overheat
  • Premium rewards

Cons:

  • Slower than contemporary aircraft
  • Lack of bulletproof glass makes the pilot prone to snipes, also vulnerable to head-on attacks
  • Extremely prone to fires
  • Large target, easy for enemy fighters and SPAA to hit
  • Bad high altitude performance

History

The TIS A (and the improved MA) were designed to a 1938 specification for a heavy fighter - but work did not begin until 1940 due to resources being devoted to the I-180 and SPB projects.

The TIS A was an all metal monocoque monoplane with a very heavy forward facing armament of some mix of 2 x 37 mm, 2 x 20 mm cannon; and 2 x 12.7 mm UB + 4 x 7.62 mm ShKAS machine guns, or 6 x 7.62 mm ShKAS machine guns - sources vary on the exact nature of armament for the prototype[1][2]. The single rear gunner had 2 ShKAS machine guns - 1 mounted to fire from a dorsal position, the other mounted to shoot through a ventral hatch. It was fitted with Mikulin AM-39 engines, but these had protracted development problems - they were unreliable and vibrated above 5,000 m altitude.

By 1942 flight testing showed several problems, and a major redesign was conducted - radiators were moved to the wings, the machine guns in the nose were replaced by 2 x ShVAK 20 mm cannon, and 2 x 45 mm 11P guns were fitted in the wing roots. The gunner's 2 x ShKAS were replaced by a single 12.7 mm UBT machine gun. Engine reliability was not improved, so AM-38F engines (as fitted to Il-2s) were fitted instead - and these had much lower output resulting in predictably lower performance, especially at higher altitudes due to the AM-38's single stage supercharger optimised for lower altitudes.

This configuration was renamed the TIS-MA.

Flight testing of the TIS-MA from June-September 1944 found it performed as expected with the new engines - being generally disappointing at altitude. Calculations showed much better performance if the desired AM-39s could be fitted. However fate intervened - Polikarpov died on 30 July of stomach cancer, and when the TIS-MA crashed on 15 September it spelled the end of the program - his design bureau was being shut down and none of the others could or would take it on.

Media

Skins
Videos

See also

External links

References


Polikarpov Design Bureau (Опытное конструкторское бюро Поликарпова)
I-15  I-15 WR · I-15 M-22 · I-15 M-25 · I-15bis · Krasnolutsky's I-15bis
I-153  I-153 M-62 · Zhukovsky's I-153-M62 · I-153P
I-16  I-16 type 5 · I-16 type 10 · I-16 type 18 · I-16 type 24 · I-16 type 27 · I-16 type 28
I-180  I-180S · I-185 (M-71) · I-185 (M-82)
ITP  ITP (M-1)
Twin-engine fighters  TIS MA
Bombers  Po-2 · Po-2M
Export  ␗I-15bis · ␗I-153 M-62 · ␗I-16 type 5 · ␗I-16 type 10 · ␗I-16 type 17 · ␗I-16 Chung 28

USSR strike aircraft
IL-2  IL-2 (1941) · IL-2 (1942) · IL-2M (1943) · IL-2M type 3 · IL-2M "Avenger" · IL-2-37 · IL-2 M-82
IL-8  IL-8 (1944)
IL-10  IL-10 · IL-10 (1946)
Pe-3  Pe-3 (e) · Pe-3 · Pe-3bis
Su-2  BB-1 · Su-2 MV-5 · Su-2 TSS-1 · Su-2 (M-82)
Su-6  Su-6 · Su-6 (AM-42) · Su-6 (M-71F)
Su-8  Su-8
Tandem MAI  Tandem MAI
TIS MA  TIS MA
Tu-1  Tu-1
Yak-2  Yak-2 KABB

USSR premium aircraft
Fighters  Krasnolutsky's I-15bis · I-16 type 28 · Zhukovsky's I-153-M62 · I-153P · I-180S · I-301 · ITP (M-1)
  LaGG-3-4 · LaGG-3-23 · LaGG-3-34 · Dolgushin's La-7 · La-11
  Yak-3 (VK-107) · Yak-3T · Golovachev's Yak-9M
  ▂P-39K-1 · ▂Pokryshkin's P-39N-0 · ▂P-39Q-15 · ▂P-40E-1 · ▂P-47D-27 · ▂P-63A-5 · ▂P-63A-10 · ▂P-63C-5
  ▂Hurricane Mk IIB · ▂Spitfire Mk IXc · ▂Fw 190 D-9
Twin-engine fighters  I-29
Jet fighters  Su-11 · MiG-15bis ISH · MiG-17AS · MiG-21S (R-13-300) · MiG-23ML
Strike aircraft  IL-2M "Avenger" · IL-2 M-82 · IL-8 (1944) · Su-6 · Tandem MAI · TIS MA · Su-8 · Tu-1
  Yak-38 · Su-7BMK · Su-25K · Su-39
Bombers  Po-2M · Be-6 · MBR-2-M-34 · Pe-2-205 · TB-3M-17-32
  ▂PBY-5A Catalina · ▂Hampden TB Mk I · ▂A-20G-30 · ▂B-25J-30

Winter events
2022  Winter Quest
Pilot stars  Late 298D · ◄Tornado IDS MFG
Tanker stars  T-80UM2
Sailor stars  USS Newport News
2021  Operation W.I.N.T.E.R.
Pilot stars  C. 202D · ◊MiG-23MF
Tanker stars  A.C.I · AGS
Sailor stars  IJN Hayanami · MPK Pr.201K
2020  Operation W.I.N.T.E.R.
Pilot stars  Ro.57 Quadriarma · MiG-21PFM
Tanker stars  E.B.R. (1954) · Class 3 (P)
Sailor stars  Type K-8 No.13 · USS Baltimore
2019  Operation F.R.O.S.T.
Pilot stars  TIS MA · J6K1
Tanker stars  QF 3.7 Ram · ▃Merkava Mk.2B
Sailor stars  PT-811 · Jaguar
2018  Festive Quest
Pilot stars  M.B.152C1 · Fw 190 C
Tanker stars  SU-85A · T30
Christmas Lights  P-43A-1 · Comet I "Iron Duke IV"
2017  Festive Quest
Pilot christmas toys  P-40C · NC.900
Tanker christmas toys  AEC Mk II · Ersatz M10
Christmas Lights  Fw 189 A-1 · KV-2 (1940)
2016  Winter Holiday
Pilot stages  Ki-21-I hei · Me 262 A-2a
Tanker stages  ▃LVT(A)(4) (ZIS-2) · ▂Type 62
2015  War Thunder Fulfills Your Wishes!
Pilot reward  ▂P-63C-5
Tanker reward  VK 45.01 (P)
2014  Holiday War Thunder Marathon!
Pilot reward  I-301
Tanker reward  M8A1 GMC