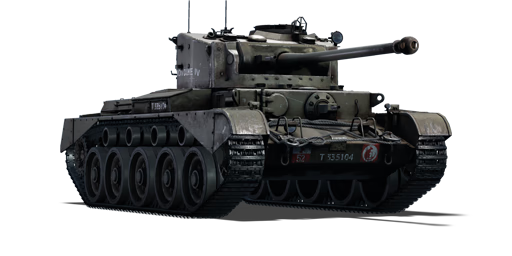
Comet I "Iron Duke IV"

From War Thunder Wiki
Jump to: navigation, search
This page is about the premium British medium tank Comet I "Iron Duke IV". For other versions, see Comet (Family).
Comet I "Iron Duke IV"
uk_a_34_comet_iron_duke.png
GarageImage Comet I "Iron Duke IV".jpg
Comet I "Iron Duke IV"
AB RB SB
5.0 5.3 5.3
Show in game
MARKET

Description

The Tank, Cruiser, Comet I (A34) "Iron Duke IV" is a premium gift rank III British medium tank with a battle rating of 5.0 (AB) and 5.3 (RB/SB). It was introduced during Update 1.57 "Battle March" as a reward for the 2016 WW2 Chronicles event. Armed with a 77 mm HV gun, essentially a 17-pounder with a lower muzzle velocity, it has one of the more powerful guns available for a medium tank at the rating.

The Comet is an excellent medium tank. It has great mobility and acceleration, able to reach 38 km/h very quickly and stay there in full throttle, but its reverse speed is pitiful like the Cromwell's. Firepower is also a benefit of the vehicle, especially after the unlocking of the APDS shot, giving it the penetration needed to deal with any threat you might encounter. The drawback of the design is the sub-par armour that can be pretty easily penetrated at BR 5.3. One should take advantage of the Comet's low profile and mobility to hide and manoeuvre from the enemy to catch them at an advantageous angle. The Comet also has a benefit the previous tanks in its branch, the Sherman Firefly, didn't have in the great gun depression. This allows the Comet to more easily fire over hills in an hull-down position to destroy the enemy with the most the best terrain benefit for protection.

Iron Duke IV was the tank of Lieutenant-Colonel Pat Hobart, commander of the 1st RTR, 7th Armoured Division.

General info

Survivability and armour

Smoke grenades
Creation of a smoke screen in front of the vehicle
Armourfront / side / back
Hull76 / 43 / 32
Turret102 / 64 / 57
Crew5 people
Visibility99 %

Armour type:

  • Rolled homogeneous armour
  • Cast homogeneous armour (Turret front, Gun mantlet)
Armour Front Sides Rear Roof
Hull 76.2 mm (1°) Front plate
32 mm (72°) Front glacis
63.5 mm (19°) Joint plate
25.4 mm (69°) Lower glacis
32 mm Top front half
25 mm Top back half
29 + 14 mm Bottom
32 + 25.4 mm (1°) Top half
32 mm (32°) Lower half
14 mm
Turret 102 mm (3-57°) Turret front
102 mm (1-34°) Gun mantlet
63.5 mm 57.1 + 5 mm (1°) 25.4 mm Front half
20 mm Rear half
Cupola 44 mm 44 mm 44 mm 25.4 mm

Notes:

  • Suspension wheels and the tracks are 20 mm thick.
  • There are tracks attached on the turret that provide an extra 20 mm armour where they are attached.
  • The bustle rack on the back of the turret gives an armour rating of 5 mm.

Mobility

Speedforward / back
AB58 / 4 km/h
RB and SB52 / 4 km/h
Number of gears5 forward
1 back
Weight33.5 t
Engine power
AB1 145 hp
RB and SB600 hp
Power-to-weight ratio
AB34.2 hp/t
RB and SB17.9 hp/t
Game Mode Max Speed (km/h) Weight (tons) Engine power (horsepower) Power-to-weight ratio (hp/ton)
Forward Reverse Stock Upgraded Stock Upgraded
Arcade 58 4 33.5 930 1,145 27.76 34.18
Realistic 52 4 531 600 15.85 17.91

Modifications and economy

Repair cost
AB1 600 Sl icon.png
RB1 982 Sl icon.png
SB2 531 Sl icon.png
Crew training10 000 Sl icon.png
Experts290 000 Sl icon.png
Aces710 Ge icon.png
Research Aces960 000 Rp icon.png
Reward for battleAB / RB / SB
Talisman.png 2 × 100 / 160 / 190 % Sl icon.png
Talisman.png 2 × 166 / 166 / 166 % Rp icon.png
Modifications
Mobility Protection Firepower
Mods new tank traks.png
Tracks
Mods new tank suspension.png
Suspension
Mods new tank break.png
Brake System
Mods new tank filter.png
Filters
Mods new tank transmission.png
Transmission
Mods new tank engine.png
Engine
Mods tank tool kit.png
Improved Parts
Mods extinguisher.png
Improved FPE
Mods tank reinforcement uk.png
Crew Replenishment
Mods tank ammo.png
76mm_britain_17pdr_APC_ammo_pack
Mod arrow 0.png
Mods new tank horizontal aiming.png
Horizontal Drive
Mods tank ammo.png
76mm_britain_17pdr_APCBC_ammo_pack
Mod arrow 0.png
Mods tank cannon.png
Adjustment of Fire
Mods tank ammo.png
76mm_britain_17pdr_APDS_ammo_pack
Mods new tank vertical aiming.png
Elevation Mechanism
Mods art support.png
Artillery Support
Mods smoke screen.png
Smoke grenade

Armaments

Main armament

Ammunition61 rounds
Reloadbasic crew → aces
9.6 → 7.4 s
Vertical guidance-12° / 20°
Main article: OQF Mk.II (77 mm)
77 mm OQF Mk.II Turret rotation speed (°/s) Reloading rate (seconds)
Mode Capacity Vertical Horizontal Stabilizer Stock Upgraded Full Expert Aced Stock Full Expert Aced
Arcade 61 -12°/+20° ±180° N/A 14.3 19.8 24.0 26.5 28.2 9.62 8.51 7.84 7.40
Realistic 8.9 10.5 12.8 14.1 15.0

Ammunition

Penetration statistics
Ammunition Type of
warhead
Penetration @ 0° Angle of Attack (mm)
10 m 100 m 500 m 1,000 m 1,500 m 2,000 m
Shot Mk.6 AP 137 134 123 111 100 91
Shell Mk.1 HE 16 16 14 13 12 11
Shot Mk.4 APC 137 134 123 111 100 91
Shot Mk.8 APCBC 152 149 137 124 112 101
Shot SV Mk.1 APDS 216 213 199 182 167 153
Shell details
Ammunition Type of
warhead
Velocity
(m/s)
Projectile
mass (kg)
Fuse delay
(m)
Fuse sensitivity
(mm)
Explosive mass
(TNT equivalent) (g)
Ricochet
0% 50% 100%
Shot Mk.6 AP 754 7.71 - - - 47° 60° 65°
Shell Mk.1 HE 754 6.98 0 0.1 580 79° 80° 81°
Shot Mk.4 APC 754 7.71 - - - 48° 63° 71°
Shot Mk.8 APCBC 754 7.71 - - - 48° 63° 71°
Shot SV Mk.1 APDS 1,035 2.48 - - - 75° 78° 80°

Ammo racks

Ammo racks of the Comet I (identical).
Full
ammo
1st
rack empty
2nd
rack empty
3rd
rack empty
4th
rack empty
5th
rack empty
61 56 (+5) 50 (+11) 43 (+18) 38 (+23) 30 (+31)
6th
rack empty
7th
rack empty
8th
rack empty
9th
rack empty
10th
rack empty
Visual
discrepancy
25 (+36) 20 (+41) 12 (+49) (+54) (+60) No

Notes:

  • As they are modeled by sets of 2, shells disappear from the rack only after you fire both shells in the set.
  • Right side empty: 25 (+36) shells

Optics

Comet I "Iron Duke IV" Optics
Default magnification Maximum magnification
Main Gun optics x3 x6
Comparable optics VFW

Identical to Comet I, this is one of the first tanks for British faction to have X6 scope. It will not get any better than this until rank VI, so get used to it - it will be the same across entire tech tree for a while with SPAA being the only exception.

As of rank III, this scope is slightly or moderately superior to most medium and heavy tanks, but do not expect to outsnipe German SPG as they have same optics or even better.

With newfound APDS ammunition, you might want to take tank on a test drive to get used to APDS ballistic markings. As usually, each mark represents 200 m, but they skip over the 8 number on the scope, leaving inexperienced user guessing where is the 800 m mark. It is the second big line on your scope - try to remember it well.

Machine guns

Ammunition5 175 rounds
Belt capacity225 rounds
Reloadbasic crew → aces
10.4 → 8.0 s
Fire rate600 shots/min
Main article: BESA (7.92 mm)
7.92 mm BESA
Mount Capacity (Belt) Fire rate Vertical Horizontal
Coaxial 5,175 (225) 600 N/A N/A

Usage in battles

Fighting a tank of the same weight classification is relatively easy, but difficult against the more armoured Panther and T-34-85 tanks. Until the APDS shot can be unlocked, more decisive shots will have to be made to take care of these tanks, the Mk.6 and Mk.8 shot are the preferred ammunition to use. The Panthers should be targeted on the gun mantlet in the front and should be aimed at the gunner to immobilize their firepower and cause crew damage. The T-34-85 is a bit of a hit-or-miss due to the more heavy sloping nature of the armour and the turret. Penetrating through the front hull armour when it is facing directly at you is the best course of action against the T-34-85. Heavy tanks get even more tricky, but easier once the APDS round is unlocked for use. A Tiger I is admittedly an easy tank to deal with due to the vertical slope of the armour. Problems arise with the IS-2 tank that may show up, due to their heavy armour and their tendency to absolutely destroy vehicles with their 122 mm gun. Distance is not your friend against this tank, the closer the better for your gun to penetrate the weak spots on its frontal armour. A tough situation, but a survivable one.

For every Comet player that does not have the APDS shells, do not engage in long distance gun fights. You are almost certainly going to lose. So use it first as its intention is, a cruiser tank. Cap point and retreat. If you find yourself in a sticky situation, get as close to the enemy as possible and fire at its side. Conduct the battle in this manner until the APDS is unlocked

The best tactic is flanking and "shoot and scoot". Your armour won't stand against T-34s and Tigers you'll meet so don't pick a snipe position and keep firing - sooner or later you will be pinned down. You need to locate a good spot for attack, fire a few shots (Comet has a great fire rate: use it) and relocate. Don't mind the damage you made: keep moving!

Also, another "never" to do with this tank, never go in reverse. You are almost certainly going to get yourself blown up in the process as you have an awful reverse speed of only -1 mph (-3 km/h). If you want to reverse, turn the whole tank around instead using neutral steer or just charge at the enemy, circle him or her once and disappear the other way. You must do this as quickly as you appeared. You can use smoke grenades, but still, don't reverse, charge at the enemy. To not to get in the situation in the first place, choose where you are going to go carefully. You must study the situation quickly and cautiously to not to get yourself destroyed in the process. The key is to run, run and run.

Overall, you must dedicate quite a bit of time to master the tank in all. Even when you have the APDS shells.

Battle mode specifics

Arcade battles

In arcade domination mode where the cap points are arranged perpendicular to the cap points (ex. Poland, Ash River, Berlin, Korea, Karelia, Kuban, etc.), go for the flanks (A or C). If the cap points are diagonal (ex. Stalingrad), go for the closest cap point. And if the cap points are parallel to cap points (ex. Ardennes, Eastern Europe, etc.) go for the middle point as fast as you can. If you feel that you cant make it, help cap the point closest to spawn. You can also decide if you want to defend the point after capturing it. It is suggested to defend the cap point that has a lot of cover and an easy escape if overwhelmed (Suggested points to defend: A or C in Poland, C in Stalingrad, C in Ardennes).

Realistic/Simulator battles

In realistic and simulator, the Comet can become sluggish and isn't as fast as in arcade. A suggestion would be to capture the closest cap point, cap it, and then go into hiding. When you go into hiding, take every well placed shot you can and immediately run away from an encounter. You will mainly be facing Tiger IIs, Tiger Is, and Panthers, T-34-85s, rarely Chi-Tos and Chi-Ris. If you encounter them on a one v. one, always be on the move. Move around the other tank and try to hit it from the side (Panthers, Tiger Is, Chi-Tos, and Chi-Ris). If you encounter a Tiger II, slap it across the cheek with a APDS shell and take shoot it through the side. T-34-85 would be easier. You can easily penetrate the frontal armour of the T-34-85. It is just a matter of reaction time.

Specific enemies worth noting

All tanks when you do not have APDS shells yet. If you do, it a lot easier. As it has been mention before, when engaging a Tiger II, slap an APDS shell on the right turret cheek to knock out the gunner and finish it off from the side. The hardest tanks to counter are the following:

Although your gun can counter anything within the Comets BR range, you should constantly be aware that one hit from pretty much any gun to the front of the hull will destroy you. In particular, the Soviet 85 mm and German 75/88 mm guns should be taken very seriously. They have plenty of explosive filler. The turret on the Comet has the chance to bounce even the mighty 88 mm gun found on the Tiger I, but only a chance. Your hull won't even protect you from the majority of rank 2 guns, so rank 3 and 4 guns will slice through the Comets armour like butter. Because of this, almost any enemy is dangerous. Even SPAA can be a frontal threat to you. In particular, the Wirbelwind or the Ostwind can cause serious damage at close to medium range. Be particularly cautious late in a match when SPAA are more common.

Pros and cons

Pros:

  • Excellent manoeuvrability and speed - second only by a little to the T-34-85 (D-5T) and Panther D
  • Good gun, precise and with good penetration values (vertical armour)
  • Access to APDS shot
  • Great turret armour
  • Low profile
  • Great gun depression
  • 5 crew members

Cons:

  • Bad penetration values against sloped armour without APDS
  • Bad gun damage (without APDS), you'll need to aim at the enemy gunner to have a fighting chance
  • The 17-pdr does not have as much penetration as other variants
  • Overall bad armour for its rank,only the turret front has some chance to bounce some hits
  • Awful reverse speed of only -3 km/h (-2 mph)

History

Development

The British experience against the Germans during World War II showed that there were severe deficiencies with their cruiser tanks. The main cruiser tanks in the British inventory was the Crusader tank, but suffered from a gradually inefficient armament and thin armour. A request was submitted in 1941 to the Nuffield Organization and Leyland Motors Ltd for a heavier cruiser tank that could take on the gradually stronger German tanks, the design was also to use components from the Crusader tanks for economic reasons. This became the A24 Cruiser Tank Mk VII Cavalier tank and the A27L Cruiser tank Mk VII Centaur tank, which are both superseded by the A27M Cruiser Tank Mk VII Cromwell tank. The Cromwell ended up as a decent cruiser tank for the British Army, giving great mobility, reliability, and a decent OQF 75 mm gun (or a 6-pounder gun). However, it still had problems, such as being under-gunned against the more armoured German tanks and suspension problems.

It was determined that the British Army needed a tank that mounted the large 17-pounder gun, which would allow the tank to stand its ground against the German panzers. The first attempt was an upgraded Cromwell in the form of the A30 Challenger, but development and production was slow and the first mass-produced tank with the 17-pounder was the modified Sherman Firefly. While the Firefly was adequate, it was a logistical burden when the Firefly is attached with Cromwell troops, which would require the troop to have maintenance requirements for a Cromwell and a Sherman tank. A more standard tank is needed to fix this, and development started on this with the General Staff specification A34.

The developing tank, now called A34 Comet I, was meant to fix the issues from the Cromwell such as the suspension and the track shedding, plus also increase the firepower and speed. The gun mounted on the tank was the "77 mm HV", a specifically built gun for the Comet I. Though using the same projectiles as the 17-pounder, the 77 mm HV gun uses cartridges with different casings and thus the rounds between the two gun are different and the 77 mm HV produces a lower muzzle velocity for the round, but this allowed easier stowage in the gun due to the more compact size. The Comet I also gave a greater armour protection, a welded armour construction, cast gun mantlet, stronger suspension, a return roller established in the suspension, an electrically traversed turret, and ammo stowage inside armoured bins. The Comet I, though having the power to go faster than the Cromwell, is restricted with an engine governor to preserve the suspension, engine, and tracks. The Comet I entered prototype stage in February 1944, but delays caused production to start at September 1944 and then put into service in Europe at December 1944. By the end of the war, about 1,186 Comet I tanks were made for the British Army.

Combat usage

The first units to receive the Comet I tank was the British 11th Armoured Division, which was delivered in December 1944, and was the only division to be refitted with Comets by the end of the war. The Comet did not perform significantly in the battlefield due to its late arrival, but it was involved in the crossing of the Rhine and the Berlin Victory parade in July 1945. At Europe, the maximum speed of 51 km/h allowed the Comet I to exploit the German highways to travel throughout the entire countryside.

The Comet I saw service after World War II during the Korean War when it started, serving alongside its to-be successor Centurion tank. Though the Centurion was adopted in 1949, the Comet I continued to see service in the British Army until 1958, when it was then decommissioned and sold to foreign countries, which included South Africa, Finland, Ireland, Cuba, and Myanmar. Notable records with the Comet I sales was 41 tanks to Finland, which used them until 1970 and kept them in storage for much longer. In 1959, 4 were sent to Ireland in 1959 and another 4 the following year, the Irish kept them until 1973 before being withdrawn.

Media

Skins
Images
Videos

See also

Links to the articles on the War Thunder Wiki that you think will be useful for the reader, for example:

  • reference to the series of the vehicles;
  • links to approximate analogues of other nations and research trees.

External links


Leyland Motors Limited
Cruiser Tanks 
Tank, Cruiser, Comet I (A34)  Comet I · Comet I "Iron Duke IV"
MBTs 
Centurion  FV4202
Cheiftain  Chieftain Mk 3 · Chieftain Mk 5 · Chieftain Mk 10

Britain medium tanks
Valentine  Valentine I · Valentine IX · Valentine XI
Cromwell  Cromwell I · Cromwell V · Cromwell V (RP-3)
Cromwell derivatives  Challenger · Avenger · Comet I · Comet I "Iron Duke IV" · Charioteer Mk VII
Centurion  Centurion Mk 1 · Centurion Mk.2 · Centurion Mk 3 · Centurion Mk.5 AVRE · Centurion Mk 10 · Centurion Action X · FV4202
Vickers MBT  Vickers Mk.1 · Vickers Mk.3 · Vickers Mk.7
Chieftain  Chieftain Mk 3 · Chieftain Mk 5 · Chieftain Mk 10
Challenger 1  Challenger Mk.2 · Challenger Mk.3 · Challenger DS
Challenger 2  Challenger 2 · Challenger 2 (2F) · Challenger 2 TES · Challenger 2 OES · Challenger 2E · Challenger 2 Black Night
Challenger 3  Challenger 3 TD
Australia  A.C.I · A.C.IV · Centurion Mk.5/1
South Africa  Olifant Mk.1A · Olifant Mk.2 · TTD
India  Vijayanta · Bhishma TWMP
Israel  ▄Sho't Kal Dalet
Jordan  Khalid
Sweden  ▄Strv 81 (RB 52)
USA  Grant I · Sherman II · Sherman Firefly · Sherman IC "Trzyniec"

Britain premium ground vehicles
Light tanks  A13 Mk I (3rd R.T.R.) · A13 Mk II 1939 · AEC Mk II · Crusader "The Saint" · Rooikat 105
Medium tanks  A.C.I · Grant I · Cromwell V (RP-3) · Sherman IC "Trzyniec" · A.C.IV · Comet I "Iron Duke IV"
  Centurion Mk.2 · ▄Strv 81 (RB 52) · Centurion Mk.5 AVRE · Centurion Mk.5/1 · ▄Sho't Kal Dalet · Centurion Action X
  Vijayanta · Khalid · Challenger DS · Challenger 2 OES
Heavy tanks  Independent · Matilda Hedgehog · Excelsior · TOG II · Churchill Crocodile · Black Prince
Tank destroyers  Alecto I · Achilles (65 Rg.) · QF 3.7 Ram

Winter events
2022  Winter Quest
Pilot stars  Late 298D · ◄Tornado IDS MFG
Tanker stars  T-80UM2
Sailor stars  USS Newport News
2021  Operation W.I.N.T.E.R.
Pilot stars  C. 202D · ◊MiG-23MF
Tanker stars  A.C.I · AGS
Sailor stars  IJN Hayanami · MPK Pr.201K
2020  Operation W.I.N.T.E.R.
Pilot stars  Ro.57 Quadriarma · MiG-21PFM
Tanker stars  E.B.R. (1954) · Class 3 (P)
Sailor stars  Type K-8 No.13 · USS Baltimore
2019  Operation F.R.O.S.T.
Pilot stars  TIS MA · J6K1
Tanker stars  QF 3.7 Ram · ▃Merkava Mk.2B
Sailor stars  PT-811 · Jaguar
2018  Festive Quest
Pilot stars  M.B.152C1 · Fw 190 C
Tanker stars  SU-85A · T30
Christmas Lights  P-43A-1 · Comet I "Iron Duke IV"
2017  Festive Quest
Pilot christmas toys  P-40C · NC.900
Tanker christmas toys  AEC Mk II · Ersatz M10
Christmas Lights  Fw 189 A-1 · KV-2 (1940)
2016  Winter Holiday
Pilot stages  Ki-21-I hei · Me 262 A-2a
Tanker stages  ▃LVT(A)(4) (ZIS-2) · ▂Type 62
2015  War Thunder Fulfills Your Wishes!
Pilot reward  ▂P-63C-5
Tanker reward  VK 45.01 (P)
2014  Holiday War Thunder Marathon!
Pilot reward  I-301
Tanker reward  M8A1 GMC