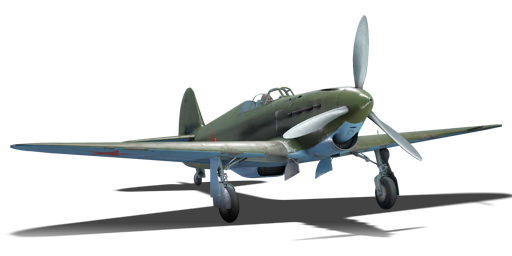
Yak-1
| This page is about the Soviet fighter Yak-1. For other versions, see Yak-1 (Family). |

Contents
Description
The Yak-1 is a rank II Soviet fighter with a battle rating of 2.7 (AB/SB) and 2.3 (RB). It was introduced in Update 1.43.
The Yak-1 is a fairly good turn fighter. Although not as good as Spitfires around the same BR, it is better than some of the German aircraft. The aircraft has good diving speed and energy retention, however, without slats, it cannot out-turn a Bf 109 F in a vertical loop. This aircraft performs best at medium-low altitudes. Due to its small wings and poor rate of climb at higher altitudes, it is lacking as a high altitude fighter. The aircraft can be used as a horizontal turn fighter, but one must be careful to be on the lookout for Boom & Zoomers. If the situation gets worse, a possible escape can be flying low level at high speed or trying an energy-retaining climb. While this aircraft should not be wasted on a ground attack, as a last resort it can be used to destroy unarmoured ground targets if the last flying opponent happens to be running away. The aircraft does perform well at lower speeds, yet it becomes very vulnerable to most enemy aircraft including biplanes.
Used well, the Yak-1 can be an unstoppable flying machine. Two of the most important things a Yak-1 pilot should aim for are the opponent's cockpit (pilot sniping) or wings. These are typically the weakest spots of an aircraft where a good shot can knock-out the enemy pilot or snap off a wing with a few well-placed rounds. The ShVAK is a fantastic 20 mm cannon if the pilot's aim is good! This cannon has an excellent rate of fire, unfortunately, it is paired with a barely adequate amount of ammunition which can be used up quickly. Mounted alongside the ShVAK are two 7.62 ShKAS machine guns. Much like the cannon, the machine guns do not have a large ammo pool to draw from. Yak-1 pilots always need to be mindful on how much ammo remains after an encounter or risk being pounced on by more manoeuvrable enemies when out of ammunition (or while reloading in AB).
An Achilles Heel of the Yak-1 is that it lacks armour protection. Head-on attacks from an enemy risk the pilot being knocked out by flying rounds or the water coolant radiator being hit. With a leaking water radiator, the Yak-1 will suffer engine failure within a few minutes (in RB mode). The engine of the Yak-1, like most Soviet fighter engines, tends to overheat quickly and stays running hot. One way to combat overheating is to run the engine at 97% of maximum and limiting usage of WEP. Manual engine control (MEC) can be used to keep the Yak's engine running cool at 100% power, though this means that prop pitch, fuel mixture, and supercharger gears must be manually adjusted in addition to the radiators (In Realistic mode, you can always use MEC while climbing, then switch back to automatic once you are dogfighting). If the aircraft is damaged, the Yak-1 pilot can check the cockpit's instrument panel and observe the oil temperature gauge as this will give a more accurate state of the engine than the water temperature gauge. The wings of the Yak-1 are also vulnerable to enemy fire, being rather fragile and full of fuel tanks.
General info
Flight performance
| Characteristics | Max Speed (km/h at 5,000 m) |
Max altitude (metres) |
Turn time (seconds) |
Rate of climb (metres/second) |
Take-off run (metres) | |||
|---|---|---|---|---|---|---|---|---|
| AB | RB | AB | RB | AB | RB | |||
| Stock | 555 | 538 | 10000 | 19.0 | 19.6 | 13.1 | 13.1 | 320 |
| Upgraded | 601 | 577 | 17.1 | 18.0 | 19.6 | 16.0 | ||
Details
| Features | ||||
|---|---|---|---|---|
| Combat flaps | Take-off flaps | Landing flaps | Air brakes | Arrestor gear |
| X | X | ✓ | X | X |
| Limits | ||||||
|---|---|---|---|---|---|---|
| Wings (km/h) | Gear (km/h) | Flaps (km/h) | Max Static G | |||
| Combat | Take-off | Landing | + | - | ||
| 675 | 320 | N/A | N/A | 280 | ~11 | ~8 |
| Optimal velocities (km/h) | |||
|---|---|---|---|
| Ailerons | Rudder | Elevators | Radiator |
| < 380 | < 420 | < 490 | > 340 |
| Compressor (RB/SB) | ||
|---|---|---|
| Setting 1 | ||
| Optimal altitude | 100% Engine power | WEP Engine power |
| 2,300 m | 1,081 hp | 1,211 hp |
| Setting 2 | ||
| Optimal altitude | 100% Engine power | WEP Engine power |
| 4,200 m | 1,015 hp | N/A |
Survivability and armour
- 8 mm steel behind the pilot
- Self-sealing fuel tanks (2 in each wing)
- Oil cooling system located underneath engine
- Liquid cooling system located behind and under the pilot
Modifications and economy
| Flight performance | Survivability | Weaponry | ||||||||||||||||||||
|---|---|---|---|---|---|---|---|---|---|---|---|---|---|---|---|---|---|---|---|---|---|---|
|
|
|
Armaments
Offensive armament
The Yak-1 is armed with:
- 1 x 20 mm ShVAK cannon, nose-mounted (110 rpg)
- 2 x 7.62 mm ShKAS machine guns, nose-mounted (620 rpg = 1,240 total)
Suspended armament
The Yak-1 can be outfitted with the following ordnance:
- Without load
- 2 x 50 kg FAB-50 bombs (100 kg total)
- 2 x 100 kg FAB-100 bombs (200 kg total)
Usage in battles
Due to the Yak-1's manoeuvrability and armament, the main role will be employed as a fighter in the game. The Yak-1 can be used as a turn fighter (see next section for aircraft to avoid while turn fighting), boom & zoomer or energy fighter. The Yak-1 performs well in the mid to lower altitudes but loses mobility in the higher altitudes.
- Ground attack: This should be avoided due to low speeds needed allowing the Yak-1 to become an easy target for enemy aircraft (especially biplanes).
- Bomber hunting: This is a risky option as bombers typically fly in the higher altitudes where the Yak-1 starts losing its manoeuvrability. The lack of armour on the Yak-1 makes it vulnerable to turret gunners and it is very easy to lose the pilot, engine or a wing to them. When hunting bombers, the Yak-1 can utilise a head-on approach going for the pilots (pilot sniping) or the engines; otherwise employ the speed of the Yak-1 by diving from a higher altitude towards the front of the bomber aiming for the cockpit, engine or wings. If failing to destroy the bomber on the first pass, exercise patience and set up for another diving pass, any other way the Yak-1 risks bleeding crucial speed in making a quick turn in an attempt to finish off the bomber. Here, quick turns will expose the Yak-1 to any turrets on the plane which would otherwise have a very difficult time acquiring a firing solution on a zooming fighter which is quickly out of their range.
Specific enemies worth noting
- Spitfires: The Spitfire's superior turning ability gives it an edge over the Yak-1's manoeuvrability. Turn fighting against a Spitfire is very difficult in a Yak-1, usually resulting in the Yak-1 being unable to shake or outrun the Spitfire. Baring any mistakes made by the Spitfire pilot, the Yak-1 will have a very difficult time gaining an advantage or escaping.
- A6M Zeroes: Much like the Spitfires, the A6M Zeros are superior turn fighters and have the added bonus of being armed with 20 mm auto cannons giving the Japanese fighter a firepower boost against the Yak-1.
- Bf 109 Friedrichs: The Bf 109 F1 is at the same br as the Yak-1, the Bf 109 F is faster, climbs better, has better energy retention, and better all around high altitude performance than the Yak-1. The Yak-1 should attempt to lure the Bf 109 into a low altitude (below 3000m) turnfight where the Yak has the advantage.
Counter-tactics
When attacking a Yak-1, specific areas to exploit:
- When attacking in a Spitfire or A6M Zero, engage in a turn fight, bait the Yak-1 into tight turns to bleed its speed.
- Bait the Yak-1 to higher altitudes, the higher it goes, the less manoeuvrable it becomes and the more limited their options become.
- The Yak-1 does not have any armour plates in the front and is susceptible to pilot sniping, wing snapping, engine/fuel tank fires and overheating with a few well-placed shots from cannons or machine guns.
- Non-turn fighting aircraft should rely on Boom & Zoom tactics in an attempt to take out a Yak-1.
If there's a Yak-1 on the tail:
- If your plane has similar or better turn compare to the Yak-1 drastically reduce speed and turn in hopes of an overshoot.
- If your plane is faster or has better high speed performance than the Yak-1, dive at a high angle and make evasive maneuvers, the Yak-1 has a low rip speed and compresses at high speed.
- Keep moving around, try to keep your cockpit at an 180 degree angle to the Yak-1, so the Yak-1 cannot get acquire a firing solution with its cannon, causing the Yak-1 to expend all of its rounds (in AB this then gives a ~40-second window to attempt to get away or reverse roles before the Yak-1 cannon has reloaded).
- Drag the Yak-1 back towards teammates and set the Yak-1 up to be an easy target for comrades/teammate to take out.
Manual Engine Control
| MEC elements | ||||||
|---|---|---|---|---|---|---|
| Mixer | Pitch | Radiator | Supercharger | Turbocharger | ||
| Oil | Water | Type | ||||
| Controllable | Controllable Not auto controlled |
Controllable Not auto controlled |
Controllable Not auto controlled |
Separate | Controllable 2 gears |
Not controllable |
Pros and cons
Pros:
- Highly manoeuvrable.
- Good acceleration and top speed at low altitudes.
- Even though its frame is constructed of wood, the Yak can take a lot of punishment and still perform well.
- Powerful cannon with limited ammo/dual machine guns with an adequate amount of ammo.
Cons:
- Engine overheats quite easily, forcing the pilot to slow down or return to base to allow it to cool (engine is notorious for overheating and ceasing to work mid-dogfight if run at 100% or WEP). Operating the engine at 97% reduces chances for engine overheating while maintaining very good aircraft performance.
- Elevator compresses at high speeds, so turning or pulling up in a dive can be a struggle.
- No armour to protect the pilot from the front, engine or fuel tanks, almost doomed if set on fire.
- Wings are an easy target when trying to loop in a dogfight, and they almost always get hit.
- Cannon ammo runs out very quickly if not carefully monitored (in AB, reloading at every opportunity is advised).
- Single powerful gun requires good aim and knowledge of aircraft weak spots to be used effectively ("spray and pray" causes ammo to deplete very quickly).
History
In 1939 the Soviet Command was looking for a replacement for their outdated I-153 Chaikas and I-16 Ishaks. Yakovlev was part of a Soviet delegation on a visit to the German aviation industry in October 1939. His interest was in aerodynamic design and during a visit at Heinkel, their new radiator lacking He 100 fighter was shown to them. Three (or ten) vehicles were bought by the CCCP. While the He 100 was producing record level top speeds, the surface cooling technology and other handling characteristics tainted the aircraft with the Soviets and were marked unsuitable, like in Germany.[1]
Already by January 1940 a first prototype was ready for taking off. Baptized I-26 (Istrebitel -> Fighter), the test flights were marked by a horrible accident as Julian I. Piontkowski, a test pilot for every Yakovlev plane, crashed and died. Fortunately for the plane's designers, the aircraft's construction was not found to be the cause of the accident and state supervised tests continued until November 1940. Serial production subsequently started in December 1940 under the new designation "Yak-1".[1]
By the time of the German invasion, all of the new fighters were delegated to the defence of Moscow, as was the MiG-3.[1]
Notable pilots
Media
- Skins
- Images
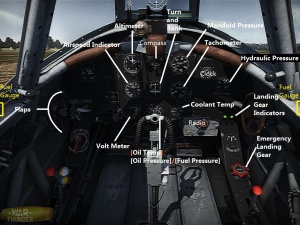
Cockpit of the Yak-1 explained

- Videos
See also
Links to the articles on the War Thunder Wiki that you think will be useful for the reader, for example:
- reference to the series of the aircraft;
- links to approximate analogues of other nations and research trees.
External links
References
- ↑ 1.0 1.1 1.2 German Wikipedia, figuratively translated, From the German Wikipedia Yak-1 article. The text was figuratively translated.
| A.S. Yakovlev Design Bureau (Яковлев Опытное конструкторское бюро) | |
|---|---|
| Fighters | |
| Yak-1 | Yak-1 · Yak-1B |
| Yak-3 | Yak-3 · Yak-3 (VK-107) · Yak-3P · Yak-3T · Yak-3U |
| Yak-7 | Yak-7B |
| Yak-9 | Yak-9 · Yak-9B · Yak-9K · Golovachev's Yak-9M · Yak-9P · Yak-9T · Yak-9U · Yak-9UT |
| Twin-engine fighters | I-29 |
| Jet fighters | |
| Yak-15 | Yak-15P · Yak-15 |
| Yak-17 | Yak-17 |
| Yak-23 | Yak-23 |
| Yak-30 | Yak-30D |
| Yak-141 | Yak-141 |
| Strike aircraft | |
| Yak-2 | Yak-2 KABB |
| Yak-38 | Yak-38 · Yak-38M |
| Bombers | Yak-4 |
| Jet bombers | Yak-28B |
| Foreign use | ▄Yak-3 · Challe's ▄Yak-9T · ◔Yak-9P |
| Captured | ▀Yak-1B |
| USSR fighters | |
|---|---|
| I-15 | I-15 WR · I-15 M-22 · I-15 M-25 · I-15bis · Krasnolutsky's I-15bis |
| I-153 M-62 · Zhukovsky's I-153-M62 · I-153P | |
| I-16 | I-16 type 5 · I-16 type 10 · I-16 type 18 · I-16 type 24 · I-16 type 27 · I-16 type 28 · I-180S |
| I-29 | I-29 |
| I-185 | I-185 (M-71) · I-185 (M-82) |
| I-225 | I-225 |
| ITP | ITP (M-1) |
| MiG-3 | MiG-3-15 · MiG-3-15 (BK) · MiG-3-34 |
| LaGG | I-301 · LaGG-3-4 · LaGG-3-8 · LaGG-3-11 · LaGG-3-23 · LaGG-3-34 · LaGG-3-35 · LaGG-3-66 |
| La | La-5 · La-5F · La-5FN · La-7 · Dolgushin's La-7 · La-7B-20 · La-9 · La-11 |
| Yak-1/7 | Yak-1 · Yak-1B · Yak-7B |
| Yak-3 | Yak-3 · Yak-3P · Yak-3T · Yak-3U · Yak-3 (VK-107) |
| Yak-9 | Yak-9 · Yak-9B · Golovachev's Yak-9M · Yak-9T · Yak-9K · Yak-9U · Yak-9UT · Yak-9P |
| Other countries | ▂P-40E-1 · ▂P-47D-27 · ▂Hurricane Mk IIB · ▂Fw 190 D-9 · ▂Spitfire Mk IXc |
| P-39 | ▂P-39K-1 · ▂Pokryshkin's P-39N-0 · ▂P-39Q-15 |
| P-63 | ▂P-63A-5 · ▂P-63A-10 · ▂P-63C-5 |
