Difference between revisions of "F-4S Phantom II"
Colok76286 (talk | contribs) (Edits) |
(Wiki page overhaul to bring the page up to standard in the ARH age) |
||
| (72 intermediate revisions by 24 users not shown) | |||
| Line 1: | Line 1: | ||
| + | {{About | ||
| + | |about = premium American jet fighter '''{{PAGENAME}}''' | ||
| + | |usage = other versions | ||
| + | |link = F-4 Phantom II (Family) | ||
| + | }} | ||
{{Specs-Card | {{Specs-Card | ||
|code=f-4s | |code=f-4s | ||
| − | |images={{Specs-Card-Image|GarageImage_{{PAGENAME}}.jpg}} | + | |images={{Specs-Card-Image|GarageImage_{{PAGENAME}}.jpg|StoreImage_{{PAGENAME}}_004.jpg}} |
| + | |store=12048 | ||
}} | }} | ||
== Description == | == Description == | ||
<!-- ''In the description, the first part should be about the history of and the creation and combat usage of the aircraft, as well as its key features. In the second part, tell the reader about the aircraft in the game. Insert a screenshot of the vehicle, so that if the novice player does not remember the vehicle by name, he will immediately understand what kind of vehicle the article is talking about.'' --> | <!-- ''In the description, the first part should be about the history of and the creation and combat usage of the aircraft, as well as its key features. In the second part, tell the reader about the aircraft in the game. Insert a screenshot of the vehicle, so that if the novice player does not remember the vehicle by name, he will immediately understand what kind of vehicle the article is talking about.'' --> | ||
| − | The '''{{Specs|name}}''' | + | The F-4 Phantom II served its most notable service period in the Vietnam War for both the US Air Force (USAF) and US Navy (USN). The USN had the [[F-4J Phantom II|F-4J]] as their latest aircraft, and it began to show its age in the post Vietnam War period. A modernization program began to keep the F-4J up to date with latest upgrades. Improvements were done in avionics, weapon systems, airframe, and undercarriage, but the two most notable improvements were wing leading-edge slats, for improved manoeuvrability, and new smokeless engines. The F-4S flew for USN up until the Phantom's retirement in the late 1980s, replaced by more modern aircraft like the [[F-14A Early|F-14 Tomcat]] and the F-18 Hornet. |
| + | |||
| + | The '''{{Specs|name}}''', introduced in [[Update "Sky Guardians"]], is one of the top versions of the F-4 Phantom II in the game. While the overall play style is not very different from the F-4J, the performance improvements in manoeuvrability should allow the F-4S to occasionally get the upper hand over even more modern fighter designs that it can encounter. Outside the dogfighting range, the usual complement of BVR weaponry like the Sparrows alongside the PD radar should allow the F-4S to shoot down careless enemy fighters who can't evade in time. | ||
== General info == | == General info == | ||
| Line 12: | Line 20: | ||
{{Specs-Avia-Flight}} | {{Specs-Avia-Flight}} | ||
<!-- ''Describe how the aircraft behaves in the air. Speed, manoeuvrability, acceleration and allowable loads - these are the most important characteristics of the vehicle.'' --> | <!-- ''Describe how the aircraft behaves in the air. Speed, manoeuvrability, acceleration and allowable loads - these are the most important characteristics of the vehicle.'' --> | ||
| − | |||
{| class="wikitable" style="text-align:center" width="70%" | {| class="wikitable" style="text-align:center" width="70%" | ||
! rowspan="2" | Characteristics | ! rowspan="2" | Characteristics | ||
| − | ! colspan="2" | Max speed<br>(km/h at | + | ! colspan="2" | Max speed<br>(km/h at 12,192 m) |
! rowspan="2" | Max altitude<br>(metres) | ! rowspan="2" | Max altitude<br>(metres) | ||
! colspan="2" | Turn time<br>(seconds) | ! colspan="2" | Turn time<br>(seconds) | ||
| Line 25: | Line 32: | ||
|- | |- | ||
! Stock | ! Stock | ||
| − | | | + | | 2,080 || 2,058 || rowspan="2" | {{Specs|ceiling}} || 26.5 || 27.4 || 155.0 || 145.2 || rowspan="2" | 850 |
|- | |- | ||
! Upgraded | ! Upgraded | ||
| − | | | + | | 2,224 || 2,140 || 25.5 || 26.0 || 217.6 || 185.0 |
|- | |- | ||
|} | |} | ||
| Line 39: | Line 46: | ||
! Combat flaps !! Take-off flaps !! Landing flaps !! Air brakes !! Arrestor gear !! Drogue chute | ! Combat flaps !! Take-off flaps !! Landing flaps !! Air brakes !! Arrestor gear !! Drogue chute | ||
|- | |- | ||
| − | | | + | | ✓ || ✓ || ✓ || ✓ || ✓ || ✓ <!-- ✓ --> |
|- | |- | ||
|} | |} | ||
| Line 54: | Line 61: | ||
! Combat !! Take-off !! Landing !! + !! - | ! Combat !! Take-off !! Landing !! + !! - | ||
|- | |- | ||
| − | | {{Specs|destruction|body}} || {{Specs|destruction|gear}} || | + | | {{Specs|destruction|body}} || {{Specs|destruction|gear}} || 1,458 || 618 || 463 || ~11 || ~4 |
|- | |- | ||
|} | |} | ||
| Line 64: | Line 71: | ||
! Ailerons !! Rudder !! Elevators !! Radiator | ! Ailerons !! Rudder !! Elevators !! Radiator | ||
|- | |- | ||
| − | | < | + | | < 810 || < 750 || < 700 || - |
|- | |- | ||
|} | |} | ||
| Line 77: | Line 84: | ||
! colspan="2" | {{Annotation|Basic mass|Mass of the aircraft with pilot and engine oil, but no fuel or weapons load}} || colspan="2" | Wing loading (full fuel) | ! colspan="2" | {{Annotation|Basic mass|Mass of the aircraft with pilot and engine oil, but no fuel or weapons load}} || colspan="2" | Wing loading (full fuel) | ||
|- | |- | ||
| − | | colspan="2" | | + | | colspan="2" | General Electric J79-GE-10B || 2 |
| − | | colspan="2" | | + | | colspan="2" | 14,205 kg || colspan="2" | 408 kg/m<sup>2</sup> |
|- | |- | ||
! colspan="3" | Engine characteristics | ! colspan="3" | Engine characteristics | ||
| Line 84: | Line 91: | ||
|- | |- | ||
! Weight (each) || colspan="2" | Type | ! Weight (each) || colspan="2" | Type | ||
| − | ! | + | ! 9m fuel || 20m fuel || 30m fuel |
|- | |- | ||
| − | | | + | | 1,750 kg || colspan="2" | Afterburning axial-flow turbojet |
| − | | | + | | 15,964 kg || 18,047 kg || 20,070 kg || 27,058 kg |
|- | |- | ||
! colspan="3" | {{Annotation|Maximum engine thrust @ 0 m (RB/SB)|The maximum thrust produced by each engine, while mounted in the aircraft. NOTE: Thrust varies significantly depending on speed & altitude.}} | ! colspan="3" | {{Annotation|Maximum engine thrust @ 0 m (RB/SB)|The maximum thrust produced by each engine, while mounted in the aircraft. NOTE: Thrust varies significantly depending on speed & altitude.}} | ||
| − | ! colspan="4" | Thrust to weight ratio @ 0 m ( | + | ! colspan="4" | Thrust to weight ratio @ 0 m (WEP) |
|- | |- | ||
| − | ! Condition || 100% || | + | ! Condition || 100% || WEP |
| − | ! | + | ! 9m fuel || 20m fuel || 30m fuel || MGW |
|- | |- | ||
| − | | ''Stationary'' || | + | | ''Stationary'' || 5,250 kgf || 8,159 kgf |
| − | | | + | | 1.02 || 0.90 || 0.81 || 0.60 |
|- | |- | ||
| − | | ''Optimal'' || | + | | ''Optimal'' || 5,311 kgf<br>(1,458 km/h) || 10,361 kgf<br>(1,400 km/h) |
| − | | | + | | 1.30 || 1.15 || 1.03 || 0.77 |
|- | |- | ||
|} | |} | ||
| Line 106: | Line 113: | ||
{{Specs-Avia-Armour}} | {{Specs-Avia-Armour}} | ||
<!-- ''Examine the survivability of the aircraft. Note how vulnerable the structure is and how secure the pilot is, whether the fuel tanks are armoured, etc. Describe the armour, if there is any, and also mention the vulnerability of other critical aircraft systems.'' --> | <!-- ''Examine the survivability of the aircraft. Note how vulnerable the structure is and how secure the pilot is, whether the fuel tanks are armoured, etc. Describe the armour, if there is any, and also mention the vulnerability of other critical aircraft systems.'' --> | ||
| − | + | While the F-4S completely lacks any armour plating or ballistic glass, meaning that the pilot and internal systems are exposed to damage from even small arms fire, the airframe itself is relatively sturdy thanks to the upgrades it got to better handle high-G sustained turns, and can take a few hits from opposing aircraft using 20 x 102 mm Vulcan or 20 x 110 mm USN rounds and remain airborne. Higher calibre guns however such as the BK-27 found on the Tornados, and the GSh-30-1 on the MiG-29 have a higher chance of severely crippling your performance or outright destroying the aircraft. As with the F-4J, the RIO (Radar Intercept Officer) in the back of the cockpit cannot take control of the aircraft if the pilot is knocked out, as it lacks the dual controls found on the USAF variants of the Phantom (C & E.) | |
| + | |||
| + | The fuel tanks are self-sealing, but generally won't be able to stop a fire from igniting due to every aircraft at the F-4S' BR using guns that are at least 20 mm in calibre. They also take up a lot of space in the midsection and rear of the Phantom, making shots to the fuselage potentially fatal. There are additional fuel tanks located in the upper-front of the wings and in the bottom of the fuselage, but they are a much smaller and thinner target, so the chances that they get hit are much lower in comparison. You have an extinguisher to put out engine fires, but effectiveness may vary depending on the severity of damage to the rest of the airframe, along with your airspeed. | ||
| + | |||
| + | It is important to note that your countermeasures fire in pairs of two; with the introduction of separate flare/chaff firing, it is now possible to optimize your countermeasure drops in order to defend against both SARH and IR air-to-air missiles. 60 countermeasures at this BR is roughly the norm, but as you may face ARH missiles in the form of AIM-120As on the [[AV-8B_Plus|AV-8B+]] it is best to keep the idea of chaffing separately in the back of your head at all times. | ||
=== Modifications and economy === | === Modifications and economy === | ||
| Line 115: | Line 126: | ||
{| class="wikitable" style="text-align:center" | {| class="wikitable" style="text-align:center" | ||
|- | |- | ||
| − | ! colspan=" | + | ! colspan="5" | [[Ballistic Computer]] |
|- | |- | ||
| − | ! CCIP (Guns) !! CCIP (Rockets) !! CCIP (Bombs) !! CCRP (Bombs) | + | ! CCIP (Guns) !! CCIP (Rockets) !! CCIP (Bombs) !! CCRP (Bombs) !! EEGS |
|- | |- | ||
| − | | {{Tick}} || {{Tick}} || {{Tick}} || {{Tick}} | + | | {{Tick}} || {{Tick}} || {{Tick}} || {{Tick}} || {{Tick}} |
|- | |- | ||
|} | |} | ||
| Line 128: | Line 139: | ||
The '''''{{PAGENAME}}''''' is armed with: | The '''''{{PAGENAME}}''''' is armed with: | ||
| − | + | * 60 x countermeasures | |
| − | |||
| − | |||
=== Suspended armament === | === Suspended armament === | ||
{{Specs-Avia-Suspended}} | {{Specs-Avia-Suspended}} | ||
<!-- ''Describe the aircraft's suspended armament: additional cannons under the wings, bombs, rockets and torpedoes. This section is especially important for bombers and attackers. If there is no suspended weaponry remove this subsection.'' --> | <!-- ''Describe the aircraft's suspended armament: additional cannons under the wings, bombs, rockets and torpedoes. This section is especially important for bombers and attackers. If there is no suspended weaponry remove this subsection.'' --> | ||
| − | |||
| − | |||
| − | The '''''{{PAGENAME}}''''' can be outfitted with the following ordnance | + | The '''''{{PAGENAME}}''''' can be outfitted with the following ordnance: |
| − | |||
| − | |||
| − | |||
| − | |||
| − | |||
| − | |||
| − | |||
| − | |||
| − | |||
| − | |||
| − | |||
{| class="wikitable" style="text-align:center" width="100%" | {| class="wikitable" style="text-align:center" width="100%" | ||
|- | |- | ||
! !! width="4%" | 1 !! width="4%" | 2 !! width="4%" | 3 !! width="4%" | 4 !! width="4%" | 5 !! width="4%" | 6 !! width="4%" | 7 !! width="4%" | 8 !! width="4%" | 9 !! width="4%" | 10 !! width="4%" | 11 | ! !! width="4%" | 1 !! width="4%" | 2 !! width="4%" | 3 !! width="4%" | 4 !! width="4%" | 5 !! width="4%" | 6 !! width="4%" | 7 !! width="4%" | 8 !! width="4%" | 9 !! width="4%" | 10 !! width="4%" | 11 | ||
| − | | rowspan=" | + | | rowspan="15" width="30%" | <div class="ttx-image">[[File:Hardpoints_F-4C_Phantom_II.png]]</div> |
|- | |- | ||
| − | ! 20 mm Mk 11 mod 5 cannons (750 rpg) | + | ! [[Mk 11 mod 5 (20 mm)|20 mm Mk 11 mod 5]] cannons (750 rpg) |
| || || || || || 1 || || || || || | | || || || || || 1 || || || || || | ||
|- | |- | ||
| − | ! 250 lb LDGP Mk 81 bombs | + | ! [[LDGP Mk 81 (250 lb)|250 lb LDGP Mk 81]] bombs |
| + | | 6 || 3 || || || || 6 || || || || 3 || 6 | ||
| + | |- | ||
| + | ! [[Mk 81 Snakeye (250 lb)|250 lb Mk 81 Snakeye]] bombs | ||
| 6 || 3 || || || || 6 || || || || 3 || 6 | | 6 || 3 || || || || 6 || || || || 3 || 6 | ||
|- | |- | ||
| − | ! 500 lb LDGP Mk 82 bombs | + | ! [[LDGP Mk 82 (500 lb)|500 lb LDGP Mk 82]] bombs |
| 6 || 3 || || || || 6 || || || || 3 || 6 | | 6 || 3 || || || || 6 || || || || 3 || 6 | ||
|- | |- | ||
| − | ! 750 lb M117 cone 45 bombs | + | ! [[Mk 82 Snakeye (500 lb)|500 lb Mk 82 Snakeye]] bombs |
| + | | 6 || 3 || || || || 6 || || || || 3 || 6 | ||
| + | |- | ||
| + | ! [[M117 cone 45 (750 lb)|750 lb M117 cone 45]] bombs | ||
| 3 || 3 || || || || 3 || || || || 3 || 3 | | 3 || 3 || || || || 3 || || || || 3 || 3 | ||
|- | |- | ||
| − | ! 1,000 lb LDGP Mk 83 bombs | + | ! [[LDGP Mk 83 (1,000 lb)|1,000 lb LDGP Mk 83]] bombs |
| 2 || 2 || || || || 3 || || || || 2 || 2 | | 2 || 2 || || || || 3 || || || || 2 || 2 | ||
|- | |- | ||
| − | ! FFAR Mighty Mouse rockets | + | ! [[Mk 79 Mod 1 incendiary]] bombs |
| + | | 1 || || || || || 1 || || || || || 1 | ||
| + | |- | ||
| + | ! [[FFAR Mighty Mouse]] rockets | ||
| 38 || 57 || || || || 57 || || || || 57 || 38 | | 38 || 57 || || || || 57 || || || || 57 || 38 | ||
|- | |- | ||
| − | ! Zuni Mk32 Mod 0 ATAP rockets | + | ! [[Zuni Mk32 Mod 0 ATAP]] rockets |
| 12 || 12 || || || || 12 || || || || 12 || 12 | | 12 || 12 || || || || 12 || || || || 12 || 12 | ||
|- | |- | ||
| − | ! AIM-7F Sparrow missiles | + | ! [[AIM-7F Sparrow]] missiles |
| || 1* || || 1 || 1 || || 1 || 1 || || 1* || | | || 1* || || 1 || 1 || || 1 || 1 || || 1* || | ||
|- | |- | ||
| − | ! AIM-9H Sidewinder missiles | + | ! [[AIM-9H Sidewinder]] missiles |
| || || 2* || || || || || || 2* || || | | || || 2* || || || || || || 2* || || | ||
| + | |- | ||
| + | ! 600 gal drop tanks | ||
| + | | || || || || || 1 || || || || || | ||
|- | |- | ||
| colspan="12" | Maximum permissible loadout weight: 7,257 kg<br>Maximum permissible wing load: 3,000 kg<br>Maximum permissible weight imbalance: 1,500 kg | | colspan="12" | Maximum permissible loadout weight: 7,257 kg<br>Maximum permissible wing load: 3,000 kg<br>Maximum permissible weight imbalance: 1,500 kg | ||
|- | |- | ||
| colspan="13" | * Sparrows on hardpoints 2/10 cannot be carried in conjunction with Sidewinders on hardpoints 3/9 respectively | | colspan="13" | * Sparrows on hardpoints 2/10 cannot be carried in conjunction with Sidewinders on hardpoints 3/9 respectively | ||
| + | |- | ||
|} | |} | ||
| + | |||
| + | {{Navigation-Start|Default weapon presets}} | ||
| + | {{Navigation-First-Simple-Line}} | ||
| + | |||
| + | * 1 x 20 mm Mk 11 mod 5 cannon (750 rpg) | ||
| + | * 1 x 600 gal drop tank | ||
| + | * 4 x AIM-9H Sidewinder missiles | ||
| + | * 6 x AIM-7F Sparrow missiles | ||
| + | * 1 x 20 mm Mk 11 mod 5 cannon + 4 x AIM-7F Sparrow missiles + 4 x AIM-9H Sidewinder missiles + 48 x Zuni Mk32 Mod 0 ATAP rockets | ||
| + | * 1 x 20 mm Mk 11 mod 5 cannon + 4 x AIM-7F Sparrow missiles + 4 x AIM-9H Sidewinder missiles + 190 x FFAR Mighty Mouse rockets | ||
| + | * 1 x 20 mm Mk 11 mod 5 cannon + 4 x AIM-7F Sparrow missiles + 4 x AIM-9H Sidewinder missiles + 18 x 250 lb LDGP Mk 81 bombs (4,500 lb total) | ||
| + | * 1 x 20 mm Mk 11 mod 5 cannon + 4 x AIM-7F Sparrow missiles + 4 x AIM-9H Sidewinder missiles + 18 x 500 lb LDGP Mk 82 bombs (9,000 lb total) | ||
| + | * 1 x 20 mm Mk 11 mod 5 cannon + 4 x AIM-7F Sparrow missiles + 4 x AIM-9H Sidewinder missiles + 18 x 250 lb Mk 81 Snakeye bombs (4,500 lb total) | ||
| + | * 1 x 20 mm Mk 11 mod 5 cannon + 4 x AIM-7F Sparrow missiles + 4 x AIM-9H Sidewinder missiles + 18 x 500 lb Mk 82 Snakeye bombs (9,000 lb total) | ||
| + | * 1 x 20 mm Mk 11 mod 5 cannon + 4 x AIM-7F Sparrow missiles + 4 x AIM-9H Sidewinder missiles + 12 x 750 lb M117 cone 45 bombs (9,000 lb total) | ||
| + | * 1 x 20 mm Mk 11 mod 5 cannon + 4 x AIM-7F Sparrow missiles + 4 x AIM-9H Sidewinder missiles + 8 x 1,000 lb LDGP Mk 83 bombs (8,000 lb total) | ||
| + | * 3 x Mk 79 Mod 1 incendiary bombs | ||
| + | {{Navigation-End}} | ||
== Usage in battles == | == Usage in battles == | ||
<!-- ''Describe the tactics of playing in the aircraft, the features of using aircraft in a team and advice on tactics. Refrain from creating a "guide" - do not impose a single point of view, but instead, give the reader food for thought. Examine the most dangerous enemies and give recommendations on fighting them. If necessary, note the specifics of the game in different modes (AB, RB, SB).'' --> | <!-- ''Describe the tactics of playing in the aircraft, the features of using aircraft in a team and advice on tactics. Refrain from creating a "guide" - do not impose a single point of view, but instead, give the reader food for thought. Examine the most dangerous enemies and give recommendations on fighting them. If necessary, note the specifics of the game in different modes (AB, RB, SB).'' --> | ||
| − | '' | + | |
| + | Being a slightly upgraded F-4J, the F-4S retains many of its predecessor's defining characteristics. | ||
| + | |||
| + | The main difference between the two is the F-4S' leading edge wing slats. These greatly increase manoeuvrability below ~970-1000 km/h SPD by allowing you to pull more AoA (Angle of Attack) which helps to tighten down your turning circle, but results in noticeably more energy bleed. Inversely, the slats will reduce the amount of AoA you can pull above the priorly-mentioned airspeed, which massively improves energy retention and delays pilot blackouts at the cost of an overall wider turn circle. This ability to control your AoA at various speeds can be an invaluable tool in winning engagements if properly mastered, but remember that you're still a Phantom; the F-4S can't turn tight enough to competitively dogfight most other top-tier aircraft even with the manoeuvrability upgrade, but it's good enough that you may be able to last in an extended engagement against a single opponent until an ally comes to your aid. <!--Testing was done with a loadout consisting of 6 Sparrows and the gunpod with 30:23 / a full tank of fuel at ~1,000 ft and ~6,500 ft, starting from ~1,190-1,210 km/h SPD. RB physics and good weather were selected with limited fuel and ammo disabled, and the test location was Peale Island. Testing was performed by continually turning horizontally with combat flaps deployed and full WEP at both specified altitudes while maintaining said altitude as best as possible.--> | ||
| + | |||
| + | |||
| + | The most powerful aspect of the F-4S is its weaponry. For IR-guided missiles, it carries AIM-9Hs, which are functionally very similar to their predecessor, the AIM-9Gs. Even though they have a fairly average turn performance with a max overload of 18G, their respectable range and long guidance time make them ideal for picking off inattentive players or AI planes. The crown jewel of the F-4S' arsenal however is the AIM-7F Sparrow, a Semi-Active Radar Homing missile. With enough range to reliably hit 15km+ shots from front-aspect, it offers a much needed range boost from the lacking-in-range AIM-7E-2s and starts pulling in much faster than AIM-7Es, making them an excellent all-rounder missile. Head-on snapshots from less than 3 km can be done, but you'll be pushing the limits of both your radar's lock speed and the Sparrow's 25G pull limit, so it may be beneficial to roll your aircraft to lessen the G load the missile will have to pull in some circumstances. | ||
| + | |||
| + | There are two types of vehicles you have to be wary of in the F-4S as of current: 4th generation fighters that completely outclass you, and Harriers. First off, 4th generation fighters such as the [[F-14 (Family) | F-14]], [[F-15A]], [[F-16A]] and [[MiG-29]] all have you completely beat in terms of flight performance. While you may attempt to fight them in a 1v1, unless the enemy pilot makes a severe lapse in judgement it will be all but certain you will be the one ejecting out of your plane. On the topic of missile armament, while the F-15A still comes equipped with AIM-7Ms (which are functionally identical to your AIM-7Fs) and the F-16A lacks SARH/ARH missiles, the F-14 comes equipped with the AIM-54 Phoenix Active Radar Homing (ARH) missile which has an effective launch range at least twice that of your 7Ms and the MiG-29 has 2 R-27ER/ET SARH missiles which have better range, a stronger motor and significantly faster speeds than your AIM-7M can hope to achieve, meaning even if you launch first you may not be guaranteed a win. The latter two aircraft also come equipped with a Track-While-Scan (TWS) mode capable radar, which can easily give your position away even from extreme ranges while your radar needs a hard lock to make sure if a target is, in fact, an enemy flying towards you at maximum speed. | ||
| + | |||
| + | The second problem you may face is, as said prior, Harriers. This may sound odd, as Harriers are a much lower Battle Rating than the F-4S, and even in a 1v1 situation aren't excellent dogfighters unless they take full advantage of their VTOL capabilities, but it is also of the most vital importance to remember the [[AV-8B_Plus | AV-8B+]] for the simple fact that it has AIM-120As. ARH missiles are much less reliant on holding a lock on the target than SARH missiles due to the seeker built into the missile itself, so all the AV-8B+ has to do is obtain a lock within visual range (<10km or so) and fire a missile at you, as the missile's own seeker will almost instantly turn itself on and lock your aircraft. To dodge these ARH missiles, you should first lower your altitude (if possible) to be as close to ground level as possible, as multipathing means that the missiles will not be able to track you properly if you are hugging the ground. However, this may not always be possible, or the terrain may have too many trees to realistically dive down and hold that altitude - so in that case, what should you do? The ideal way to dodge an ARH missile is not to try and notch the missile (keeping the missile lock 90 degrees to your aircraft), as the missile seeker is not as easily spoofed as a SARH missile. Instead, you should strive to 'go cold', i.e. turn a full 180 degrees around from the missile to make it harder for the missile to track you - in general, it is recommended to try both and see what works best for you depending on the situation you're in. What matters is the ability to be aware of the possibilty of facing ARH in a full uptier, so you can control your encounters as much as possible. | ||
| + | |||
| + | As always, you can carry ordinance for attacking bases. However, it is to be noted that this is generally not looked upon favorably by many teammates. This may not matter to ''you'' specifically, as you're only trying to grind, but it is always something to keep in mind that it may be in your best interest to fight ''for the team's benefit'' as it is also in your best interest to win the match and reap the rewards of the victory bonus. What people look at unfavorably are people who simply base bomb with ''no intention of even putting up a fight'' against enemy players should they come across one - as such, going for bases for extra RP and SL isn't something that should be shunned, but if base bombing alone is your goal some people may take issue with it and for good reason. | ||
=== Pros and cons === | === Pros and cons === | ||
| Line 197: | Line 236: | ||
'''Pros:''' | '''Pros:''' | ||
| − | * | + | * Powerful Pulse-Doppler radar |
| + | * HMD allows significant off-boresight tracking for both the AIM-7F and AIM-9H | ||
| + | * Can carry up to 8 air-to-air missiles | ||
| + | * Very potent SARH missiles for its BR | ||
| + | * Can take off and land on aircraft carrier | ||
| + | * A wide range of suspended armaments, suitable for any playstyle | ||
| + | * Can carry enough bombs to destroy a base without significantly affecting its flight performance | ||
| + | * Slats provide valuable ability to control AoA and energy retention, increasing adaptability in aerial combat | ||
'''Cons:''' | '''Cons:''' | ||
| − | * The | + | * Doesn't have an internal gun |
| + | * The external gun pod adversely affects flight performance | ||
| + | * The 20 mm Mk 11 mod 5 cannon is less efficient than other cannons at this BR | ||
| + | * Can't carry a gun pod and drop tank at the same time as they share the same hardpoint | ||
| + | * Quite large and heavy compared to other fighters at its rank | ||
| + | * Lack of guided munitions limits its potential in Ground Battles | ||
| + | * 60 countermeasures is mediocre in uptiers, which this aircraft sees extremely often | ||
== History == | == History == | ||
<!-- ''Describe the history of the creation and combat usage of the aircraft in more detail than in the introduction. If the historical reference turns out to be too long, take it to a separate article, taking a link to the article about the vehicle and adding a block "/History" (example: <nowiki>https://wiki.warthunder.com/(Vehicle-name)/History</nowiki>) and add a link to it here using the <code>main</code> template. Be sure to reference text and sources by using <code><nowiki><ref></ref></nowiki></code>, as well as adding them at the end of the article with <code><nowiki><references /></nowiki></code>. This section may also include the vehicle's dev blog entry (if applicable) and the in-game encyclopedia description (under <code><nowiki>=== In-game description ===</nowiki></code>, also if applicable).'' --> | <!-- ''Describe the history of the creation and combat usage of the aircraft in more detail than in the introduction. If the historical reference turns out to be too long, take it to a separate article, taking a link to the article about the vehicle and adding a block "/History" (example: <nowiki>https://wiki.warthunder.com/(Vehicle-name)/History</nowiki>) and add a link to it here using the <code>main</code> template. Be sure to reference text and sources by using <code><nowiki><ref></ref></nowiki></code>, as well as adding them at the end of the article with <code><nowiki><references /></nowiki></code>. This section may also include the vehicle's dev blog entry (if applicable) and the in-game encyclopedia description (under <code><nowiki>=== In-game description ===</nowiki></code>, also if applicable).'' --> | ||
| − | + | ||
| + | The F-4S is a variant of the F-4 Phantom II, a twin-engine, all-weather jet fighter-bomber originally developed by McDonnell Douglas (now part of Boeing) for the United States Navy in the 1950s. The F-4S was the final production version of the F-4, and saw extensive service during the Cold War and in various conflicts around the world. The F-4S was an upgraded F-4J, with slats and a better turn speed. | ||
| + | |||
| + | The F-4S was developed in response to the need for an advanced fighter-bomber that could operate in all weather conditions and perform a wide range of missions, including air-to-air combat, ground attack, and reconnaissance. It featured improved avionics, a more powerful engine, and upgraded weapons systems compared to earlier variants of the F-4. | ||
| + | |||
| + | One of the F-4S's most significant upgrades was its advanced radar system, which could track multiple targets at once and provide the pilot with a clear picture of the battlefield. It was also equipped with a more sophisticated weapons delivery system, which allowed it to carry a wider variety of bombs and missiles, including the AIM-7 Sparrow and AIM-9 Sidewinder air-to-air missiles, as well as multiple types of unguided bombs and rockets. | ||
| + | |||
| + | The F-4S saw extensive service with the US Navy and Marine Corps. It was used in a variety of conflicts, including the Vietnam War, the Gulf War, and the Gulf of Sidra incident. | ||
| + | |||
| + | Despite its success in combat, the F-4S was eventually phased out of service in the late 1980s and early 1990s, as newer and more advanced fighter aircraft were introduced into the US military fleet. Today, several examples of the F-4S can be found on display in aviation museums and military bases around the world, serving as a reminder of the aircraft's important role in military history. | ||
== Media == | == Media == | ||
<!-- ''Excellent additions to the article would be video guides, screenshots from the game, and photos.'' --> | <!-- ''Excellent additions to the article would be video guides, screenshots from the game, and photos.'' --> | ||
| − | + | ||
| + | ;Skins | ||
| + | |||
| + | * [https://live.warthunder.com/feed/camouflages/?vehicle=f-4s Skins and camouflages for the {{PAGENAME}} from live.warthunder.com.] | ||
| + | |||
| + | ;Videos | ||
| + | {{Youtube-gallery|m-dyqOq5Xlo|'''F-4S Beginner's Tutorial in 10 Minutes''' - ''Jaek_''|IdPkE_xhUw0|'''Finally A Worthy Premium? - F-4S Phantom II''' - ''DEFYN''}} | ||
== See also == | == See also == | ||
| Line 215: | Line 282: | ||
* ''reference to the series of the aircraft;'' | * ''reference to the series of the aircraft;'' | ||
* ''links to approximate analogues of other nations and research trees.'' --> | * ''links to approximate analogues of other nations and research trees.'' --> | ||
| − | |||
| − | + | ;Related development | |
| − | * | + | |
| + | * [[F-4 Phantom II (Family)]] | ||
== External links == | == External links == | ||
| Line 224: | Line 291: | ||
* ''topic on the official game forum;'' | * ''topic on the official game forum;'' | ||
* ''other literature.'' --> | * ''other literature.'' --> | ||
| − | |||
| − | * | + | * [[wt:en/news/8133-development-pre-order-f-4s-phantom-ii-pack-en|[Devblog] Pre-order: F-4S Phantom II pack]] |
| − | |||
| + | {{AirManufacturer McDonnell}} | ||
{{USA jet aircraft}} | {{USA jet aircraft}} | ||
{{USA premium aircraft}} | {{USA premium aircraft}} | ||
Latest revision as of 15:00, 18 July 2024
| This page is about the premium American jet fighter F-4S Phantom II. For other versions, see F-4 Phantom II (Family). |


Contents
Description
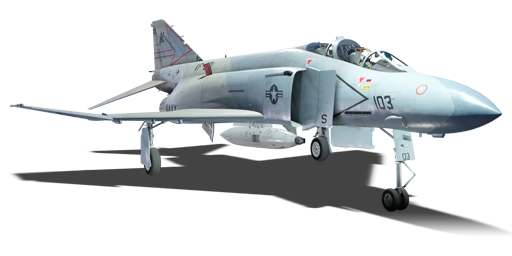
The F-4 Phantom II served its most notable service period in the Vietnam War for both the US Air Force (USAF) and US Navy (USN). The USN had the F-4J as their latest aircraft, and it began to show its age in the post Vietnam War period. A modernization program began to keep the F-4J up to date with latest upgrades. Improvements were done in avionics, weapon systems, airframe, and undercarriage, but the two most notable improvements were wing leading-edge slats, for improved manoeuvrability, and new smokeless engines. The F-4S flew for USN up until the Phantom's retirement in the late 1980s, replaced by more modern aircraft like the F-14 Tomcat and the F-18 Hornet.
The F-4S Phantom II, introduced in Update "Sky Guardians", is one of the top versions of the F-4 Phantom II in the game. While the overall play style is not very different from the F-4J, the performance improvements in manoeuvrability should allow the F-4S to occasionally get the upper hand over even more modern fighter designs that it can encounter. Outside the dogfighting range, the usual complement of BVR weaponry like the Sparrows alongside the PD radar should allow the F-4S to shoot down careless enemy fighters who can't evade in time.
General info
Flight performance
| Characteristics | Max speed (km/h at 12,192 m) |
Max altitude (metres) |
Turn time (seconds) |
Rate of climb (metres/second) |
Take-off run (metres) | |||
|---|---|---|---|---|---|---|---|---|
| AB | RB | AB | RB | AB | RB | |||
| Stock | 2,080 | 2,058 | 16000 | 26.5 | 27.4 | 155.0 | 145.2 | 850 |
| Upgraded | 2,224 | 2,140 | 25.5 | 26.0 | 217.6 | 185.0 | ||
Details
| Features | |||||
|---|---|---|---|---|---|
| Combat flaps | Take-off flaps | Landing flaps | Air brakes | Arrestor gear | Drogue chute |
| ✓ | ✓ | ✓ | ✓ | ✓ | ✓ |
| Limits | ||||||
|---|---|---|---|---|---|---|
| Wings (km/h) | Gear (km/h) | Flaps (km/h) | Max Static G | |||
| Combat | Take-off | Landing | + | - | ||
| 1458 | 463 | 1,458 | 618 | 463 | ~11 | ~4 |
| Optimal velocities (km/h) | |||
|---|---|---|---|
| Ailerons | Rudder | Elevators | Radiator |
| < 810 | < 750 | < 700 | - |
Engine performance
| Engine | Aircraft mass | |||||
|---|---|---|---|---|---|---|
| Engine name | Number | Basic mass | Wing loading (full fuel) | |||
| General Electric J79-GE-10B | 2 | 14,205 kg | 408 kg/m2 | |||
| Engine characteristics | Mass with fuel (no weapons load) | Max Gross Weight | ||||
| Weight (each) | Type | 9m fuel | 20m fuel | 30m fuel | ||
| 1,750 kg | Afterburning axial-flow turbojet | 15,964 kg | 18,047 kg | 20,070 kg | 27,058 kg | |
| Maximum engine thrust @ 0 m (RB/SB) | Thrust to weight ratio @ 0 m (WEP) | |||||
| Condition | 100% | WEP | 9m fuel | 20m fuel | 30m fuel | MGW |
| Stationary | 5,250 kgf | 8,159 kgf | 1.02 | 0.90 | 0.81 | 0.60 |
| Optimal | 5,311 kgf (1,458 km/h) |
10,361 kgf (1,400 km/h) |
1.30 | 1.15 | 1.03 | 0.77 |
Survivability and armour
While the F-4S completely lacks any armour plating or ballistic glass, meaning that the pilot and internal systems are exposed to damage from even small arms fire, the airframe itself is relatively sturdy thanks to the upgrades it got to better handle high-G sustained turns, and can take a few hits from opposing aircraft using 20 x 102 mm Vulcan or 20 x 110 mm USN rounds and remain airborne. Higher calibre guns however such as the BK-27 found on the Tornados, and the GSh-30-1 on the MiG-29 have a higher chance of severely crippling your performance or outright destroying the aircraft. As with the F-4J, the RIO (Radar Intercept Officer) in the back of the cockpit cannot take control of the aircraft if the pilot is knocked out, as it lacks the dual controls found on the USAF variants of the Phantom (C & E.)
The fuel tanks are self-sealing, but generally won't be able to stop a fire from igniting due to every aircraft at the F-4S' BR using guns that are at least 20 mm in calibre. They also take up a lot of space in the midsection and rear of the Phantom, making shots to the fuselage potentially fatal. There are additional fuel tanks located in the upper-front of the wings and in the bottom of the fuselage, but they are a much smaller and thinner target, so the chances that they get hit are much lower in comparison. You have an extinguisher to put out engine fires, but effectiveness may vary depending on the severity of damage to the rest of the airframe, along with your airspeed.
It is important to note that your countermeasures fire in pairs of two; with the introduction of separate flare/chaff firing, it is now possible to optimize your countermeasure drops in order to defend against both SARH and IR air-to-air missiles. 60 countermeasures at this BR is roughly the norm, but as you may face ARH missiles in the form of AIM-120As on the AV-8B+ it is best to keep the idea of chaffing separately in the back of your head at all times.
Modifications and economy
| Flight performance | Survivability | Weaponry | ||||||||||||||||||||||||||||
|---|---|---|---|---|---|---|---|---|---|---|---|---|---|---|---|---|---|---|---|---|---|---|---|---|---|---|---|---|---|---|
|
|
|
Armaments
| Ballistic Computer | ||||
|---|---|---|---|---|
| CCIP (Guns) | CCIP (Rockets) | CCIP (Bombs) | CCRP (Bombs) | EEGS |
| |
|
|
|
|
Offensive armament
The F-4S Phantom II is armed with:
- 60 x countermeasures
Suspended armament
The F-4S Phantom II can be outfitted with the following ordnance:
| 1 | 2 | 3 | 4 | 5 | 6 | 7 | 8 | 9 | 10 | 11 |  | |
|---|---|---|---|---|---|---|---|---|---|---|---|---|
| 20 mm Mk 11 mod 5 cannons (750 rpg) | 1 | |||||||||||
| 250 lb LDGP Mk 81 bombs | 6 | 3 | 6 | 3 | 6 | |||||||
| 250 lb Mk 81 Snakeye bombs | 6 | 3 | 6 | 3 | 6 | |||||||
| 500 lb LDGP Mk 82 bombs | 6 | 3 | 6 | 3 | 6 | |||||||
| 500 lb Mk 82 Snakeye bombs | 6 | 3 | 6 | 3 | 6 | |||||||
| 750 lb M117 cone 45 bombs | 3 | 3 | 3 | 3 | 3 | |||||||
| 1,000 lb LDGP Mk 83 bombs | 2 | 2 | 3 | 2 | 2 | |||||||
| Mk 79 Mod 1 incendiary bombs | 1 | 1 | 1 | |||||||||
| FFAR Mighty Mouse rockets | 38 | 57 | 57 | 57 | 38 | |||||||
| Zuni Mk32 Mod 0 ATAP rockets | 12 | 12 | 12 | 12 | 12 | |||||||
| AIM-7F Sparrow missiles | 1* | 1 | 1 | 1 | 1 | 1* | ||||||
| AIM-9H Sidewinder missiles | 2* | 2* | ||||||||||
| 600 gal drop tanks | 1 | |||||||||||
| Maximum permissible loadout weight: 7,257 kg Maximum permissible wing load: 3,000 kg Maximum permissible weight imbalance: 1,500 kg | ||||||||||||
| * Sparrows on hardpoints 2/10 cannot be carried in conjunction with Sidewinders on hardpoints 3/9 respectively | ||||||||||||
| Default weapon presets | |
|---|---|
| |
Usage in battles
Being a slightly upgraded F-4J, the F-4S retains many of its predecessor's defining characteristics.
The main difference between the two is the F-4S' leading edge wing slats. These greatly increase manoeuvrability below ~970-1000 km/h SPD by allowing you to pull more AoA (Angle of Attack) which helps to tighten down your turning circle, but results in noticeably more energy bleed. Inversely, the slats will reduce the amount of AoA you can pull above the priorly-mentioned airspeed, which massively improves energy retention and delays pilot blackouts at the cost of an overall wider turn circle. This ability to control your AoA at various speeds can be an invaluable tool in winning engagements if properly mastered, but remember that you're still a Phantom; the F-4S can't turn tight enough to competitively dogfight most other top-tier aircraft even with the manoeuvrability upgrade, but it's good enough that you may be able to last in an extended engagement against a single opponent until an ally comes to your aid.
The most powerful aspect of the F-4S is its weaponry. For IR-guided missiles, it carries AIM-9Hs, which are functionally very similar to their predecessor, the AIM-9Gs. Even though they have a fairly average turn performance with a max overload of 18G, their respectable range and long guidance time make them ideal for picking off inattentive players or AI planes. The crown jewel of the F-4S' arsenal however is the AIM-7F Sparrow, a Semi-Active Radar Homing missile. With enough range to reliably hit 15km+ shots from front-aspect, it offers a much needed range boost from the lacking-in-range AIM-7E-2s and starts pulling in much faster than AIM-7Es, making them an excellent all-rounder missile. Head-on snapshots from less than 3 km can be done, but you'll be pushing the limits of both your radar's lock speed and the Sparrow's 25G pull limit, so it may be beneficial to roll your aircraft to lessen the G load the missile will have to pull in some circumstances.
There are two types of vehicles you have to be wary of in the F-4S as of current: 4th generation fighters that completely outclass you, and Harriers. First off, 4th generation fighters such as the F-14, F-15A, F-16A and MiG-29 all have you completely beat in terms of flight performance. While you may attempt to fight them in a 1v1, unless the enemy pilot makes a severe lapse in judgement it will be all but certain you will be the one ejecting out of your plane. On the topic of missile armament, while the F-15A still comes equipped with AIM-7Ms (which are functionally identical to your AIM-7Fs) and the F-16A lacks SARH/ARH missiles, the F-14 comes equipped with the AIM-54 Phoenix Active Radar Homing (ARH) missile which has an effective launch range at least twice that of your 7Ms and the MiG-29 has 2 R-27ER/ET SARH missiles which have better range, a stronger motor and significantly faster speeds than your AIM-7M can hope to achieve, meaning even if you launch first you may not be guaranteed a win. The latter two aircraft also come equipped with a Track-While-Scan (TWS) mode capable radar, which can easily give your position away even from extreme ranges while your radar needs a hard lock to make sure if a target is, in fact, an enemy flying towards you at maximum speed.
The second problem you may face is, as said prior, Harriers. This may sound odd, as Harriers are a much lower Battle Rating than the F-4S, and even in a 1v1 situation aren't excellent dogfighters unless they take full advantage of their VTOL capabilities, but it is also of the most vital importance to remember the AV-8B+ for the simple fact that it has AIM-120As. ARH missiles are much less reliant on holding a lock on the target than SARH missiles due to the seeker built into the missile itself, so all the AV-8B+ has to do is obtain a lock within visual range (<10km or so) and fire a missile at you, as the missile's own seeker will almost instantly turn itself on and lock your aircraft. To dodge these ARH missiles, you should first lower your altitude (if possible) to be as close to ground level as possible, as multipathing means that the missiles will not be able to track you properly if you are hugging the ground. However, this may not always be possible, or the terrain may have too many trees to realistically dive down and hold that altitude - so in that case, what should you do? The ideal way to dodge an ARH missile is not to try and notch the missile (keeping the missile lock 90 degrees to your aircraft), as the missile seeker is not as easily spoofed as a SARH missile. Instead, you should strive to 'go cold', i.e. turn a full 180 degrees around from the missile to make it harder for the missile to track you - in general, it is recommended to try both and see what works best for you depending on the situation you're in. What matters is the ability to be aware of the possibilty of facing ARH in a full uptier, so you can control your encounters as much as possible.
As always, you can carry ordinance for attacking bases. However, it is to be noted that this is generally not looked upon favorably by many teammates. This may not matter to you specifically, as you're only trying to grind, but it is always something to keep in mind that it may be in your best interest to fight for the team's benefit as it is also in your best interest to win the match and reap the rewards of the victory bonus. What people look at unfavorably are people who simply base bomb with no intention of even putting up a fight against enemy players should they come across one - as such, going for bases for extra RP and SL isn't something that should be shunned, but if base bombing alone is your goal some people may take issue with it and for good reason.
Pros and cons
Pros:
- Powerful Pulse-Doppler radar
- HMD allows significant off-boresight tracking for both the AIM-7F and AIM-9H
- Can carry up to 8 air-to-air missiles
- Very potent SARH missiles for its BR
- Can take off and land on aircraft carrier
- A wide range of suspended armaments, suitable for any playstyle
- Can carry enough bombs to destroy a base without significantly affecting its flight performance
- Slats provide valuable ability to control AoA and energy retention, increasing adaptability in aerial combat
Cons:
- Doesn't have an internal gun
- The external gun pod adversely affects flight performance
- The 20 mm Mk 11 mod 5 cannon is less efficient than other cannons at this BR
- Can't carry a gun pod and drop tank at the same time as they share the same hardpoint
- Quite large and heavy compared to other fighters at its rank
- Lack of guided munitions limits its potential in Ground Battles
- 60 countermeasures is mediocre in uptiers, which this aircraft sees extremely often
History
The F-4S is a variant of the F-4 Phantom II, a twin-engine, all-weather jet fighter-bomber originally developed by McDonnell Douglas (now part of Boeing) for the United States Navy in the 1950s. The F-4S was the final production version of the F-4, and saw extensive service during the Cold War and in various conflicts around the world. The F-4S was an upgraded F-4J, with slats and a better turn speed.
The F-4S was developed in response to the need for an advanced fighter-bomber that could operate in all weather conditions and perform a wide range of missions, including air-to-air combat, ground attack, and reconnaissance. It featured improved avionics, a more powerful engine, and upgraded weapons systems compared to earlier variants of the F-4.
One of the F-4S's most significant upgrades was its advanced radar system, which could track multiple targets at once and provide the pilot with a clear picture of the battlefield. It was also equipped with a more sophisticated weapons delivery system, which allowed it to carry a wider variety of bombs and missiles, including the AIM-7 Sparrow and AIM-9 Sidewinder air-to-air missiles, as well as multiple types of unguided bombs and rockets.
The F-4S saw extensive service with the US Navy and Marine Corps. It was used in a variety of conflicts, including the Vietnam War, the Gulf War, and the Gulf of Sidra incident.
Despite its success in combat, the F-4S was eventually phased out of service in the late 1980s and early 1990s, as newer and more advanced fighter aircraft were introduced into the US military fleet. Today, several examples of the F-4S can be found on display in aviation museums and military bases around the world, serving as a reminder of the aircraft's important role in military history.
Media
- Skins
- Videos
See also
- Related development
External links
| McDonnell Aircraft Corporation | |
|---|---|
| Jet Fighters | F2H-2 · F3H-2 |
| F-4C Phantom II · F-4E Phantom II · F-4J Phantom II · F-4S Phantom II | |
| F-15A · F-15C MSIP II | |
| Strike Aircraft | AV-8B Plus |
| Helicopters | AH-6M |
| Export/Licensed | |
| Aircraft | ◄F-4F Early · ◄F-4F · ◄F-4F KWS LV · Phantom FG.1 · Phantom FGR.2 · F-4J(UK) Phantom II · F-4EJ Phantom II · F-4EJ ADTW · Kurnass · Kurnass 2000 |
| F-15J · F-15J(M) · Baz · Baz Meshupar | |
| ▄AV-8B Plus | |
| Helicopters | Lahatut |
| The McDonnell Aircraft Corporation merged with Douglas Aircraft Company in 1967 to form McDonnell Douglas Corporation. Later it was merged with The Boeing Company in 1997. | |
| See Also | Mitsubishi Heavy Industries |
| USA jet aircraft | |
|---|---|
| Fighters | |
| F-4 | F-4C Phantom II · F-4E Phantom II · F-4J Phantom II · F-4S Phantom II |
| F-5 | F-5A · F-5C · F-5E · F-20A |
| F-8 | F8U-2 · F-8E |
| F-80 | F-80A-5 · F-80C-10 |
| F-84 | F-84B-26 · F-84F · F-84G-21-RE |
| F-86 | F-86A-5 · F-86F-25 · F-86F-2 · F-86F-35 |
| F-89 | F-89B · F-89D |
| F-100 | F-100D |
| F-104 | F-104A · F-104C |
| F-14 | F-14A Early · F-14B |
| F-15 | F-15A · F-15C MSIP II |
| F-16 | F-16A · F-16A ADF · F-16C |
| F9F | F9F-2 · F9F-5 · F9F-8 |
| Other | P-59A · F2H-2 · F3D-1 · F3H-2 · F4D-1 · F11F-1 |
| Strike Aircraft | |
| FJ-4 | FJ-4B · FJ-4B VMF-232 |
| A-4 | A-4B · A-4E Early |
| A-6 | A-6E TRAM |
| A-7 | A-7D · A-7E · A-7K |
| AV-8 | AV-8A · AV-8C · AV-8B Plus |
| A-10 | A-10A · A-10A Late |
| B-57 | B-57A · B-57B |
| F-105 | F-105D |
| F-111 | F-111A |
| USA premium aircraft | |
|---|---|
| Fighters | Thach's F2A-1 · Galer's F3F-2 · F2G-1 · F4U-4B VMF-214 · P-26A-34 · Rasmussen's P-36A · P-40C · P-43A-1 |
| P-47M-1-RE · ⋠P-47M-1-RE · P-51A · P-51D-10 · P-51D-20-NA · ␠Kingcobra · XP-55 | |
| ▃A6M2 · ▃Ki-43-II · ▃Ki-61-Ib · ▃Bf 109 F-4 · ▃Fw 190 A-8 · ▃Spitfire LF Mk IXc | |
| Twin-engine fighters | XP-38G · Bong's P-38J-15 · P-38K · YP-38 · P-61A-11 · XF5F · XP-50 · F7F-3 |
| Jet fighters | P-59A · F-86F-35 · F-89B · F-89D · F-4S Phantom II · F-5C · F-20A |
| Strike aircraft | A-1H · A2D-1 · AU-1 · XA-38 · AV-8A · A-6E TRAM · A-10A |
| Bombers | A-26C-45DT · B-10B · BTD-1 · PBM-3 "Mariner" · PV-2D |
