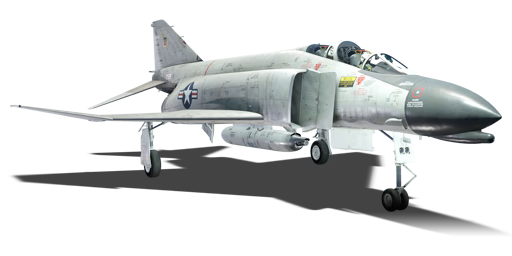
F-4C Phantom II

From War Thunder Wiki
Jump to: navigation, search
Rank IV USSR | Premium | Golden Eagles
Tu-1 Pack
This page is about the American jet fighter F-4C Phantom II. For other versions, see F-4 Phantom II (Family).
F-4C Phantom II
f-4c.png
GarageImage F-4C Phantom II.jpg
ArtImage F-4C Phantom II.png
F-4C Phantom II
AB RB SB
10.3 10.0 10.3
Research:260 000 Specs-Card-Exp.png
Purchase:710 000 Specs-Card-Lion.png
Show in game

Description

The F-4C Phantom II is a rank VII American jet fighter with a battle rating of 10.3 (AB/SB) and 10.0 (RB). It was introduced in Update 1.91 "Night Vision".

Development of fighter aircraft attempts to balance size, speed, armament and manoeuvrability to come up with the perfect fighter. Due to the difficulties and challenges of bundling all of these in one aircraft, many different varieties have been developed through the years which highlighted one or more aspects but rarely all in one. And sometimes the mould had to be broken and the motto "bigger IS better" came into play. Due to these such heavyweight fighters like the P-61, Me 410, Beaufighter, J5N1 and SM.91 were developed to fly faster, remain manoeuvrable and carry heavier weapons and ordnance, sometimes much heavier than their lighter counterparts. The F-4C Phantom II is no exception, originally developed as a souped-up F3H Demon, this fighter was modified into a larger, heavier, faster fighter-interceptor/bomber that the U.S. Navy didn't realize it needed and when it did, it went all in.[1]

The imposing F-4C Phantom II can seem a bit intimidating at first due to its size, but the pilot will quickly find that with the dual J79-GE-15 engines that this fighter is no slouch. Going from takeoff, acceleration in a climb and to level flight the F-4C Phantom II will move and is quite agile for an aircraft of its size. Pilots new to the F-4C Phantom II will initially be set up with an M61 20 mm cannon. Due to this aircraft not being configured with an internal cannon, one was required to be mounted on a centre-line pylon. Options become available to mount two additional 20 mm cannon gun pods, one under each wing which all together will spew out a slew of 20 mm rounds acting like a shotgun effect even at >500 m. AIM-9B and AIM-9E Sidewinder missiles round out the Phantom's anti-air capabilities and are okay missiles to use against enemy aircraft which will cause the enemy pilot to take evasive manoeuvres to avoid the missile. In the event that happens, be ready with the cannons for backup as the enemy pilot should be an easy target after bleeding all of their speed and energy avoiding the missile.

Bird's eye view of a F-4C Phantom II from the VF-111 Sundowners squadron

Another arena where the F-4C Phantom II shines is in the ground-pounding or ground attack function of the aircraft. With eleven hardpoints, this fighter/bomber can be configured in many different ways to carry a combination of guns, bombs and rockets. When it comes to bombs, the F-4C Phantom II has the option to use either 250 lb, 500 lb, 750 lb or 1,000 lb bombs and can hold upwards of 9,000 lbs total. The Phantom also has three different rocket types to choose from, depending on the targets you are going after. These range from anti-tank AGM-12B and AGM-12C Bullpup guided rockets, Zuni Mk32 anti-tank rockets and the small but powerful FFAR Mighty Mouse in a volume of 228, which can be devastating when used en masse.

The amazing F-4 Phantom II was state-of-the-art in its day and even 60 years later, several countries are still utilising this iconic fighter/bomber as a force multiplier with their air forces today. This fighter coupled with a pilots skill and determination can help alter the outcome in the jet-battle matches.

General info

Flight performance

Arrestor gear
Accelerates braking by grabbing the brake cable on the deck of the aircraft carrier
Air brakes
Allows you to dramatically reduce the flight speed by releasing special flaps
Drogue parachute
Reduces braking distance when landing on any runway
Max speed
at 12 192 m2 288 km/h
Turn time26 s
Max altitude16 000 m
Engine2 х General Electric J79-GE-15
TypeJet
Cooling systemAir
Take-off weight24 t

The F-4C Phantom II is an incredibly stable aircraft, however from the way its wingtips and tailplanes look, one might think otherwise. Due to extensive wind tunnel testing, McDonnell engineers determined that by canting the tailplanes downward at a 23° anhedral (inclination) the stability and stall recovery characteristics of the aircraft dramatically improved and in the same fashion they didn't interfere with the engine's jet exhaust. The wings, on the other hand, were developed to be extremely strong to support large suspended armaments; however, they needed to be given a 5° upward inclination to prevent having to redesign the entire wing. So, the engineers elected to just raise the wingtips at a 12° dihedral which averaged the wing at the necessary 5°. The iconic shape of the F-4C Phantom II was set.[1]

With the airframe, wings and tailplanes set in place, the fighter became a stable and solid aircraft. Stability is especially critical with a jet which closes in on the Mach 2 mark. Early speed trials identified flaws in the aircraft which at times proved fatal, but corrections and modifications for later aircraft increased their stability and airworthiness which saved many pilots with damaged aircraft. The F-4C Phantom II is powered by two General Electric J79-GE-15 engines which are necessary to keep the fighter/bomber in the sky, especially with heavy ordnance loads, however, these engines don't bog down too much under heavy loads as it will still accelerate in a climb, during level flight and during a dive. A testament to the jet and its engines, during one altitude test, the F-4 flew Mach 2 all the way to 90,000 feet where the engines were shut off and the plane coasted up to 98,000 ft, slowing to almost 45 mph and upon dropping back to Earth, fired up its engines at around 70,000 ft and successfully landed.

The Phantom II has the speed and acceleration and also has sufficient manoeuvrability. As a low altitude bomber, the F-4C needed to be manoeuvrable or else it would have been an easier target for either the MiG fighters or the anti-aircraft ground fire. Even with heavy ordnance loads, the Phantom II could still shimmy into position, release its ordnance and then rocket away to a higher altitude. Pilots found out early on that some MiG fighters like the -17 were extremely manoeuvrable and had to be prepared to nullify the target to prevent the MiG from getting behind them. For the F-4C pilot, it is important when bombing targets to keep a look around and watch for enemy fighters attempting to swoop in, attack the ground target and rocket up to safety. When flying at altitude, be careful not to get into a turning fight as the Phantom is a very heavy aircraft and does not turn very well, instead fly fast and work with Boom & Zoom techniques and always watch your six as a MiG may try to sneak up from behind. Furthermore, beware pulling negative G's as this can result in a broken wing quite easily (especially if equipped with ordnance on the wing hardpoints).

In game, however, the aircraft will not reach both its maximum altitude of 16,000 m or top speed of over 2,000 km/h (even when unarmed and with the minimum fuel loadout). After about 8,000-9,000 m the aircraft starts to slowly lose nearly all lift and eventually plateaus at 12,132 m. In order to reach higher altitudes one must go supersonic, enter a steep climb, and then level off at the desired altitude (although currently this serves little to no gameplay purpose). As for its actual average speed, the F-4C is more likely to just barely break Mach 1 after about 30-40 seconds of level flight at any altitude with all upgrades (so keep this in mind when attempting to boom and zoom or outrun an opponent).

Characteristics Max Speed
(km/h at 12,192 m)
Max altitude
(metres)
Turn time
(seconds)
Rate of climb
(metres/second)
Take-off run
(metres)
AB RB AB RB AB RB
Stock 2,228 2,202 16000 26.5 27.5 142.4 132.5 850
Upgraded 2,362 2,288 25.5 26.0 203.9 172.0

Details

Features
Combat flaps Take-off flaps Landing flaps Air brakes Arrestor gear Drogue chute
X
Limits
Wings (km/h) Gear (km/h) Flaps (km/h) Max Static G
Combat Take-off Landing + -
1458 463 N/A 584 463 ~11 ~4
Optimal velocities (km/h)
Ailerons Rudder Elevators Radiator
< 810 < 750 < 700 N/A

Engine performance

Engine Aircraft mass
Engine name Number Basic mass Wing loading (full fuel)
General Electric J79-GE-15 2 13,405 kg 392 kg/m2
Engine characteristics Mass with fuel (no weapons load) Max Gross
Weight
Weight (each) Type 9m fuel 20m fuel 30m fuel 32m fuel
1,720 kg Afterburning axial-flow turbojet 15,164 kg 17,014 kg 18,819 kg 19,270 kg 27,745 kg
Maximum engine thrust @ 0 m (RB/SB) Thrust to weight ratio @ 0 m (WEP)
Condition 100% WEP 9m fuel 20m fuel 30m fuel 32m fuel MTOW
Stationary 4,910 kgf 7,561 kgf 1.00 0.89 0.80 0.78 0.54
Optimal 4,955 kgf
(1,458 km/h)
8,856 kgf
(1,200 km/h)
1.17 1.04 0.94 0.92 0.64

Survivability and armour

Crew2 people
Speed of destruction
Structural1 458 km/h
Gear463 km/h
Fox-2, Fox-2 - ROKAF F-4C Phantom II launching an AIM-9B Sidewinder missile

Due to the sheer weight of the F-4C Phantom II it is surprising to note that there is no armour plating nor any bulletproof canopies. Littered with eight fuel tanks, one in each wing and the other six in the fuselage right above the engines, there isn't much protection for the self-sealing tanks. The Phantom pilot will need to be cognizant of where enemy aircraft are behind them to ensure they prevent their aircraft from taking damage as speed and manoeuvrability are the keys to survival and if lost, there is not much hope for the fighter.

For those aircraft attacking the F-4C Phantom II, when using machine guns and cannons an attempt can be made to try to blow off a wing or snipe the pilot, however, the best bet will be to aim for centre fuselage where there is the greatest chance of hitting several fuel tanks or even the engines. Firing missiles will cause the pilot to take evasive manoeuvres which may cause the aircraft to pitch up or down which will expose the greatest surface area allowing guns or cannons to finish the fight as for without any armour, only the thin metal skin separates the incoming bullets from critical F-4C Phantom II components.

Modifications and economy

Repair costBasic → Reference
AB3 077 → 4 157 Sl icon.png
RB11 165 → 15 083 Sl icon.png
SB9 243 → 12 487 Sl icon.png
Total cost of modifications233 400 Rp icon.png
365 000 Sl icon.png
Talisman cost2 800 Ge icon.png
Crew training200 000 Sl icon.png
Experts710 000 Sl icon.png
Aces2 800 Ge icon.png
Research Aces1 080 000 Rp icon.png
Reward for battleAB / RB / SB
120 / 380 / 600 % Sl icon.png
232 / 232 / 232 % Rp icon.png
Modifications
Flight performance Survivability Weaponry
Mods jet compressor.png
Compressor
Research:
9 100 Rp icon.png
Cost:
14 000 Sl icon.png
410 Ge icon.png
Mods booster.png
New boosters
Research:
8 500 Rp icon.png
Cost:
13 000 Sl icon.png
390 Ge icon.png
Mods aerodinamic wing.png
Wings repair
Research:
9 400 Rp icon.png
Cost:
15 000 Sl icon.png
430 Ge icon.png
Mods jet engine.png
Engine
Research:
12 000 Rp icon.png
Cost:
19 000 Sl icon.png
550 Ge icon.png
Mods aerodinamic fuse.png
Fuselage repair
Research:
9 100 Rp icon.png
Cost:
14 000 Sl icon.png
410 Ge icon.png
Mods armor frame.png
Airframe
Research:
8 500 Rp icon.png
Cost:
13 000 Sl icon.png
390 Ge icon.png
Mods g suit.png
G-suit
Research:
9 400 Rp icon.png
Cost:
15 000 Sl icon.png
430 Ge icon.png
Mods armor cover.png
Cover
Research:
12 000 Rp icon.png
Cost:
19 000 Sl icon.png
550 Ge icon.png
Mods pilon bomb.png
Mk81
Research:
9 100 Rp icon.png
Cost:
14 000 Sl icon.png
410 Ge icon.png
Mod arrow 0.png
Mods ammo.png
M60_belt_pack
Research:
9 100 Rp icon.png
Cost:
14 000 Sl icon.png
410 Ge icon.png
Mod arrow 0.png
Mods agm missile.png
AGM-12B Bullpup
Research:
9 100 Rp icon.png
Cost:
14 000 Sl icon.png
410 Ge icon.png
Mod arrow 0.png
Mods pilon bomb.png
Mk82
Research:
8 500 Rp icon.png
Cost:
13 000 Sl icon.png
390 Ge icon.png
Mod arrow 0.png
Mods weapon.png
M60_new_gun
Research:
8 500 Rp icon.png
Cost:
13 000 Sl icon.png
390 Ge icon.png
Mods weapon.png
M60_new_gun
Research:
8 500 Rp icon.png
Cost:
13 000 Sl icon.png
390 Ge icon.png
Mods agm missile.png
AGM-12C Bullpup
Research:
8 500 Rp icon.png
Cost:
13 000 Sl icon.png
390 Ge icon.png
Mod arrow 0.png
Mods air to air missile.png
AIM-9B
Research:
8 500 Rp icon.png
Cost:
13 000 Sl icon.png
390 Ge icon.png
Mod arrow 0.png
Mods pilon bomb.png
M117
Research:
9 400 Rp icon.png
Cost:
15 000 Sl icon.png
430 Ge icon.png
Mod arrow 0.png
Mods gunpods.png
Gun pod SUU-23/A.
Research:
9 400 Rp icon.png
Cost:
15 000 Sl icon.png
430 Ge icon.png
Mods pilon block rocket.png
LAU-3/A
Research:
9 400 Rp icon.png
Cost:
15 000 Sl icon.png
430 Ge icon.png
Mod arrow 0.png
Mods air to air missile.png
AIM-9E
Research:
9 400 Rp icon.png
Cost:
15 000 Sl icon.png
430 Ge icon.png
Mod arrow 0.png
Mods pilon bomb.png
Mk83
Research:
12 000 Rp icon.png
Cost:
19 000 Sl icon.png
550 Ge icon.png
Mod arrow right 0.png
Mods pilon bomb.png
Mk84
Research:
12 000 Rp icon.png
Cost:
19 000 Sl icon.png
550 Ge icon.png
Mods pilon block rocket large.png
LAU-10/A
Research:
12 000 Rp icon.png
Cost:
19 000 Sl icon.png
550 Ge icon.png
Mods air to air midrange missile.png
AIM-7D
Research:
12 000 Rp icon.png
Cost:
19 000 Sl icon.png
550 Ge icon.png

Armaments

Ballistic Computer
CCIP (Guns) CCIP (Rockets) CCIP (Bombs) CCRP (Bombs)
Icon GreenCheckmark.png Icon GreenCheckmark.png Icon GreenCheckmark.png Icon RedXCross.png

Suspended armament

The F-4C Phantom II can be outfitted with the following ordnance:

1 2 3 4 5 6 7 8 9 10 11
Hardpoints F-4C Phantom II.png
20 mm GAU-4 cannons (1,200 rpg) 1 1 1
250 lb LDGP Mk 81 bombs 6 3 6 3 6
500 lb LDGP Mk 82 bombs 6 3 6 3 6
500 lb Mk 82 Snakeye bombs 6 3 6 3 6
750 lb M117 cone 45 bombs 3 3 5 3 3
1,000 lb LDGP Mk 83 bombs 2 3 3 3 2
2,000 lb LDGP Mk 84 bombs 1 1 1
2,000 lb LDGP Mk 84 Air bombs 1 1 1
BLU-27/B incendiary bombs 1 2 1
FFAR Mighty Mouse rockets 57 57 57 57 57
Zuni Mk32 Mod 0 ATAP rockets 12 12 12 12 12
AGM-12B Bullpup missiles 1 1* 1* 1
AGM-12C Bullpup missiles 1 1
AIM-7D Sparrow missiles 1 1 1 1
AIM-9B Sidewinder missiles 1, 2* 1, 2*
AIM-9E Sidewinder missiles 2* 2*
600 gal drop tanks 1
Maximum permissible loadout weight: 7,257 kg
Maximum permissible wing load: 3,000 kg
Maximum permissible weight imbalance: 1,500 kg
* The AGM-12C Bullpup missile on hardpoints 2/10 cannot be carried in conjunction with air-to-air missiles on hardpoints 3/9 respectively.
Default weapon presets
  • 1 x 20 mm GAU-4 cannon (1,200 rpg)
  • 1 x 600 gal drop tank
  • 1 x 20 mm GAU-4 cannon + 2 x AIM-9B Sidewinder missiles
  • 1 x 20 mm GAU-4 cannon + 4 x AIM-9B Sidewinder missiles
  • 3 x 20 mm GAU-4 cannons (1,200 rpg = 3,600 total)
  • 24 x 250 lb LDGP Mk 81 bombs (6,000 lb total)
  • 24 x 500 lb LDGP Mk 82 bombs (12,000 lb total)
  • 24 x 500 lb Mk 82 Snakeye bombs (12,000 lb total)
  • 17 x 750 lb M117 cone 45 bombs (12,750 lb total)
  • 13 x 1,000 lb LDGP Mk 83 bombs (13,000 lb total)
  • 3 x 2,000 lb LDGP Mk 84 bombs (6,000 lb total)
  • 3 x 2,000 lb LDGP Mk 84 Air bombs (6,000 lb total)
  • 4 x BLU-27/B incendiary bombs
  • 1 x 20 mm GAU-4 cannon + 4 x AGM-12B Bullpup missiles
  • 1 x 20 mm GAU-4 cannon + 2 x AGM-12C Bullpup missiles
  • 285 x FFAR Mighty Mouse rockets
  • 60 x Zuni Mk32 Mod 0 ATAP rockets
  • 4 x AIM-7D Sparrow missiles
  • 4 x AIM-9E Sidewinder missiles

Usage in battles

VF-96 Showtime-100 F-4C unloading bombs in Vietnam

The F-4C Phantom II is, frankly, not a dogfighter. That is because its ungainly manoeuvrability, large size, and lack of countermeasures leave it heavily disadvantaged and an easy target should one catch it in weapons range. The F-4C's best friend is its good speed and powerful armaments. As a result, F-4C pilots are forced to act as vultures, staying fast and using missiles or gunpods to pick off hapless targets of opportunity.

If playing this aircraft in Air Battles from stock the first modification you should focus on unlocking are the AIM-9Es and AIM-7Ds. If one does not want to spend the golden eagles to unlock them immediately, then ground attack in Air Realistic Battles is often the fastest avenue for advancement, as on most maps one can easily rack up an immense amount of RP and SL from the large number of targets (as a short burst from the 20 mm cannon is more than capable of destroying high value targets such as light pillboxes or tanks).

In Ground Realistic Battles this aircraft has next to no utility while stock due to both the powerful AA at this BR and the inability to penetrate most tanks with the stock 20 mm cannon. At most you may only be able to harass aircraft or thinly armoured vehicles before you are shot down, therefore it is recommended that you first unlock some basic ground ordnance before adding this to your Ground RB lineup (see "Ground pounding" for further information).

Air-to-air

Due to its size and weight, it is heavily recommended not to turn-fight in the F-4C. As stated earlier, speed and its weapons systems will be the F-4C's best friend. The two best weapons for air combat on the F-4C are its AIM-9E Sidewinder missiles and M61 Vulcan cannons (in a configuration of one or three). The Vulcan cannons can spray the area in front of the Phantom II with an insane amount of 20 mm rounds, with the three gun pods creating a shotgun scatter effect by the time it gets to where the enemy fighter is (often critically damaging or outright destroying the enemy aircraft). The AIM-9Bs meanwhile are relatively poor performing rear-aspect missiles that are easily evaded by even the most modest manoeuvres. If it is mandatory to use them: take rear-aspect only shots, while the target is not in a turn, and while they aren't deploying countermeasures (as the missiles can be easily decoyed). The AIM-9Es on the other hand are a moderate improvement all around, but top out as average at this BR due to their small seeker cone and rear-aspect only lock angle. Regardless, the AIM-9Es can make for a reliable backup anti-air missile and both Sidewinders will be your primary air combat missile that can at the very least force an enemy into a disadvantageous position.

A F-4C eliminating a enemy A-5 with a AIM-7D Sparrow missile

While the F-4C's speciality is its AIM-7D Sparrow SARH (Semi-Active Radar Homing) missiles, in game they are quite ineffective (as they were in real life), especially at this BR or above where many enemies will have an RWR to alert them the moment you lock them and/or chaff countermeasures which easily defeats the missile.

Furthermore, three major factors significantly reduce the effectiveness of this missile, and one may find it simply constantly missing. First, perhaps the AIM-7D's biggest downside is that it has a 1 km warmup range before it starts tracking. What this means it that, once fired, it will always travel in a straight line for one kilometre (around 2-3 seconds) before it starts manoeuvring itself towards the target. While at longer ranges (7 km+) this generally isn't a problem, it is most problematic when the missile is launched at close ranges (with usual speed and at around 4 km or less); in these cases, the missile won't start manoeuvring until it's very close to the enemy (less than 1.5 km), which usually isn't enough time for the missile to turn into the now very close enemy. Additionally, this initial straight line travel means that there is a chance the enemy can move out of the missile's field of view before it can track, in which case the missile will simply self-destruct. Second, the F-4C's own unreliable radar. Despite it having a maximum listed range of over 150 km, in-game, you typically will only see the radar start picking up targets at less than 20 km. Commonly, the radar fails to see a target directly in front of it until it gets closer (less than 9 km). This is a significant downside, as oftentimes the radar will pick up a target too late to reliably launch an AIM-7D (due to its 1 km initial straight line travel). Additionally, the radar can easily lose lock on a target (often due to enemy manoeuvres reducing their radar signature or diving below you, hiding among ground clutter), which instantly ruins your missile attack. The latter is especially common when engaging aircraft with RWR and/or countermeasures, as the moment they are radar locked they can instantly begin dumping chaff and manoeuvring to avoid the missile. Overall, the radar generally struggles to do its job, even under ideal conditions. As a result, the majority of your air kills with missiles will be from the Sidewinders as they are far more reliable and give no warning to the enemy.

However, seeing as the Sparrow has its own dedicated pylons that don't interfere with your ability to equip other weapons, there is often little reason to not equip them, even if they are marginally effective. A common strategy for their use is to zoom climb to high altitude (at least 5 km) at the start of the match and/or sideclimb as the radar and missiles work better at high altitude. By side climbing, you can avoid the major furball, keeping the plane out of danger. Once the plane climbs up to a decent altitude (4-6 km), use the radar to lock onto someone, and start launching the AIM-7Ds. The thinner air at altitude significantly increases your missiles' range, while aircraft will have trouble manoeuvring and regaining speed, increasing the chance your missile will hit the enemy. Furthermore, early match tends to be the only time where enemy targets will be at these high altitudes as later on, the fight goes to low altitudes where the radar will struggle with ground clutter and will be unable to lock low flying enemies. Retaining high speed is important as the faster the F-4C goes, the farther missiles go due to the higher launch speed. To actually use the AIM-7, you must first radar lock a target, and then launch the AIM-7. You must then keep the radar target locked for the entire duration of the missile's flight, or else it will stop tracking, as a result you want to avoid launching from your maximum range to limit the time the enemy has to avoid the missile. The AIM-7D has great range and under ideal conditions, can hit non-manoeuvring targets from upwards of a 10 km launch. It has a 15G manoeuvring capability, meaning it can follow targets in a turn decently well. And since they are radar guided, assuming you can get and maintain lock, they can engage targets from any angle. But remember that your lack of countermeasures makes high altitudes dangerous for you as well, as the thinner air limits your ability to dodge missiles. An alternative strategy, often used while/after attacking ground targets, is to fly in at treetop level to where you expect the enemies to be dogfighting and quickly popup and engage them from below/behind. Staying low will help hide you from enemy radar and allow you to engage your ground targets with ease, while doing so (largely dependent on the map) you're likely to spot enemies flying over you to engage the rest of your team at altitude, here your Sparrows can be quite useful as you can pop-up, quickly lock the target above you, and fire. This has the advantage of giving the enemy little time or room to evade as the missile will be coming from below them rather than above, meaning there's no chance for the lock to be lost in ground clutter. The obvious downsides is this will greatly reduce the range of your Sparrow seeing as such a tactic: often entails a far slower launch speed, forces the missile to expend much of its energy climbing rather than gaining speed, forces it to traverse much thicker air (even further limiting its terminal performance), and can leave you in a very vulnerable position while guiding the missing as another enemy could swoop in and engage you while you're stuck unable to manoeuvre.

After your AIM-7s are gone or no targets at altitude can be found, move down to lower altitudes to fight. Below 2 km, your primary weapons will be your cannons and AIM-9s. As the Phantom lacks in manoeuvrability, it is not recommended to get into a dogfight, but rather to utilize the its great top speed to make high speed passes, as the Phantom retains controllability even at very high speeds while the Vulcan's incredibly high muzzle velocity allows for ease of aiming. Try to make sure no one can/will bother following you though these passes so you aren't forced to turn into a dogfight.

The powerful M61 Vulcan is another tool you'll often use to engage air targets, especially if playing from stock (consider it your backup weapon if your missiles fail you/are unavailable). The cannon itself is quite powerful and you are given a decent pool of ammo. Its greatest and most common use will be in the classic head on, where you'll often come out on top due to its decent punch, high rate of fire, and massive spread. But again, remember to not dogfight as your poor manoeuvrability hinders your ability to line up a shot, especially if heavily loaded.

Unguided rockets are another option for this aircraft, but they are not recommended for air-to-air combat. While extremely large amounts of FFAR Mighty Mouse rockets can be carried, they are highly inaccurate for air-to-air combat, and even with a timed fuse, you generally won't be routinely hitting anything as aircraft are very fast at this BR (don't expect an F-89D-like experience). The Zuni rockets, on the other hand, have a large blast radius, and when the timed fuse is used correctly, they can be used somewhat reliably. However, the main downside of these rockets are that they are both carried in rocket pods which are large and heavy and significantly impact manoeuvrability and performance. This impact on performance is why it isn't recommended to use them in air combat; stick to using them for ground strikes.

In a downtier, the F-4C can act independently as it can easily outspeed most enemies. Additionally, most enemies in a downtier lack a radar warning receiver (RWR), allowing you to radar lock them and launch AIM-7Ds without alerting them in any way until they spot the missile. The F-4C's high top speed and high speed controllability allows the plane to boom-and-zoom and quickly getting out of a furball without much issue. Again, it is not recommended to get into a dogfight, as nearly all subsonics encountered in a downtier will out-manoeuvre you

In a full uptier, it is recommended to fly near teammates, as the F-4C's inferior top speed, manoeuvrability, and weapon systems make it very difficult to dogfight any high-tier fighter. As a result, the best chance at obtaining any significant amount of score will be to focus on ground targets and avoiding enemies as much as possible. Your lack of countermeasures generally means that if a high tier fighter gets on your tail, you are guaranteed to die. Therefore, you should avoid air combat at all costs, staying with the team should you be forced to do so. If you do get into air combat, keep your speed up as it will be your best (and only) defense against missiles, and make high speed passes with your M61 cannon. AIM-7Ds still can be used in fashions as described before, but know that your BVR capability is outclassed by much of the opposition, and all likely have countermeasures, making BVR combat of any type generally a waste with your outdated AIM-7Ds. In summary, try your best not to catch the attention of anyone and stay with your team should you do so, as you'll be largely ineffective against air targets and generally be considered free score due to your lack of of countermeasures and exceptionally poor dogfighting performance.

In Air Arcade battles, this aircraft's flaws are a lot more forgiving and it can see far more utility, especially with its gunpods. As with nearly all aircraft in Air Arcade, the minimum fuel option should be your default choice, as you will rarely if ever run out of fuel due to low survival time and overall match time in arcade battles. Even if you do run out, your airfield is a short distance away once you notice your fuel is low. The recommended armaments remain the same as in Air RB, but with much more leeway to tack on ground ordnance to quickly destroy large groups of armour (especially at the start of the "Domination" gamemode). Even the lack of countermeasures can be worked around via clever use of terrain on most maps (with the great exceptions being all the flat "Domination" maps). As for your opponents, you may encounter anything from top rank aircraft all the way down to lowly rank I biplanes. Be aware of the aircraft you're fighting, even if its a low rank propeller aircraft as all carry the risk of sniping your pilot (especially the Americans with their .50 cals and Germans with their cannons); all propeller aircraft also have a superior turn rate on the F-4C, so instead simply boom-and-zoom as you would with anyone else. Tactics for fighting aircraft around your BR remain the same as in Air RB, albeit they're much easier to execute and you have unlimited missiles. Because of the latter, you'd think side climbing could be a legitimate tactic, but due to the poor radar of the F-4C, the rarity of high-altitude fighting in Arcade, and/or the heavy terrain clutter on most maps you'll rarely find many targets to shoot at.

Ground pounding

Fully loaded F-4C Phantom II en route to bombing site

The F-4C Phantom II was not called a "Mud Mover" for nothing as with its legendary suspended ordnance options it can quickly reshape the landscape with bombs and rockets.[1] Although in War Thunder there are better CAS options at or around this BR in the American tech tree (the F-105D being superior in all forms as it can carry countermeasures in addition to its ground ordnance). Nonetheless, the Phantom II's ballistic computer and bomb options ranging from 250, 500, 750 and 1,000 lbs let it effectively attack ground targets ranging from large bases to armour. The triple gunpods in particular can made the F-4C very efficient in destroying ground units in air battles, as they can destroy all but the heaviest of targets and have a large ammo count (allowing one to rack up significant score before having to rearm). Zuni and FFAR Mighty Mouse rockets can be used for great effect on vehicles and anti-aircraft sites, especially those which are clustered close together, however against heavy pillboxes and heavy tanks they might not do much. The final option is to outfit the AGM-12B or AGM-12C Bullpup rockets. These are this aircraft's best anti-tank ordnance in Ground Realistic battles and should be your first modification to unlock before usage in said battles. But know that while these missiles can be guided, this can only be done manually and, at this BR, puts the F-4C at significant risk due to the chances of radar guided AAA or a SAM shooting the F-4C down. During the guiding phase of the Bullpup, a Phantom II is vulnerable as the pilot cannot be looking around for incoming enemy fire and must keep a visual on the target if they intend to guide it. A common tactic with the bullpups is to simply utilize them as if they were high-yield unguided rockets (forgoing any guidance input to turn the bullpups into rocket powered bombs); since they fly in a straight line, the F-4C pilot can easily line the nose up to the targets, fire the bullpups, and then immediately pull away. This is even more lethal with the AGM-12Cs as they have a 1000 lb warhead compared to the 250 lb warhead on the AGM-12B. Dogfighting in Ground Realistic battles is somewhat rare and nearly always limited to low altitude visual range (where the radar of the F-4C has trouble locking any target), as a result the Sparrows can usually be omitted for a performance improvement. The Sidewinders on the other hand can be useful should enemy air be encountered and don't incur as much of a performance penalty, but do add extra SP cost to loadouts with them.

Bait attack

The F-4C Phantom II is a phenomenal aircraft to use in a group manoeuvre known as a baiting attack. This fighter can play both roles as either the bait or an attacking aircraft. For this to work, the Phantom II can be used as the bait aircraft, which flies in a way to attract the attention of an enemy fighter (or two), after closing in, the Phantom II should use its speed and acceleration to go into a climb, almost like setting up for a rope-a-dope manoeuvre. While the enemy aircraft are attempting to chase the F-4 in the climb the group buddies can swoop in and take out the distracted enemy aircraft. Due to the fast speed and acceleration of the F-4, it can also be used as the support aircraft in the manoeuvre as with its cannons and missiles; it can lunge in to take out the baited enemy fighters.

Most dangerous enemies

MiG fighters, Mirages, and VTOL aircraft tend to be the most dangerous enemies, especially the MiG-21 and Harrier variants, which are quite agile and can easily outmanoeuvre the F-4. The max speed of the MiG-21 and the Mirages are comparable with the F-4, whereas aircraft such as the earlier MiG-17 will get left in the dust as they are almost half as fast. The early MiG-21 variants like the MiG-21F-13 and J-7II can carry the R-3S/PL-2, missiles similar to the AIM-9B but inferior to the AIM-9E. They can also be equipped with rockets, and the 30 mm cannons can rip through the F-4C Phantom II with careful aiming. The best bet against a MiG-21 is to attempt to first cripple the aircraft either during a head-on approach or through a missile, rocket or gun attack, once it is operating at less than 100%, it will be easier to manoeuvre around it and set up for the finishing blow. When facing a Harrier, Hunter, Mirage, or other Phantom variant the same strategy applies as they can be difficult to outmanoeuvre when in pristine shape. Although with the Phantoms and Mirages, it is best to avoid a head on approach due to the potential danger of a wall of fire from triple SUU-23/A gunpods (from the Phantoms) or taking a radar guided missile to the face (from both the Phantoms and the Mirages). Be wary of aircraft like the Mirage IIIC, Mirage IIIE, MiG-21SMT, MiG-21MF, Yak-38, Hunter F.6, and Harrier GR.1 as they can carry up to four (two in the case of the Yak-38s and Mirages) high-performance missiles such as the R-60 for the MiG-21s and Yak-38s, the SRAAMs for the Hunter and Harrier, and the Matra R550 Magic 1 missile for the Mirages respectively. These are air-to-air missiles with high agility and high-aspect capability that are extremely difficult to dodge without countermeasures (something the F-4C lacks). Furthermore, foreign variants of the Phantom can match the F-4C in performance and often come equipped with later, higher-performing variants of the Sidewinder and Sparrow missiles. If you are bombing bases be aware of enemies like the Su-25 and A-10A which carry all-aspect IR missiles and will try to intercept you from head-on. In such situations it is advisable to take a pod of Mighty Mouse rockets to use them as makeshift flares.

In Ground realistic battles, the most dangerous ground enemies are all SAM vehicles, but especially the radar SAM vehicles such as the FlaRakPz 1 Roland 2 and 2S6 Tunguska as they outrange the F-4C's Bullpups and on some maps can even immediately fire at the plane seconds after spawning. Due to the lack of countermeasures the F-4C's only defense against any missile is maneuvering and/or the terrain; so if using this aircraft while such threats are active, dive to the ground to get below their radar horizon and spend as little time as possible over the battlefield (as loitering increases the chance someone will spot and engage you). Radar guided AAA is also prevalent at this rank, but can be much more easily worked around due to their limited range (especially when using Bullpups).

The most common missiles to face are the SRAAM, AIM-9J, -9G, -9E, -9B, -7E, the R-3S, R-60 and Magics. In order to dodge an SRAAM, do not turn, as the SRAAM, unlike most other missiles, uses thrust vectoring instead of control surfaces. This gives the SRAAM extreme agility, but at the cost of range, meaning pilots that can outrun the missile are far more likely to survive as the SRAAM self-destructs once it runs out of fuel. At the other end of the spectrum, AIM-9Gs have incredibly long ranges, so even if one is launched at the F-4C from 4 km the plane must manoeuvre in order to lose it. An F-4C pilot can either attempt to outturn it, as they have worse agility than an AIM-9J, Magic or R-60, or attempt to outspeed it. By waiting for it to run out of fuel (this only works at long ranges), the plane can do big barrel rolls and large turns (not too sharp as to lose speed), and since missiles are incredibly light and will not be able to propel itself once it runs out of fuel, it will lose speed and the F-4C will outrun it. For an AIM-9E, -9E, or R-3S, the F-4C can simply turn a bit to the side and it will quickly lose track. Against an R-60, AIM-9J or Magic however, it is a bit more complex: the most effective way to outmanoeuvre one without countermeasures is to roll 90 degrees so the F-4C's wings are perpendicular to the ground, turn, wait a bit, then begin rolling towards the ground while pulling. This will usually outmanoeuvre most missiles launched at the F-4C. However, an F-4C pilot should not turn to the sky as the plane will quickly drop speed and make it easier for a missile to hit.

Pros and cons

Artistic rendition of a F-4C Phantom II in a power climb

Pros:

  • Impressive variety and maximum payload of ordnance, including: 20 mm cannon gunpods, bombs, rockets, and air-to-air and air-to-ground missiles
    • Can equip the AIM-7D Sparrow and AIM-9 Sidewinder air-to-air missiles at the same time (with a maximum of four each) in addition to five pylons for ground attack ordnance
  • Has BVR (Beyond Visual Range) engagement capability with the radar-guided AIM-7D Sparrow
  • Has a ballistic computer, which allows for accurate usage of unguided air-to-ground weapons and cannon(s)
  • Fantastic climb rate
  • Good top speed
  • Great acceleration
  • Good roll rate for a large aircraft
  • M61 Vulcan has excellent fire rate, ballistics and damage, as well as a generous ammo pool

Cons:

  • As it has no internal gun, some sort of weapon must be equipped on the pylons, meaning flight performance will always be lower than listed due to drag and/or G-limits
  • Large target profile compared to other fighters it flies against
  • Poor turning ability unless using minimum fuel
  • Manoeuvrability suffers greatly with fully loaded pylons
  • Using wing-mounted hardpoints will break wings at low altitudes while flying Mach 1.10+
  • Has a low negative G limit, meaning wings can snap easily
  • The gunpods are pointed slightly downwards (pilot must adjust aim to compensate)
  • No countermeasures
    • As a result has low battlefield endurance in ground RB battles, as SAM vehicles are quite prevalent at its BR
  • Radar has difficulty finding and locking aircraft, even in ideal conditions
    • The majority of enemies have an RWR at this BR, eliminating any surprise from semi-active radar guided missiles (such as the AIM-7D)
  • AIM-7D Sparrow missiles are unreliable and easily dodged
    • Unlike the Soviet R-3R or Matra R.530E, the AIM-7D has a 1 km warm up time where it flies completely straight, only after which it can begin tracking (but if the target is no longer within the missile's sights it will automatically self destruct, requiring the F-4C to lead the missile). This also makes it very unreliable in a short range engagement as the missile often cannot react in time
  • AIM-9B Sidewinder missiles are notoriously poor performing, while the AIM-9Es are below average at this BR
  • Has limited utility in a full uptier, as it is heavily outclassed by nearly all other aircraft above 10.0


Msg-info.png Fun Fact: The F-4C Phantom II's air-intake splitters each have 12,500 small holes drilled into them to reduce incoming turbulence and allow the maximum amount of ram air available into the air-intakes for the engines.

History

McDonnell Aircraft Corporation began operations in 1939, though it didn't produce any fighter aircraft for the second great war, it did make a name for itself manufacturing aircraft parts for other aircraft. Though the company worked on a prototype twin-engine, single-seat interceptor aircraft, the XP-67 "Bat" (also known as "Moonbat"), the destruction of the prototype due to an engine fire caused the project to be cancelled. However, starting in 1943, McDonnell began developing jet aircraft and successfully produced the FH-1 Phantom during the post-war era.[1] The success of the Phantom prompted other McDonnell aircraft to have similar features such as the dual engines placed forward under the fuselage and exiting just behind the wings, unlike many single-engine jet fighters which ran the rear length of the aircraft and exited out the rear. Follow on aircraft which shared the engine style of the Phantom was the F2H Banshee, F3H Demon and the F-101 Voodoo.[1]

Though McDonnell had initial success with the Phantom and Banshee, they started having problems with the Demon, though it was not because of the aircraft itself, however, it was because of the engines it was outfitted with. The aircraft was sound in its construction and aerodynamics. Later after the Westinghouse XJ40 turbojet was replaced with the Allison J71, the Demon saw greater success.[1] The F-101 Voodoo was an excellent performing aircraft which fulfilled its multi-role capability as an interceptor, fighter/bomber and reconnaissance aircraft, however, when going up against Vought Aircraft Company for a contract with the Navy, McDonnell lost out with the F-8 Crusader being the winner[2].

McDonnell's response to this failure was to task their design team to build a fighter aircraft that the Navy could not refuse, but they did not yet know they needed. Part of the time spent gathering information included interviews with pilots and their wives and one major find was that while the pilots loved to fly fast single-engine fighters, they felt safer in an aircraft which had two engines. With this and other information in hand, McDonnell knew that they needed a single-seat, long-range attack aircraft which manifested itself in a full-size mock-up as the F3H-H, looking noticeably like a combination of a shortened Demon with the swept wings of a Banshee, plus straight tailplanes and an aerodynamic fuselage. This fighter was outfitted with four internal 20 mm cannons plus numerous external payload pylons mounted under the wings and fuselage. The F3H-H was considered more than just an aircraft and was evolving into what would be known as a weapon system. The original engines specified for this aircraft were the Wright J65-W-2, but McDonnell was eyeballing the new General Electric J79 engines for this project.[1]

The F3H-H was soon changed to the AH-1 (later the F4H-1) when it went into prototype status, but the aircraft was still having difficulty trying to find a place in the Navy as existing aircraft were already fulfilling the same roles. To make a fit, it was understood to the McDonnell engineers that major changes and modifications were needed to be made, the biggest of which was adding a second crew member.[1] Also, the Navy was willing to sit down and detail out all of the requirements they would need the aircraft to have before they would consider buying it.[2] Three other major requirements were that the aircraft was to be outfitted with the GE J79 engines, the aircraft was to be capable of Mach 2 and the internal 20 mm cannons were removed from the design. Upon the Navy committing to two prototypes, McDonnell knew they needed to undergo a major redesign of the flight surfaces. Through extensive wind tunnel testing the rear tailplanes ended up needing to be bent downward at a 23° anhedral while remaining clear of the jet exhaust. The wings needed to go through a similar change of a 5° dihedral, however, to save time and engineering, it was settled on just adjusting the outer most section of the wings at 12° dihedral which averaged to 5° across the entire wing.[1]

Though the first two test flights of the F4H-1 ran into issues (after the first one, the right engine needed to be replaced due to foreign object damage to the compressor blades), flights three and four went smoothly including exceeding Mach 1. The F4H-1 was then shipped to Edwards Air Force Base where it was tested against the Crusader III where after being tested to its full capabilities showed that is undeniably beat the Vought aircraft across the board. Following this McDonnell followed up with breaking a height record where an F4H-1 successfully reached 98,500 ft in altitude and successfully returned. After this, the name of the jet was agreed to be the "Phantom II" which was a nod to the Navy's first jet fighter, the FH-1 Phantom.[1]

The United States Marine Corps had shown interest in the F-4 program since its inception as they were tired of the worn-out hand-me-downs that Navy tended to give them.[3] Impressed with the payload and range of the aircraft, the Corps went all in with this fighter to augment and enhance their current aircraft inventory. The United States Air Force, on the other hand, balked at the F-4, believing it to be a second-rate fighter having to be constrained to be built for carrier operations. However, the Air Force could not turn down a request to pit the Phantom II against their finest fighter, the Convair F-106 Delta Dart. During the endurance trials between the two aircraft, again it was shown that the F-4 excelled in just about every area tested (speed, payload, altitude, range and maintenance hours needed) over the F-106 and because of this, the Air Force requested two prototypes for further evaluation.[1] At this point the Navy was receiving the F-4B fighters and ultimately after further testing, the Air Force put in an urgent request for a transfer of 29 Navy F-4Bs while the Air Forces F-4C models were being built.[1]

Air Force versions of the F-4C differed from the Navy's F-4B in that the C version had additional ground-attack capabilities along with a full set of controls for the rear seat.[2] The rear-seater was typically a junior pilot nicknamed "Wizzo" or Weapons Systems Operator. Other changes included a reworking of the landing gear which led to lower pressure, but wider tires and an anti-skid assembly attached to the landing gear.[1] The refuelling probe was replaced with a receptacle in the spine of the fighter (for boom refuelling operations) and the cockpit was reconfigured to improve visibility for the guy in back. Updated SST-181X Combat Skyspot radar bombing system allowed the F-4s to accomplish bombing missions under complete cloud cover. Though, not essential to the Air Force, their F-4s did retain the Navy's folding wings, catapult hooks and arrestor hook.[1]

Initial deliveries of the F-4C delivered them in the standard non-combat grey and white paintwork; however, upon arriving in Vietnam at Udon RTAFB in Thailand, the aircraft was painted to the more appropriate green and brown tactical camouflage.[1]

Devblog

In the early 1950s, McDonnell Aircraft began work on a revised design of their F3H Demon naval fighter, in an effort to expand upon its capabilities and improve performance in general. By September 1953, the design was submitted for Navy consideration. Showing interest in the project, the U.S. Navy ordered the construction of a mock-up and expressed interest in potentially procuring the type.

By 1955, however, the U.S. Navy changed the requirements for the aircraft substantially. Instead of a multipurpose aircraft, the new design was now supposed to act as a two-seat, long-range, all-weather fleet interceptor. Having revised the design, orders were issued for the construction of two XF4H-1 prototypes as well as an additional five pre-production F4H-1s. Following comparative testing against other machines in service with the Navy at the time, the F4H proved itself as highly capable aircraft and was thus ordered into full-scale production as the F-4. The name 'Phantom II' was given to the aircraft at McDonnell's 20th anniversary celebration in July 1959.

Some time after the Navy procured the F-4, other branches of the U.S. military also became interested in the aircraft. A result, the USAF also introduced a special "army" version of the F-4 into service during the mid 1960s under the designation F-4C.

The F-4 Phantom II would become one of the most produced and widely used American combat aircraft of the second half of the 20th century. With over 5,100 machines being built, the F-4 Phantom II saw service with several operators around the globe and remained in service until the 1990s, while some still serve to this day. Phantom II is widely known as a symbol of the US campaign in Vietnam, in particular.

Media

Skins
Images
Videos
Notable pilots
During the Vietnam war Robin Olds flew the F-4C and F-4D fighters and failed to claim aircraft kills after #4 to prevent attaining ace status to remain flying in the war as long as possible

See also

Aircraft of comparable role, configuration and era

External links

References

Citations
  1. 1.00 1.01 1.02 1.03 1.04 1.05 1.06 1.07 1.08 1.09 1.10 1.11 1.12 1.13 1.14 Hachette Partworks LTD. (2019)
  2. 2.0 2.1 2.2 Joiner, S. (2015, March)
  3. Roblin, S. (2019, April 17)
Bibliography


McDonnell Aircraft Corporation
Jet Fighters  F2H-2 · F3H-2
  F-4C Phantom II · F-4E Phantom II · F-4J Phantom II · F-4S Phantom II
  F-15A
Export/Licensed 
Aircraft  ◄F-4F Early · ◄F-4F · Phantom FG.1 · Phantom FGR.2 · F-4J(UK) Phantom II · F-4EJ Phantom II · F-4EJ ADTW · Kurnass · Kurnass 2000
  Baz · F-15J
  ▄AV-8B Plus
Helicopters  AH-6M · Lahatut
  The McDonnell Aircraft Corporation merged with Douglas Aircraft Company in 1967 to form McDonnell Douglas.
See Also  Mitsubishi Heavy Industries

USA jet aircraft
  Fighters
F-4  F-4C Phantom II · F-4E Phantom II · F-4J Phantom II · F-4S Phantom II
F-5  F-5A · F-5C · F-5E · F-20A
F-8  F8U-2 · F-8E
F-80  F-80A-5 · F-80C-10
F-84  F-84B-26 · F-84F · F-84G-21-RE
F-86  F-86A-5 · F-86F-25 · F-86F-2 · F-86F-35
F-89  F-89B · F-89D
F-100  F-100D
F-104  F-104A · F-104C
F-14  F-14A Early · F-14B
F-15  F-15A
F-16  F-16A · F-16A ADF · F-16C
F9F  F9F-2 · F9F-5 · F9F-8
Other  P-59A · F2H-2 · F3D-1 · F3H-2 · F4D-1 · F11F-1
  Strike Aircraft
FJ-4  FJ-4B · FJ-4B VMF-232
A-4  A-4B · A-4E Early
A-6  A-6E TRAM
A-7  A-7D · A-7E · A-7K
AV-8  AV-8A · AV-8C
A-10  A-10A · A-10A Late
B-57  B-57A · B-57B
F-105  F-105D
F-111  F-111A