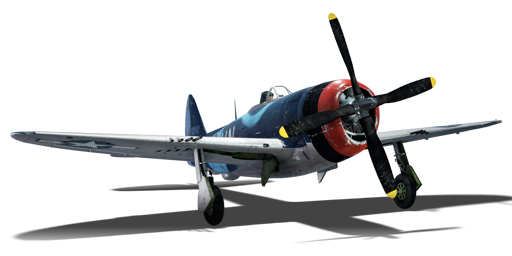
Bostwick's P-47M-1-RE

From War Thunder Wiki
Jump to: navigation, search
Rank VI USSR | Premium | Golden Eagles
Su-25K Pack
This page is about the gift American fighter Bostwick's P-47M-1-RE. For other versions, see P-47 (Family).
P-47M-1-RE
p-47m-1-re.png
GarageImage Bostwick's P-47M-1-RE.jpg
360://https://wiki.warthunder.com/images/6/6f/Cockpit_p-47m-1-re.jpg
P-47M-1-RE
AB RB SB
4.7 5.7 5.7
Show in game

Description

Bostwick's P-47M-1-RE Thunderbolt was a P-47M-1-RE Thunderbolt belonging to US ace George Eugene Bostwick. Bostwick was born on 19th October 1919 in Eau Claire, Eau Claire County, Wisconsin. During his career he achieved eight confirmed, two probable and six destroyed aircraft on ground. His first victim was a Bf 109 over Grandevilliers, France, on 7th June 1944, a day after D-Day. On 4th July 1944, he scored three more Bf 109s and damaged one. Two days later he shot down another Bf 109. On 11th September 1944, while attacking Euskirchen airfield, he destroyed three Fw 190 fighters on the ground. His success led to him being promoted on 11th September 1944 to a rank of Captain. After his first tour of duty ended, he transferred to 63rd Fighter Squadron from his previous 62nd Fighter Squadron. On 25th March 1945, Bostwick became one of few allied pilots to shoot down a Me 262 Schwalbe jet fighter, near Köln. His last air to air victory was achieved over two Fw 190s over Bremen on 7th April 1945. Three days later he destroyed four aircraft on the ground at Werder airport. He achieved no further success. On 19th April 1945, Bostwick was promoted to a rank of Major, a month before his promotion he also became a commander of the 63rd Fighter Squadron. He retired from the air force in 1953 and died on 6th February 1990. The plane, nicknamed "Ugly Duckling", is painted after the camouflage scheme of Bostwick's P-47 while in the 56th Fighter Group.

Bostwick's P-47M-1-RE Thunderbolt was introduced as a premium pack in Update 1.49 "Weapons of Victory". The P-47M is the fastest P-47 variant in the game. The engine features more horsepower than any of the P-47s found in the game, allowing it to climb faster to altitude or get away from unfavourable situations. Another feature not found on any other P-47 are the underwing dive brakes, allowing to slow down when going too fast, as the controls tend to stiffen when above 700 km/h.

Bostwick's P-47M-1-RE Thunderbolt was discontinued after the 2020 May sale, but has since been made available either for purchase in the store or in-game with Golden Eagles Ge icon.png for specific American mini-events like the 2020 "D-Day sale", the 2021 "US Air Force Day", the 2022 "US Air Force Birthday" and, most recently, the 2023 "US Air Force Birthday".

General info

Flight performance

Air brakes
Allows you to dramatically reduce the flight speed by releasing special flaps
Max speed
at 9 144 m760 km/h
Turn time24 s
Max altitude12 200 m
EnginePratt & Whitney R-2800-57C
TypeRadial
Cooling systemAir
Take-off weight8 t

The P-47M is a high-altitude interceptor that has impressive armament and ordnance that serves it well in both the fighter and Close Air Support role. In Air RB, it is currently unequalled in performance at its battle rating, possessing ridiculous top speed, competitive climb rate, decent energy retention, great armament, and surprising manoeuvrability at speed.

As such, the P-47M is best played to its strengths as a Boom & Zoom and Boom & Run fighter in Air RB. In Ground RB it is an excellent fighter bomber with a good rocket/bomb load-out and .50 cals that can deal with most turret roofs.

The M variant was specifically setup to intercept Germany's buzz-bombs and the new jet/rocket powered fighters. The primary advantage of this new variant came through speed. The aircraft was powered by either a Pratt & Whitney R-2800-14W or R-2800-5 engine while using the CH-5 turbo-supercharger. The aircraft was able to produce 2,800 hp, giving it higher top speed.

The P-47M has the flight performance of super-props. Top speeds above 5 km exceed literally any opponent besides the Ta 152 H-1 (which is only faster at around 11-12 km). Climb rate is great, at around an average of 23 m/s from 0-6,000 m. WEP is available for up to 12 minutes to maximize engine output.

Interestingly (besides the better engine), the P-47M gets a unique airbrake which makes it very easy to stick behind the tails of opponents in a high-speed dive.

Characteristics Max Speed
(km/h at 9,144 m)
Max altitude
(metres)
Turn time
(seconds)
Rate of climb
(metres/second)
Take-off run
(metres)
AB RB AB RB AB RB
Stock 726 711 12200 25.3 26.1 10.8 10.8 500
Upgraded 794 760 22.8 24.0 23.3 15.9

Details

Features
Combat flaps Take-off flaps Landing flaps Air brakes Arrestor gear
X
Limits
Wings (km/h) Gear (km/h) Flaps (km/h) Max Static G
Combat Take-off Landing + -
885 450 498 469 320 ~13 ~5
Optimal velocities (km/h)
Ailerons Rudder Elevators Radiator
< 400 < 420 < 470 > 335

Survivability and armour

Armour diagram of the P-47M-1-RE, corresponds to the list on the left
Crew1 person
Speed of destruction
Structural885 km/h
Gear450 km/h
  1. 9.5 mm Steel - Instrument panel and pilot armour
  2. 38 mm Bulletproof glass - Windscreen
  3. 9.5 mm Steel - Seat back and headrest armour plates

Modifications and economy

Repair cost
AB1 929 Sl icon.png
RB4 623 Sl icon.png
SB6 896 Sl icon.png
Crew training10 000 Sl icon.png
Experts340 000 Sl icon.png
Aces1 200 Ge icon.png
Research Aces1 140 000 Rp icon.png
Reward for battleAB / RB / SB
Talisman.png 2 × 100 / 230 / 500 % Sl icon.png
Talisman.png 2 × 178 / 178 / 178 % Rp icon.png
Modifications
Flight performance Survivability Weaponry
Mods aerodinamic fuse.png
Fuselage repair
Mods radiator.png
Radiator
Mods armor frame.png
Airframe
Mods compressor.png
Compressor
Mods aerodinamic wing.png
Wings repair
Mods new engine.png
Engine
Mods armor cover.png
Cover
Mods metanol.png
Engine injection
Mods g suit.png
G-suit
Mods ammo.png
bmg50_belt_pack
Mod arrow 1.png
Mods pilon bomb.png
FSBC mk.5
Mod arrow 0.png
Mods pilon bomb.png
FMBC mk.1
Mod arrow 0.png
Mods weapon.png
bmg50_new_gun
Mods pilon rocket.png
FRC mk.2
Mod arrow 0.png
Mods pilon bomb.png
FLBC mk.1

Armaments

Offensive armament

Main article: M2 Browning (12.7 mm)

Bostwick's P-47M-1-RE is armed with:

  • 8 x 12.7 mm M2 Browning machine guns, wing-mounted (425 rpg = 3,400 total)

Suspended armament

Bostwick's P-47M-1-RE can be outfitted with the following ordnance:

1 2 3 4 5 6 7 8 9 10 11 12 13
Hardpoints P-47D-25.png
250 lb AN-M57 bombs 1 1 1
500 lb AN-M64A1 bombs 1 1 1
1,000 lb AN-M65A1 bombs 1 1
HVAR rockets 1 1 1 1 1 1 1 1 1 1
Maximum permissible weight imbalance: 680 kg
Default weapon presets
  • Without load
  • 10 x HVAR rockets
  • 3 x 250 lb AN-M57 bombs (750 lb total)
  • 3 x 500 lb AN-M64A1 bombs (1,500 lb total)
  • 2 x 1,000 lb AN-M65A1 bombs (2,000 lb total)

Usage in battles

First of all, the P-47 should always fly fast. No matter the altitude, it is recommended to fly at speeds higher than 520 km/h (~320 mph). One of the few things the P-47 is terrible at doing is prolonged dogfighting. Imagine a truck loaded with cement with wings strapped to the side. Congratulations, you just pictured a P-47 flying at low speeds. Now, with this out of the way you must remember one thing and one thing only, when and where possible, fly high, the higher the better. The higher in altitude the P-47 goes the better the engine performs compared to its potential adversaries. The best altitude for the P-47M is around 9,000 m (~30,000 ft), but it still can perform very good at lower altitudes ranging from 6,000 m (~20,000 ft) to 8,000 m (~26,000 ft). One drawback of the P-47M's engine is that it can easily overheat when using WEP for extended periods of time. However just disabling WEP for few seconds should be enough to cool down the powerful Pratt & Whitney powerplant hidden under the hood. More experienced pilots can utilize Manual Engine Controls (MEC) to eliminate overheating entirely.

Combat tactics

Arcade - Much of what was mentioned above can be disregarded due to the adjusted flight model of arcade battles, instead just put your throttle to WEP, climb above your enemies and Boom & Zoom them. It is important to realize that while the P-47 can be the king of the hill, there are a few others which will buck for the spot too including Spitfires, Fw 190s and Bf 109s as they can climb as good as you and they often have cannons which in no time can dismantle a P-47 quickly in flight.

Realistic - A P-47M's pilot should not take any additional armaments such as bombs and rockets, they will only slow down the plane and make it an easy prey for Bf 109 K-4s, Ta 152s and Fw 190s. As soon as you take off from the airfield, divert 30 degrees to left or right (depends on where the middle of the map is, just don't climb towards the middle), engage WEP and climb at ~17-18 degrees. The best speed for climbing is around ~267 km/h IAS (~165 mph). When you reach an altitude of about 5,500 m (18,000 ft) start to gradually turn towards the middle of the map. Watch out for any enemy planes coming towards you, especially Ta 152s and Bf 109 K-4s which are your biggest threats as they have similar performance output compared to the P-47M. Approaching ~6,000 m, you will notice that climbing at 18 degrees becomes less efficient and is necessary to adjust the angle of attack to 10-15 degrees to maintain the optimal climbing speed. It is also a plausible option to stop climbing at this point since there is a good chance you will already be above everyone. Next, it is recommended to fly level and gain some speed, but not more than 400 km/h IAS (~250 mph) due to the air being thinner (your true airspeed will be very high at this point). In this situation, the P-47 will reign supreme over the skies. Look around you to see if there are any enemy planes spotted, and pick off the easiest targets. Preferably slow-flying fighters who are flying straight or climbing. If you cannot see such targets, position yourself to target those who pose the biggest threat to your aircraft advantageously (such aircraft are outlined at the bottom).

Weighing in at eight tons, the P-47M (and all other P-47s) carries vast inertia through manoeuvers so long as they are gentle and efficient. Above 500 km/h (~310 mph) you will find it is initially possible to best most fighters in the first or second circles of a sharp turn, but a vast amount of energy is consumed in the process. This can lead to a quick kill (ideally attempted against a foe you know you can outturn), but can rob you of your zooming escape should things go wrong. For this reason, pilots of this aircraft should adhere to quite possibly its biggest strength: fighting in the vertical. Unlike horizontal turnfights, fighting vertically requires substantially more energy as it is dependent on gravity and inertia rather than continuous lift generated by the wings. Horizontal turnfighting thusly plays into the strengths of light aircraft; P-47s are not light aircraft, do not turn horizontally in a P-47M unless you are absolutely certain of the outcome (as you will be committed). However, a skilled pilot does not have to worry about this. You will find that light and nimble opponents such as Spitfires or Zeroes succumb to sustained, long, vertical looping due to their inability to carry momentum through stall-fighting. The high straight-line top speed and sheer weight of your aircraft can even find one having an energy advantage over an enemy who may be 1-2 km higher than you are, resulting in a nasty surprise should they try and climb away (though you should always strive to begin with an altitude advantage). Conservation of inertia is key when setting up energy traps in the vertical; you want to give the enemy as little breathing room as possible. As a rule of thumb, try to reach at least 400 km/h (~250 mph) IAS while positioning and do your best to maintain this speed by not turning too sharply. This will make the zoom portion of an attack far more effective. Once adequate separation is achieved, more complex vertical manoeuvers can be used to spring the trap. Spiral climbing can be utilized to great effect against a tailing enemy at an (initially hidden) energy disadvantage. Just remember in this case to turn tight enough so as not to give them a shot at your rear before you come over the top once their energy is exhausted. Smarter foes may dive away, but it is possible to counter this by spiral diving such that they are "pressed" ever lower by the threat of you turning to get a shot on them. Do not fall for this bait and enter a horizontal turnfight, however. Instead, solely "suggest" such a manoeuver and reposition (ideally through a bout of spiral climbing) until their energy is at such a point where you can execute a proper attack. Ensuring your shots are on target and that enemy energy is depleted is key. You may not be able pull out of a steep dive if you shoot too late or execute too early, resulting in a humiliating crash as your quarry dives towards the ground to avoid you.

Always perform powered dives, and if you feel you're going too fast, just extend the airbrakes long enough to reign in the aircraft's speed. This is one of the biggest advantages of the P-47M over the D-series (though the D-30 also has them) and other comparable prop fighters. When you are finished with the Boom phase of your attack, resist the urge to climb outright. Instead, speed away from the enemies (preferably towards your teammates) while increasing distance between you and anyone tailing. When you gain ~3 km (~2 mi) of separation from enemy planes, you can begin the Zoom part of the tactic. Alternatively, you can remain level and fast if you feel that any potential pursuer could catch up to you. Once you are confident this won't happen, climb at 10 degrees and gain enough altitude to ensure that you have an energy advantage above enemy planes. In the most dire situations you can try to go for a head-on attack (only if you have at least 2.5 km separation from the enemy), but it's not recommended to do that as you will most likely damage your engine in the process. In the worst-case scenario, your plane will catch fire and burn up. If you see an enemy fighter who is attempting a diving attack, try and force them to overshoot, call for help and fly towards your closest teammate. You can shrug off a few hits to the fuselage, but anything that touches your wings and elevators will most likely disable or destroy the aircraft's ability to fly well or at all. Flying with friends is also an ideal source of help. Should you be the last on your team, climb as high as possible, look out for enemy fighters, and Boom & Zoom them. Bear in mind that the P-47 does not perform well in 1v2 dogfights; try and separate enemies to pick them off one by one. Bombers are typically a difficult target to go after as they usually soak up quite a bit of ammunition before taking critical damage while leaving you at risk of being set afire or sniped by the defensive gunners. However, the long effective range and shallow drop of the .50 cals makes it possible to attack some bombers from outside their own gunners' effective range.

It's important to remember that the P-47's first and foremost mission is air superiority, especially in the case of the P-47M. Taking bombs and rockets will make your plane even more sluggish than it already is and because of that you will have to fly near the ground, and that typically makes the P-47 easy pickings for other enemy fighters. This is not to say you should never attack ground targets however, and there are certain situations where it is more rewarding (e.g. no enemy fighters left). With a large ammunition pool of 3,400 .50 cal rounds, there will almost certainly be enough left over to wreak substantial havoc on soft targets. It's also important to note that the Ground Targets and Tracer belts are capable of destroying light pillboxes with ~100 rounds. For more flexibility in attacking, it is sometimes beneficial to RTB and take on ordnance, but you should only do this after expending all of your .50 cal ammunition. The two 1,000 lb and 500 lb bombs as well as ten HVAR rockets mean it is possible to engage hard targets such as tanks. Again, it must be remembered that this should only seriously be considered if the relative danger to your aircraft is virtually zero. But if this is the case, it can be very rewarding to the player, as well as help win the game faster.

It is important to mention the two schools of thought regarding the ammunition belts for .50 cals. The first one says that you should use Ground Targets belts because of the high amount of armour piercing rounds. These do a lot of damage and can easily shred anything hit with them. However, the second school of thought states one should use Tracer belts because they have the highest chance of setting the enemy on fire, which will typically lead to a fiery destruction of the enemy aircraft. But, there's one thing everyone agrees on: don't use Default belts, as the other available belts have a higher ratio of more damaging AP-T, API, and API-T bullets.

Enemies worth mentioning:

While flying the P-47M (or any P-47), it is best to be wary of opponents who possess unusually good energy retention/generation characteristics (vertical or otherwise) or tend to have an altitude advantage when entering combat:

-Any fighter of the Yak/La (Yak-3, Yak-9, La-7, La-9) family and the I-225 should be dealt with on as unequal terms as possible. Possessing extremely powerful engines on airframes weighing less than half yours, Yaks and La's shine in all aspects of energy fighting, and are also above-average turnfighters to boot. Running is not always an option as their acceleration is also very good. However, their poor structural limits of ~675 km/h (420 mph) can be exploited (except for the I-225) to make a diving escape or high-speed pass depending on the scenario. Yak and La series aircraft also suffer from performance issues above 6,000 m, at such altitudes you will stand a far better chance of victory.

-The Hornet, Ki-83, & F7F have some of the best performance of any prop plane, and they climb far better than you. As all of these get an interceptor airspawn, a possible scenario leveling out at 6,000 m is seeing one of these two kilometres higher and closing fast. In such a situation, fighting in the vertical can be close to suicidal against such an energy advantage, and a last resort dive is often the only option. However, being heavy fighters, you can actually outturn these in more conventional manner (e.g. the horizontal), and an overshoot can quickly turn the tide in your favor.

-The Ta 152 H-1 & G.56 are pure energy fighters. In the hands of experienced pilots, these long-winged Axis superprops bring a deadly combination of speed, energy retention, and turnfighting to the table. Under no circumstances should you engage one of these at low altitude (<2,000 m), and/or low speed (<500 km/h) as they will make short work of your plane out of its element. Both stiffen in turns at higher speeds, however, and a skilled pilot can utilize the P-47M's excellent manoeuvrability at speed to gain the initiative. Be sure to end the engagement quickly or you will lose energy rapidly.

-The Tempest Mk II is everything you are below 3,000 m. As such, engaging with it at low altitude is extremely inadvisable as it produces unrivaled speed for a prop without a turbocharger and will outclimb near anything down there as well. It is roughly your equal in manoeuvrability, however, and finding yourself on its six will often end well. The only problem is catching it. Diving from higher altitudes is a tactic that leaves even jets helpless at times, and as such you can apply this to the jet-like Tempest if hunting it is important, but this can leave you open to attack from enemy teammates.

-The J2M family excels at vertical energy fighting and famously hangs until almost 0 km/h in a stall, while also possessing above-average climb rates. Should you encounter one, it is best to practice pure BnZ tactics against them. Their comparatively slow top-speed (615 km/h for the J2M5) cannot compete with the P-47M in a straight line. However, do not be fooled into climbing early/into a stall, as they can retain that speed very effectively in a climb and get easy shots on you.

Manual Engine Control

MEC elements
Mixer Pitch Radiator Supercharger Turbocharger
Oil Water Type
Controllable
Not auto controlled
Controllable
Auto control available
Controllable
Not auto controlled
Controllable
Not auto controlled
Separate Controllable
1 gear
Auto controlled

To get the most performance out of your Pratt & Whitney R-2800-57(C), use 120% mixture from 0 to 7,000 m, 100% mixture from 7,000 to 8,500 m, and 60% mixture above 8,500 m; the turbocharger allows for the richest mix (and the most HP) at almost any altitude you will fight at. The default setting on auto mixture controls is 60%, setting it higher at these altitudes allows you to squeeze some extra horsepower out of the engine, which significantly improves the rate of climb. It is possible to set the oil and engine radiators to 0% and not worry about overheating when not using WEP. However, it is possible to do this and utilize WEP for the full 13 minutes without overheating so long as propeller pitch is set to (and does not exceed) 85%. Using auto prop-pitch settings, prolonged WEP usage will overheat the engine. To run WEP for extended periods of time with auto prop-pitch, set the oil radiator to ~15%, and engine radiator from 25% to 50% as needed. It is important to note that you have a limited WEP duration of ~12 minutes. While this is enough to last through most engagements, during prolonged battles it does well to conserve the boost for when it is most needed.

Pros and cons

Pros:

  • Forgiving aircraft
  • Eight deadly .50 cal M2 Brownings
  • Great ground-attack ordnance selection
  • Unrivalled high altitude performance
  • Very good high-speed manoeuvrability, excellent vertical energy retention
  • Enemies are often surprised by the enhanced performance of what is usually seen as an easy target
  • Good climb rate; can keep up with many fighters at its battle rating, unlike its earlier variants
  • Radial engine is good at soaking up damage from the rest of the aircraft
  • Airbrakes
  • Access to premium bonuses in Silver Lion and Research Points

Cons:

  • Payloads encourage a low-altitude attacker playstyle, playing into P-47M's disadvantages
  • Still needs to sideclimb due to higher performance enemies at 5.7
  • Sluggish acceleration on the deck as the turbocharger doesn't produce much extra horsepower
  • Inadequate performance near the ground means most enemy fighters will be able to catch you
  • Bleeds energy very quickly in sharp turns
  • Poor low-speed manoeuvrability: a prolonged turnfight almost always ends badly
  • Large size and wingspan makes it easier for enemy fighters to score hits on you
  • While protective, the engine will typically suffer disproportionately at the cost of keeping the plane intact
  • Engine easily catches fire when hit by 13/15/20 mm shells

History

Four P-47D-27 Aircraft were pulled from the production line at the Farmingdale factory and were fitted with the Pratt & Whitney R-2800-57(C) engine. They were also equipped with a larger CH-5 turbo-supercharger allowing the aircraft to reach 2,800 hp at 32,000 feet. Air brakes were also added underneath the wings to aid in deceleration and recovery during dives. These four prototypes were re-designated YP-47M.

The engine installations were eventually added to the last 130 P-47D-30s from Farmingdale in Sept of 1944. They were all re-designated P-47M-1-RE. It is important to note that the under-wing racks were not fitted to this aircraft. It was intended to be strictly a fighter. They were delivered in Dec. of 1944. The dorsal fins were later added as a field modification.

The M-variant saw service with the 56th Fighter Group but problems with the new highly tuned R-2800 delayed their use until the last weeks of the war in Europe. At one point the aircraft was pulled from service and replaced with D variants until the aircraft performed reliably. The P-47M was never used against V-1 flying bombs, its original target.

The P-47M is most remembered for Major George Bostwick's engagements with the Me 262. Bostwick shot down a Me 262 on March 25 1945. He was able to damage a second one a few days later on April 7th.

His P-47M-1-RE had the nickname "Ugly Duckling" and a striking paint scheme.

Media

Skins
Videos

See also

Carbon-copy vehicle

External links


Republic Aviation Corporation
Fighters  P-43A-1
  P-47D-22-RE · P-47D-25 · P-47D-28 · P-47M-1-RE · ⋠P-47M-1-RE · P-47N-15
Jet Aircraft  F-84B-26 · F-84F · F-84G-21-RE
  F-105D
Export  J9 Early*
  ␗P-43A-1
  ▄Thunderbolt Mk.1 · ▄P-47D-22-RE · ␗P-47D-23-RA · ▂P-47D-27 · ␗P-47D-30 · ▄P-47D-30
  ◄F-84F · ▄F-84F (Italy) · ▄F-84F (France) · F-84F IAF · F-84F
  ␗F-84G-21-RE · ▄F-84G-21-RE · ▄F-84G-26-RE · ␗F-84G-31-RE
Captured  ▀P-47D-16-RE · ▀P-47D
  *The company was named "Seversky Aircraft Company" before being renamed in 1939

USA fighters
P-26 Peashooter  P-26A-33 · P-26A-34 · P-26A-34 M2 · P-26B-35
P-36 Hawk  P-36A · Rasmussen's P-36A · P-36C · ○P-36C · P-36G
P-39 Airacobra  P-400 · P-39N-0 · P-39Q-5
P-40  P-40C · P-40E-1 · P-40E-1 TD · P-40F-10
P-43 Lancer  P-43A-1
P-47 Thunderbolt  P-47D-22-RE · P-47D-25 · P-47D-28 · P-47M-1-RE · ⋠P-47M-1-RE · P-47N-15
P-51 Mustang  P-51 · P-51A (Thunder League) · P-51C-10 · P-51D-5 · P-51D-10 · P-51D-20-NA · P-51D-30 · P-51H-5-NA
P-63 Kingcobra  P-63A-5 · P-63A-10 · P-63C-5 · ␠Kingcobra
Prototypes  XP-55
F2A Buffalo  F2A-1 · Thach's F2A-1 · F2A-3
BF2C  BF2C-1
F3F  F3F-2 · Galer's F3F-2
F4F Wildcat  F4F-3 · F4F-4
F4U Corsair  F4U-1A · F4U-1A (USMC) · F4U-1D · F4U-1C · F4U-4 · F4U-4B · F4U-4B VMF-214 · F2G-1
F6F Hellcat  F6F-5 · F6F-5N
F8F Bearcat  F8F-1 · F8F-1B
Other countries  ▃Ki-43-II · ▃Ki-61-Ib · ▃A6M2 · ▃Bf 109 F-4 · ▃Fw 190 A-8 · ▃Spitfire LF Mk IXc

USA premium aircraft
Fighters  Thach's F2A-1 · Galer's F3F-2 · F2G-1 · F4U-4B VMF-214 · P-26A-34 · P-40C · P-43A-1
  P-47M-1-RE · ⋠P-47M-1-RE · P-51A · P-51D-10 · P-51D-20-NA · ␠Kingcobra · XP-55
  ▃A6M2 · ▃Ki-43-II · ▃Ki-61-Ib · ▃Bf 109 F-4 · ▃Fw 190 A-8 · ▃Spitfire LF Mk IXc
Twin-engine fighters  XP-38G · Bong's P-38J-15 · P-38K · YP-38 · P-61A-11 · XF5F · XP-50 · F7F-3
Jet fighters  P-59A · F-86F-35 · F-89B · F-89D · F-4S Phantom II · F-5C · F-20A
Strike aircraft  A-1H · A2D-1 · AU-1 · XA-38 · AV-8A · A-6E TRAM · A-10A
Bombers  A-26C-45DT · B-10B · BTD-1 · PBM-3 "Mariner" · PV-2D