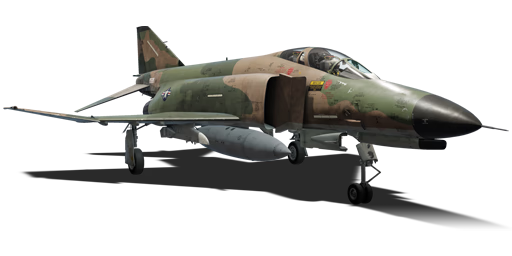
F-4E Phantom II

From War Thunder Wiki
Jump to: navigation, search
RANK 4 FRANCE
Somua SM PACK
This page is about the American jet fighter F-4E Phantom II. For other versions, see F-4 Phantom II (Family).
F-4E Phantom II
f-4e.png
GarageImage F-4E Phantom II.jpg
ArtImage F-4E Phantom II.png
360://https://wiki.warthunder.com/images/b/bc/F-4E_II_Cockpit.jpg
F-4E Phantom II
AB RB SB
11.0 11.0 10.7
Research:350 000 Specs-Card-Exp.png
Purchase:950 000 Specs-Card-Lion.png
Show in game

Description

The F-4E Phantom II is a rank VII American jet fighter with a battle rating of 11.0 (AB/RB) and 10.7 (SB). It was introduced in Update 1.97 "Viking Fury".

The mighty F-4E Phantom II is a famous US aircraft from the Vietnam War era and a reliable workhorse of many militaries around the world. Powered by two General Electric J79-GE-17 jets, each producing an incredible 8,010 kgf on maximum afterburner, the F-4E boasts high speed and a solid climb rate. Leading-edge "Agile Eagle" slats increase its turning capability and somewhat mitigate the reputation of the Phantom family as flying bricks. In the weapons department, the F-4E has access to AIM-7E-2 Sparrows for medium-to-long range combat, AIM-9J Sidewinders for close-in work, and an enormous array of ground attack ordnance including AGM-65 Maverick air-to-ground missiles and AGM-62 Walleye glide bombs. This multi-role vehicle is a supremely capable ground attacker and a competitive fighter, though in air combat pilots must account for its lack of a pulse-Doppler radar.

General info

Flight performance

Arrestor gear
Accelerates braking by grabbing the brake cable on the deck of the aircraft carrier
Air brakes
Allows you to dramatically reduce the flight speed by releasing special flaps
Drogue parachute
Reduces braking distance when landing on any runway
Max speed
at 12 192 m2 140 km/h
Turn time26 s
Max altitude16 000 m
Engine2 х General Electric J79-GE-17
TypeJet
Cooling systemAir
Take-off weight24 t
Characteristics Max Speed
(km/h at 12,192 m)
Max altitude
(metres)
Turn time
(seconds)
Rate of climb
(metres/second)
Take-off run
(metres)
AB RB AB RB AB RB
Stock 2,097 2,074 16000 26.5 27.5 160.8 151.2 850
Upgraded 2,202 2,140 25.5 26.0 221.6 190.0

Details

A ROKAF F-4E Phantom II from to 153th Combat Squadron deploying its drogue chute for landing
Features
Combat flaps Take-off flaps Landing flaps Air brakes Arrestor gear Drogue chute
Limits
Wings (km/h) Gear (km/h) Flaps (km/h) Max Static G
Combat Take-off Landing + -
1458 463 1,458 625 463 ~11 ~4
Optimal velocities (km/h)
Ailerons Rudder Elevators Radiator
< 810 < 750 < 700 N/A

Engine performance

Engine Aircraft mass
Engine name Number Basic mass Wing loading (full fuel)
General Electric J79-GE-17 2 14,205 kg 408 kg/m2
Engine characteristics Mass with fuel (no weapons load) Max Gross
Weight
Weight (each) Type 9m fuel 20m fuel 30m fuel
1,750 kg Afterburning axial-flow turbojet 15,964 kg 18,027 kg 20,069 kg 28,681 kg
Maximum engine thrust @ 0 m (RB/SB) Thrust to weight ratio @ 0 m (WEP)
Condition 100% WEP 9m fuel 20m fuel 30m fuel MGW
Stationary 5,200 kgf 8,010 kgf 1.00 0.89 0.80 0.56
Optimal 5,200 kgf
(0 km/h)
10,170 kgf
(1,400 km/h)
1.27 1.13 1.01 0.71

Survivability and armour

Flares/Chaff
Aircraft countermeasures to distract IR and radar-guided missiles and also AA radar
Crew2 people
Speed of destruction
Structural1 458 km/h
Gear463 km/h

The survivability features of the F-4E Phantom II have grown compared to its predecessor with an armour plate and missile countermeasures attached.

By this stage in the high-rank battles, all the fuel tanks are self-sealing. While this will assist with any fuel tank punctures from machine gun calibre weapons, the presence of fast-firing autocannons and missiles mean that these self-sealing tanks are only an accessory to the overall survival of the aircraft.

The addition of an armour plate is a minor benefit as it is only an 8.5 mm steel plate just below the forward fuel tank in the fuselage. This is only thick enough to block a glancing shot to the fuselage. Its most effective use seems to when the F-4E Phantom II as it is pulling up from an attack run, as it is in that angle where the armour plate can potentially block any shot threatening the fuselage fuel tanks and engine. However, considering the small size it is made up of and the large plane overall, this armour plate should not be relied upon for the overall survival of the aircraft.

The biggest change from previous version is the countermeasure flares, which are greatly useful at deterring incoming infrared-homing missiles like the Sidewinders or R-60s. To utilise the flares, one must turn off their engine afterburners to eliminate that as a significant source of heat, deploy the flares in a suitable manner, then bank away from the flares to that the missile lock onto the remaining heat source rather than the plane's engine.

A survivability feature shared with its predecessor is the Radar Warning Receiver (RWR). The RWR will ping the player in the source of any incoming radar scans, and will also notify if the radar source have achieved a lock-on with the player. Keep an eye on this as it may signify to the player that an enemy semi-active radar homing missile may be launched soon and evasive actions should be taken.

Modifications and economy

Repair costBasic → Reference
AB2 994 → 4 044 Sl icon.png
RB8 833 → 11 933 Sl icon.png
SB9 129 → 12 333 Sl icon.png
Total cost of modifications294 200 Rp icon.png
457 000 Sl icon.png
Talisman cost3 000 Ge icon.png
Crew training270 000 Sl icon.png
Experts950 000 Sl icon.png
Aces3 200 Ge icon.png
Research Aces1 210 000 Rp icon.png
Reward for battleAB / RB / SB
100 / 320 / 600 % Sl icon.png
244 / 244 / 244 % Rp icon.png
Modifications
Flight performance Survivability Weaponry
Mods jet compressor.png
Compressor
Research:
8 600 Rp icon.png
Cost:
13 000 Sl icon.png
350 Ge icon.png
Mods booster.png
New boosters
Research:
11 000 Rp icon.png
Cost:
17 000 Sl icon.png
450 Ge icon.png
Mods aerodinamic wing.png
Wings repair
Research:
12 000 Rp icon.png
Cost:
19 000 Sl icon.png
490 Ge icon.png
Mods jet engine.png
Engine
Research:
16 000 Rp icon.png
Cost:
25 000 Sl icon.png
650 Ge icon.png
Mods aerodinamic fuse.png
Fuselage repair
Research:
8 600 Rp icon.png
Cost:
13 000 Sl icon.png
350 Ge icon.png
Mods armor frame.png
Airframe
Research:
11 000 Rp icon.png
Cost:
17 000 Sl icon.png
450 Ge icon.png
Mods g suit.png
G-suit
Research:
12 000 Rp icon.png
Cost:
19 000 Sl icon.png
490 Ge icon.png
Mods armor cover.png
Cover
Research:
16 000 Rp icon.png
Cost:
25 000 Sl icon.png
650 Ge icon.png
Mods air to air missile.png
AIM-9E
Research:
8 600 Rp icon.png
Cost:
13 000 Sl icon.png
350 Ge icon.png
Mod arrow 0.png
Mods ammo.png
M60_belt_pack
Research:
8 600 Rp icon.png
Cost:
13 000 Sl icon.png
350 Ge icon.png
Mod arrow 0.png
Mods agm missile.png
AGM-12C Bullpup
Research:
8 600 Rp icon.png
Cost:
13 000 Sl icon.png
350 Ge icon.png
Mod arrow 0.png
Mods pilon bomb.png
M117
Research:
8 600 Rp icon.png
Cost:
13 000 Sl icon.png
350 Ge icon.png
Mod arrow 0.png
Mods heli false thermal targets.png
Flares/Chaff
Research:
8 600 Rp icon.png
Cost:
13 000 Sl icon.png
350 Ge icon.png
Mods air to air missile.png
AIM-9J
Research:
11 000 Rp icon.png
Cost:
17 000 Sl icon.png
450 Ge icon.png
Mod arrow 0.png
Mods weapon.png
M60_new_gun
Research:
11 000 Rp icon.png
Cost:
17 000 Sl icon.png
450 Ge icon.png
Mods pilon block rocket.png
LAU-3/A
Research:
11 000 Rp icon.png
Cost:
17 000 Sl icon.png
450 Ge icon.png
Mod arrow 0.png
Mods pilon bomb.png
Mk83
Research:
11 000 Rp icon.png
Cost:
17 000 Sl icon.png
450 Ge icon.png
Mod arrow 0.png
Mods air to air midrange missile.png
AIM-7E
Research:
12 000 Rp icon.png
Cost:
19 000 Sl icon.png
490 Ge icon.png
Mod arrow 0.png
Mods gunpods.png
Gun pod SUU-23/A.
Research:
12 000 Rp icon.png
Cost:
19 000 Sl icon.png
490 Ge icon.png
Mods pilon block rocket large.png
LAU-10/A
Research:
12 000 Rp icon.png
Cost:
19 000 Sl icon.png
490 Ge icon.png
Mod arrow 0.png
Mods pilon bomb.png
Mk84
Research:
12 000 Rp icon.png
Cost:
19 000 Sl icon.png
490 Ge icon.png
Mod arrow 0.png
Mods air to air midrange missile.png
AIM-7E-2
Research:
16 000 Rp icon.png
Cost:
25 000 Sl icon.png
650 Ge icon.png
Mods atgm heli preset.png
AGM-65B
Research:
16 000 Rp icon.png
Cost:
25 000 Sl icon.png
650 Ge icon.png
Mods optical guided bomb.png
AGM-62A
Research:
16 000 Rp icon.png
Cost:
25 000 Sl icon.png
650 Ge icon.png
Mod arrow right 0.png
Mods optical guided bomb.png
GBU-8/15
Research:
16 000 Rp icon.png
Cost:
25 000 Sl icon.png
650 Ge icon.png

Armaments

Ballistic Computer
CCIP (Guns) CCIP (Rockets) CCIP (Bombs) CCRP (Bombs)
Icon GreenCheckmark.png Icon GreenCheckmark.png Icon GreenCheckmark.png Icon GreenCheckmark.png

Offensive armament

Main article: M61A1 (20 mm)

The F-4E Phantom II is armed with:

  • A choice between two presets:
    • 1 x 20 mm M61A1 cannon, chin-mounted (640 rpg)
    • 1 x 20 mm M61A1 cannon + 90 x countermeasures

Due to this cannon's high rate of fire, trigger discipline is a must.

Suspended armament

The F-4E Phantom II can be outfitted with the following ordnance:

1 2 3 4 5 6 7 8 9 10 11
Hardpoints F-4C Phantom II.png
20 mm GAU-4 cannons (1,200 rpg) 1 1 1
250 lb LDGP Mk 81 bombs 6 3 6 3 6
500 lb LDGP Mk 82 bombs 6 3 6 3 6
500 lb Mk 82 Snakeye bombs 6 3 6 3 6
750 lb M117 cone 45 bombs 3 3 5 3 3
1,000 lb LDGP Mk 83 bombs 2 3 3 3 2
2,000 lb LDGP Mk 84 bombs 1 1 1
2,000 lb LDGP Mk 84 Air bombs 1 1 1
505 kg AGM-62A Walleye I bombs 1 1* 1* 1
2,000 lb GBU-8 bombs 1 1* 1* 1
2,000 lb GBU-15(V)1/B bombs 1* 1*
BLU-27/B incendiary bombs 1 2 1
FFAR Mighty Mouse rockets 57 57 57 57 57
Zuni Mk32 Mod 0 ATAP rockets 12 12 12 12 12
AGM-12C Bullpup missiles 1* 1*
AGM-65B missiles 3* 3*
AIM-7E Sparrow missiles 1 1 1 1
AIM-7E-2 Sparrow missiles 1 1 1 1
AIM-9E Sidewinder missiles 1, 2* 1, 2*
AIM-9J Sidewinder missiles 2* 2*
600 gal drop tanks 1
Maximum permissible loadout weight: 7,257 kg
Maximum permissible wing load: 3,000 kg
Maximum permissible weight imbalance: 1,500 kg
* Marked options for hardpoints 2/10 cannot be used in conjunction with air-to-air missiles on hardpoints 3/9 respectively
Default weapon presets
  • 1 x 600 gal drop tank
  • 2 x AIM-9E Sidewinder missiles
  • 3 x 20 mm GAU-4 cannons (1,200 rpg = 3,600 total)
  • 24 x 250 lb LDGP Mk 81 bombs (6,000 lb total)
  • 24 x 500 lb LDGP Mk 82 bombs (12,000 lb total)
  • 24 x 500 lb Mk 82 Snakeye bombs (12,000 lb total)
  • 17 x 750 lb M117 cone 45 bombs (12,750 lb total)
  • 13 x 1,000 lb LDGP Mk 83 bombs (13,000 lb total)
  • 3 x 2,000 lb LDGP Mk 84 bombs (6,000 lb total)
  • 3 x 2,000 lb LDGP Mk 84 Air bombs (6,000 lb total)
  • 4 x BLU-27/B incendiary bombs
  • 285 x FFAR Mighty Mouse rockets
  • 60 x Zuni Mk32 Mod 0 ATAP rockets
  • 4 x AIM-9E Sidewinder missiles
  • 4 x AIM-9J Sidewinder missiles
  • 4 x AIM-7E Sparrow missiles
  • 4 x AIM-7E-2 Sparrow missiles
  • 2 x AGM-12C Bullpup missiles
  • 6 x AGM-65B missiles
  • 4 x 505 kg AGM-62A Walleye I bombs (2,020 kg total)
  • 4 x 2,000 lb GBU-8 bombs (8,000 lb total)
  • 2 x 2,000 lb GBU-15(V)1/B bombs (4,000 lb total)

Usage in battles

The F-4E Phantom II is well-suited for most in-game situations. For attacking ground targets, the plane is armed with an assortment of bombs, rockets, and missiles. And against air targets, players may employ the vehicle's deadly air-to-air missiles and frontal cannon(s). If desired, three externally-mounted gunpods may be equipped, but note that these may not be useful in certain situations. Although they will undoubtedly increase the vehicle's destructive capabilities, they also appreciably hinder flight performance through induced drag. In many situations, one front-facing cannon is all that is required to dispatch an opponent aircraft. As for the missiles, the ones used by this plane are average at its rank, comparable to the R-60 missiles equipped by the MiG-21MF (Germany) and the MiG-21SMT (albeit with worse manoeuvrability). The AIM-9J missiles are most effective when fired from between 1 to 3 km away from the target. Any closer and they will struggle to track and likely veer off target for a miss.

The F-4E has one of the highest rates of climb out of any vehicle in the game. This is however where most of its performance advantages end. Due to its weight, the Phantom has rather mediocre acceleration, and not the best top speed. It is not advised to dogfight anything other than Starfighters and other Phantom variants, as the F-4 has a very poor turn rate. Although the aircraft has better energy retention than most of its opponents, it still bleeds considerable amounts of speed while turning, which can't be regained very quickly due to the aircraft's heavy weight. It also performs quite poorly at low speeds, which is also caused by its weight.

Air-to-Air

In air realistic battles, it is recommended to take a balanced fuel load of 20 or 30 minutes, depending on how aggressive you fly (this will also allow you to liberally use the afterburner without fear of premature fuel exhaustion). The most useful default Air RB armament for the F-4E are the 4 AIM-9Js or 4 AIM-7E-2s, though both missiles can be used under a custom loadout setting. As the F-4E's dogfighting abilities are rather lacklustre, the Sparrows may prove more useful in the long run compared to the AIM-9J Sidewinders. The best strategy is to accelerate to a speed of roughly 900-1,100 km/h on the deck and then zoom climb to altitude (5 km or higher), where the pilot should accelerate to the highest speed possible. Lock on to targets with your radar and use your Sparrows to shoot down enemy aircraft when in range; and remember to keep an eye on your RWR as being at altitude makes you an easy target for the long range missiles prevalent at this tier. Sparrows should ideally be launched above Mach 1 to take maximum advantage of their range and manoeuvrability. After using up all your Sparrows, return to base to rearm, with the Sidewinders (if brought along) used moreso for self-defense rather than as a primary weapon. Because of its poor flight characteristics, the Phantom will struggle in one-on-one fights, making it vital to keep your teammates around and to avoid dogfighting whenever possible. The Phantom should target enemies turnfighting its friendlies, as not only will the enemy be distracted and slow, but it provides you a chance to save your teammate, who in turn may down another enemy chasing you later in the match.

To reiterate, dogfighting should be avoided as much as possible. The Phantom was designed around missiles, so they will naturally be your main way of getting kills, with the gun being a backup weapon for opportune targets. Furthermore, most of the enemies you will face at 11.0 or above can and will be able to easily manoeuvre around you, if they haven't already fired a high performance AAM at you. Although if one has unlocked the triple SUU-23/A gunpods, that is an almost surefire way to earn at least one kill in the classic head-on (in addition to its usefulness in attacking ground targets, possibly being the best option in Air Realistic).

Notable Air RB enemies

  • MiG-21bis: the most advanced Soviet MiG-21, with amazing acceleration that can catch up to the F-4E quite easily, a good turn rate than can easily out-dogfight the F-4E, and flares to evade missiles. The German MiG-21bis-SAU has access to all-aspect R-60MK missiles as well. Neither has competitive radar-guided missiles however.
  • JA37C Viggen: a Swedish powerhouse that boasts high low-altitude speed, good turning performance, similar weapons to the F-4E, and a Pulse-Doppler radar.
  • Mirage IIIC/IIIE: armed with two of the best infrared missiles in the game, the R.550 Magic, and a long-range radar-guided missile with similar performance to the AIM-7. Strong short-term turning capabilities make them dangerous in snapshots. However, the former does not have countermeasures, and both have rather sluggish flight performance that is easily outran by the F-4E.
  • Phantom FGR.2/FG.1: British Phantoms with more powerful engines, can out accelerate and outrun the F-4E. They also have pulse-Doppler radars and are superior in BVR. However, the F-4E beats these phantoms in a dogfight as they lack the F-4E's agile eagle slats.
  • F-4EJ Kai: Japanese Phantom with an excellent pulse-Doppler radar and dangerous AIM-9L and AIM-7F missiles. However, similar to the British Phantoms. it lacks the F-4E's agile eagle slats and thus is beaten by the F-4E in a dogfight.
  • F-4E Phantom II: This very aircraft, as a result you simply play around its weaknesses as described in the "Pros and cons" section.
  • F-4J Phantom II: Equivalent naval American Phantom variant, sacrifices ATGM/GBU capability for superior AIM-7F SARH missiles and a PD radar, but lack of "agile eagle" wing slats means it is beaten by the F-4E in a dogfight.
  • MiG-23M/MF/MLD: swing-wing fighters with potent missiles, good avionics, and superior agility to the F-4E on lower sweep settings. Avoid dogfighting and keep an eye out for sneak attacks with the R-23T/24T missiles. The MiG-23M and MiG-23MF have very limited countermeasures, which the F-4E can exploit with its large missile capacity. The MiG-23MLD has excellent speed and climb performance that can match or exceed the F-4E.
  • J-7E: a light and nimble Chinese fighter with exceptional agility but no radar-guided missiles. Avoid dogfighting whenever possible.
  • F-14A Early: Fourth generation fighter and American successor to the F-4, with the ultra-long range and fire-and-forget Phoenix missiles, superior radar and missiles, and vastly superior dogfighting performance. Acceleration and top speed is mediocre, however, and the F-4E can keep up with its speed.
  • Mirage 2000C: French fourth generation fighter with vastly superior turn rate, acceleration, and missiles. It only has four missiles, however, as opposed to the F-4E's eight.
  • F-16A: American fourth generation fighter with superior AIM-9L (and, in most cases, AIM-7F/Ms), superior PD radar, vastly superior turn rate and acceleration. Its top speed can be matched by the F-4E. Avoid dogfighting whenever possible.
  • MiG-29: Russia fourth generation fighter with R-60Ms, extremely dangerous R-27ER radar guided missiles, look-down radar, and vastly superior turn rate, acceleration and top speed. Generally should be avoided.

Ground Realistic

While the AA threat at this BR is significant, this aircraft can still find great utility if used properly and is among the top aircraft for CAS in the American tech tree when the appropriate modifications are unlocked. However, like most aircraft at this BR it has little utility in ground RB when stock/without countermeasures unlocked and even when spaded is still heavily pressured by SAMs, which on some maps can even immediately engage the aircraft as it spawns. In the ground attack role, while its 20 mm cannon can do significant damage against the thinly armoured topsides of most vehicles at this BR, the strafing runs required to do so put you at immense risk of being shot down by radar-guided AAA, any SAM, or even some tanks with proximity fused ammunition/ATGMs/autocannons. Due to this, CAS should be completely avoided in a stock F-4E.

As a result, you want to rely on quick strikes that put you in the line of fire for as little time as possible or long range attacks that eliminate the need to enter enemy AA range at all. The latter is most prominently done with its TV-guided munitions, the best of which are the AGM-62 Walleyes, GBU-8s and AGM-65 Mavericks. To significantly make use of these guided weapons, you often need to put several kilometers worth of distance between you and the target so you can properly aim, fire, and pull away (and optimally against a stationary target). All these weapons have two lock modes: point lock and track lock (you can tell what kind of lock you have by looking at the selected weapon name). Point lock means that the weapon has locked on to a point of the ground, and upon optimal conditions will hit that point. Track lock means that the weapon has locked on to an enemy vehicle, and under optimal conditions will follow its movement and hit it. Track locks are usually much more difficult to achieve, needing a much closer range, but is the more reliable option when attempting to destroy vehicles (oftentimes an unaware enemy will accidentally move outside the point lock of your weapon and dodge it).

  • The AGM-62A Walleye is a guided bomb, meaning it has no power and glides to a target via gravity and launch speed of the aircraft. It is a smaller, lighter weapon than the heavier GBU-8.
  • The GBU-8 HOBOS is also a guided bomb similar to the Walleye. Compared to the Walleye, it has a vastly heavier 2,000lb warhead, but is also heavier in weight.
  • The GBU-15(V)1/B is another guided bomb that the F-4E has. It is very similar to the GBU-8, but cannot be launched at supersonic speeds, and so taking these over GBU-8s or AGM-65s are generally not recommended.
  • The AGM-65B Maverick is an air-to-ground missile. This means it has a rocket motor that propels it for a short amount of time, making it more suitable for lower altitude launches where the guided bombs would not have enough altitude to glide to the target. The Maverick is also generally better than the guided bombs at obtaining and holding a track lock on enemy vehicles. In addition, more can be taken (3 can be taken in the place of one bomb). However, the AGM-65 can sometimes be unreliable, such as exploding randomly or losing lock, especially in the case of long range launches (<8 km). Compared to the guided bombs, the Maverick has an anti-tank HEAT warhead, which theoretically should destroy any vehicle it hits but sometimes can fail to kill heavily-armoured MBTs. In addition, being a HEAT warhead and not a bomb, the Maverick doesn't have the blast radius to score critical hits from near misses.

Obtaining a lock can be difficult as the launch parameters for a reliable track lock with the TV-guided weapons put you in the range of most radar-guided SAMs due to the limited zoom of its seeker head. This is especially true with the advent of the highly advanced Pantsir-S1, with SAMs that vastly outrange your weapons. Therefore, in order to properly perform CAS, the SAM vehicles must first be destroyed. For the Pantsir, the most reliable strategy is quick pop-up strikes with the guided weapons. Upon spawning, immediately dive for treetop level as your airspawn is in range of the Pantsir's SAMs. Attempt to use terrain to stay hidden from the SAMs, which are likely located in the enemy's spawn area, while flanking left, right or behind the enemy's spawn. Once around 10 km away from the spawn, turn in and accelerate directly towards the enemy's spawn while staying low. Get as close as you can without being detected; at around 4-5 km, start rapidly climbing to around 500 m, and use the TV sight to attempt to locate any SAMs in the enemy's spawn. At 3-4 km, your TV-guided munitions have a better chance of tracking the enemy, and if you've located a SAM vehicle, launch your weapon. Quickly go defensive by turning away from the spawn while releasing chaff (also turn away if you haven't located any SAMs by 3 km). By any luck, your TV-guided weapon will destroy the SAM. You can circle around and rinse and repeat to attempt to destroy additional SAMs. Once you are sure there are no more SAMs, you can climb to a higher altitude to launch your ordnance against enemy tanks.

AGM-12C Bullpup missiles must be guided with your keyboard, thus highly reducing your situational awareness and aircraft movement while you attempt to guide the missile. Though Bullpups were powerful at lower BRs, at top tier and in a SAM prevalent environment, it is not recommended to use them.

Air-to-air ordnance can be taken, but in a limited amount. Sidewinders can generally be omitted for additional ordnance due to the prevalence of countermeasures at this BR. Additionally, they are of little use against many helicopters such as the Ka-50/52 which have IRCM and countermeasure dispensers that automatically activate upon a missile launch. What does work against helicopters is the radar-guided AIM-7E/E-2 Sparrow. Though the F-4E's radar unfortunately cannot lock on to low-flying aircraft, at top tier, oftentimes helicopters will be flying high enough to be locked onto. Due to the to helicopter's slow speed, the radar will still not lock on to the helicopter until at most <3 km, and sometimes will only lock as close as 1.5 km. At this close range, chaff launches and evasive manoeuvres from the helicopter will not be enough to fool the radar-guided missile. While the M61 cannon can be used to shoot down helicopters, they have tracking-assisted cannons which will likely destroy you if you are spotted. Thus Sparrows are the safer weapon choice against helicopters. Sparrows can also be used against strike drones, which are not hot and difficult to get a Sidewinder lock on. This air-to-air ordnance adds to the SP costs of air to ground loadouts, it's generally worth it to entirely omit or take a reduced loadout of said weapons.

Pros and cons

Pros:

  • Can carry up to eight missiles, allowing a total of four AIM-9Js and AIM-7E-2 (DF) for fighting either manoeuvring aircraft or at close-medium range head-on engagements respectively.
  • Equipped with flares and chaff for evading enemy missiles
  • Can carry a vast range of deadly ground attack ordnance (including fire-and-forget ATGMs and guided bombs)
  • Deadly frontal armament with high burst mass and high damage
  • Has a ballistic computer for assisting in the aim of cannons, rockets, and bombs
  • Better manoeuvrability than most other Phantoms due to slats
  • Best CAS payload out of all US Phantoms

Cons:

  • Susceptible to wing rip, especially when doing negative G manoeuvres or rolls
  • Limited ammunition in the frontally-mounted cannon
  • Large target for aircraft and AA alike
  • Despite having slats, it is still a heavy aircraft which bleeds speed quickly and will struggle in dogfights versus more manoeuvrable opponents
  • Two engines make for a strong heat signature, making it harder to dodge missiles
  • Flight performance suffers immensely when carrying large amounts of ordnance
  • Radar lacks pulse-Doppler or look-down capabilities, meaning it is difficult to lock and engage enemies below the horizon and/or at low altitudes with Sparrows
  • In Air Battles, is often uptiered to top-rank where it can become vastly outclassed in speed, manoeuvrability, and firepower

History

An F-4E of Holloman Air Force base.

The F-4E was initially designed as an incremental upgrade to the standard F-4C airframe used by the US Air Force. The aircraft carried a new radar in a redesigned radome, and more importantly, an internal M61 cannon mounted in the nose. As well, later-production aircraft featured the Agile Eagle upgrade, which gave the Phantom leading edge slats which improved manoeuvrability at the expense of top speed. The addition of an internal cannon was a highly anticipated upgrade, as it fixed a problem that F-4C squadrons faced when operating over Vietnam.

The first F-4Es entered service in the 1960s and were dispatched to serve in Vietnam, where they complemented the existing inventories of F-4C and D variant aircraft. The aircraft type was credited with 21 kills in Vietnam, most of which were achieved using the AIM-7E-2 'Dogfight Sparrow'. Several pilots achieved Ace status while flying the F-4 in Vietnam, including Charles B. DeBellevue, who was the highest-scoring American ace in Vietnam. The F-4 went on to form the backbone of the US fighter force for the bulk of the 1960s and 70s. As well, F-4E was flown by the USAF Thunderbirds Demonstration Team between 1969 and 1974. The large, noisy Phantom performed around the world until 1974, when rising fuel costs forced the Thunderbirds to convert to the smaller T-38 Talon.

The F-4E was exported to a variety of countries. Israel was the largest foreign user of the F-4 Phantom, having purchased 124 F-4 Phantoms from the United States betwen 1971 and 1974; the Israelis were credited with at least 115 kills using the F-4 Phantom during various conflicts. As well, Germany and Japan both procured modified versions of the F-4E, being the F-4F and F-4EJ, respectively. Other notable foreign users of the F-4E include Australia (24 aircraft), Egypt (35 aircraft), Greece (34 aircraft), and Turkey (40 aircraft).

During service, the Phantom gained a number of nicknames, including "Rhino" (referencing its titanium construction and long nose), "Double-Ugly", and even "The world's largest distributor of MiG Parts", referencing the 277 MiGs downed by the Phantom during various conflicts. The USAF retired the aircraft in 1996, and the aircraft was used as a target drone until 2016. The aircraft remains in service with Iran, Japan, South Korea, Greece and Turkey, 62 years after its maiden flight.

Media

Skins
Videos

See also

Related development
Aircraft of comparable role, configuration and era

External links


McDonnell Aircraft Corporation
Jet Fighters  F2H-2 · F3H-2
  F-4C Phantom II · F-4E Phantom II · F-4J Phantom II · F-4S Phantom II
  F-15A
Export/Licensed 
Aircraft  ◄F-4F Early · ◄F-4F · Phantom FG.1 · Phantom FGR.2 · F-4J(UK) Phantom II · F-4EJ Phantom II · F-4EJ ADTW · Kurnass · Kurnass 2000
  Baz · F-15J
  ▄AV-8B Plus
Helicopters  AH-6M · Lahatut
  The McDonnell Aircraft Corporation merged with Douglas Aircraft Company in 1967 to form McDonnell Douglas.
See Also  Mitsubishi Heavy Industries

USA jet aircraft
  Fighters
F-4  F-4C Phantom II · F-4E Phantom II · F-4J Phantom II · F-4S Phantom II
F-5  F-5A · F-5C · F-5E · F-20A
F-8  F8U-2 · F-8E
F-80  F-80A-5 · F-80C-10
F-84  F-84B-26 · F-84F · F-84G-21-RE
F-86  F-86A-5 · F-86F-25 · F-86F-2 · F-86F-35
F-89  F-89B · F-89D
F-100  F-100D
F-104  F-104A · F-104C
F-14  F-14A Early · F-14B
F-15  F-15A
F-16  F-16A · F-16A ADF · F-16C
F9F  F9F-2 · F9F-5 · F9F-8
Other  P-59A · F2H-2 · F3D-1 · F3H-2 · F4D-1 · F11F-1
  Strike Aircraft
FJ-4  FJ-4B · FJ-4B VMF-232
A-4  A-4B · A-4E Early
A-6  A-6E TRAM
A-7  A-7D · A-7E · A-7K
AV-8  AV-8A · AV-8C
A-10  A-10A · A-10A Late
B-57  B-57A · B-57B
F-105  F-105D
F-111  F-111A