F11F-1

From War Thunder Wiki
Jump to: navigation, search
F11F-1
f11f_1_late.png
GarageImage F11F-1.jpg
ArtImage F11F-1.png
360://https://wiki.warthunder.com/images/d/d8/Cockpit_f11f_1_late.jpg
F11F-1
Show in game
MARKET

Description

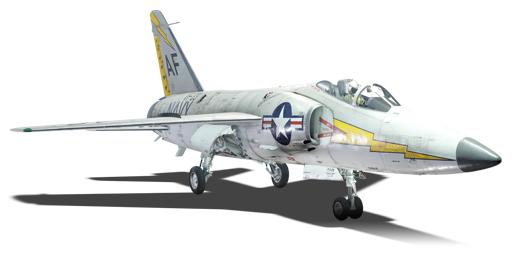
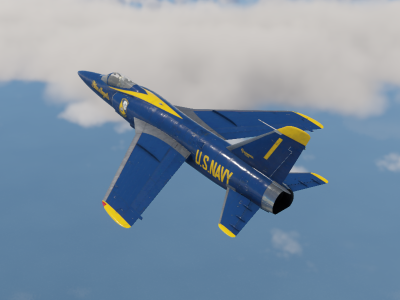
In the early '50s, Grumman began the G-98 project as a privately funded effort to redesign the existing F9F Cougar into a more sleek, high-speed fighter. However, a Cougar redesign was deemed unfeasible and a completely new design was thought of. The G-98 project had a completely different shape compared to the Cougar, utilizing the area rule to reduce drag at transonic speeds. It would also be powered by the Wright J65-18 afterburning turbojet. In 1953, the Navy Bureau of Aeronautics approved an order for two G-98 prototypes. Although a redesign was first thought of, the G-98 project was still called the F9F-9 Cougar until the Navy finally stated it was more than just a Cougar. It was given the designation F11F-1 "Tiger" to keep the Grumman feline naming scheme. The F11F-1 was soon phased out of service after the Vought F-8 Crusader was deemed more reliable and modern for the time, only lasting 4 years in frontline service. Previous orders were canceled, but the F11F-1 did find a home with the Blue Angels flight demo squadron for over a decade.

Introduced during Update "Starfighters" as a reward vehicle for the 2020 Operation S.U.M.M.E.R. event, the F11F-1 Tiger can almost be thought of as a baby Starfighter. At its battle rating, the Tiger is relatively fast and can reach supersonic speeds at level flight (notably at lower fuel). If played with boom and zoom tactics, the F11F-1 is almost untouchable except for uptiers. The four 20 mm Browning-Colt Mk 12 cannons are quite good but players should practice trigger discipline, as the 500 rounds will be expended quickly. However, the F11F-1 is able to carry up to four AIM-9B Sidewinders which are useful for forcing enemies to turn and/or launching at slow or non-manoeuvring targets.

General info

Flight performance

Arrestor gear
Accelerates braking by grabbing the brake cable on the deck of the aircraft carrier
Air brakes
Allows you to dramatically reduce the flight speed by releasing special flaps
Max speed
at 0 m1 213 km/h
Turn time35 s
Max altitude15 240 m
EngineWright J65-W-18
Type
Cooling systemAir
Take-off weight11 t
Top view of the F11F-1.

The F11F-1 Tiger is a supersonic carrier-based jet fighter equipped with the Wright J65-W-18 engine. The plane is able to reach about Mach 1 speed in level speed (climbing may be necessary) making it one of the fastest planes at its battle rating, but getting it past that speed will require some diving. Because of the very high structural speed limit, it basically can dive with an afterburner at any angle and the player will only have to worry about very high speed (Mach .9 or higher) compression.

While other United States supersonic jet fighters like the F-100 or F3H are better at it, the acceleration is decent for this type of plane. The other planes that it will meet at its battle rating will struggle to keep up with it, for example the MiG-17AS, Shenyang F-5 or the German CL-13B Mk.6, especially when the Tiger is flying with 20 or less minutes of fuel.

The F11F is very good at climbing: ~65 m/s at sea level when the plane is fully loaded with no additional armament under its wings and the climb rate increases to 75 m/s with just 20 minutes of fuel. While the engine in this plane does not tend to overheat, the player should still be cautious about flying at full power as the afterburner can be taxing on your fuel load.

The manoeuvrability depends a lot on its speed. When the plane is flying at 500 km/h IAS or below, every subsonic fighter will be able to outturn the F11F, but it gets better once it reaches 700 km/h and above. The best speed for sustained turning is ~650 km/h IAS, at that speed it can perform full horizontal circle at sea level in 24 seconds. The jet can lock up when close to Mach 1, and installing the boosters upgrade is recommended. While it can run circles around something like a Starfighter or F-100, it's not close to a MiG-19, MiG-17 or Sabre in a low speed dogfight. With low fuel, the jet has outstanding acceleration for its tier, and can confidently outrun most of its fighters at the same BR or even some aircraft at higher ones. The turning performance increases to be akin to something like an F-2 Sabre, but this is at <10 minutes of fuel, which you might not see too often in-game.

Its roll rate is as good as in the F-86 series: it can reach up to ~250 degrees per second at its optimal speed, that can make it very hard for the enemy to land some hits on it and make it easier to force the enemy to overshoot.

The airbrake on this plane is questionably effective, and won't help too much even on idle throttle in a straight line. While it can be useful for slowing down when turning, manoeuvring when attempting to land is much more effective. Using flaps can help in a dogfight, but since only landing flaps can be deployed, and they break above 440 km/h, they aren't very effective for landing either.

A group of F11F-1's ready for take off.

In simulator battles, the F11 can fly at much higher angles than with the enabled instructor, making it more capable at high angle attacks and snapshots, but it can also lead to a broken wing if the speed is too high. The other downside is even further decreased turning energy retention which is already quite mediocre at low and medium speeds.

Characteristics Max Speed
(km/h at 0 m - sea level)
Max altitude
(metres)
Turn time
(seconds)
Rate of climb
(metres/second)
Take-off run
(metres)
AB RB AB RB AB RB
Stock 1,198 1,193 15240 36.1 37.0 59.9 55.4 950
Upgraded 1,230 1,213 34.4 35.0 90.1 74.0

Details

Features
Combat flaps Take-off flaps Landing flaps Air brakes Arrestor gear Drogue chute
X X X
Limits
Wings (km/h) Gear (km/h) Flaps (km/h) Max Static G
Combat Take-off Landing + -
1458 447 N/A N/A 500 ~9 ~3
Optimal velocities (km/h)
Ailerons Rudder Elevators Radiator
< 650 < 540 < 620 N/A

Engine performance

Engine Aircraft mass
Engine name Number Basic mass Wing loading (full fuel)
Wright J65-W-18 1 6,627 kg 415 kg/m2
Engine characteristics Mass with fuel (no weapons load) Max Takeoff
Weight
Weight (each) Type 17m fuel 20m fuel 30m fuel 45m fuel 57m fuel
1,320 kg Afterburning axial-flow turbojet 7,532 kg 7,675 kg 8,199 kg 8,985 kg 9,642 kg 10,500 kg
Maximum engine thrust @ 0 m (RB/SB) Thrust to weight ratio @ 0 m (WEP)
Condition 100% WEP 17m fuel 20m fuel 30m fuel 45m fuel 57m fuel MTOW
Stationary 3,077 kgf 4,770 kgf 0.63 0.62 0.58 0.53 0.49 0.45
Optimal 3,077 kgf
(0 km/h)
5,138 kgf
(1,200 km/h)
0.68 0.67 0.63 0.57 0.54 0.49
A group of F11F-1's in a formation.

Survivability and armour

Crew1 person
Speed of destruction
Structural1 458 km/h
Gear447 km/h
  • 38 mm bulletproof glass
  • 12.7 mm Steel plate on pilot's seat
  • 12.7 mm Steel plate in front of pilot

Modifications and economy

Repair costBasic → Reference
AB3 362 → 4 542 Sl icon.png
RB9 366 → 12 653 Sl icon.png
SB10 858 → 14 669 Sl icon.png
Total cost of modifications227 000 Rp icon.png
353 000 Sl icon.png
Talisman cost2 800 Ge icon.png
Crew training200 000 Sl icon.png
Experts710 000 Sl icon.png
Aces2 800 Ge icon.png
Research Aces1 080 000 Rp icon.png
Reward for battleAB / RB / SB
130 / 380 / 600 % Sl icon.png
232 / 232 / 232 % Rp icon.png
Modifications
Flight performance Survivability Weaponry
Mods aerodinamic fuse.png
Fuselage repair
Research:
11 000 Rp icon.png
Cost:
17 000 Sl icon.png
330 Ge icon.png
Mods jet compressor.png
Compressor
Research:
11 000 Rp icon.png
Cost:
17 000 Sl icon.png
330 Ge icon.png
Mods armor frame.png
Airframe
Research:
13 000 Rp icon.png
Cost:
20 000 Sl icon.png
390 Ge icon.png
Mods booster.png
New boosters
Research:
13 000 Rp icon.png
Cost:
20 000 Sl icon.png
390 Ge icon.png
Mods aerodinamic wing.png
Wings repair
Research:
14 000 Rp icon.png
Cost:
22 000 Sl icon.png
420 Ge icon.png
Mods g suit.png
G-suit
Research:
14 000 Rp icon.png
Cost:
22 000 Sl icon.png
420 Ge icon.png
Mods armor cover.png
Cover
Research:
25 000 Rp icon.png
Cost:
39 000 Sl icon.png
740 Ge icon.png
Mods jet engine.png
Engine
Research:
25 000 Rp icon.png
Cost:
39 000 Sl icon.png
740 Ge icon.png
Mods ammo.png
mk_12_mod3_belt_pack
Research:
11 000 Rp icon.png
Cost:
17 000 Sl icon.png
330 Ge icon.png
Mod arrow 1.png
Mods pilon block rocket.png
AERO-6
Research:
11 000 Rp icon.png
Cost:
17 000 Sl icon.png
330 Ge icon.png
Mod arrow 0.png
Mods pilon bomb.png
Mk82
Research:
13 000 Rp icon.png
Cost:
20 000 Sl icon.png
390 Ge icon.png
Mod arrow 1.png
Mods pilon block rocket.png
AERO-7
Research:
13 000 Rp icon.png
Cost:
20 000 Sl icon.png
390 Ge icon.png
Mods weapon.png
mk_12_mod3_new_gun
Research:
14 000 Rp icon.png
Cost:
22 000 Sl icon.png
420 Ge icon.png
Mods air to air missile.png
AIM-9B
Research:
14 000 Rp icon.png
Cost:
22 000 Sl icon.png
420 Ge icon.png
Mods pilon bomb.png
Mk83
Research:
25 000 Rp icon.png
Cost:
39 000 Sl icon.png
740 Ge icon.png

Armaments

Offensive armament

F11F-1 after using its four 20 mm cannons.

The F11F-1 is armed with:

  • 4 x 20 mm Browning-Colt Mk12 Mod 0 cannons, cheek-mounted (125 rpg = 500 total)

Suspended armament

The F11F-1 can be outfitted with the following ordnance:

1 2 3 4
Hardpoints F11F-1.png
500 lb LDGP Mk 82 bombs 1 1 1 1
1,000 lb LDGP Mk 83 bombs 1 1
FFAR Mighty Mouse rockets 7 7, 19 7, 19 7
AIM-9B Sidewinder missiles 1 1 1 1
Maximum permissible weight imbalance: 620 kg
Default weapon presets
  • Without load
  • 2 x AIM-9B Sidewinder missiles
  • 4 x AIM-9B Sidewinder missiles
  • 28 x FFAR Mighty Mouse rockets
  • 38 x FFAR Mighty Mouse rockets
  • 4 x 500 lb LDGP Mk 82 bombs (2,000 lb total)
  • 2 x 1,000 lb LDGP Mk 83 bombs (2,000 lb total)

Usage in battles

Air RB

This plane is an extremely potent support fighter. It is one of the fastest aircraft at its battle rating, which will be your greatest advantage over other fighters. If you are in a full down-tier, no one will be able to catch you if you play it right. In low altitude level flight, the F11 can sustain speeds near (but not quite) Mach 1. Mach 1 cannot be achieved in low altitude level flight (unless at low fuel), but putting the plane in even a small dive at low altitude allows you to go supersonic. Actually passing Mach 1 doesn't give you much of an advantage as you are already faster than many planes you will face. In up-tiers where faster supersonics such as the MiG-19 and early MiG-21 variants can be found, the F11's speed isn't as potent, but if you keep your speed up you will find yourself able to keep up with these faster and more manoeuvrable aircraft. It's worth noting that the F11 compresses substantially near Mach, so if an early air-to-air missile is launched at you at this time, you will need to decide whether to manoeuvre to avoid it, or pitch up to drain it of its likely low energy.

The great speed of the F11 comes at a cost; its dogfighting ability is questionable. The F11 does not turn well compared to its subsonic foes and loses quite a bit of speed while turning, so it is ill-advised to dogfight other enemy fighters as it will most likely result in you losing the dogfight. If dogfighting cannot be avoided, do not horizontally turn-fight; try to use the superior engine power of the F11 in the vertical to gain the energy advantage over a slower opponent.

The four nose-mounted 20 mm Browning-Colt Mk12s have a good fire rate, good ballistics, an adequate ammo pool of 500 rounds, and decent killing power. However, they are inaccurate and prone to jamming when stock. The best belt choice for air combat is not the Air targets belt, but actually the Default belt since it has a better ratio of high explosive shells. If you are comfortable with aiming the guns, Stealth is also a very good option for the higher proportion of high explosive rounds and lack of tracers.

The AIM-9B Sidewinder air-to-air missiles give the F11 a huge advantage over other fighters. The plane starts off with two of them and can carry a maximum of four. These missiles, though easily dodged, can become a very dangerous weapon when used correctly. The main thing that sets the F11 apart from other AIM-9B carriers around its BR such as the A-4 Skyhawk and G.91s is the F11's speed. Because the F11 goes fast, missiles that are launched start off faster than on other planes, which gives them better range. Due to the low G-overload of the AIM-9B, they should not be wasted and should only be used under the right conditions.

The best enemies to engage are usually going to be bombers like the IL-28 and B-57s as they are slow to manoeuvre and easy to catch up to. Fighters that are damaged, or extremely slow as a result from just leaving (or attempting such) an engagement with an enemy fighter are easy picks too, as they can't manoeuvre as much and are much easier to hit. Generally, any enemy unaware of you or in an engagement themselves are obvious targets.

As a general rule of thumb against non-manoeuvring enemies:

  • When approaching a similar speed enemy from behind, AIM-9Bs will be able to hit at a maximum range of around 2 km.
  • When approaching a slightly slower enemy from behind at a fast speed, AIM-9Bs will be able to hit at a maximum range of around 2.25 km.
  • When approaching a very slow enemy at a fast speed, AIM-9Bs will be able to hit at a maximum range of around 3.25 km.
  • At high altitudes (>6 km), the AIM-9B becomes very difficult to dodge without the use of flares due to aircraft losing manoeuvrability and thrust while the missile doesn't. AIM-9Bs will hit enemies at ranges of 3-5 km depending on the speed and altitude of you and the enemy.

Ideal launch conditions (assuming you are in ideal launch range):

  • You are behind an enemy who is unaware of you or distracted by a target in front of them. You should use the missile to hit them at longer ranges. Launching at longer ranges increases the chance the unaware enemy doesn't see you and the incoming missile.
  • An enemy is very slow/stalling out. Aircraft need speed to dodge even the "weakest" of air-to-air missiles, so slow jets are prime targets for your missiles.
  • An enemy has gone fully vertical. Aircraft are losing speed constantly in a vertical and will have some difficulty dodging your missile.
  • You are behind any enemy at high altitude.
  • You are behind an aircraft that is faster and that you want to catch up to. Even if they are aware of your missile and dodge it, they will lose some speed, which may put them in your gun range. If they are a much faster aircraft and are far in front of you (>1.5 km), then don't do this as they will simply regain the lost speed back, and you will have wasted a missile.

Unideal launch conditions:

  • You are not in ideal launch range (as indicated above).
  • You are behind an enemy who is aware you are there. There doesn't tend to be much purpose in wasting a missile on someone who will easily dodge it because they know it's coming.
  • You are behind an enemy in front of you who is in the process of turning. Don't waste a missile if the enemy is already turning; AIM-9Bs don't turn well and will not follow the enemy in their turn.
  • You are behind an enemy who is flying into the sun.
  • Your intended target's engine exhaust is very close to that of a friendly's. Don't risk the teamkill.

The F11 is able to carry some air-to-ground ordnance, but it isn't the best. It can take a maximum of four 500 lb bombs, two 1,000 lb bombs, or 76 FFAR rockets. The bomb loads are pretty small and generally shouldn't be taken unless it's late game and you need to lower the enemy's tickets by bombing pillboxes or finishing off a damaged base. The FFAR rockets are pretty hard to aim and so taking them is generally not recommended.

In a full down-tier, the F11 is pretty much untouchable thanks to its great speed. If there are some friendly strike aircraft (commonly many A-4Es), you will want to rush in full speed to support them because they are, after all, a part of your team. If they all end up dying, you can simply run away with hopefully a kill or two. Ideally, you will want to find a furball and use your great speed to rush in, missile or gun down a vulnerable enemy, and rush out. Speed away, make sure no one is following you, and turn back in to rinse and repeat. Be wary of Sea Vixens; they are fast subsonics than can keep up with you if you aren't at your top speed, and their missiles can be difficult to dodge.

In an up-tier, you are still hard to catch, but no longer untouchable. There are a few aircraft to worry about: MiG-19s, early MiG-21 variants, and T-2s can outspeed and outturn you, and Yak-38s have difficult to dodge missiles, though you can dogfight them easily. If a MiG-19, 21 or T-2 gets on your six, your best bet is to push them into a scissors, where you can airbrake behind them to hopefully get a firing opportunity on them before you are left slow and vulnerable. If they also airbrake or go vertical, your luck will run out, and you will probably die. Your worst nightmare is J35As, which you can't outrun and definitely can't outturn; if one gets on your six, consider yourself dead. Don't be the first to the battlefield where you will be alone and a prime target for these aircraft; let them engage slower turn-fighters first, then swoop in and kill them while they're distracted, using your speed to make yourself a hard to catch target. Again, if one decides to focus you, you will have to resort to the options above, which are only last-ditch efforts, so try not to have them notice you.

In a full up-tier, you will want to play very cautiously. Certain aircraft are a great threat to you; Harrier GR.1s and A-5Cs can descend from space and launch very hard to dodge missiles at you. MiG-21 SPS-Ks have difficult to dodge missiles and also have much better performance in basically every way (unlike the Yak-38). You will want to fly low and keep your speed up so these aircraft don't find the lengthy process of catching up to you worth it.

The F11 has a high landing speed and no drag parachute, so it takes a very long time to come to a stop on the runway. Due to this, it may be more convenient to attempt a belly-landing as the increased friction will slow the aircraft's speed more quickly.

SB EC

In simulator battles, when used in EC6 bracket, the plane is a very capable fighter. It is the most capable at hit-and-run tactics and high speed vertical manoeuvres, it is also decent at sustained horizontal turning when its speed is above 650 km/h IAS. The player should however be careful when performing them: some of the jets in this bracket are equipped with missiles which are not able to hit a turning target in most cases but once the plane gets slow or stops turning, they will easily destroy it. It is best to take off from some airfield close to the edge of the map with 45 minutes of fuel (since turning with anyone will end up badly for the plane and huge fuel consumption that can be a problem), reach at least 800 km/h IAS in level flight and start climbing to between 2000 and 4000 m altitude. Flying at this altitude is very important: the plane will have a lot of space for manoeuvres and thus be able to make the most of its good level speed performance. This will make sure the F11F is not easily shot down unlike at lower altitude where it can not really get away by diving and where any zoom climbing attempt can also end up badly because of planes that can carry missiles.

At very high speed, the plane does not suffer from compressibility issues and it can easily get a proper lead on its target. It has an amazing forward cockpit visibility with a gunsight whose reticle is projected on the armoured frontal glass. This is a gyro gunsight so there is an additional circle that can help with leading your shots. It is also connected to the rangefinder radar which can also be used to check the distance to the target and launch the missile from the proper distance (around 2 km), depending on how fast the enemy is. Since the best missile that the enemies can use is the AIM-9B or the Russian and Chinese equivalents, the best way to avoid them is to just pull 5-6G turns for a few seconds at very high speed. Reducing the engine power against this kind of missile is optional, as long as the plane keeps turning it will no be able to hit it anyway.

Against the MiG-15 and 17 and other similar jets without missiles, the best tactics is just to either boom and zoom them, or in the defensive situation to start running in a straight line, get some distance between two planes, then use the superior climb rate to get above it and proceed to boom and zooming the enemy. Any dogfighting will end up very badly: its very bad turning energy retention when the plane starts flying at high angle of attack and worse sustained turn rate will lead to losing the fight in a few seconds.

F11F-1 shooting down a Tu-4.

When fighting the Shenyang F-5 or MiG-17AS or any other planes with missiles, it is best to not allow them to get behind the Tiger (your excellent cockpit visibility will help you detect when it happens). While they can be avoided, it is still risky and can lead to the plane slowing down and becoming an easy target for higher manoeuvrable fighters. One of the tactics is to make the enemy waste all his missiles by baiting them into launching the missile by running away and pulling a few G (depends on the speed, 4-5G works at ~700 km/h TAS, at higher speed you need more G), then avoiding them. For example both MiG-17 variants are able to carry only two of them. Once they run out of missiles, deal with them like with any other jet fighter. The only exception is the Yak-38: it also carries the R-60 missiles which have much higher tracking ability and can pull much more G but its manoeuvrability is even worse, so it can be outturned in any situation, especially after forcing it to prolonged turning: its energy retention is awful.

There are a few fighters that can be beaten by dogfighting at high speed, most of British fighters like the Scimitar or Hunter F.1 are worse at turning, especially at low speed. They also will not be able to escape: in the case of the Scimitar the level speed is almost the same, but it does have better climb rate performance and acceleration. When it starts to run, it is the best to launch the missile and force it to slow down. Both Supermarine Swifts are also inferior to the F11F in both turn rate and flight performance. The other nation with fighters worse at both turning and flight performance is France, the Super Mystèe B2 and Étendard IVM still can pose a treat, both are able to carry missiles. The first one has an engine with afterburner, this way it can be spotted from a few kilometres away, it is also as fast as the F11F. The other one does not have access to it, however its climbing performance and level acceleration are superior to the Super Mystère and the Tiger.

Radars

The F11F-1 is equipped with an AN/APG-30 rangefinding radar, located in the nose of the aircraft. It will automatically detect other planes within the scanning area and display the range to the closest target. It is linked with a gyro gunsight and can help with aiming at close range.

AN/APG-30 - Rangefinding radar
Maximum
Tracking
Range
Minimum
Tracking
Range
Azimuth Tracking
Angle
Elevation Tracking
Angle
2,750 m 300 m ±9° ±9°

Pros and cons

F11F-1 landing.

Pros:

  • Very high top speed
  • Good acceleration
  • Outstanding roll rate
  • Has access to 4x AIM-9B sidewinder missiles
  • Good cannon armament with high velocity and decent fire rate and damage

Cons:

  • Poor energy retention; loses tons of speed in turns
  • Poor turn time
  • No takeoff or combat flaps, only landing flaps
  • Significant compression when approaching Mach 1
  • High stall speed means long takeoff/landing distance (additionally, doesn't have a drogue chute)

History

The F11F Tiger was a carrier-based fighter aircraft used by the US Navy between 1955 and 1968. The aircraft was originally designed as an advanced derivative of the F9F Panther, but soon became a completely new design. The aircraft has the distinction of being the second supersonic navy aircraft, after the F4D Skyray. F11F aircraft served in operational units between 1957 and 1961, while trainer variants served into the early 1970s. The aircraft also enjoyed a long service life with the Blue Angels demonstration team, which used the aircraft from 1957 to 1968 when it was superseded by the McDonnell Douglas F-4 Phantom II.

Design and Development

An F11F-1 Tiger on board of USS Ranger.

The F11F Tiger had its origins in an advanced variant of the F9F Panther, by incorporating new technological advances to allow for higher speeds. However, the design had changed so much by 1953 that the aircraft no longer bore any resemblance to its older cousin, despite having an initial designation of F9F-9. The aircraft had full-length leading-edge slats and rear flaps on the swept wing, and utilized a pair of spoilers for roll control. The aircraft also had an all-moving tail to improve turning ability at higher speeds. It was fitted with the Wright J65 turbojet, a license-built version of the Armstrong-Siddeley Sapphire.

The US Navy had considerable interest in such a fighter, and thus, two prototypes were ordered. The aircraft almost went supersonic on the first flight, despite having a non-afterburning engine due to delays with the readiness of the J65. The second prototype was fitted with the afterburning J65, and became the second supersonic US Navy aircraft after the F4D Skyray. Carrier trials were started in 1956, when an F11F-1 Tiger landed on the deck of the USS Forrestal.

Operational Service

The F11F-1 Tiger entered service in early 1957, operating from Essex-class and Forrestal-class carriers. However, it was retired in 1961 after just four years of service, as the aircraft's performance was inferior to the F8U Crusader. A total of 199 F11F-1 Tigers were built, while the remaining 231 aircraft on order were cancelled. The F11F-1 Tiger also enjoyed a longer service life with the Blue Angels, which started using them from 1957. They would fly with the demonstration team until 1968, when they were replaced by the F-4 Phantom II.

The F11F-1 Tiger also had the unfortunate distinction of being the first jet aircraft to shoot itself down. In 1956, during a test-firing of the aircraft's cannons, test pilot Tom Attridge fired the aircraft's cannons in a dive, only to run into the bullets as the F11F's trajectory passed the rounds. The aircraft was damaged, forcing him to crash-land; he survived. Following the end of operational service, several F11F-1 aircraft were used as advanced trainers to prepare pilots for flying supersonic aircraft; these trainers went on to serve into the 1970s, when they were retired and replaced with the T-38 Talon.

Media

Skins
Videos

See also

External links


Grumman Aircraft Engineering Corporation
Fighters 
F3F  F3F-2 · Galer's F3F-2
F4F Wildcat  F4F-3 · F4F-4
XF5F Skyrocket  XF5F · XP-50
F6F Hellcat  F6F-5 · F6F-5N
F7F Tigercat  F7F-1 · F7F-3
F8F Bearcat  F8F-1 · F8F-1B
Jet Fighters 
F9F Panther/Cougar  F9F-2 · F9F-5 · F9F-8
F-11 Tiger  F11F-1
F-14 Tomcat  F-14A Early · F-14B
Jet Strike Aircraft 
A-6 Intruder  A-6E TRAM
Bombers  TBF-1C
Export  ▄Martlet Mk IV · ▄F6F-5 · ▄F6F-5N · ▄F8F-1B · ▄Avenger Mk II · ▄Hellcat Mk II

USA jet aircraft
  Fighters
F-4  F-4C Phantom II · F-4E Phantom II · F-4J Phantom II · F-4S Phantom II
F-5  F-5A · F-5C · F-5E · F-20A
F-8  F8U-2 · F-8E
F-80  F-80A-5 · F-80C-10
F-84  F-84B-26 · F-84F · F-84G-21-RE
F-86  F-86A-5 · F-86F-25 · F-86F-2 · F-86F-35
F-89  F-89B · F-89D
F-100  F-100D
F-104  F-104A · F-104C
F-14  F-14A Early · F-14B
F-15  F-15A
F-16  F-16A · F-16A ADF · F-16C
F9F  F9F-2 · F9F-5 · F9F-8
Other  P-59A · F2H-2 · F3D-1 · F3H-2 · F4D-1 · F11F-1
  Strike Aircraft
FJ-4  FJ-4B · FJ-4B VMF-232
A-4  A-4B · A-4E Early
A-6  A-6E TRAM
A-7  A-7D · A-7E · A-7K
AV-8  AV-8A · AV-8C
A-10  A-10A · A-10A Late
B-57  B-57A · B-57B
F-105  F-105D
F-111  F-111A