F-14B

From War Thunder Wiki
Jump to: navigation, search
VTOL | Rank 5 USA
AV-8A Harrier Pack
This page is about the American jet fighter F-14B. For the other version, see F-14A Early.
F-14B
f_14b.png
GarageImage F-14B.jpg
F-14B
Research:410 000 Specs-Card-Exp.png
Purchase:1 100 000 Specs-Card-Lion.png
Show in game

Description

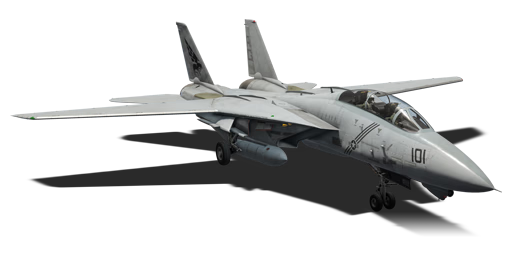
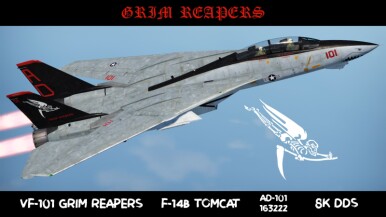
Even before the F-14 had its first test flight, Grumman knew the F-14A's performance would be underwhelming due to its TF-30 engines. This, as well as the VAX-2 specification sent out by the US Navy during the 1980s, led to the F-14B. The F-14B was a huge improvement over the F-14A in almost every aspect. New avionics, systems, engines, and much more were done on the F-14B. One of the upgrades included the addition of the AN/AXX-1 Television Camera System (TCS), for IFF purposes. The F-14B's main upgrade were the engines: General Electric F110-GE-400s replaced the TF-30s and massively improved the performance in essentially every aspect. The range, top speed, and turn rate were significantly improved, which meant the F-14B was far more suitable for carrier operations than the F-14A.

Introduced in Update "La Royale", the F-14B Tomcat is an extremely capable aircraft. The F-14B is essentially a heavily upgraded F-14A. With new engines, avionics, and weapons, the F-14B is a much more potent aircraft. It gets access to AIM-9L Sidewinders, AIM-7M Sparrows, and AIM-54C Phoenixes, which is a big improvement over the F-14A's armament. Furthermore, the General Electric engines make the F-14B far more competent in dogfights compared to the F-14A. The F-14B is also more capable for ground attack thanks to the addition of the Paveway II guided bomb.

General info

Flight performance

Arrestor gear
Accelerates braking by grabbing the brake cable on the deck of the aircraft carrier
Air brakes
Allows you to dramatically reduce the flight speed by releasing special flaps
Max speed
at 10 668 m2 215 km/h
Turn time24 s
Max altitude16 764 m
Engine2 х General Electric F110-GE-400
TypeJet
Cooling systemAir
Take-off weight34 t

Describe how the aircraft behaves in the air. Speed, manoeuvrability, acceleration and allowable loads - these are the most important characteristics of the vehicle.

Characteristics Max speed
(km/h at 10,668 m)
Max altitude
(metres)
Turn time
(seconds)
Rate of climb
(metres/second)
Take-off run
(metres)
AB RB AB RB AB RB
Stock 2,191 2,181 16764 24.4 24.5 195.5 188.7 750
Upgraded 2,238 2,215 23.6 24.0 256.6 224.8

Details

Features
Combat flaps Take-off flaps Landing flaps Air brakes Arrestor gear Drogue chute
X
Limits Wings (km/h) Gear (km/h) Flaps (km/h) Max Static G
Combat Take-off Landing + -
Min sweep 1,359 518 1,200 873 416 ~10 ~5
Max sweep 1,555 ~11 ~5
Optimal velocities (km/h)
Ailerons Rudder Elevators Radiator
< 1,200 < 850 < 1,800 N/A

Engine performance

Engine Aircraft mass
Engine name Number Basic mass Wing loading (full fuel)
General Electric F110-GE-400 2 19,663 kg 514 kg/m2
Engine characteristics Mass with fuel (no weapons load) Max Gross
Weight
Weight (each) Type 16m fuel 20m fuel 30m fuel 45m fuel 53m fuel
1,897 kg Afterburning low-bypass turbofan 21,868 kg 22,399 kg 23,766 kg 25,818 kg 27,013 kg 33,593 kg
Maximum engine thrust @ 0 m (RB/SB) Thrust to weight ratio @ 0 m (WEP)
Condition 100% WEP 16m fuel 20m fuel 30m fuel 45m fuel 53m fuel MGW
Stationary 6,200 kgf 10,230 kgf 0.93 0.91 0.86 0.79 0.76 0.61
Optimal 6,428 kgf
(1,200 km/h)
13,610 kgf
(1,200 km/h)
1.24 1.22 1.15 1.05 1.00 0.81

Survivability and armour

Flares/Chaff
Aircraft countermeasures to distract IR and radar-guided missiles and also AA radar
Crew2 people
Speed of destruction
Structural0 km/h
Gear518 km/h

Examine the survivability of the aircraft. Note how vulnerable the structure is and how secure the pilot is, whether the fuel tanks are armoured, etc. Describe the armour, if there is any, and also mention the vulnerability of other critical aircraft systems.

Modifications and economy

Repair costBasic → Reference
AB2 807 → 4 432 Sl icon.png
RB8 102 → 12 793 Sl icon.png
SB9 540 → 15 063 Sl icon.png
Total cost of modifications309 000 Rp icon.png
470 000 Sl icon.png
Talisman cost3 200 Ge icon.png
Crew training310 000 Sl icon.png
Experts1 100 000 Sl icon.png
Aces3 600 Ge icon.png
Research Aces1 350 000 Rp icon.png
Reward for battleAB / RB / SB
90 / 320 / 500 % Sl icon.png
256 / 256 / 256 % Rp icon.png
Modifications
Flight performance Survivability Weaponry
Mods jet compressor.png
Compressor
Research:
10 000 Rp icon.png
Cost:
15 000 Sl icon.png
440 Ge icon.png
Mods booster.png
New boosters
Research:
10 000 Rp icon.png
Cost:
15 000 Sl icon.png
440 Ge icon.png
Mods aerodinamic wing.png
Wings repair
Research:
11 000 Rp icon.png
Cost:
17 000 Sl icon.png
480 Ge icon.png
Mods jet engine.png
Engine
Research:
17 000 Rp icon.png
Cost:
26 000 Sl icon.png
750 Ge icon.png
Mods aerodinamic fuse.png
Fuselage repair
Research:
10 000 Rp icon.png
Cost:
15 000 Sl icon.png
440 Ge icon.png
Mods night vision device.png
NVD
Research:
10 000 Rp icon.png
Cost:
15 000 Sl icon.png
440 Ge icon.png
Mods armor frame.png
Airframe
Research:
10 000 Rp icon.png
Cost:
15 000 Sl icon.png
440 Ge icon.png
Mods g suit.png
G-suit
Research:
11 000 Rp icon.png
Cost:
17 000 Sl icon.png
480 Ge icon.png
Mods armor cover.png
Cover
Research:
17 000 Rp icon.png
Cost:
26 000 Sl icon.png
750 Ge icon.png
Mods pilon block rocket large.png
LAU-10/A
Research:
10 000 Rp icon.png
Cost:
15 000 Sl icon.png
440 Ge icon.png
Mods thermal sight.png
LANTIRN
Research:
10 000 Rp icon.png
Cost:
15 000 Sl icon.png
440 Ge icon.png
Mod arrow 0.png
Mods heli false thermal targets.png
Flares/Chaff
Research:
10 000 Rp icon.png
Cost:
15 000 Sl icon.png
440 Ge icon.png
Mod arrow 0.png
Mods ammo.png
M60_belt_pack
Research:
10 000 Rp icon.png
Cost:
15 000 Sl icon.png
440 Ge icon.png
Mod arrow 0.png
Mods pilon bomb.png
Mk82
Research:
10 000 Rp icon.png
Cost:
15 000 Sl icon.png
440 Ge icon.png
Mod arrow 0.png
Mods laser guided bomb.png
GBU-12
Research:
10 000 Rp icon.png
Cost:
15 000 Sl icon.png
440 Ge icon.png
Mod arrow 0.png
Mods heli false thermal targets.png
Flares/Chaff BOL
Research:
10 000 Rp icon.png
Cost:
15 000 Sl icon.png
440 Ge icon.png
Mod arrow 0.png
Mods air to air midrange missile.png
AIM-7M
Research:
10 000 Rp icon.png
Cost:
15 000 Sl icon.png
440 Ge icon.png
Mod arrow 0.png
Mods weapon.png
M60_new_gun
Research:
11 000 Rp icon.png
Cost:
17 000 Sl icon.png
480 Ge icon.png
Mods pilon bomb.png
Mk83
Research:
11 000 Rp icon.png
Cost:
17 000 Sl icon.png
480 Ge icon.png
Mod arrow 0.png
Mods laser guided bomb.png
GBU-16
Research:
11 000 Rp icon.png
Cost:
17 000 Sl icon.png
480 Ge icon.png
Mod arrow 0.png
Mods air to air missile.png
AIM-9L
Research:
11 000 Rp icon.png
Cost:
17 000 Sl icon.png
480 Ge icon.png
Mods air to air midrange missile.png
AIM-54A
Research:
11 000 Rp icon.png
Cost:
17 000 Sl icon.png
480 Ge icon.png
Mod arrow 0.png
Mods jet engine extinguisher.png
EFS
Research:
17 000 Rp icon.png
Cost:
26 000 Sl icon.png
750 Ge icon.png
Mods pilon bomb.png
Mk84
Research:
17 000 Rp icon.png
Cost:
26 000 Sl icon.png
750 Ge icon.png
Mods laser guided bomb.png
GBU-10/24
Research:
17 000 Rp icon.png
Cost:
26 000 Sl icon.png
750 Ge icon.png
Mods air to air midrange missile.png
AIM-54C
Research:
17 000 Rp icon.png
Cost:
26 000 Sl icon.png
750 Ge icon.png

Armaments

Ballistic Computer
CCIP (Guns) CCIP (Rockets) CCIP (Bombs) CCRP (Bombs) EEGS
alt={{{alt}}} alt={{{alt}}} alt={{{alt}}} alt={{{alt}}} alt={{{alt}}}

Offensive armament

Main article: M61A1 (20 mm)

The F-14B is armed with:

  • 1 x 20 mm M61A1 cannon, cheek-mounted (676 rpg)
  • 60 x countermeasures

Suspended armament

The F-14B can be outfitted with the following ordnance:

1 2 3 4 5 6 7 8
Hardpoints F-14A Early.png
500 lb LDGP Mk 82 bombs 8 6
500 lb Mk 82 AIR bombs 8 6
1,000 lb LDGP Mk 83 bombs 2 2
1,000 lb Mk 83 AIR bombs 2 2
2,000 lb LDGP Mk 84 bombs 2 2
2,000 lb LDGP Mk 84 Air bombs 2 2
957 kg GBU-10 Paveway II bombs 2
1,092 lb GBU-16 Paveway II bombs 2 2
277 kg GBU-12 Paveway II bombs 2 2
2,000 lb GBU-24 Paveway III bombs 1 1
Zuni Mk32 Mod 0 ATAP rockets 8 8
AIM-7M Sparrow missiles 1 2 1, 2 1
AIM-9L Sidewinder missiles 1* 1* 1* 1*
AIM-54A Phoenix missiles 1 2 2 1
AIM-54C Phoenix missiles 1 2 2 1
Countermeasures 160* 160* 160* 160*
LANTIRN targeting pod 1
280 gal drop tanks 1 1
* AIM-9L missiles can be equipped with countermeasures on the same hardpoint
LANTIRN targeting pod must be equipped when carrying guided bombs
Single AIM-7M missile on hardpoint 5 cannot be equipped with GBU-10 or GBU-24 bombs on hardpoint 4
Dual AIM-7M missiles on hardpoint 5 cannot be equipped with marked options on hardpoint 4
Default weapon presets
  • 2 x 280 gal drop tanks
  • 2 x AIM-9L Sidewinder missiles
  • 4 x AIM-9L Sidewinder missiles
  • 4 x AIM-9L Sidewinder missiles + 640 x countermeasures
  • 6 x AIM-7M Sparrow missiles
  • 6 x AIM-54A Phoenix missiles
  • 6 x AIM-54C Phoenix missiles
  • 14 x 500 lb LDGP Mk 82 bombs (7,000 lb total)
  • 14 x 500 lb Mk 82 AIR bombs (7,000 lb total)
  • 4 x 1,000 lb LDGP Mk 83 bombs (4,000 lb total)
  • 4 x 1,000 lb Mk 83 AIR bombs (4,000 lb total)
  • 4 x 2,000 lb LDGP Mk 84 bombs (8,000 lb total)
  • 4 x 2,000 lb LDGP Mk 84 Air bombs (8,000 lb total)
  • 2 x 957 kg GBU-10 Paveway II bombs (1,914 kg total)
  • 4 x 277 kg GBU-12 Paveway II bombs (1,108 kg total)
  • 4 x 1,092 lb GBU-16 Paveway II bombs (4,368 lb total)
  • 2 x 2,000 lb GBU-24 Paveway III bombs (4,000 lb total)
  • 16 x Zuni Mk32 Mod 0 ATAP rockets

If you are flying the F-14B, then you most likely have experience with the previous F-14A and thus are aware of the F-14's wide variety of missile loadout options. Like the F-14A, the F-14B can carry a maximum of four AIM-9 Sidewinders, though two of these can be substituted for AIM-7 Sparrows or AIM-54 Phoenixes. Just like the F-14A, there are also four centerline hardpoints dedicated for Sparrow or Phoenix missiles.

Unlike the previous F-14A which only has 60 countermeasures, the F-14B can unlock extra countermeasure pods with 160 countermeasures that can be carried on the wing pylons in conjunction with a sidewinder missile. Since there are two dedicated Sidewinder pylons on the F-14, the aircraft can have a massive total of 380 countermeasures without sacrificing any hardpoints for Sparrows or Phoenixes. If one opts to take four Sidewinders, they will be able to carry a grand total of 680 countermeasures. Therefore, don't be afraid to take a half chaff/flare loadout and/or turn on periodic flares. It is highly recommended to take these pods once unlocked; the minimal weight of the extra countermeasure pods and no hardpoint penalty for taking them means they are very much worth it. Keep in mind of the one downside of these pods: it launches countermeasures behind the aircraft, not downwards and/or away. Thus, it may be slightly more difficult to flare off IR missiles launched at shorter ranges.|}

Usage in battles

Air Realistic Battles

Beyond Visual Range (BVR) Combat

As one of the only two aircraft with active radar homing missiles in the game, the F-14B has some unique tactics when it comes to radar missile combat.

The most obvious and advantageous feature of the AIM-54 is that it is an active radar homing missile, and thus it is, to an extent, "fire-and-forget". Unlike other aircraft, which have to stay pointed in the general direction of their target to guide SARH missiles, the F-14 can theoretically completely turn away once AIM-54s are launched. However, just because you can doesn't mean you should.

Before we get to this, let's break down in basic terms how the AIM-54C works. The AIM-54's own radar only activates in its terminal phase (<16 km). When launched at longer ranges, it relies on datalink (DL) and inertial guidance (IOG) to guide itself towards the target. The former, DL, allows the missile to obtain periodic guidance information from the parent F-14's radar, even from track while scan (TWS) mode. This is what allows the F-14 to launch multiple AIM-54s at multiple targets; each AIM-54 can obtain data link information for their respective targets while the F-14's radar is in TWS mode. The latter, IOG, means that if the missile were to lose guidance from the parent F-14, then the missile would travel towards the last known predicted location of the enemy aircraft in the hopes that it can get close enough for its own onboard radar to pick up and track the target.

So, while you could theoretically launch AIM-54s towards the enemy and then turn away, it would only be relying on inertial guidance and thus would be very unreliable.

As for guiding the AIM-54 in with your radar, you have a couple different options, both with their own set of pros and cons. A TWS "soft lock" has its advantages; it doesn't alert the enemy's radar warning receiver, allows multiple targets to be fired on, and while you are tracking a target you can still scan for other targets, thus providing excellent situational awareness. At the same time, however, it does have some disadvantages. It can track a target while you manoeuvre, but it is prone to locking another target and is unreliable. Additionally, if a solid lock is quickly needed, it could accidentally lock another target, potentially compromising an engagement. The other option is to fully lock the target, which gives a much more reliable track. If the target starts notching, you can quickly switch the radar mode from PD to SRC to counter the notch and maintain the lock. Of course, since it is a solid lock, you won't be able to scan for other targets, and you can't provide guidance for other AIM-54s you have already launched.

All air-to-air missiles are more effective at higher altitudes, as the air is thinner and thus the drag on the missile is reduced, while the reduction in air density reduces lift and thus manoeuvrability of aircraft. This holds especially true for the AIM-54, which is programmed to "loft" itself towards targets at longer ranges. This means that, for targets at longer ranges, it flies at an upwards angle (rather than straight) towards the enemy. This will bring it into the aforementioned less dense air, thus increasing its range and speed. Once the missile is close enough to the enemy, it will descend from altitude, attaining maximum speed and manoeuvrability while falling on top of the enemy. Due to this, the AIM-54 has the most range when launched at higher altitudes (>6 km). While its advertised maximum range of 150 kilometers is over-exaggerated (like most other air-to-air missiles), the AIM-54 still has the longest range of any air-to-air missile in game. A very high altitude launch (>8 km) on a non-manoeuvring enemy at lower altitude will still hit at ranges up to 80 kilometers. This can be useful in enduring confrontation maps, as you can quickly and easily take out enemy AI aircraft at long range, which travel in a mostly straight line and don't manoeuvre much.

However, for fighters piloted by real human beings, launches at high altitude and at around 37-43 kilometers from the target will prove the most lethal; at this range, the missile's rocket motor will burn for most of the flight time, only burning out when it gets near the target. TThis will allow it to have its maximum speed and manoeuvrability, increasing its lethality. In addition, with the rocket motor burned out, it will be invisible to the enemy as it approaches, making it more difficult to dodge. And the launch range will allow it to outrange even R-27ERs provided the proper defensive manoeuvres are performed. While the AIM-54C only has 17G of manoeuvrability, it does have an extremely high top speed of mach 5. These two factors combined are typically enough to reliably hit any target not actively manoeuvring to dodge the missile. Thus,the missile is useful to clear higher altitudes of enemies, as it at least forces enemy fighters at high altitude to defend and lose energy and/or positioning.

Missile Jousting Techniques

After launching a radar-guided missile at medium to long ranges, it is advised to crank to one side. To crank means to turn almost (but not) fully sideways, so that you are flying almost perpendicular to the enemy. This has numerous advantages over simply flying straight in.

  • By flying almost sideways to the enemy, you are significantly reducing the speed at which you and the enemy's missile are approaching each other, while also forcing the missile to manoeuvre that much further ahead of your aircraft to hit it. These factors combined make the missile have a longer flight time and thus significantly reduces its effectiveness. In addition, if you decrease altitude while also cranking, you are also dragging the missile down into denser air, further reducing its effectiveness.
  • Radars in the nose can rotate sideways to a certain degree (for example, the F-14Bs AWG-9 system can keep an enemy locked until they are somewhere around 80 degrees to the right or left of your nose), so you can go almost perpendicular without breaking lock. In a crank, you are still holding a radar lock at the edge of your radar's rotation limit (or gimbal limit) to guide your own missile in.
  • If needed, you can quickly transition from almost perpendicular to fully perpendicular to achieve a defensive notch against pulse-Doppler radars, and you can go cold (fully turn away from the incoming missile) quicker than if you were flying straight. Note that these manoeuvres will put the enemy outside your radar's gimbal limit, which will break radar lock and thus trash any SARH missiles you have been guiding.
  • As was just mentioned, going defensive will cause you to lose your own radar lock. However, this is where the AIM-54s main advantage kicks in; once you've provided a long enough lock for the AIM-54 to track the enemy with its own radar, you can go defensive to break the enemy's missile lock while your AIM-54 is still guiding itself.
  • If needed, you can quickly point the nose at the enemy to launch further AIM-7s or AIM-54s before cranking again to avoid enemy missiles. Provided there is no incoming threat (either the enemy didn't launch, your crank/defensive manoeuvres defeated the missile, or their missile lost lock while they were defending), you can push closer to the enemy to increase the probability your missile will hit the enemy.

In conclusion, cranking will allow you to dramatically decrease the energy of the enemy missile while also allowing you to guide your own missile in. The positioning from the crank also allows you to easily launch further missiles or go defensive against enemy missiles. Usually, just the crank is enough to defeat weaker radar-guided missiles such as Skyflashes or AIM-7Es launched at longer ranges, but further steps must be taken to defeat the more powerful AIM-7F/Ms and R-27s, such as hitting the notch and dropping chaff once the enemy missile begins to get close.

Dogfighting

With the abundance of potent air-to-air missiles, jet dogfighting at top tier air RB is uncommon, but certainly not absent. As for the F-14, it may have been built as a large and heavy missile-carrying interceptor, but do not be fooled; the F-14B is also a supremely capable dogfighter which, if flown correctly, has the performance to out-manoeuvre nearly every fighter in the game. However, this is much easier said than done, as the plane itself will not do all the work. Proper tactics, energy management, and utilization of the F-14's flaps and variable sweep wings are required to get this fighter to perform in a dogfight.

Flaps

Usage of the F-14B's flaps is critical in dogfights. With the flaps completely up, the F-14B can attain higher speeds outside of dogfights, though at this flap state the plane will not be at its full manoeuvring potential. Generally, during dogfights, it is preferable to set the flaps to "combat", as this significantly boosts both F-14B's instantaneous and sustained turn rates. Energy retention at this flap state, while lowered, is still sufficient, and the combination of turn and energy retention will make this flap state ideal for two-circle rate fights. The combat flaps can be extended at very high speeds, and thus pilots should not be worried about them falling off. In some cases, the flaps can be brought back up to increase energy retention and gain back energy. Setting the flaps to "takeoff" will further increase manoeuvrability at the expense of additional energy retention. The "landing" flaps gives the F-14B its fastest turn rate and tightest turning circle, but at the expense of greatly diminished energy retention. These flaps should be used at lower speeds, ideally in one-circle fights or if you are behind the enemy. It should be noted that in the "landing" configuration, the flaps have a much lower speed tolerance than the other configurations. Go above 400 km/h with these flaps down, and you risk breaking them off, so be careful.

If it wasn't clear already, it is important to keep these flaps on, as if you do lose your flaps, you will greatly damage your dogfighting capability, not to mention the loss of dogfighting position that comes from the force of the flaps breaking off. If you've lost your flaps but sense you will eventually have to dogfight the enemy, it is best to go back to your airfield to get them repaired. If you end up locked in a dogfight without flaps, your best bet would be to keep your speed up and attempt a two-circle rate fight. Without it's flaps, the F-14B's AOA (angle of attack) is not sufficient for one circle fights, so in most cases, do not attempt them.

The Two-Circle (Rate Fight)

The F-14B's main advantage in a dogfight is its excellent energy retention and sustained turn rate. These can be used to great extent in a two-circle rate fight, which will be the preferred type of fight for the F-14B. Due to this, it is important that F-14 pilots understand this rate fight. A two-circle rate fight is a type of dogfight where the two fighters attempt to get on each other's tails. In this kind of dogfight, instead of turning as hard as you can, you instead must keep a certain speed. All fighter jets lose speed in turns, and generally, they turn worse at lower speeds. A fighter jet's optimal rate speed is the speed at which they can sustain the highest turn rate (or, the sustained turn rate). While you could pull harder to turn faster, you would be sacrificing speed to do this, and if you cannot take the shot, you will get slow and lose your turning capability, eventually lagging behind the now better turning enemy fighter. All aircraft have different flight capabilities and varied sustained turn rates. In a rate fight, the aircraft with the better sustained turn rate will have the advantage.

The beginning of the fight will have the two fighters' paths form two circles, hence the name. The fighter with the superior sustained turn rate (which we'll call the friendly fighter) will attempt to manoeuvre onto the other enemy fighter's tail. While this is happening, they must carefully manage their energy, taking great care in ensuring they do not go too much faster or slower than their optimal rate speed. During this initial turn, the enemy fighter may turn harder and initially get a shot on the friendly fighter, who must dodge. As the two fighters turn, the enemy fighter with the inferior sustained turn rate will lose speed faster, forcing them to fly downwards to use gravity to gain more speed and thus more turn. The friendly fighter follows the enemy downward, and this has the effect of pushing the fight closer to the ground; this is the goal of the friendly fighter, to push the fight down to the deck, where they will be able to outrate the enemy. Eventually, the fight will lower to the ground, where there won't be any more altitude for the enemy fighter to gain speed. With the enemy fighter now slow, the friendly fighter, still fast and better turning, will begin to get behind the other fighter (the enemy fighter is being "out-rated" here). Once they are approaching the enemy's tail, the enemy fighter may attempt to get the friendly fighter to overshoot by turning hard; to counteract this, the friendly fighter can pull hard, drop the flaps further, and/or airbrake to stay on the enemy's tail. At this point, the friendly fighter will be firmly planted on the tail of the enemy and has an opportunity to shoot them down.

Some jets will prefer the two-circle, while others will prefer other tactics. Again, the F-14B is one that favours this two-circle type of fight; in fact, theoretically, the F-14B has a superior sustained turn rate to just about every single aircraft it will encounter at top tier, with one notable exception in the F-16. In the F-14B, the optimal turn rate can be achieved with the wings at 0% sweep, combat flaps down, and at a speed of around 700-800 km/h with full afterburner (though, ideally, you should keep your speed at the higher end of this range in case you need to pull a hard manoeuvre). For maximum turn rate, it is imperative that you stay around this speed. To do this, you can tap your elevator key, or use the mouse to gradually turn. It is fine if it gets below that speed but be sure to regain it eventually. Try not to go below 700 km/h, as by that point, the turn rate will start to noticeably suffer. If you get above 830 km/h, you will want to drop down back to your optimal rate speed by turning harder, but when doing this sweep the wings back a little (to around 20-30%), as this will help you lose speed quicker and allow you to turn harder without breaking the wings off (at 0% wing sweep, you risk ripping the wing off at these higher speeds). When entering a dogfight in the F-14B, it is preferable to be at a higher speed (>900 km/h). This way, when you merge with an enemy fighter, you can sweep the wings back to around 45% and deploy combat flaps to boost your initial turn rate, thus initially gaining position before sweeping your wings forward and reaching your optimal rate speed.

The One-Circle and Counter-Two Circle Tactics

The other type of dogfight is the one-circle fight. This one is generally simpler than the two circle. It involves both fighters turning as hard as they can into each other. Unlike a two-circle fight, where the fighters turn opposite of each other to get on each other's tails, a one-circle fight sees the two fighters turning directly into each other. In one-circle dogfights, sustained turn rate is irrelevant, as the fight will come down to which aircraft can turn better in a short amount of time. Speed is not as important in these fights; actually, depending on how the one-circle dogfight develops, it is often advantageous to keep speed low so that the faster enemy aircraft will pass out in front. Due to this, most one-circle fights often occur at low speeds.

Fighters which prefer one-circle tactics are those which can turn tightly (or instantaneous turn rate), have a high AoA (Angle of Attack) and have a low stall speed. One circle fighters often are superior turners at lower speeds. Typically, planes which have excellent instantaneous turn rate have the downside of trading off energy retention and sustained turn rate. Therefore, fighters which prefer the two-circle will want to rate fight these one-circle fighters.

However, in practice, this is much easier said than done. When quickly transitioning from the chaotic and fast-paced nature of Air RB combat to a dogfight, there usually isn't a lot of time to think, so it may not be easy to set up the conditions for a rate fight in such a short amount of time. This is especially true for the F-14; while the multiple flap, wing sweep and radar states give F-14 pilots numerous options for combat, quickly and manually reconfiguring all these parts for a rate fight can prove challenging. It doesn't help that the F-14B's rate speed is rather high at 800 km/h, so if the F-14 stars the dogfight slow, it is already at a disadvantage.

Once again, it is important for pilots in two-circle fighters to remember not to panic and keep their speed at their optimal rate speed. Because in rate fights, this is exactly what one-circle fighters attempt to exploit to gain the advantage. It is sort of a mental game, where they attempt to trick you into pulling hard and losing your speed, thus drawing you into the one-circle fight where you will subsequently be destroyed. There are numerous tactics for this. When rating, they may pull into you, cashing in their speed in an attempt to make you panic, pull hard and lose your speed. In a horizontal rate, they may pull downwards to gain speed and pull up into you; when this happens, pull up and sideways perpendicular to them, in order to say out of their guns while maintaining your energy.

One of the more effective tactics is actually performed when the two-circle fighter is on the verge of winning. Like earlier, we'll call the two-circle Fighter the friendly aircraft and the one-circle fighter the enemy aircraft. When the two aircraft are close to the ground, the friendly fighter will out-rate the enemy. It is when the friendly fighter is gaining on the enemy, but is not fully around the circle yet, that the enemy fighter begins to pull a bit harder, suggesting they are slow and vulnerable. Seeing this, and on the verge of wining, the friendly fighter may choose to finish the fight now, cashing in their speed to turn hard and shoot the enemy while they are vulnerable. But, this is a trick. The enemy still has some speed left, and because the friendly fighter wasn't fully around the circle yet, they had insufficient speed to complete the turn and get the shot on the enemy. This results in the friendly fighter now being slow, and the enemy fighter can take this opportunity to close the distance with the friendly fighter and turn it in to a one-circle fight. At this point, it is likely game-over for the friendly fighter. Additionally, this scenario could also happen if the friendly fighter started pulling hard too early, and ran out of speed before they could take the shot. Ideally, the friendly fighter would have ignored the enemy's hard pull, instead continuing with the rate until they are actually close enough to reliably hit the shot. This way, even if the friendly fighter missed their shot, they would have enough speed to continue rating.

As for the F-14B, it is not as much of a one-circle fighter as it is a two-circle fighter, but it still performs well in the one-circle. At the very least, combat flaps should be utilized when in any kind of dogfight. The slower you get, the more you can lower your flaps; set it to "takeoff" from 600-400 km/h, and below 400 km/h, to "Landing". Landing flaps provides the most lift and turn and therefore should always be used when dogfighting at lower speeds. Keep in mind that it is rather easy to forget to raise them from the "landing" configuration above 400 km/h, which may result in them falling off; remember that against capable opponents, losing your flaps may result in your loss.

If necessary, you may set a key bind to switch to the "realistic" or "full-real" control mode, which turns the instructor off. In the F-14B, it allows for much higher angles of attack and highly improved very low-speed control. However, keep in mind that with realistic/full-real, manoeuvring harder at lower speeds will bleed speed very quickly. Additionally, depending on the manoeuvre, one could easily destabilize the aircraft, which would typically mean game-over in the majority of dogfights. Therefore, use advanced controls sparingly if at all.

Though the F-14B is decent in the one-circle, getting locked into a one-circle fight with a dedicated one-circle fighter such as the MiG-29, Mirage 2000 or JA37 will very quickly result in a loss for the F-14. Stick to the two-circle whenever possible.

Radar Lead Indicator

The F-14 comes equipped with a radar lead indicator, which calculates the lead required to hit a moving aircraft. At higher speeds, this mechanic can be a bit finicky, but at slower speed dogfights, it is much more accurate. The radar lead indicator can be quite helpful in dogfights, especially when the difference between victory and defeat could come down to hitting a single gunshot opportunity. In the F-14, the best way to get this to work is by using the radar's ACM (Acquisition Mode) to automatically radar lock the enemy aircraft once in range. It is important that, in dogfights, the radar is set to the standard SRC mode. The radar's other pulse-Doppler modes, while highly useful in general combat, are highly unreliable in dogfights, as it is prone to losing lock in tail-chase and side-aspect radar locks- both situations you will constantly encounter in dogfights. The normal SRC mode does not have these limitations, and at the close ranges dogfights occur at, ground clutter and chaff will usually not be an issue. To further optimize the radar lead indicator, you can switch the ACM mode on, and then press "change radar mode" to change the small box to a tall rectangle; this can be used to automatically radar lock an aircraft without directly pointing towards them (the shape of this box will usually catch aircraft you are about to take a gunshot at).

Aircraft Worth Noting

While the F-14B itself is a highly capable dogfighter, so are many of the common enemies that it will face. In order to prevail, you need to know the strengths and weaknesses of both your own and the opposing aircraft you will be facing.

  • F-16A (All): The F-14B is nearly unmatched in a rate fight. Unfortunately, arguably the most common fighter family at top tier- the supremely capable F-16A and its variants- are also the only aircraft superior to the F-14B in a rate fight. Even in the one-circle, the F-16A seems to have a slight advantage. Therefore, if possible, it is best to avoid dogfights with F-16As. Keep in mind that the F-16A being a superior aircraft has nothing to do with its pilot's skill; in a dogfight, if you recognize that an enemy F-16A is pulling too hard and getting too slow, keeping your optimal rate speed will allow you to emerge victorious in a two-circle rate fight.
  • F-16C: Sporting more engine power than the previous F-16A, formidable AIM-7M Sparrows and dangerous AIM-9Ms paired with a HMD, this fighter is a force to be reckoned with. In a dogfight, like the previous A variant it is extremely capable. However, despite the extra engine power given from the improved engine, the added weight of other avionics actually makes it a slightly worse dogfighter than the previous F-16A. While the F-16C is still very dangerous in a one-circle against the F-14B, the slight decrease in dogfighting performance allows the F-14B to keep up with the F-16C in a two-circle fight.
  • MiG-29A: The MiG-29A is highly capable in the one-circle fight, having a better AOA and tighter turn radius than the F-14B. However, it does also have worse energy retention; thus, as long as you can keep the MiG-29A in a two-circle fight, the F-14B will be able to prevail.
  • MiG-29SMT, MiG-29G: These MiG-29s are massively more capable than the previous MiG-29As. This can be directly attributed to the addition of the all-aspect, thrust-vectoring R-73 air-to-air missile. In a dogfight, these planes' HMDs (Helmet Mounted Device) allow them to easily lock you with the missile as long as you are within a certain angle of their planes nose. The insane manoeuvrability of the R-73 allows it to make extremely sharp turns no other missile can do, and it's IRCCM (Infrared Counter-Counter Measures) can make it difficult to flare. This makes the missile extremely lethal in dogfights; at the low to medium speed and close ranges that dogfights occur at, it isn't uncommon for an R-73 to turn on a dime and completely ignore your flares. This, combined with the HMD, poses a huge threat in dogfights. So, what about the rate fight? Yes, the F-14B's primary strategy against dogfighting MiG-29s is to rate fight them, and that theoretically doesn't change against these versions of the MiG-29. In a rate fight, the inferior rate fighter normally wouldn't be able to pull hard enough to get a shot on the dominant rate fighter. However, the problem is that, because these newer MiG-29s have R-73s and a HMD, all they need to do is simply point their nose in the general direction of you to launch a very dangerous missile. The nature of the rate fight means that until you get the enemy to the ground, you are constantly going to be vulnerable to getting launched on by an R-73, which as was just discussed, will put you in great danger. So, your primary strategy when dogfighting these MiG-29s is to deny the launch of the missile. There are numerous ways to do this.
    • First, you have to recognize where the MiG-29's WEZ (Weapons Employment Zone) is. The HMD of the MiG-29 can only see so far off the nose of the aircraft, and whenever you are within the HMD's range (and thus in range of an R-73 launch), you are in the WEZ..
    • The first strategy is that, whenever you notice you are in this WEZ, you should aggressively pre-flare to prevent the missile from locking on to you. Most other aircraft at top tier would quickly run out of flares doing this, but the F-14B with its large countermeasure capacity can sustain this tactic for some time.
    • Another strategy is called "Jamming the WEZ", which basically means staying out of the HMD's range (and thus preventing an R-73's launch). You can do this in a number of different ways. One way is to make the rate fight tighter by rating at the lower end of your optimal rate speed; for the F-14B, this will be around 700 km/h.Depending on the speed of both you and your opponent, you could also attempt to simply engage the MiG-29 in a one-circle fight, as the F-14B's instantaneous turn rate is above average and can to an extent compete with the MiG-29. In the tight turns, an R-73 launch would initially be difficult. However, be aware that the MiG-29 is still much better in the one circle, and after the first few turns, the F-14B will often find itself at a disadvantage, so this could be risky if you don't end the fight quickly. When engaging one of these fighters in a dogfight, if you notice they have depleted all their R-73s, then you can dogfight them in a rate fight normally without worry. It should be noted that the MiG-29SMT is heavier than the other MiG-29s, and so its overall flight performance (and thus overall dogfight performance) is noticeably worse than the other MiG-29s.
  • Mirage 2000C, Mirage 2000-5F: The Mirage 2000s are among the tightest and fastest turning fighters in the game. Therefore, in the F-14B, it is highly advised not to attempt engaging them in two-circle fights, as in nearly all situations this will end in your defeat. As a delta-winged fighter, the Mirage 2Ks lose lots of speed in a turn. This makes the two-circle rate fight the F-14B is so good at the main strategy when dogfighting Mirage 2Ks. Against Mirages, it is important to recognize their energy state; even if it seems like the Mirage is getting behind you, it could be that, in reality, they are slow and only sitting inside your circle, unable to shoot you. Stay calm and do your best to stay at the F-14B's optimal rate speed of 800 km/h. Try not to panic and pull too hard to get away from the Mirage's nose, as doing so will slow you down and make the Mirage's victory come closer. Continue to rate until you reach the ground, where you will begin outrating them. Remember that the 2000-5F has a HMD, making the Magic 2 missiles a problem in dogfights.
  • F-14A (Early): The earlier F-14A is very similar in dogfighting performance to the F-14B, with similar turn and rate performance. The F-14B does have superior engine power over the F-14A, so make sure to utilize the vertical to gain an advantage against this older F-14.
  • MiG-23 (All): MiG-23s are, like the F-14B, excellent rate fighters. However, the F-14B's sustained turn rate is slightly better than the MiG-23's. An easier tactic is to one-circle them, as the F-14B has a much superior instantaneous turn rate.
  • Viggens (JA37C, JA37D, AJ37, AJS37): The Viggen has an excellent instantaneous turn rate. However, its energy retention is very poor, and thus two-circle rate tactics should be used to overcome this Swedish fighter in a dogfight.

Pros and cons

Pros:

  • Ability to equip additional countermeasure pods grants a massive amount of countermeasures
  • Access to upgraded AIM-7M SARH missiles and AIM-54C ARH missiles
  • All-aspect AIM-9L Sidewinder missiles are a significant upgrade from the previous rear-aspect AIM-9H
  • High velocity and extremely fast firing M61 rotary cannon
  • Large air-to-air missile capacity of eight
  • Substantial improvement to thrust and climb rate from the previous F-14A
  • Powerful radar
  • Strong air-to-ground load out with Paveway laser-guided bombs and the LANTIRN thermal laser targeting pod
  • Great instantaneous turn rate and excellent sustained turn rate
  • Excellent energy retention
  • Built-in camera targeting system automatically zooms in to radar locked aircraft and is useful for identification in simulator mode
  • Built-in camera works with the EEGS, allowing you to use the function by applying the target point on the enemy
  • Lower afterburner fuel consumption compared to F-14A Early

Cons:

  • Large airframe makes for a large target
  • Two very hot engines make it harder to flare off IR-guided missiles
  • M61 rotary cannon has a rather small ammunition pool of 676
  • The AIM-54C still only has 17G maximum overload and is thus rather easy to kinetically defeat

History

F-14B Upgrade Program

During the mid-1980s, the United States Navy (USN) made a momentous decision to enhance the F-14 airframe by introducing a remarkable new variant of the aircraft. Originally designated as the F-14A+, this exceptional aircraft would eventually earn the prestigious moniker of the F-14B. The USN's comprehensive modernization program aimed to bring the F-14 airframe up to date with the latest technological advancements. One of the key aspects of this program was the incorporation of numerous electronic upgrades. The F-14B underwent a significant avionics overhaul, introducing advanced systems that improved the aircraft's capabilities in various areas. These upgrades included enhanced RWR systems, improved target detection and tracking capabilities (introduction of the Television Camera System) and upgraded communication systems to ensure seamless integration with other elements of the modern battlefield. In addition to these upgrades, the F-14B also received a major boost in terms of its powerplant. The outdated engines of the original F-14A model were replaced with the more advanced F110-GE-400 engines. These engines provided increased thrust and improved fuel efficiency, resulting in enhanced performance and greater operational flexibility for the aircraft. The F-110 engines also offered improved reliability and reduced maintenance requirements, which were crucial factors in ensuring the overall effectiveness and availability of the F-14B.

Devblog

As part of the further upgrade of the Grumman F-14A carrier-based fighters, the aircraft were equipped with new General Electric F110-GE-400 turbojet engines with an afterburner, which significantly increased thrust, while reducing specific fuel consumption. The aircraft also received updated electronic equipment, as well as, unlike early production versions, the TISEO (Target Identification System, Electro Optical) optical target identification system. Initially, the updated Tomcats received the designation F-14A +.

This configuration was applied both to newly manufactured fighters, as well as to those already in service as an upgrade pack. In 1992, the designation was changed to F-14B in order to unify it with other military equipment in service. Subsequently, the F-14B were further upgraded in 1998 under the SLEP program. These jet fighters were in service with the US Navy aviation until 2006.

Media

Skins
Images
Videos

See also

Related development
Other jet planes with variable sweep wings

External links


Grumman Aircraft Engineering Corporation
Fighters 
F3F  F3F-2 · Galer's F3F-2
F4F Wildcat  F4F-3 · F4F-4
XF5F Skyrocket  XF5F · XP-50
F6F Hellcat  F6F-5 · F6F-5N
F7F Tigercat  F7F-1 · F7F-3
F8F Bearcat  F8F-1 · F8F-1B
Jet Fighters 
F9F Panther/Cougar  F9F-2 · F9F-5 · F9F-8
F-11 Tiger  F11F-1
F-14 Tomcat  F-14A Early · F-14B
Jet Strike Aircraft 
A-6 Intruder  A-6E TRAM
Bombers  TBF-1C
Export  ▄Martlet Mk IV · ▄F6F-5 · ▄F6F-5N · ▄F8F-1B · ▄Avenger Mk II · ▄Hellcat Mk II

USA jet aircraft
  Fighters
F-4  F-4C Phantom II · F-4E Phantom II · F-4J Phantom II · F-4S Phantom II
F-5  F-5A · F-5C · F-5E · F-20A
F-8  F8U-2 · F-8E
F-80  F-80A-5 · F-80C-10
F-84  F-84B-26 · F-84F · F-84G-21-RE
F-86  F-86A-5 · F-86F-25 · F-86F-2 · F-86F-35
F-89  F-89B · F-89D
F-100  F-100D
F-104  F-104A · F-104C
F-14  F-14A Early · F-14B
F-15  F-15A
F-16  F-16A · F-16A ADF · F-16C
F9F  F9F-2 · F9F-5 · F9F-8
Other  P-59A · F2H-2 · F3D-1 · F3H-2 · F4D-1 · F11F-1
  Strike Aircraft
FJ-4  FJ-4B · FJ-4B VMF-232
A-4  A-4B · A-4E Early
A-6  A-6E TRAM
A-7  A-7D · A-7E · A-7K
AV-8  AV-8A · AV-8C
A-10  A-10A · A-10A Late
B-57  B-57A · B-57B
F-105  F-105D
F-111  F-111A