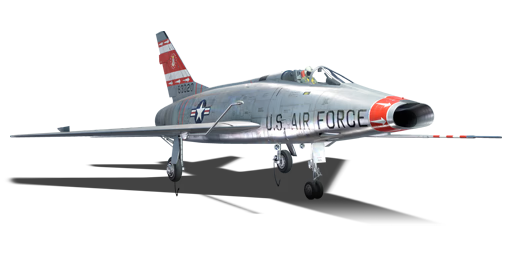
F-100D

From War Thunder Wiki
Jump to: navigation, search
Rank VI USSR | Premium | Golden Eagles
Su-25K Pack
This page is about the American jet fighter F-100D. For other versions, see F-100 (Family).
f-100d.png
GarageImage F-100D.jpg
ArtImage F-100D.png
360://https://wiki.warthunder.com/images/1/1e/Cockpit_f-100d.jpg
F-100D
AB RB SB
9.3 9.3 9.7
Research:190 000 Specs-Card-Exp.png
Purchase:520 000 Specs-Card-Lion.png
Show in game

Description

The F-100D Super Sabre is a rank VI American jet fighter with a battle rating of 9.3 (AB/RB) and 9.7 (SB). It was introduced in Update 1.85 "Supersonic" and was one of the first three jets to feature guided air-to-air missiles, the other two being the MiG-19PT and the Javelin F.(A.W.) Mk.9.

The dogfighting days of World War II were over and while there was air-to-air combat during the Korean and Vietnam Wars, it was nowhere the level of previous wars. Jets were becoming faster, electronics and avionics were making them more manoeuvrable and the fighters were able to carry extremely large amounts of ordnance. The F-100D was no exception to this, as it was designed to be a ground attacker first and a fighter/interceptor as a secondary role. One noticeable difference from earlier aircraft is that early on in development the F-100D was known as the 45-Sabre (officially later it was dubbed Super Sabre) due to its wings being swept back at a 45° angle. The fighter's elevators were also swept back to help increase the aerodynamics of the aircraft. This, combined with a strong engine, upgraded avionics and early computer systems made this the first US fighter which was able to fly faster than the speed of sound in level flight.

Literally looking down the barrels of an oncoming F-100D.

Weapon loadout options allow the pilot to tailor the aircraft to their playstyle or even mix it up depending on the map they are flying. This fighter excels as a ground attack bomber utilizing up to 6,000 lb of bombs, AGM-12B Bullpup missiles, Mighty Mouse rockets or several combinations of the three. Whether you are into dropping and running or firing and forgetting, there are ordnance choices will fit the pilot's style. For those pilots who want to hunt fighters and bombers, the four nose-mounted 20 mm cannons and choice of AIM-9B/E Sidewinder air-to-air missiles will fit the bill. The Sidewinders can also be used an intimidation factor as pilots with one on their tail must focus on outmanoeuvring the missile, providing you with the opportunity to manoeuvre in and line up the kill-shot with your cannons if the missile does not make contact. The speed of the F-100D can come in handy when attacking bomber aircraft as Boom & Zoom tactics will help you avoid any defensive weapons allowing you to wreak havoc during an attacking dive.

With the advent of other faster supersonic aircraft such as MiG-21s, J35As, and F-5s as well as powerful missile wielding A-5Cs, Su-25s and A-10s, aircraft lacking countermeasures such as the F-100D tend to be seen as easy prey. However, if handled correctly, the F-100D can be a formidable aircraft in both the fighter and strike roles.

General info

Flight performance

Air brakes
Allows you to dramatically reduce the flight speed by releasing special flaps
Drogue parachute
Reduces braking distance when landing on any runway
Max speed
at 10 667 m1 433 km/h
Turn time40 s
Max altitude14 700 m
EnginePratt & Whitney J57P21
Type
Cooling systemAir
Take-off weight17 t

The F-100D's flight performance is adequate. Being supersonic at its BR, the F-100D can outrun many of the subsonic opponents it faces. Despite this, its top speed is slightly below average for a supersonic jet, being able to approach but not quite reach Mach 1 at sea level. However, it isn't the only supersonic jet at this BR; Early MiG-21s and F-104s, and Su-7s are all supersonic jets also found at the same BR which all have a higher sea level top speed than the F-100D.

Although the F-100D is supersonic and equipped with an afterburner, one of its weaknesses is its slow acceleration, especially at lower speeds, compared to other supersonic jets. Many subsonic jets can keep up with your acceleration, while the faster subsonic jets such as Saab 32s, Sea Vixens and Harriers out-accelerate the F-100D.

The F-100D's overall manoeuvrability is decent, having a fairly good turn rate, but its energy retention is poor. These two characteristics combined mean that if the F-100D is forced to dogfight, one-circle dogfights (such as scissors) should be favored as prolonged dogfights will see the its poor energy retention and mediocre acceleration disadvantage it. This poor energy retention, though for the most part a weakness, can occasionally be useful in situations where speed must be bled quickly (such as to get an enemy to overshoot). Of course, as with any high tier jet, dogfighting should generally be avoided as it leaves you slow and vulnerable, and this is especially true for the F-100D due to its slow acceleration.

Bird's eye view of a F-100D after unloading on ground targets.

Flying at speeds close to Mach 1 or past can pose a challenge for pilots utilizing the 3rd-person view as a condensation cloud forms around the aircraft and obscures your view (not an issue for those flying simulator-style from in the cockpit). While this can make targeting enemy aircraft a challenge, it just takes a little more work to line up the shot either with the cannons or air-to-air missiles.

Previously, attack aircraft fly slow to ensure they accurately hit their ground targets with guns, rockets or bombs. However, with poor low-speed manoeuvrability and acceleration, the F-100D becomes difficult to get out of harms way when flying slow, so it requires the pilot to learn how to bomb and fire rockets at targets at higher speeds than what they may be used to ensure anti-aircraft fire nor any trailing fighters gain a targeting solution on you. Speed in and speed out is the key with the F-100D.

Characteristics Max speed
(km/h at 10,668 m)
Max altitude
(metres)
Turn time
(seconds)
Rate of climb
(metres/second)
Take-off run
(metres)
AB RB AB RB AB RB
Stock 1,419 1,412 14700 40.5 41.2 88.1 78.8 1,400
Upgraded 1,448 1,433 39.5 40.0 123.6 105.0

Details

F-100D at cruising altitude on the watch for potential enemy fighters.
Features
Combat flaps Take-off flaps Landing flaps Air brakes Arrestor gear Drogue chute
X
Limits
Wings (km/h) Gear (km/h) Flaps (km/h) Max Static G
Combat Take-off Landing + -
1361 447 620 590 435 ~11 ~4
Optimal velocities (km/h)
Ailerons Rudder Elevators Radiator
< 640 < 540 < 610 -

Engine performance

Engine Aircraft mass
Engine name Number Basic mass Wing loading (full fuel)
Pratt & Whitney J57P21 1 9,658 kg 354 kg/m2
Engine characteristics Mass with fuel (no weapons load) Max Gross
Weight
Weight (each) Type 14m fuel 20m fuel 30m fuel 46m fuel
2,361 kg Afterburning axial-flow turbojet 10,708 kg 11,156 kg 11,905 kg 13,159 kg 16,436 kg
Maximum engine thrust @ 0 m (RB/SB) Thrust to weight ratio @ 0 m (WEP)
Condition 100% WEP 14m fuel 20m fuel 30m fuel 46m fuel MGW
Stationary 4,424 kgf 5,823 kgf 0.54 0.52 0.49 0.45 0.35
Optimal 4,424 kgf
(0 km/h)
8,364 kgf
(1,200 km/h)
0.78 0.75 0.70 0.64 0.51

Survivability and armour

Crew1 person
Speed of destruction
Structural1 361 km/h
Gear447 km/h

Designers of post-war jet fighters wanted to take advantage of the newer jet technology and maximize both speed and ordnance carried, and to do this, something had to give and that was armour. The idea was that, if you are faster than the enemy, it is difficult for them to hit you, and armour will not be necessary. The F-100D follows this doctrine; though it does have some protection for the pilot, it isn't much and leaves the rest of the critical components virtually unprotected with armour. For the pilot, the back of the seat and headrest maintains a continuous piece of steel at 12.7 mm thick and the windscreen is rated at 64 mm bulletproof windscreen. Typically this type of protection is meant more for lighter protection from defensive turret attacks from bombers rather than cannon attacks from other aircraft.

The F-100D is a relatively sturdy aircraft and can take a beating before critical components begin to fail. While the engine and the pilot are important to protect as much as possible, the wings are another critical component which you must protect, as hits to the wings can effectively cripple the aircraft. If being tailed by another aircraft try to speed away because if you try to pull up, turn to the side or pull-down, you risk exposing increased surface area of the skin, giving the enemy pilot more to shoot at and a greater opportunity of taking out a wing. If possible, increase speed and sway back and forth, even some very shallow elevator dips up and down maybe enough to throw off the sighting of the enemy pilot and spray his bullets all around you without exposing very much surface area of the jet.

Modifications and economy

Repair costBasic → Reference
AB3 195 → 4 316 Sl icon.png
RB10 118 → 13 669 Sl icon.png
SB9 897 → 13 370 Sl icon.png
Total cost of modifications168 100 Rp icon.png
265 000 Sl icon.png
Talisman cost2 600 Ge icon.png
Crew training150 000 Sl icon.png
Experts520 000 Sl icon.png
Aces2 400 Ge icon.png
Research Aces950 000 Rp icon.png
Reward for battleAB / RB / SB
130 / 380 / 600 % Sl icon.png
220 / 220 / 220 % Rp icon.png
Modifications
Flight performance Survivability Weaponry
Mods aerodinamic fuse.png
Fuselage repair
Research:
6 700 Rp icon.png
Cost:
11 000 Sl icon.png
310 Ge icon.png
Mods jet compressor.png
Compressor
Research:
6 700 Rp icon.png
Cost:
11 000 Sl icon.png
310 Ge icon.png
Mods armor frame.png
Airframe
Research:
7 600 Rp icon.png
Cost:
12 000 Sl icon.png
350 Ge icon.png
Mods booster.png
New boosters
Research:
7 600 Rp icon.png
Cost:
12 000 Sl icon.png
350 Ge icon.png
Mods aerodinamic wing.png
Wings repair
Research:
14 000 Rp icon.png
Cost:
22 000 Sl icon.png
640 Ge icon.png
Mods armor cover.png
Cover
Research:
9 100 Rp icon.png
Cost:
14 000 Sl icon.png
420 Ge icon.png
Mods jet engine.png
Engine
Research:
9 100 Rp icon.png
Cost:
14 000 Sl icon.png
420 Ge icon.png
Mods g suit.png
G-suit
Research:
9 100 Rp icon.png
Cost:
14 000 Sl icon.png
420 Ge icon.png
Mods napalm fire bomb.png
BLU-27/B
Research:
6 700 Rp icon.png
Cost:
11 000 Sl icon.png
310 Ge icon.png
Mods pilon bomb.png
M64
Research:
6 700 Rp icon.png
Cost:
11 000 Sl icon.png
310 Ge icon.png
Mod arrow 0.png
Mods pilon block rocket.png
LAU-3/A
Research:
6 700 Rp icon.png
Cost:
11 000 Sl icon.png
310 Ge icon.png
Mod arrow 0.png
Mods ammo.png
t_160_belt_pack
Research:
7 600 Rp icon.png
Cost:
12 000 Sl icon.png
350 Ge icon.png
Mod arrow 1.png
Mods pilon bomb.png
M64/2
Research:
7 600 Rp icon.png
Cost:
12 000 Sl icon.png
350 Ge icon.png
Mod arrow 0.png
Mods agm missile.png
AGM-12B Bullpup
Research:
7 600 Rp icon.png
Cost:
12 000 Sl icon.png
350 Ge icon.png
Mod arrow 0.png
Mods pilon bomb.png
M117
Research:
14 000 Rp icon.png
Cost:
22 000 Sl icon.png
640 Ge icon.png
Mod arrow 0.png
Mods air to air missile.png
AIM-9B
Research:
14 000 Rp icon.png
Cost:
22 000 Sl icon.png
640 Ge icon.png
Mod arrow 0.png
Mods weapon.png
t_160_new_gun
Research:
9 100 Rp icon.png
Cost:
14 000 Sl icon.png
420 Ge icon.png
Mods pilon bomb.png
M65
Research:
9 100 Rp icon.png
Cost:
14 000 Sl icon.png
420 Ge icon.png
Mods air to air missile.png
AIM-9E
Research:
9 100 Rp icon.png
Cost:
14 000 Sl icon.png
420 Ge icon.png

Armaments

Ballistic Computer
CCIP (Guns) CCIP (Rockets) CCIP (Bombs) CCRP (Bombs)
Icon RedXCross.png Icon RedXCross.png Icon RedXCross.png Icon GreenCheckmark.png

Offensive armament

Main article: M39A1 (20 mm)

The F-100D is armed with:

  • 4 x 20 mm M39A1 cannons, chin-mounted (200 rpg = 800 total)

For internal guns, the F-100D has four 20 mm M39A1 revolver autocannons mounted under the nose intake. Those familiar with the preceding F-86F-2 and its extremely powerful 20 mm T-160 cannons will be delighted to hear that the F-100D's M39A1 cannons are nearly identical to the F-86F-2's T-160, and in addition, have 50 more rounds of ammo per gun. These cannons are fast-firing, have high velocity, and deal heavy damage. Its only downside is that, with a fast fire rate and 200 rounds per gun, one must be careful of spraying the guns, as ammo will run out quicker than expected.

Suspended armament

The F-100D can be outfitted with the following ordnance:

1 2 3 4 5 6
Hardpoints F-100D.png
500 lb LDGP Mk 82 bombs 1 1 1, 3 1, 3 1 1
500 lb Mk 82 Snakeye bombs 1 1 1 1 1 1
750 lb M117 cone 45 bombs 1 1 1, 2 1, 2 1 1
1,000 lb LDGP Mk 83 bombs 1 1 1 1
BLU-27/B incendiary bombs 1 1 1, 2 1, 2 1 1
FFAR Mighty Mouse rockets 19 19 19 19
AGM-12B Bullpup missiles 1 1
AIM-9B Sidewinder missiles 1, 2 1, 2
AIM-9E Sidewinder missiles 2 2
Maximum permissible loadout weight: 3,220 kg
Maximum permissible wing load: 1,610 kg
Maximum permissible weight imbalance: 1,400 kg
Default weapon presets
  • Without load
  • 2 x AIM-9B Sidewinder missiles
  • 4 x AIM-9B Sidewinder missiles
  • 4 x AIM-9E Sidewinder missiles
  • 38 x FFAR Mighty Mouse rockets
  • 76 x FFAR Mighty Mouse rockets
  • 2 x AGM-12B Bullpup missiles
  • 6 x 500 lb LDGP Mk 82 bombs (3,000 lb total)
  • 6 x 500 lb Mk 82 Snakeye bombs (3,000 lb total)
  • 10 x 500 lb LDGP Mk 82 bombs (5,000 lb total)
  • 6 x 750 lb M117 cone 45 bombs (4,500 lb total)
  • 8 x 750 lb M117 cone 45 bombs (6,000 lb total)
  • 4 x 1,000 lb LDGP Mk 83 bombs (4,000 lb total)
  • 6 x BLU-27/B incendiary bombs
  • 8 x BLU-27/B incendiary bombs

One of the areas where the F-100D shines is its armament options, boasting a variety of different armaments for both air-to-air and air-to-ground missions.

For unguided rockets, the F-100D can carry up to 76 x 70 mm Folding-Fin Aerial Rocket (FFAR) Mighty Mouse rockets. They can be used to attack lighter targets in air RB, as well as armoured targets such as pillboxes and tanks, but due to their inaccuracy the latter is generally not advised. If needed, a small amount of these rockets can be used as makeshift flares to decoy all-aspect missiles in a head-on, but don’t expect them to work on missiles fired at you in the rear aspect. In ground RB, these rockets have decent penetration, but due to their inaccuracy and generally low damage, it is best used against less armoured targets such as SPAAs and light tanks.

For dumb bombs, the F-100D can carry either 500 lb, 750 lb or 1,000 lb bombs, as well as BLU-27/B napalm bombs. The F-100D can carry enough bombs to take out one base in air RB. For CAS in ground RB, the lack of ballistics computer means you must manually compute where your bombs will land. For many, this leaves out the 500 lb bombs as the amount of explosive in them may not be large enough to account for the margin of error in a manual bomb drop; the 750 lb or 1,000 lb bombs are generally better for this CAS job. Some may prefer to take the 750 lb bombs instead of the 1,000 lb bombs, as the explosive in them is sufficient and the F-100D can carry eight 750 lb bombs in comparison to four 1,000 lb bombs.

F-100D peeling away from the flight revealing the suspended ordnance it is carrying.

A more reliable CAS option for the F-100D is the AGM-12B Bullpup air-to-ground guided missile. Once fired, this missile can be manoeuvred via your keyboard (keybinds must be set); simply keep the flare light on the missile near the intended target until the missile hits them. The 250 lb warhead in the missile gives a high likelihood of destroying most enemy armoured vehicles in one hit, though its lethality in practice will rely on the player's ability to keep the missile centered on the target. The downside of using these missiles is that, compared to the high volume of unguided bombs or rockets the F-100D can take, it can only take two AGM-12Bs. Due to this, the AGM-12B is most useful in ground RB, where in the presence of radar SPAAGs and SAMs, precision strikes at longer ranges are generally favored over close range high volume unguided bombing.

For the air-to-air role, the F-100D can carry up to four AIM-9B/E Sidewinder air-to-air missiles. Though the AIM-9 Sidewinder is a well-known and successful air-to-air weapon, this version, the AIM-9B Sidewinder, is one of its earliest variants and thus is fairly weak. It locks on to targets via their heat signature, but being an early variant, the AIM-9B can only do so from the rear-aspect where the target's hot engine exhaust is. It generally has a 1.8 km range against targets flying straight and at the same speed as the launching aircraft. Its main and significant weakness lies in its inability to turn very hard; oftentimes, the enemy simply turning slightly is enough to dodge the missile kinetically. The upgraded AIM-9E allows the missile to be "lead" a little, that is, it can still keep a lock on an enemy within a small radius of the launching aircraft's nose, but is otherwise similar to the AIM-9B and will still be performing similarly to it. Though the AIM-9B/E is fairly weak, they can be useful in situations. At higher altitudes (>5,000 m), the missile is more effective due to lower air density hampering an aircraft's manoeuvrability and thrust while leaving the missile generally unaffected. The AIM-9B/E is also useful against aircraft in a low energy state (in other words, slow) that don't have the speed to escape the missile.

Usage in battles

The F-100D caught in the cross-hairs of a MiG fighter.
Air Realistic Battles

The F-100 is a decent fighter aircraft in air RB.

In a downtier, few aircraft can match the F-100's speed. Thus, boom-and-zoom tactics utilizing its excellent cannons and useful AIM-9s will work well on the slower, subsonic fighters. Generally, do not commit to a turning dogfight as most of these slower subsonic fighters are likely much better turners than the F-100 is.

In an uptier, the plane is much more limited to a support role due to the presence of higher performance fighters such as MiG-19s and MiG-21s. Though one-on-one these planes can be fought to an extent, you will be at a acceleration disadvantage and therefore it is not recommended. The F-100 should continue to be played in a support role, catching these superior enemies while they are already engaged and vulnerable. The F-100's speed is good enough that even these superior enemies cannot pursue while engaged with other allies. If dogfighting these superior enemies cannot be avoided, the F-100's low energy retention and fairly good turn can be used to initially fall on an enemy's tail, but this will only give you a short firing solution for a few turns before you are left out of energy and vulnerable.

A common enemy you will face in uptiers are Su-25s with all-aspect missiles. Due to the lack of countermeasures, F-100 pilots should always be distancing themselves from Su-25s in the area to avoid all-aspect R-60M launches. If a one-on-one with a Su-25 cannot be avoided, you must bait both of its R-60M missiles before you can begin dogfighting them. One option is to keep your distance and trick them into launching a missile at a rather long range. For example, provided you are faster than the Su-25, a tempting 2 km rear-aspect R-60M launch will likely not hit (even more so if you do defensive manoeuvres after its motor has burned out). Another option is to take some FFAR rockets. When an R-60M is launched in a head-on, launch a bunch of rockets towards the missile while disengaging your afterburner and turning out of the way; the missile will be fooled. You can drop the drag-inducing rocket pods once they are not needed. Once the Su-25 has been depleted of its R-60Ms, it can easily be fought. It is a slow aircraft and easily energy-trapped by the F-100's superior speed, and once you are on its tail, there is generally little they can do to shake you off. Just be careful to stay out of its powerful gun.

Full uptiers see aircraft such as the MiG-21SMT/MF, J35D and Mirage III with high-performance air-to-air missiles and supersonic, manoeuvrable performance to back it up, which the F-100D simply has no chance of fighting on its own. F-100 pilots must be much more careful with when to engage these aircraft. Only when they are distracted and slow should they be engaged. Make absolutely sure that one of these aircraft at a similar speed as you doesn't get on your tail, because if they do, they will chase you down and launch difficult to dodge missiles at you. Provided you are actually able to dodge these missiles, they all have substantially superior flight performance and manoeuvrability which the F-100 is simply incapable of matching.

The F-100 is an amalgamation of paradoxical design features that results in an aircraft too heavy to sustain manoeuvring engagements despite its strong slats, slow to accelerate to its surprisingly high rip speeds, and too sluggish at speed to take full advantage of its strong armament. Overall to get this bus to perform, it must be at high speeds. Keep your energy up.

Ground attack

The F-100D is no stranger to ground attack and can be effectively outfitted with just about anything necessary to destroy ground targets both large and small. While bombers could deliver a massive amount of ordnance, they typically flew slow and high and were not always as precise as hoped for. Therefore, the USAF designed many of their fighter aircraft not only as air-to-air platforms but to additionally excel as low altitude bombers.

A fully researched F-100D can carry an assortment of low-drag general-purpose bombs ranging from 500 lb, 750 lb and 1,000 lb. The F-100D’s maximum bomb payload weight is 6,000 lb, the same amount carried by a single B-17E bomber, but the F-100D can heft this amount at almost 1,000 km/h faster and at a lower, more accurate altitude. Of course, the bomb size will be determined by which type of target will be in the crosshairs. For smaller targets the 500 and 750 lb bombs will work best. The full 8 x 750 lb is the best load out for base bombing since this load out has the highest total TNT.

Not all targets will require the usage of bombs. You may be fortunate enough to have several strike aircraft working on ground targets, or ground targets may be spread out. this is where rockets begin to shine. The AGM-12B Bullpup is essentially a 250 lb bomb attached to a rocket motor and is spin-stabilized. The Bullpup can be quite precise as long as the pilot can maintain visual of the target as he will need to guide the Bullpup in. However, any break from the target (due to defensive manoeuvring or avoiding incoming enemies) will most likely cause the missile to miss the target. If needed, the F-100D can throttle back and deploy the speed brake to ensure the Bullpup hits the target. Keep in mind that the entire Bullpup guiding process makes you vulnerable, as not only you will be slowed down, but you will also be forced to tunnel-vision on guiding the missile in and won’t be able to see what happening around you for a few seconds. Therefore, if enemy fighters are in the area, it is best to hold back launching one.

On the other hand, the smaller FFAR Mighty Mouse unguided rockets can do a good amount of damage against ground and aerial targets, but the one drawback is that they are unguided. This means that once they are fired, they continue at their trajectory until they either hit something or run out of fuel and crash into the ground. Without a ballistic computer, it can be somewhat difficult to accurately aim these rockets. The main strength of taking these Mighty Mouse rockets is that 76 of them can be carried. Rockets work best when they are fired in groups as this significantly increases chances that one or more rockets will hit their target. In ground RB, these rockets are best used against lighter targets such as light tanks and SPAAs, as usually a rocket striking in the vicinity of their lightly armored vehicle will cause it to simply be destroyed. Rockets are especially useful for taking out SPAAs, as they are more accurate at longer ranges compared to bombs and therefore are the safer option when engaging these anti-air vehicles. While more armored targets can be attacked, this is not fully advised. Direct hits must be achieved to obtain significant damage on armored targets, and the likelyhood of a direct hit with these rockets is not very high. Even so, a direct hit has no guarantee of dealing significant damage to a tank; in the case of more heavily armored targets, there is a chance a direct hit may not even penetrate.

Radars

The F-100D is equipped with an AN/APG-30 rangefinding radar, located in the nose of the aircraft. It will automatically detect other planes within the scanning area and display the range to the closest target. It is linked with a gyro gunsight and can help with aiming at close range. This can be useful in simulator battles. However, the radar rangefinder lock will set off radar warning receivers, so in air RB pilots may prefer to switch it off to maintain the element of surprise.

AN/APG-30 - Rangefinding radar
Maximum
Tracking
Range
Minimum
Tracking
Range
Azimuth Tracking
Angle
Elevation Tracking
Angle
2,750 m 300 m ±9° ±9°

Pros and cons

Pros:

  • Excellent cannons that has a high muzzle velocity, rate of fire, an adequate amount of ammo (200 rpg), and pack a good punch with high-explosive shells
  • Can carry a wide array of suspended armaments including bombs, rockets and missiles
  • 4 x AIM-9Es can be useful for air combat
  • Above average speed; outruns the subsonic jets it commonly faces
  • Good roll rate at lower speeds
  • Access to a radar warning receiver

Cons:

  • Thoroughly unmanoeuvrable at low speeds
  • Loses lots of energy in turns
  • Suffers from significant elevator and aileron (pitch and roll) control stiffening at higher speeds
  • Slow acceleration at lower speeds, even with afterburner
  • On warmer maps, engine may overheat after extended periods of afterburner usage
  • While rather fast, cannot go supersonic at sea level; not nearly fast enough to outrun supersonic jets it commonly faces such as the MiG-21, F-104, and F-5C
  • No countermeasures

History

By the mid-50s, jet aircraft had become robust machines which had obtained sufficient combat experience for the next step into a fundamentally new age: the era of supersonic speed. Supersonic fighters were developed by both of the main opposing nations of the Cold War. In parallel with the development of the MIG-19 in the USSR, American aircraft designers were putting the finishing touches on their own design for a supersonic fighter. The F-100 Super Sabre entered serial production somewhat later than its Soviet counterpart, but it needed just as many improvements and upgrades.

The F-100's main problems were its high failure rate and the shortcomings of its control systems. In addition, a fighter-bomber version was also being developed based on the Super Sabre: the F-100D, which featured an increased vertical and horizontal fin area and expanded capabilities with regard to suspended weaponry. In the end, it was the D version that became the most widespread modification of the single-seat Super Sabre thanks to its improved control and excellent combat abilities as either a fighter-bomber or pure fighter. In terms of suspended weaponry, the F-100D was able to carry over twenty extremely varied weapon load-outs, from traditional high-explosive bombs and rockets to air-to-air rockets and nuclear bombs.

- From Devblog

Media

Skins
Images
Videos

See also

Related development
  • North American F-86 Sabre
Aircraft of comparable role, configuration and era

External links


North American Aviation
Fighters 
P-51A  P-51
P-51C  P-51C-10
P-51D  P-51D-5 · P-51D-10 · P-51D-20-NA · P-51D-30
P-51H  P-51H-5-NA
Twin-engine fighters  F-82E
Jet fighters  F-86A-5 · F-86F-2 · F-86F-25 · F-86F-35 · F-100D
Strike aircraft  A-36 · PBJ-1H · PBJ-1J
  FJ-4B · FJ-4B VMF-232
Bombers  B-25J-1 · B-25J-20
Export/Licence  ▂B-25J-30 · ␗B-25J-30
  ▄Mustang Mk IA · F-6C-10-NA · ␗P-51D-20 · J26 David · J26 · P-51D-20-NA · ␗P-51K
  F-86F-30 ▅ · ␗F-86F-30 · F-86F-40 ▅ · F-86F-40 JASDF▅ · ␗F-86F-40
  ◄F-86K · ▄F-86K (Italy) · ▄F-86K (France)
  ␗F-100A · ▄F-100D · ␗F-100F
Captured  ▅P-51C-11-NT
  Canadair Limited license-built the F-86 as the CL-13 for use in Canada and export to Europe.
  Fiat license-built the F-86K for the Italian Air Force though another 120 NAA built F-86Ks were also sold to the Italians.
See Also  Mitsubishi Heavy Industries · Canadair Limited · Fiat Aviation

USA jet aircraft
  Fighters
F-4  F-4C Phantom II · F-4E Phantom II · F-4J Phantom II · F-4S Phantom II
F-5  F-5A · F-5C · F-5E · F-20A
F-8  F8U-2 · F-8E
F-80  F-80A-5 · F-80C-10
F-84  F-84B-26 · F-84F · F-84G-21-RE
F-86  F-86A-5 · F-86F-25 · F-86F-2 · F-86F-35
F-89  F-89B · F-89D
F-100  F-100D
F-104  F-104A · F-104C
F-14  F-14A Early · F-14B
F-15  F-15A
F-16  F-16A · F-16A ADF · F-16C
F9F  F9F-2 · F9F-5 · F9F-8
Other  P-59A · F2H-2 · F3D-1 · F3H-2 · F4D-1 · F11F-1
  Strike Aircraft
FJ-4  FJ-4B · FJ-4B VMF-232
A-4  A-4B · A-4E Early
A-6  A-6E TRAM
A-7  A-7D · A-7E · A-7K
AV-8  AV-8A · AV-8C
A-10  A-10A · A-10A Late
B-57  B-57A · B-57B
F-105  F-105D
F-111  F-111A