F-89D

From War Thunder Wiki
Jump to: navigation, search
Rank VI | Premium | Golden Eagles
Challenger DS Pack
This page is about the American jet fighter F-89D. For the other version, see F-89B.
F-89D
f-89d.png
GarageImage F-89D.jpg
F-89D
Purchase:3 770 Specs-Card-Eagle.png
Show in game

Description

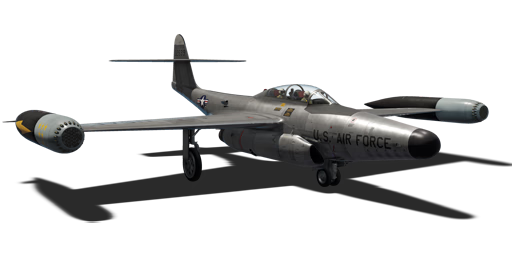
The F-89D Scorpion was designed and built to be an all-weather interceptor intended to neutralize any potential invading Soviet bomber force. The USAAF was intent of replacing the P-61 Black Widow with another night fighter, one specifically which would fly faster (minimum 850 km/h / 530 mph) almost assuredly requiring the usage of jets. To round out the aircraft for ground attack if needed, it would also need to accommodate 1,000 lb bombs and eight larger rocket types externally. Initial wind tunnel testing of the fighter determined that the proposed swept-wings were insufficient at slow speeds and were changed out with straight wings. Though causing a loss of high-end performance, increased stability at low speeds was necessary. The F-89D was a variant using 104 Folding-Fin Mighty Mouse Aerial Rockets and underwing HVAR rockets. The rockets worked with a proximity fuse, and allowed the fighter to launch a salvo to a bomber and then reacquire another bomber, however the rockets were very inaccurate, which meant that large salvos were needed for one or two rockets to explode near the target.

It was introduced in Update 1.91 "Night Vision". The F-89D is a high altitude interceptor and that translates very well to its performance in War Thunder. It is armed with proximity fuse rockets, that explode near the aerial target. This rockets have very low accuracy and require large salvos to be of any use, but they are specially good against enemy bombers, of course, not so much against small fighters. The F-89D has a mediocre flight performance, while it has a good top speed thanks to the afterburner of its engine, it wont be able to dogfight with most aircrafts, and the acceleration at low speeds is very bad thanks to the weight of the plane. For simulator battles, it has access to a radar that is very useful to find targets at high altitudes, but not so much at low altitudes.

General info

Flight performance

Air brakes
Allows you to dramatically reduce the flight speed by releasing special flaps
Max speed
at 3 200 m1 022 km/h
Turn time33 s
Max altitude14 996 m
Engine2 х Allison J35-A-35
Type
Cooling systemAir
Take-off weight20 t

The F-89D just like its previous variant has an amazing performance. Its level speed is outstanding but depends a lot on the altitude: near the ground it is being limited by the plane's structural limit which is 920 km/h IAS (a warning shows up at 870 km/h IAS) and it is very easy to get to that speed. The plane will keep accelerating even after exceeding it because of its powerful afterburner and that can end up in breaking wings if the player is not careful. Maximum level speed can be achieved at around 3000 m altitude where it reaches 1022 km/h and that makes it one of the fastest planes at its Battle Rating.

The Climb rate of the Scorpion depends a lot on its loadout: it is very mediocre when the plane is fully loaded with fuel and rockets, but gets way better when it is flying with 30 minutes of fuel or less. The main armament (rockets) and its high count (104) affects the performance too. Once you have only a few rockets left and the fuel amount is below 10 minutes the plane can even dogfight planes like the MiG-9. The other aspect of this plane affected by its overall weight is acceleration and just like with the climb rate, the less of them you have, the faster it will accelerate. While at high speed its acceleration is very good, once the speed gets lower than 500 km/h it becomes mediocre at best. Sometimes it is a viable tactic to launch half the amount of your rockets to get away from other planes and when the maximum level speed is reached then start climbing to 3000 m where its performance is the best.

The F-89D's manoeuvrability varies a lot with its weight: when it is heavy its roll rate and turn rate very poor, almost every jet fight at a similar BR should be able to win any fight where sustained turning performance is needed, but once the plane gets lighter it can turn with some of worse turning jets like the MiG-9 although it still loses to the MiG-15 or any similar plane. At low speed its energy retention is quite poor, especially when the player will start performing tight turns and at high speed the player should be wary of the high G turns as the Scorpion's G overload limit is only +8.5 G and -3.5 G when fully loaded. Overall the performance is very good when the player is managing its loadout and speed properly and make the F-89D excellent at causing a lot of damage to the enemy team together with the armament of 104 proximity fuse rockets.

Characteristics Max Speed
(km/h at 3,200 m)
Max altitude
(metres)
Turn time
(seconds)
Rate of climb
(metres/second)
Take-off run
(metres)
AB RB AB RB AB RB
Stock 1,009 1,002 14996 33.3 34.8 31.1 26.7 1,036
Upgraded 1,034 1,022 32.7 33.0 47.5 38.9

Details

Features
Combat flaps Take-off flaps Landing flaps Air brakes Arrestor gear Drogue chute
X X
Limits
Wings (km/h) Gear (km/h) Flaps (km/h) Max Static G
Combat Take-off Landing + -
920 379 554 448 379 ~8 ~3
Optimal velocities (km/h)
Ailerons Rudder Elevators Radiator
< 760 < 800 < 700 N/A

Engine performance

Engine Aircraft mass
Engine name Number Empty mass Wing loading (full fuel)
Allison J35-A-35 2 12,509 kg 318 kg/m2
Engine characteristics Mass with fuel (no weapons load) Max Takeoff
Weight
Weight (each) Type 21m fuel 30m fuel 45m fuel 60m fuel 70m fuel
1,300 kg Afterburning axial-flow turbojet 14,158 kg 14,850 kg 16,002 kg 17,162 kg 17,923 kg 20,301 kg
Maximum engine thrust @ 0 m (RB / SB) Thrust to weight ratio @ 0 m (WEP)
Condition 100% WEP 21m fuel 30m fuel 45m fuel 60m fuel 70m fuel MTOW
Stationary 2,303 kgf 3,051 kgf 0.43 0.41 0.38 0.36 0.34 0.30
Optimal 2,350 kgf
(100 km/h)
3,237 kgf
(800 km/h)
0.46 0.44 0.40 0.38 0.36 0.32

Survivability and armour

Crew2 people
Speed of destruction
Structural920 km/h
Gear379 km/h

The F-89D is quite a sturdy machine and won't crash from regular hits, both of the pilots in the cockpit have control over the plane, so if one is knocked out, you can still fly him safe home. Not only are there two pilots in this machine, but also two engines, which if one of them is shot out, the other can still thrust you back to safety for repairs.

Losing a wing tip isn't a problem as you can still fly with it, with minor compensation for aerodynamics. The thing that will mostly bring you down if you get caught in a firefight will be loss of control surfaces. So as long as you still are able to control your plane, you're good to go.

Modifications and economy

Repair cost
AB2 083 Sl icon.png
RB6 376 Sl icon.png
SB8 679 Sl icon.png
Crew training10 000 Sl icon.png
Experts550 000 Sl icon.png
Aces1 800 Ge icon.png
Research Aces1 550 000 Rp icon.png
Reward for battleAB / RB / SB
Talisman.png 2 × 130 / 340 / 600 % Sl icon.png
Talisman.png 2 × 202 / 202 / 202 % Rp icon.png
Modifications
Flight performance Survivability Weaponry
Mods aerodinamic fuse.png
Fuselage repair
Mods jet compressor.png
Compressor
Mods aerodinamic wing.png
Wings repair
Mods jet engine.png
Engine
Mods armor frame.png
Airframe
Mods jet engine extinguisher.png
EFS
Mods armor cover.png
Cover

Armaments

Suspended armament

List of setups (3)
Setup 1104 x FFAR Mighty Mouse rockets
Setup 28 x HVAR rockets
8 x HVAR rockets
104 x FFAR Mighty Mouse rockets
Setup 3104 x FFAR Mighty Mouse rockets M439
Main articles: FFAR Mighty Mouse, HVAR

The F-89D can be outfitted with the following ordnance:

  • 104 x FFAR Mighty Mouse rockets
  • 104 x FFAR Mighty Mouse rockets + 16 x HVAR rockets
  • 104 x FFAR Mighty Mouse rockets M439

The F-89D is unique in its weapons loadout and stands out in a class of its own with the F-86D Sabre Dog in that the only weapons found on the fighter/interceptor are unguided aerial rockets (both FFAR and HVAR). It is not the intention of this aircraft to dogfight other fighters, instead its purpose is to was to eliminate Soviet bombers. The F-89D when given the clearance, would zoom-climb to bomber altitude with its afterburners engaged and then would utilise its Folding-Fin Aerial Rockets (Mighty Mouse) by shooting salvos (with 104 total rockets on board, a few could be fired off or a large amount) at inbound bomber aircraft. The rockets would spread out similar to how a shotgun works and the result should be enough rockets make contact or explode near the bombers to take them out. While these unguided rockets may not be accurate, with the amount on-board, many can be fired to increase the interceptor's chances of hitting. The HVAR rockets are larger and only a few are mounted under the wings. These rockets should be reserved for the larger and slower bombers, notwithstanding there are less to work with which decreases the chances to hit compared to the FFARs.

While the F-89D was built and configured for aerial interception and destruction of aircraft, the rockets, both FFAR and HVAR can be utilised on ground targets too. The F-89D is outfitted with decelerons which double as speed brakes which open up in a clam-shell style. The Scorpion can dive on ground targets, engage the dive brakes, line up the target and then unleash either the FFAR or HVAR rockets depending on the target types. With the 104 FFAR Mighty Mouse rockets, enemy vehicles which are clustered together are an excellent target to unleash salvos of rockets at. Another opportunity is during domination maps, the rockets come in very handy for taking out aircraft which are attempting to cap the airfield as the rocket spread does not need to be super accurate to still achieve a critical hit or destruction of the aircraft capping the airfield.

Usage in battles

There are two ways to play the F-89D, either as a ground pounder or as fighter with irregular ammunition, being proximity fuse FFARs.

Ground attacker

When taking the F-89D as a ground pounder, the preferable loadout would be taking all the rockets possible, 104 FFARs + 16 HVARs. Pay close attention as the HVARs fire first before making use of the HVAR's. Exploit the fact that the F-89D is among the fastest accelerating for its battle rating and when arriving near targets will be quite relaxing as your enemies will still be on their way towards you.

Be warned that the FFAR pods are quite far away from each other and targeting isn't as easy as using the HVARs, firing in salvo is advised, and having 104 rockets will be plenty enough before you have to re-arm. Hit as much as you can and run away as soon as enemies are coming for your cannonless machine.

Fighter

The best way to achieve kills in the F-89D is by taking the proximity-fuse FFARs and playing it by boom and zooming, making great use of the high acceleration and fast climb rate. The rockets are quite inaccurate because of the fact they're spread out so much, so shooting in salvo's is strongly advised. Although extremely deadly in a head-on, rockets are however heavily to moderately affected by RNG, giving mixed results: sometimes they can annihilate and other times you can get hit after hit.

SB EC

The F-89D is very effective when used as a fighter: thanks to its proximity fuse rockets and radar, it is able to engage and destroy the enemy planes from between 1000 m and 2000 m away. The amount of proximity fuse rockets allows it to score lots of kills in one sortie, especially when the player gets used to their trajectory and will need only a few rockets to destroy a single plane. Its radar can help a lot with measuring the range and getting a good lead, but everything still should be engaged only from two positions, from the front or behind. Any high deflection shooting should be avoided, unless when the enemy plane notices you and when that happens, it is recommended to get a radar lock and then use it to get a firing solution (radar lock box is visible even through the instrument panel in the cockpit).

Any dogfighting should be avoided, it will only make the plane slower and vulnerable to faster enemies: the plane is very easy to hit because of its size and it will not be possible to win that fight anyway because of poor manoeuvrability. It is best to attack them from behind from ~1500 m away and when the attack failed then fly away in a straight line or start climbing at high speed, the only exception from that is only when the player has the low fuel amount and 10-20 rockets left, in that situation it can outturn the MiG-9 and anything else with the similar turn rate. In case when you notice an enemy fighter getting close to you from the rear it is the best to enter a very shallow dive, steep diving is not recommended because of low structural speed at lower altitude and the fact that most of the enemy fighters that the player will meet in SB EC 5 have much higher speed limit, for some of them it is even 1000 km/h IAS, while for the F-89D it is only 920 km/h. After the reaching maximum level speed the player should start climbing, then when the distance between two planes open up the best option is to start climbing vertically and then fell on the enemy plane.

The most dangerous enemies in SB EC 5 are the Meteor F.4, Yak-23, MiG-9/L, Ho 229 and all Japanese jet fighters (mainly the R2Y2). The Meteor outperforms in it all aspects except for the level speed above 3000m alt, the MiG-9 is superior only in the sustained turn rate when the F-89D is fully loaded. The Ho 229 can be easily outclimbed, but the player should keep in mind that it has very good energy retention and underestimating it is a bad idea and both Japanese jet types are just very good planes.

When using it against bombers the player should be very cautious of the enemy gunners, in SB EC 5 some planes can take out attacking planes from even 2000 m away, so it is the best to launch a few rockets at them as soon as you get a radar lock and getting closer than 1000 m should be avoided. Since most of them are going to always fly in a straight line it is recommended to take a proper position before attacking them and do not go for a high deflection attack where you can miss and waste a lot of rockets, the most effective tactic is to stay out of their gunners range and fly 3000 - 4000 m behind them, turn around, then start launching missiles at them from the same altitude, it will make the aiming easier and they will not be able to damage your plane from that distance. It is possible to take out the entire formation of AI bombers in only one attack from behind in less than 30 seconds.

Generally the best tactics in EC is to fly at 1000 - 3000 m altitude while maintaing a speed of at least 750 km/h, the afterburner shouldn't be used all the time because of fuel consumption and loading more fuel before the takeoff (45 minutes and more) decreases its climb rate and acceleration by a lot.

Radars

The F-89D is equipped with an AN/APG-33 tracking radar, located in the nose of the aircraft.

AN/APG-33 - Target tracking radar
Maximum
Tracking
Range
Minimum
Tracking
Range
Azimuth Tracking
Angle
Elevation Tracking
Angle
2,000 m 150 m ±5° ±5°

Pros and cons

Pros:

  • Fearsome rocket armament, both Mighty Mouse and HVARs
  • Decent high-speed manoeuvrability
  • Dual-engine, can fly with one (though, head back to base!)
  • Targeting radar equipped
  • Bomber interceptor or ground attacker role capable
  • Armament will be able to easily destroy enemy planes in a head-on
  • Use of decelerons as ailerons, dive brakes (clamshell-type) or flaps

Cons:

  • No autocannon armament
  • Rockets are inaccurate, odds increased when launched in salvos
  • Not very manoeuvrable at low speeds
  • Large target wing-surface
  • Heavy wing-tips, losing one throws the aircraft off balance
  • Not as nimble as single-engine MiGs

History

F-89D at cruising altitude.

Almost immediately after WWII, the Nothrop Corporation began developing an experimental jet fighter-interceptor to meet the new requirements for that class of aircraft. The American interceptor's primary targets were supposed to be Soviet bombers, so the projected model's flight characteristics and armament had to meet this objective. At first the two-seater twin-engine jet was developed to have a rather interesting four gun turret. This turret was to be mounted on the aircraft's nose and could fire on targets either automatically or manually along a vertical plane either forward, up, down or, in some cases, backward. However, when the experimental model of the aircraft was ready, the turret still hadn't undergone testing yet, so the military decided to install traditional static frontal guns on it, as well as HVARs on the wing pylons. It was with this loadout that the Scorpion F-89A and F-89B went into service. The armament was switched exclusively to rockets somewhat later. To make the change to rockets, the designers implemented an interesting solution: Mighty Mouse unguided rockets were installed on the front of the wing-mounted fuel tanks in such a way that the rocket and fuel sections of this part of the design were separated by a fireproof barrier. This also made it possible to install heavier, more destructive HVARs under the wing. The F-89D or "rocket" version of the Scorpion went on to become the most widespread version of the aircraft in the US air force – 682 of them were manufactured.

- From Devblog

Media

Skins
Images
Videos

See also

  • F-89B - Cannon-armed variant of the jet.

External links


Northrop Corporation
Fighters  P-61A-11 · P-61C-1
Jet fighters  F-89B · F-89D
  F-5A · F-5C · F-5E
  F-20A
Export  ␗F-5A · ▄F-5E FCU

USA jet aircraft
  Fighters
F-4  F-4C Phantom II · F-4E Phantom II · F-4J Phantom II · F-4S Phantom II
F-5  F-5A · F-5C · F-5E · F-20A
F-8  F8U-2 · F-8E
F-80  F-80A-5 · F-80C-10
F-84  F-84B-26 · F-84F · F-84G-21-RE
F-86  F-86A-5 · F-86F-25 · F-86F-2 · F-86F-35
F-89  F-89B · F-89D
F-100  F-100D
F-104  F-104A · F-104C
F-14  F-14A Early · F-14B
F-15  F-15A
F-16  F-16A · F-16A ADF · F-16C
F9F  F9F-2 · F9F-5 · F9F-8
Other  P-59A · F2H-2 · F3D-1 · F3H-2 · F4D-1 · F11F-1
  Strike Aircraft
FJ-4  FJ-4B · FJ-4B VMF-232
A-4  A-4B · A-4E Early
A-6  A-6E TRAM
A-7  A-7D · A-7E · A-7K
AV-8  AV-8A · AV-8C
A-10  A-10A · A-10A Late
B-57  B-57A · B-57B
F-105  F-105D
F-111  F-111A

USA premium aircraft
Fighters  Thach's F2A-1 · Galer's F3F-2 · F2G-1 · F4U-4B VMF-214 · P-26A-34 · P-40C · P-43A-1
  P-47M-1-RE · ⋠P-47M-1-RE · P-51A · P-51D-10 · P-51D-20-NA · ␠Kingcobra · XP-55
  ▃A6M2 · ▃Ki-43-II · ▃Ki-61-Ib · ▃Bf 109 F-4 · ▃Fw 190 A-8 · ▃Spitfire LF Mk IXc
Twin-engine fighters  XP-38G · Bong's P-38J-15 · P-38K · YP-38 · P-61A-11 · XF5F · XP-50 · F7F-3
Jet fighters  P-59A · F-86F-35 · F-89B · F-89D · F-4S Phantom II · F-5C · F-20A
Strike aircraft  A-1H · A2D-1 · AU-1 · XA-38 · AV-8A · A-6E TRAM · A-10A
Bombers  A-26C-45DT · B-10B · BTD-1 · PBM-3 "Mariner" · PV-2D