Difference between revisions of "M36 (Japan)"
(Edits) |
m (Added several new points to the Pros and Cons section) (Tag: Visual edit) |
||
| (9 intermediate revisions by 5 users not shown) | |||
| Line 11: | Line 11: | ||
== Description == | == Description == | ||
<!-- ''In the description, the first part should be about the history of the creation and combat usage of the vehicle, as well as its key features. In the second part, tell the reader about the ground vehicle in the game. Insert a screenshot of the vehicle, so that if the novice player does not remember the vehicle by name, he will immediately understand what kind of vehicle the article is talking about.'' --> | <!-- ''In the description, the first part should be about the history of the creation and combat usage of the vehicle, as well as its key features. In the second part, tell the reader about the ground vehicle in the game. Insert a screenshot of the vehicle, so that if the novice player does not remember the vehicle by name, he will immediately understand what kind of vehicle the article is talking about.'' --> | ||
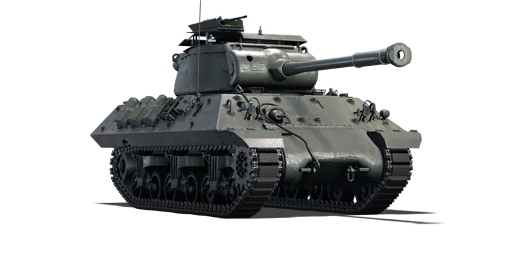
| − | + | The '''{{Specs|name}}''' is a rank {{Specs|rank}} Japanese tank destroyer {{Battle-rating}}. It was introduced in [[Update "Danger Zone"]]. | |
| − | |||
| − | |||
== General info == | == General info == | ||
| Line 19: | Line 17: | ||
{{Specs-Tank-Armour}} | {{Specs-Tank-Armour}} | ||
<!-- ''Describe armour protection. Note the most well protected and key weak areas. Appreciate the layout of modules as well as the number and location of crew members. Is the level of armour protection sufficient, is the placement of modules helpful for survival in combat? If necessary use a visual template to indicate the most secure and weak zones of the armour.'' --> | <!-- ''Describe armour protection. Note the most well protected and key weak areas. Appreciate the layout of modules as well as the number and location of crew members. Is the level of armour protection sufficient, is the placement of modules helpful for survival in combat? If necessary use a visual template to indicate the most secure and weak zones of the armour.'' --> | ||
| − | |||
| − | |||
'''Armour type:''' | '''Armour type:''' | ||
| Line 49: | Line 45: | ||
{{Specs-Tank-Mobility}} | {{Specs-Tank-Mobility}} | ||
<!-- ''Write about the mobility of the ground vehicle. Estimate the specific power and manoeuvrability, as well as the maximum speed forwards and backwards.'' --> | <!-- ''Write about the mobility of the ground vehicle. Estimate the specific power and manoeuvrability, as well as the maximum speed forwards and backwards.'' --> | ||
| − | |||
| − | |||
{{tankMobility|abMinHp=582|rbMinHp=363}} | {{tankMobility|abMinHp=582|rbMinHp=363}} | ||
| Line 63: | Line 57: | ||
<!-- ''Give the reader information about the characteristics of the main gun. Assess its effectiveness in a battle based on the reloading speed, ballistics and the power of shells. Do not forget about the flexibility of the fire, that is how quickly the cannon can be aimed at the target, open fire on it and aim at another enemy. Add a link to the main article on the gun: <code><nowiki>{{main|Name of the weapon}}</nowiki></code>. Describe in general terms the ammunition available for the main gun. Give advice on how to use them and how to fill the ammunition storage.'' --> | <!-- ''Give the reader information about the characteristics of the main gun. Assess its effectiveness in a battle based on the reloading speed, ballistics and the power of shells. Do not forget about the flexibility of the fire, that is how quickly the cannon can be aimed at the target, open fire on it and aim at another enemy. Add a link to the main article on the gun: <code><nowiki>{{main|Name of the weapon}}</nowiki></code>. Describe in general terms the ammunition available for the main gun. Give advice on how to use them and how to fill the ammunition storage.'' --> | ||
{{main|M3A1 (90 mm)}} | {{main|M3A1 (90 mm)}} | ||
| − | |||
| − | |||
{| class="wikitable" style="text-align:center" width="100%" | {| class="wikitable" style="text-align:center" width="100%" | ||
| Line 83: | Line 75: | ||
==== Ammunition ==== | ==== Ammunition ==== | ||
| − | {{: | + | {| class="wikitable sortable" style="text-align:center" width="100%" |
| + | ! colspan="8" | Penetration statistics | ||
| + | |- | ||
| + | ! rowspan="2" data-sort-type="text" | Ammunition | ||
| + | ! rowspan="2" | Type of<br>warhead | ||
| + | ! colspan="6" | Penetration @ 0° Angle of Attack (mm) | ||
| + | |- | ||
| + | ! 10 m !! 100 m !! 500 m !! 1,000 m !! 1,500 m !! 2,000 m | ||
| + | |- | ||
| + | | M318 shot || APBC || 175 || 173 || 161 || 147 || 135 || 123 | ||
| + | |- | ||
| + | | M82 shot || APCBC || 185 || 182 || 170 || 155 || 142 || 130 | ||
| + | |- | ||
| + | | M304 shot || APCR || 287 || 281 || 259 || 234 || 211 || 191 | ||
| + | |- | ||
| + | | M332 shot || APCR || 291 || 286 || 264 || 240 || 217 || 197 | ||
| + | |- | ||
| + | | M348 shell || HEATFS || 305 || 305 || 305 || 305 || 305 || 305 | ||
| + | |- | ||
| + | | M71 shell || HE || 13 || 13 || 13 || 13 || 13 || 13 | ||
| + | |- | ||
| + | |} | ||
| + | {| class="wikitable sortable" style="text-align:center" width="100%" | ||
| + | ! colspan="10" | Shell details | ||
| + | |- | ||
| + | ! rowspan="2" data-sort-type="text" | Ammunition | ||
| + | ! rowspan="2" | Type of<br>warhead | ||
| + | ! rowspan="2" | Velocity<br>(m/s) | ||
| + | ! rowspan="2" | Projectile<br>Mass (kg) | ||
| + | ! rowspan="2" | Fuse delay<br>(m) | ||
| + | ! rowspan="2" | Fuse sensitivity<br>(mm) | ||
| + | ! rowspan="2" | Explosive Mass<br>(TNT equivalent) (g) | ||
| + | ! colspan="3" | Ricochet | ||
| + | |- | ||
| + | ! 0% !! 50% !! 100% | ||
| + | |- | ||
| + | | M318 shot || APBC || 853 || 10.98 || N/A || N/A || N/A || 47° || 60° || 65° | ||
| + | |- | ||
| + | | M82 shot || APCBC || 853 || 10.94 || 1.2 || 14 || 137.2 || 48° || 63° || 71° | ||
| + | |- | ||
| + | | M304 shot || APCR || 1,021 || 7.62 || N/A || N/A || N/A || 66° || 70° || 72° | ||
| + | |- | ||
| + | | M332 shot || APCR || 1,165 || 5.7 || N/A || N/A || N/A || 66° || 70° || 72° | ||
| + | |- | ||
| + | | M348 shell || HEATFS || 853 || 6.5 || 0.05 || 0.1 || 926.17 || 65° || 72° || 77° | ||
| + | |- | ||
| + | | M71 shell || HE || 823 || 10.55 || 0 || 0.1 || 925 || 79° || 80° || 81° | ||
| + | |- | ||
| + | |} | ||
| + | {| class="wikitable" style="text-align:center" | ||
| + | ! colspan="7" | Smoke shell characteristics | ||
| + | |- | ||
| + | ! Ammunition | ||
| + | ! Velocity<br>(m/s) | ||
| + | ! Projectile<br>Mass (kg) | ||
| + | ! Screen radius<br>(m) | ||
| + | ! Screen deploy time<br>(s) | ||
| + | ! Screen hold time<br>(s) | ||
| + | ! Explosive Mass<br>(TNT equivalent) (g) | ||
| + | |- | ||
| + | | M313 || 821 || 10.7 || 13 || 5 || 20 || 50 | ||
| + | |- | ||
| + | |} | ||
==== [[Ammo racks]] ==== | ==== [[Ammo racks]] ==== | ||
| Line 119: | Line 173: | ||
! Mount !! Capacity (Belt) !! Fire rate !! Vertical !! Horizontal | ! Mount !! Capacity (Belt) !! Fire rate !! Vertical !! Horizontal | ||
|- | |- | ||
| − | | Pintle || 1,000 (200) || | + | | Pintle || 1,000 (200) || 577 || -10°/+70° || ±60° |
|- | |- | ||
|} | |} | ||
| Line 138: | Line 192: | ||
=== Pros and cons === | === Pros and cons === | ||
<!-- ''Summarise and briefly evaluate the vehicle in terms of its characteristics and combat effectiveness. Mark its pros and cons in a bulleted list. Try not to use more than 6 points for each of the characteristics. Avoid using categorical definitions such as "bad", "good" and the like - use substitutions with softer forms such as "inadequate" and "effective".'' --> | <!-- ''Summarise and briefly evaluate the vehicle in terms of its characteristics and combat effectiveness. Mark its pros and cons in a bulleted list. Try not to use more than 6 points for each of the characteristics. Avoid using categorical definitions such as "bad", "good" and the like - use substitutions with softer forms such as "inadequate" and "effective".'' --> | ||
| + | ''Summarise and briefly evaluate the vehicle in terms of its characteristics and combat effectiveness. Mark its pros and cons in a bulleted list. Try not to use more than 6 points for each of the characteristics. Avoid using categorical definitions such as "bad", "good" and the like - use substitutions with softer forms such as "inadequate" and "effective".'' | ||
'''Pros:''' | '''Pros:''' | ||
| − | + | The tank has access to HEATFS (M348) at 5.7 with a penetration value of 305mm at 500 meters, making it effective against heavy armour if shot placement is adequate | |
| − | + | ||
| − | + | the gun mantlet has a few spots predominantly around its edges and top with very high armour thickness, giving you a slight chance of the enemy ricocheting or not penetrating the frontal part of the turret if they hit the mantlet | |
| − | + | ||
| − | + | 10° gun depression gives it the capability to shoot over several types of hills | |
| − | + | ||
| + | Roof mounted M2 MG gives the tank the ability to fend of aircraft and to deal with other lightly armoured vehicles without using the main gun | ||
| + | |||
| + | * | ||
'''Cons:''' | '''Cons:''' | ||
| − | + | The armour of the turret roof is only 6.5mm thick, the sides are 17-31.75mm thick and ammo stowage is only 25.4mm thick, this makes it vulnerable against attacks from aircrafts, artillery, SPAAs, overpressure and machine guns (namely 50. caliber and higher). | |
| − | + | ||
| − | + | Lackluster acceleration makes the tank struggle greatly with climbing slopes, hills and limits its maneuverability, the engine upgrades only somewhat alleviate this issue. | |
| − | + | ||
| − | + | Base crew has a reload speed of 9.75 seconds with a loaded ready rack, making engagments more dangerous especially if there is a lack of cover | |
| − | + | ||
| − | * | + | Notably tall and large for a tank destroyer, which makes it harder to conceal and somewhat limits what type of cover is effective |
| + | |||
| + | * | ||
== History == | == History == | ||
| Line 163: | Line 223: | ||
=== M36s in Japan === | === M36s in Japan === | ||
| − | Due to the outbreak of the Korean War, the GHQ (General Headquarters of Allied occupation) ordered Japan to re-militarize, while the US also provided plenty of [[M4A3 (76) W (Japan)|M4A3 (76) W]] and [[M24 (Japan)|M24]] tanks to help Japan form their armed police force, the NPR (National Police Reserve), so more US forces could fight in Korea while Japan could still maintain reserve manpower for defense. | + | Due to the outbreak of the Korean War, the GHQ (General Headquarters of Allied occupation) ordered Japan to re-militarize, while the US also provided plenty of [[M4A3 (76) W (Japan)|M4A3 (76) W]] and [[M24 (Japan)|M24]] tanks to help Japan form their armed police force, the NPR (National Police Reserve), so more US forces could fight in Korea while Japan could still maintain reserve manpower for defense. Multiple M36B2s were assembled at a depot in Akabane which would be shipped to the Korea peninsula to support South Korean and American forces. |
| − | + | However, the tanks that the NPR received were too big for the average Japanese tanker. In order to replace the obsolete Sherman and Chaffee tanks, Japan got a M36B2 for research purposes to help develop a new domestically designed tank, which would eventually be developed into the [[Type 61]]. | |
== Media == | == Media == | ||
| Line 181: | Line 241: | ||
* ''reference to the series of the vehicles;'' | * ''reference to the series of the vehicles;'' | ||
* ''links to approximate analogues of other nations and research trees.'' --> | * ''links to approximate analogues of other nations and research trees.'' --> | ||
| + | ''Links to the articles on the War Thunder Wiki that you think will be useful for the reader, for example:'' | ||
| − | ; | + | * ''reference to the series of the vehicles;'' |
| − | + | * ''links to approximate analogues of other nations and research trees.'' | |
| − | * | ||
== External links == | == External links == | ||
Revision as of 16:57, 22 November 2022
| This page is about the tank destroyer M36 (Japan). For other versions, see M36 Jackson (Family). |
.jpg)
.png)
Contents
Description
The 90-mm Gun Motor Carriage M36, SDF is a rank IV Japanese tank destroyer with a battle rating of 5.7 (AB/RB/SB). It was introduced in Update "Danger Zone".
General info
Survivability and armour
Armour type:
- Rolled homogeneous armour
- Cast homogeneous armour (Gun mantlet, Transmission area)
| Armour | Front (Slope angle) | Sides | Rear | Roof |
|---|---|---|---|---|
| Hull | 38.1 mm (56°) Front glacis 50.8-107.8 (9-63°) Transmission housing |
19.05 mm (37°) Top 25.4 mm Bottom |
19.05 mm (42°) Top 19.05 (1-45°) Bottom |
19.5 mm Front roof 9.5 mm Engine deck |
| Turret | 31.75 mm (2-53°) Turret front 76.2 mm (°) Gun mantlet |
31.75 mm (0-21°) | 25.4 mm (2-23°) | 6.5 mm |
Notes:
- Tracks are 20 mm thick, bogies are 10 mm thick while the wheels are 20 mm thick.
- Small slivers of 5 mm armour hang off the top side hull armour, giving minuscule protections at those areas.
- Track blocks on the side hull armour allows an extra 20 mm of armour at their locations.
Mobility
| Game Mode | Max Speed (km/h) | Weight (tons) | Engine power (horsepower) | Power-to-weight ratio (hp/ton) | |||
|---|---|---|---|---|---|---|---|
| Forward | Reverse | Stock | Upgraded | Stock | Upgraded | ||
| Arcade | 52 | 7 | 29.9 | 582 | 954 | 19.46 | 31.91 |
| Realistic | 48 | 7 | 363 | 500 | 12.14 | 16.72 | |
Modifications and economy
| Mobility | Protection | Firepower | ||||||||||||||||||||
|---|---|---|---|---|---|---|---|---|---|---|---|---|---|---|---|---|---|---|---|---|---|---|
|
|
|
Armaments
Main armament
| 90 mm M3A1 | Turret rotation speed (°/s) | Reloading rate (seconds) | |||||||||||
|---|---|---|---|---|---|---|---|---|---|---|---|---|---|
| Mode | Capacity | Vertical | Horizontal | Stabilizer | Stock | Upgraded | Full | Expert | Aced | Stock | Full | Expert | Aced |
| Arcade | 47 | -10°/+20° | ±180° | N/A | 21.1 | 29.3 | 35.5 | 39.3 | 41.8 | 9.75 | 8.63 | 7.95 | 7.50 |
| Realistic | 14.3 | 16.8 | 20.4 | 22.6 | 24.0 | ||||||||
Ammunition
| Penetration statistics | |||||||
|---|---|---|---|---|---|---|---|
| Ammunition | Type of warhead |
Penetration @ 0° Angle of Attack (mm) | |||||
| 10 m | 100 m | 500 m | 1,000 m | 1,500 m | 2,000 m | ||
| M318 shot | APBC | 175 | 173 | 161 | 147 | 135 | 123 |
| M82 shot | APCBC | 185 | 182 | 170 | 155 | 142 | 130 |
| M304 shot | APCR | 287 | 281 | 259 | 234 | 211 | 191 |
| M332 shot | APCR | 291 | 286 | 264 | 240 | 217 | 197 |
| M348 shell | HEATFS | 305 | 305 | 305 | 305 | 305 | 305 |
| M71 shell | HE | 13 | 13 | 13 | 13 | 13 | 13 |
| Shell details | |||||||||
|---|---|---|---|---|---|---|---|---|---|
| Ammunition | Type of warhead |
Velocity (m/s) |
Projectile Mass (kg) |
Fuse delay (m) |
Fuse sensitivity (mm) |
Explosive Mass (TNT equivalent) (g) |
Ricochet | ||
| 0% | 50% | 100% | |||||||
| M318 shot | APBC | 853 | 10.98 | N/A | N/A | N/A | 47° | 60° | 65° |
| M82 shot | APCBC | 853 | 10.94 | 1.2 | 14 | 137.2 | 48° | 63° | 71° |
| M304 shot | APCR | 1,021 | 7.62 | N/A | N/A | N/A | 66° | 70° | 72° |
| M332 shot | APCR | 1,165 | 5.7 | N/A | N/A | N/A | 66° | 70° | 72° |
| M348 shell | HEATFS | 853 | 6.5 | 0.05 | 0.1 | 926.17 | 65° | 72° | 77° |
| M71 shell | HE | 823 | 10.55 | 0 | 0.1 | 925 | 79° | 80° | 81° |
| Smoke shell characteristics | ||||||
|---|---|---|---|---|---|---|
| Ammunition | Velocity (m/s) |
Projectile Mass (kg) |
Screen radius (m) |
Screen deploy time (s) |
Screen hold time (s) |
Explosive Mass (TNT equivalent) (g) |
| M313 | 821 | 10.7 | 13 | 5 | 20 | 50 |
Ammo racks
| Full ammo |
1st rack empty |
2nd rack empty |
3rd rack empty |
4th rack empty |
5th rack empty |
6th rack empty |
Visual discrepancy |
|---|---|---|---|---|---|---|---|
| 47 | __ (+__) | __ (+__) | __ (+__) | __ (+__) | __ (+__) | __ (+__) | __ |
Machine guns
The M36 has a roof-mounted M2HB to shoot down low altitude planes. It can also be effectively used against light armoured vehicles to great effect.
In the hull, the radio operator gunner has the ability to use a M1919A4 light machine gun which, other than spotting and against unarmoured vehicles, can't provide much anti-vehicle support.
| 12.7 mm M2HB | ||||
|---|---|---|---|---|
| Mount | Capacity (Belt) | Fire rate | Vertical | Horizontal |
| Pintle | 1,000 (200) | 577 | -10°/+70° | ±60° |
| 7.62 mm M1919A4 | ||||
|---|---|---|---|---|
| Mount | Capacity (Belt) | Fire rate | Vertical | Horizontal |
| Hull | 2,000 (250) | 500 | ±10° | ±10° |
Usage in battles
Describe the tactics of playing in the vehicle, the features of using vehicles in the team and advice on tactics. Refrain from creating a "guide" - do not impose a single point of view but instead give the reader food for thought. Describe the most dangerous enemies and give recommendations on fighting them. If necessary, note the specifics of the game in different modes (AB, RB, SB).
Pros and cons
Summarise and briefly evaluate the vehicle in terms of its characteristics and combat effectiveness. Mark its pros and cons in a bulleted list. Try not to use more than 6 points for each of the characteristics. Avoid using categorical definitions such as "bad", "good" and the like - use substitutions with softer forms such as "inadequate" and "effective".
Pros:
The tank has access to HEATFS (M348) at 5.7 with a penetration value of 305mm at 500 meters, making it effective against heavy armour if shot placement is adequate
the gun mantlet has a few spots predominantly around its edges and top with very high armour thickness, giving you a slight chance of the enemy ricocheting or not penetrating the frontal part of the turret if they hit the mantlet
10° gun depression gives it the capability to shoot over several types of hills
Roof mounted M2 MG gives the tank the ability to fend of aircraft and to deal with other lightly armoured vehicles without using the main gun
Cons:
The armour of the turret roof is only 6.5mm thick, the sides are 17-31.75mm thick and ammo stowage is only 25.4mm thick, this makes it vulnerable against attacks from aircrafts, artillery, SPAAs, overpressure and machine guns (namely 50. caliber and higher).
Lackluster acceleration makes the tank struggle greatly with climbing slopes, hills and limits its maneuverability, the engine upgrades only somewhat alleviate this issue.
Base crew has a reload speed of 9.75 seconds with a loaded ready rack, making engagments more dangerous especially if there is a lack of cover
Notably tall and large for a tank destroyer, which makes it harder to conceal and somewhat limits what type of cover is effective
History
M36s in Japan
Due to the outbreak of the Korean War, the GHQ (General Headquarters of Allied occupation) ordered Japan to re-militarize, while the US also provided plenty of M4A3 (76) W and M24 tanks to help Japan form their armed police force, the NPR (National Police Reserve), so more US forces could fight in Korea while Japan could still maintain reserve manpower for defense. Multiple M36B2s were assembled at a depot in Akabane which would be shipped to the Korea peninsula to support South Korean and American forces.
However, the tanks that the NPR received were too big for the average Japanese tanker. In order to replace the obsolete Sherman and Chaffee tanks, Japan got a M36B2 for research purposes to help develop a new domestically designed tank, which would eventually be developed into the Type 61.
Media
- Skins
- Videos
See also
Links to the articles on the War Thunder Wiki that you think will be useful for the reader, for example:
- reference to the series of the vehicles;
- links to approximate analogues of other nations and research trees.
External links
Paste links to sources and external resources, such as:
- topic on the official game forum;
- other literature.
| Japan tank destroyers | |
|---|---|
| Ro-Go Derivatives | Ro-Go Exp. |
| Chi-Ha Derivatives | Ho-Ni I · Ho-Ni III · Ho-Ro · Chi-Ha LG |
| Ho-Ri | Ho-Ri Prototype · Ho-Ri Production |
| Other | Na-To |
| JGSDF | |
| SPRG | Type 60 (C) |
| SPH | Type 75 · Type 99 |
| ATGM | Type 60 ATM |
| Rocket | Type 75 MLRS |
| USA | ▅M36 |
