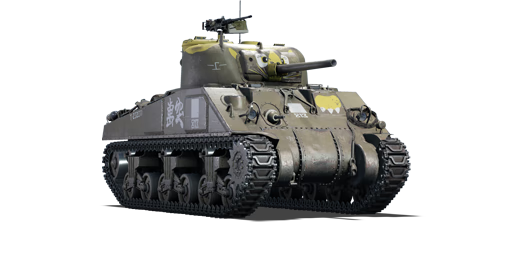
M4A4 (1st PTG) (China)

From War Thunder Wiki
Jump to: navigation, search
Rank VI | Premium | Golden Eagles
Challenger DS Pack
This page is about the gift Chinese medium tank M4A4 (1st PTG) (China). For other M4 Shermans, see M4 Sherman (Family). For other uses, see M4 (Disambiguation).
␗M4A4 (1st PTG)
cn_m4a4_sherman_1st_ptg.png
GarageImage M4A4 (1st PTG) (China).jpg
␗M4A4 (1st PTG)
AB RB SB
3.7 3.7 3.7
Purchase:1 300 Specs-Card-Eagle.png
Show in game

Description

The M4A4 Sherman - 1st Provisional Tank Group is a fifth variant of the early generation Medium Tank M4 (Sherman) family, used as part of the Chinese-American 1st Provisional Tank Group (1st PTG) of the Chinese Expeditionary Forces (中國遠征軍) during World War II, where the Chinese Kuomintang government equipped 32 such tanks under the lend-lease program and established the 1st PTG to be stationed in India. The Chinese Expeditionary Forces were primarily equipped with the M4A4 Sherman and M3A3 Stuart. They fought primarily in the China-Burma-India theatre (CBI) and helped the Allies reopen the land route through Japanese-occupied Burma by securing and repairing the Ledo-Burma Road.

Introduced in Update 1.91 "Night Vision", the premium M4A4 (1st PTG) is a unique historical unit of the M4A4 that performs similarly to other M4 Sherman variants armed with the 75 mm M3 tank gun. Players can engage opponents with more accuracy while moving thanks to a vertical stabilizer included in the gun mount. The vehicle is identical to the tech tree M4A4 except for a unique camouflage and a turret-mounted M2HB Browning heavy machine gun.

Introduced as a premium pack, it was later withdrawn from the store after the 2021 May sale. During the 2021 "National Day of the People's Republic of China", the M4A4 Sherman was temporarily made available for purchase again in-game. It returned in Update "Sky Guardians" as a premium vehicle available for purchase for Golden Eagles.

General info

Survivability and armour

Armourfront / side / back
Hull50 / 38 / 38
Turret76 / 50 / 50
Crew5 people
Visibility103 %

Armour type:

  • Rolled homogeneous armour
  • Cast homogeneous armour (transmission housing, turret, gun mantlet)
Armour Front (Slope angle) Sides Rear Roof
Hull 50.8 mm (56°) Front glacis
50.8 mm (8-17°) + 25.4 mm (29°) Viewports
34 + 25.4 mm (spherical) MG port
50.8 mm (3°) Radio antenna bulge
50.8 mm (cylindrical) Transmission housing
38.1 mm
38.1 + 25.4 mm Ammo racks
38.1 mm (21°) Top
38.1 mm Bottom
19.5 mm Front section
12.7 mm (7°) Engine bay - centre
19.5 mm (23°) Engine bay - sides
Turret 76 mm (7-65°) Turret front
50.8 mm (9-26°) Turret front - gunner side
50.8 + 88.9 mm (cylindrical) Gun mantlet
50.8 mm (1-3°) Turret sides
50.8 mm (58-66°) Roof radius
50.8 mm (1-5°) Sponson
50.8 mm (21-65°) Roof slope
25.4 mm
Cupola 50.8 mm (16°) 25.4 mm

Notes:

  • Suspension wheels are 15 mm thick while tracks are 20 mm thick and bogies are 10 mm thick.
  • The belly of the tank is 12.7 mm thick.
  • The internal wall separating the crew compartment from the engine bay is 9.5 mm thick.

The hull is very similar to the American M4 Sherman, with a 50.8 mm thick upper glacis and protruding hatches interrupting the glacis (reinforced with appliqué armour). A weak spot is the radio antenna bulge on the machine gunner side. The hull sides feature appliqué armour plates covering the ammunition storage racks. The turret is also very similar but lacks the appliqué armour on the right cheek, leaving a small weakened zone in that area. Frontal protection is quite good for its rank and shots from smaller anti-tank guns can generally be shrugged off, particularly when hull down. However more powerful guns such as the Pz.IV F2's long 75 mm can destroy the tank easily, so care should be taken. The side armour is only 38.1 mm thick and can be easily penetrated by just about any anti-tank gun if not angled.

Mobility

Speedforward / back
AB45 / 6 km/h
RB and SB41 / 5 km/h
Number of gears5 forward
1 back
Weight32.2 t
Engine power
AB811 hp
RB and SB425 hp
Power-to-weight ratio
AB25.2 hp/t
RB and SB13.2 hp/t
Game Mode Max Speed (km/h) Weight (tons) Engine power (horsepower) Power-to-weight ratio (hp/ton)
Forward Reverse Stock Upgraded Stock Upgraded
Arcade 45 6 32.2 659 811 20.47 25.19
Realistic 41 5 376 425 11.68 13.2

Based on the chassis of the M4, the M4A4 (1st PTG) (China) has the same good all-round mobility: the tank accelerates quickly and is able to reach a maximum speed of 44 km/h in a dozen of seconds. The brakes are powerful and will make the M4A4 skid rather than slow down when driving at maximum speed. The violent braking also causes the hull to wobble, making your targeting less accurate. The reverse speed is rather poor: it won't get you out of a dangerous situation quickly enough. The lack of neutral steering makes turning on the spot slow (2 km/h): make sure to build a little speed before turning and you'll turn much faster (11 km/h). Turning in reverse is equally slow (-2 km/h) Turning at full speed doesn't make you lose much speed as your acceleration is good. The offroad mobility is good: the M4A4 (1st PTG) (China) reaches 16 km/h when fording, 17 km/h when driving uphill with some speed built-up but a mere 10 km/h uphill from a stop start. The tracks are large and grant you a decent mobility on hard (solid ground, roads) and soft terrain (mud, snow, sand). Light and medium obstacles (fences, posts, bushes and small trees) are not a problem but large obstacles will reduce your mobility: avoid them.

Modifications and economy

Repair cost
AB624 Sl icon.png
RB709 Sl icon.png
SB1 815 Sl icon.png
Crew training10 000 Sl icon.png
Experts67 000 Sl icon.png
Aces330 Ge icon.png
Research Aces570 000 Rp icon.png
Reward for battleAB / RB / SB
Talisman.png 2 × 60 / 90 / 130 % Sl icon.png
Talisman.png 2 × 136 / 136 / 136 % Rp icon.png
Modifications
Mobility Protection Firepower
Mods new tank traks.png
Tracks
Mods new tank suspension.png
Suspension
Mods new tank break.png
Brake System
Mods new tank filter.png
Filters
Mods new tank transmission.png
Transmission
Mods new tank engine.png
Engine
Mods tank tool kit.png
Improved Parts
Mods extinguisher.png
Improved FPE
Mods tank reinforcement cn.png
Crew Replenishment
Mods new tank horizontal aiming.png
Horizontal Drive
Mods tank cannon.png
Adjustment of Fire
Mods tank ammo.png
75mm_usa_APCBC_ammo_pack
Mods new tank vertical aiming.png
Elevation Mechanism
Mods art support.png
Artillery Support
Mods tank ammo.png
75mm_us_M89_Smoke_ammo_pack

Armaments

Main armament

Vertical stabilizer
Reduces the swing of the gun in one plane while moving
Ammunition98 rounds
Reloadbasic crew → aces
6.5 → 5.0 s
Vertical guidance-10° / 25°
Main article: M3 (75 mm)
75 mm M3 Turret rotation speed (°/s) Reloading rate (seconds)
Mode Capacity Vertical Horizontal Stabilizer Stock Upgraded Full Expert Aced Stock Full Expert Aced
Arcade 98 -10°/+25° ±180° Vertical 22.85 31.62 38.40 42.47 45.18 6.50 5.75 5.30 5.00
Realistic 14.28 16.80 20.40 22.56 24.00

Ammunition

Penetration statistics
Ammunition Type of
warhead
Penetration @ 0° Angle of Attack (mm)
10 m 100 m 500 m 1,000 m 1,500 m 2,000 m
M72 shot AP 91 88 78 67 57 49
M48 shell HE 10 10 10 10 10 10
M61 shot APCBC 104 102 93 84 75 68
Shell details
Ammunition Type of
warhead
Velocity
(m/s)
Projectile
mass (kg)
Fuse delay
(m)
Fuse sensitivity
(mm)
Explosive mass
(TNT equivalent) (g)
Ricochet
0% 50% 100%
M72 shot AP 619 6.3 - - - 47° 60° 65°
M48 shell HE 463 6.3 0.2 0.1 666 79° 80° 81°
M61 shot APCBC 618 6.79 1.2 14 63.7 48° 63° 71°
Smoke shell characteristics
Ammunition Velocity
(m/s)
Projectile
mass (kg)
Screen radius
(m)
Screen deploy
time (s)
Screen hold
time (s)
Explosive mass
(TNT equivalent) (g)
M89 259 3 9 5 20 50

Ammo racks

Full
ammo
1st
rack empty
2nd
rack empty
3rd
rack empty
4th
rack empty
5th
rack empty
6th
rack empty
7th
rack empty
8th
rack empty
Visual
discrepancy
98 91 (+7) 89 (+9) 86 (+12) 79 (+19) 62 (+36) 46 (+52) 31 (+67) 1 (+97) No
Ammo racks of the M4A4 (1st PTG) (China)

Notes:

  • To go into battle with the turret basket empty of ammo, pack 79 (+19) shells (racks 1 to 4 emptied).
  • To go into battle with the turret basket and the flanks empty of ammo, pack 31 (+67) shells (racks 1 to 7 emptied).
  • The 8th rack is large and located in a weak spot: the bottom section of the armour. In case of penetration, there is a high risk of ammo rack detonation. Make sure not to expose your flanks unnecessarily.

Machine guns

Ammunition400 rounds
Belt capacity200 rounds
Reloadbasic crew → aces
10.4 → 8.0 s
Fire rate575 shots/min
Vertical guidance-10° / 30°
Horizontal guidance-60° / 60°
Ammunition3 000 rounds
Belt capacity250 rounds
Reloadbasic crew → aces
10.4 → 8.0 s
Fire rate500 shots/min

The M4A4 is armed with both a pintle-mounted 12.7 mm M2HB .50 cal machine gun and a coaxial 7.62 mm M1919A4 .30 cal machine gun. The latter is useful as a secondary machine gun to supplement the larger 12.7 mm machine gun, both increasing the volume of fire you can put out in a burst of your machine guns and providing a backup machine gun in case your .50 cal gunner runs out of ammo or is knocked out. The 12.7 mm machine gun is more useful as it does more damage and has more penetration. It can swivel independently of the main gun, but not a full 360 degrees around so you will still need to traverse the turret to follow moving targets. Both can be used to shoot at aircraft and unarmoured spots on enemy vehicles, and the .50 cal specifically is capable of damaging vehicles with very light armour due to the penetration.

12.7 mm M2HB
Mount Capacity (Belt) Fire rate Vertical Horizontal
Pintle 400 (200) 577 -10°/+30° ±60°
7.62 mm M1919A4
Mount Capacity (Belt) Fire rate Vertical Horizontal
Coaxial 3,000 (250) 500 N/A N/A

Usage in battles

The M4 Sherman is an effective medium-range combat tank. Equipped with a fast-firing 75 mm gun and with good handling characteristics, the M4A4 can be an extremely useful asset in most battles.

In battle the M4A4 performs well as an all-rounder; the thick turret front and 10 degrees of gun depression make the tank ideal for taking hull-down positions which protect the thinner hull armour from being penetrated by enemy fire. The sloped front upper glacis, when angled, also provides good protection against enemy fire. An unusual - and useful - difference is that the upper glacis is sloped at 56 degrees rather than the standard 45 degrees, making it more of a threat and more powerful due to improving the chances of a round ricochet. The only downfall may be the 2 crew member position in the front that protrudes out to form a flat surface, but both are covered with an additional 20 mm plate. The reasonable mobility of the Sherman makes flanking a viable tactic. The main weakness of the M4A4 is the side armour - not only is it vertical and thin, but behind it most of the ammunition is stowed. The tall silhouette of the tank also makes finding suitable cover difficult. Overall, the M4 Sherman can be considered as an armoured jack-of-all-trades - it will serve a tanker well, however it will not excel in any particular role.

In battle, try to use terrain as cover. Hull-down positions are especially strong in the M4 Sherman, as it has a good 10 degrees of gun depression. The gun mantlet and turret are reasonably strong, but avoiding shots is still the best strategy. In this respect, a hull-down position hides the vulnerable hull. If this is not available, then angling the hull armour to present a greater slope is often a good idea, as this can bounce some low-powered cannon at any range and at longer ranges, render the hull impenetrable.

Another way to play the M4A4 is to tap into its traditional cavalry role, its mobility. The M4 Sherman is a great flanker as it is fast enough to get the jump on the enemy's side. Defeat the enemy at their weak front lines or go around the entire enemy force. Once in position at their sides or rear, ambush them. Ideally, the enemy should be too busy focusing on allies attacking in the front to notice the M4A4 instantly. Take out the weaker light or medium tanks, the 75 mm gun is not very ideal against heavy tanks like the KV-1s and Churchills so take out its friends to allow allies more room to outmanoeuvre them. An organized attack will increase the M4A4 chances on the battlefield and success.

The presence of a pivot-mounted .50 calibre machine gun gives the Sherman some flexibility. It can engage softer targets such as some tank destroyers and many SPAAGs at short ranges when loading a HE shell would be inconvenient. While not ideal, they provide the Sherman tank with some measure of protection against aircraft- sometimes enough to dissuade a pilot from making another pass. It can be an effective rang-finder for targets at longer ranges where the M1919 coaxial would be less effective. While it pales in comparison to the destructive effect of tank guns, it provides the Sherman with some flexibility over other comparable vehicles, who are restricted to their rifle-calibre coaxial machine guns.

Enemies worth noting:

  • M4A2 / M4A4 (France) - These Sherman tanks are widely used by over 3 nations that spread across both the Allied and the Axis side, so no matter which nation you play they can be quite tough to destroy in the hands of a skilled tanker. Given the rather weak penetration of your short 75 mm gun, their hull can be almost impossible to penetrate when angled, hull down or 300 m away. For a M4A4, there are 2 apparent bulges on the upper front plate, a penetration through there is a guaranteed kill most of the times. But in case the opponent covers them up or when it's a M4A2, aim for the middle parts of the gun mantlet or the turret armour unprotected by the mantlet, you can at least make them defenceless. Note that their guns are equally weak against you, so wiggle around to disrupt their aim while you reload, you have a good chance of bouncing some shells.
  • KW I C 756 (r) - A heavy opponent that the M4 Sherman will have trouble against is this German KV-1. Upgunned with the 75 mm KwK40 L48, this Beutepanzer is potent enough to punch through the Sherman's front, with its heavy frontal armour being almost impervious to the Sherman. If this heavy tank is encountered angling its hull, aim at the large gun mantlet as it is only 50 mm thick, or shoot at the thin cupola, both of which can kill the gunner. Of course, the best way is to shoot at its sides and rear without any angle, where its armour is flat, though it will still have to be at a close range to penetrate the armour. In addition, shots to the sides will most likely hit fuel tanks or ammunition storage, causing a fire or ammunition detonation. Your vertical stabiliser will allow you to fire on the move which makes it harder for the KV-1 to target you. The gun is stabilised almost immediately when you are breaking, giving you an upper hand to shoot first.
  • Churchill heavy tank - The Churchills, with their complex hulls and sturdy turrets, can be quite hard to kill at range. Again, manoeuvre as close to them as possible, the idea distance being no more than 200 m. If they are angling their hull but facing their turret at you, only go for the turret. For the Mk I Churchills, aim at the near-vertical part of their rounded cheeks to ensure successful penetrations. For the Mk III and the German Churchill, also aim for their flat turret front which is at most 89 mm. The shell should go in easily and knock out most, if not all the crew. Only when you are facing their hull without any angles should you shoot the hull, otherwise shoot the turret only, as their big tracks can easily get in front of the frontal hull. The side hull has multiple layers of armour, some of which are weirdly angled and can absorb shells repeatedly.
  • Pz.IV F2/G/H/J - The historical nemesis of any Sherman, the Panzer IV is one of the Sherman's biggest threats at this rank. The long barrel 75 mm gun will easily penetrate the Sherman from the front. The F2 variant is admittedly easy to deal with. A single APCBC to its hull or turret should end it pretty quickly, even at long range. The other variants are slightly harder to deal with. They have thicker hull armour, at 80 mm, which will be much harder to penetrate with the APCBC over 500 m. Luckily the turret armour remains the same at 50 mm. Either aim here with APCBC or sacrifice damage potential and use the AP round to penetrate the hull.
  • StuG III F/G - Another historical nemesis of the Sherman, and another big threat. The StuG III packs the same punch as the Panzer IV line with its long barrel 75 mm gun, whilst losing the turret, which turns out to be both an advantage and a disadvantage. Lacking a turret means that it will have to traverse the whole vehicle to target an enemy, but it also means that it has a lower profile. The StuG's armour profile is also more complex than the Panzer IV, with less flat areas. Certain areas are sloped and very bouncy. Luckily, there is a big weak spot. There are two flat plates on the front of the hull. The flat plate on the right is the drivers port. Shoot that and you are able to kill the driver, gunner and loader in one go. This is a very efficient way to destroy this vehicle. With the F variant, you can use APCBC to instantly one-shot this vehicle. With the G variant, it is more reliable to use AP at ranges within 500 m to ensure penetration.
  • R3 T20 FA-HS: this is a small, fast and annoying armoured car that is able to appear at unexpected positions early in the match. If you are aware of its presence, face your front towards it, it has zero chance of penetrating an M4 frontally, but make sure to slightly traverse your turret side to side while you reload if you fail to one-shot it, to disrupt its aim as it will usually target gun barrels. Firing MG rounds at the ammo box next to its autocannon also has a chance to cause an ammo detonation. If you are caught off guard (usually from the side), try your best to not present your side armour unangled, since it is large and only 38 mm thick, easily penetrable by the R3. Angle the hull immediately to swing your frontal hull or even the rear towards it, both of which is better than exposing your weak side armour. As it tries to find a weakspot, get your gun on it and destroy it. If it gets away it will be a huge harm to your entire team later on.

Pros and cons

Pros:

  • Great penetration and post-penetration damage when using M61 shells; can frontally penetrate and one-shot most common opponents like the Pz.IV F2, Chi-Nu or StuG III F.
  • Excellent gun depression of -10° plus the angled frontal turret allows it to utilise hills very well.
  • Fitted with a vertical stabilizer, allowing more accurate fire on the move compared to other tanks, as well as better usage of shoot-n-scoot tactics.
  • Great turret traverse speed allows it to deal with multiple threats easily.
  • Pintle-mounted HMG provides an anti-aircraft defence or anti-tank duty against tanks like Marder III.
  • Adequate top speed allows it to get to positions in time, or to do tactical manoeuvres like flanking.

Cons:

  • The best M61 shell struggles to penetrate heavy targets like KV-1 (ZiS-5), Churchill Mk.III or even the T-34 and M10 when angled.
  • Trajectory is curved and velocity is low due to its short barrel, thus distant/moving targets are hard to shoot at.
  • Large profile and weak side armour; flankers like the Sd.Kfz.234/2 can easily see and penetrate it.
  • Frontal armour is inadequate, will get frontally penetrated and one-shot by tanks like Pz.IV F2/G, StuG III F/G, M10
  • Turret has weak spot in front of the gunner, making it easy to disable gun operation.
  • Roof armour of 19.5 mm thick is vulnerable to airstrikes from large calibre guns like the widely used M2 Browning.
  • Hull traverse is quite slow, making it sluggish in a turn.
  • The narrow tracks offer poor ground flotation, thus poor off-road capabilities. Can only reach its top speed on paved or hard surfaces.

History

M4A4 (1st PTG) in Burma

1st Provisional Tank Group

The M4A4 (1st PTG) was one of many M4 medium tanks armed with a 75 mm gun provided by the U.S to China through the lend-Lease program in April 1944. It was part of the 1st Provisional Tank Group, a joint American and Chinese unit formed in the China-Burma-India theatre in 1943, where it fought against the Japanese. It was deactivated in 1945 at the end of war, with the American troops returned to the US and the Chinese troops reformed as a separate unit which saw service in the Chinese Civil War (1946-49), where it was destroyed by Chinese communist forces in 1949.

This tank had a "Tiger face" painted on its mantlet and "claws" painted on the armoured plate in front of the driver. The top of the tank was painted yellow in order for it to be recognized by allied air units.

M4A4 (1st PTG) crossing the Namtu River in Burma in 1945

Media

Skins
Videos

See also

Other M4A4s

External links


U.S. Army Ordnance Department/Corps*
Light tanks  T18E2 · M24 (Designed in collaboration with Cadillac)
M3 Stuart  M3 · M3A1 Stuart · M3A1 (USMC)
M5 Stuart  M5A1
Medium tanks  M3 Lee
M4 Sherman  M4 · M4A1 · M4A2 · M4A3 (105) · Calliope
  M4A1 (76) W · M4A2 (76) W · M4A3 (76) W
M26 Pershing  T20 · T25 · M26 · M26E1 · M26 T99
Patton Series  M46 · M46 "Tiger" · M47
Prototypes  T54E1 · T95E1
Heavy tanks  M103
M4 Jumbo  M4A3E2 · Cobra King · M4A3E2 (76) W
M6 Heavy  M6A1 · M6A2E1 · T1E1
M26 Pershing  T26E1-1 · T26E5
Prototypes  T14
T29  T29 · T30 · T34
T-32  T32 · T32E1
Tank destroyers  M3 GMC · M10 GMC · M56
M8 GMC  M8 HMC · M8A1 GMC
M36 GMC  M36 GMC · M36B2
Prototypes  T28 · T95
SPAAGs 
Production  M19 MGMC · M42
Export/Captured  ␗M8 HMC · SU-57
Stuart  Stuart I · Stuart III · ␗M3A3 Stuart · ␗M3A3 (1st PTG) · ▄M3A3 · ▄M3A3 Stuart · ▃Stuart VI (5th CAD) · ␗M5A1
Lee/Grant  ▂M3 Medium · ▃Grant I · Grant I
M4 Sherman  Sherman II · ▄M4A1 · ␗M4A1 (75) W · ▀M4 748 (a) · ▂M4A2 · ▄M4A3 (105) · ▅M4A3 (76) W · ▄M4A3E2
  ␗M4A4 · ␗M4A4 (1st PTG) · ▄Sherman V · ▄M4A4 · ▄Sherman I Composito
M26 Pershing  M26 "D.C.Ariete" · M26A1
M47 Patton  mKPz M47 G · ▅M47
M10 GMC  ␗M10 GMC · ▄M10 GMC
M36 GMC  ␗M36 GMC · M36B1 · ▅M36 · ▄M36B2
M19 MGMC  ▅M19A1
M42 MGMC  ▅M42 · ␗M42
  *The Ordnance Department was renamed to the Ordnance Corps after the Army Reorganization Act of 1950.

China medium tanks
ZTZ59  Type 59 · ZTZ59A · ZTZ59D1
ZTZ69  Type 69 · Type 69-IIa · T-69 II G
ZTZ88/96  ZTZ88A · ZTZ88B
  ZTZ96 · ZTZ96A · ZTZ96A (P)
ZTZ99  ZTZ99-II · ZTZ99-III
ZTZ99A  ZTZ99A · WZ1001(E) LCT
Export series  MBT2000 · VT-4A1
ROC  CM11
Other  Т-34-85 Gai · Object 122MT "MC"
Japan  ␗Chi-Ha · ␗Chi-Ha Kai
USA  ␗M4A4 · ␗M4A4 (1st PTG) · ␗M4A1 (75) W · ␗M48A1 · ␗M60A3 TTS
USSR  ␗T-34 (1943) · ␗Т-34-85 (S-53) · T-34-85 No.215 · Т-62 №545

China premium ground vehicles
Light tanks  T-26 No.531 · ␗M3A3 (1st PTG) · ␗M41A3 · M64 · WMA301
Medium tanks  ␗M4A4 (1st PTG) · T-34-85 No.215 · Т-62 №545 · ZTZ59A · Type 69-IIa · T-69 II G · ZTZ96A (P)
Heavy tanks  IS-2 No.402