M4A1 (France)

From War Thunder Wiki
Jump to: navigation, search
Rank VI | Premium | Golden Eagles
Chinese A-5C Pack
This page is about the medium tank M4A1 (France). For other M4 Shermans, see M4 Sherman (Family). For other uses, see M4 (Disambiguation).
fr_m4a1_sherman.png
GarageImage M4A1 (France).jpg
ArtImage M4A1 (France).png
▄M4A1
AB RB SB
3.3 3.3 3.3
Class:
Research:14 000 Specs-Card-Exp.png
Purchase:32 000 Specs-Card-Lion.png
Show in game

Description

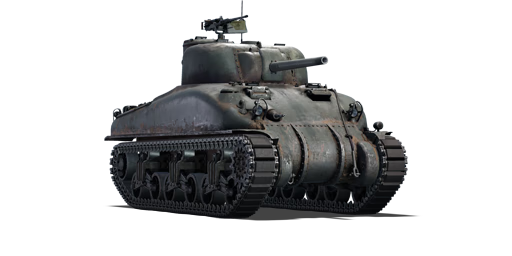
The M4A1 Sherman is the first variant of the early-generation Medium Tank M4 (Sherman) family. Tanks were substantially provided to Britain, the Soviet Union, China, and Free France through the lend-lease program. The M4A1 appears to have been used for the first time by a French battalion, dubbed the "Fighting French Tank Company" by the British. Originally known as the 1ère Compagnie Autonome de Chars de Combat (1ère CACC), it was integrated into the French Army Corps Reconnaissance Group (GRCA) and became known as the "Free French Flying Column". It fought in El Alamein as part of the British Eighth Army. The tank company was eventually assigned to "Force L (Leclerc)", and later became the 1st Company of the newly formed 501ème Régiment de Chars de Combat, "2ème Division Blindée". Some of the M4A1s under the 2ème Division Blindée were allocated to observation groups in artillery regiments. The French received a few more M4A1s by lend-lease in late 1944 as a result of a serious shortage of French combat vehicles later in World War II. According to a U.S. Army report, the 2ème DB in Alsace had 9 M4A1s on hand as of January 10, 1945. A few more M4A1s were delivered to 2ème DB battalions throughout the winter and spring of 1945, as more replacement tanks were made available from Sixth Army Group reserves. During the final weeks of the European War, French armoured units got their final batch of M4A1s.

Introduced in Update 1.75 "La Résistance", the M4A1 is the French Army's first creditable medium tank capable of engaging the enemy on the ground. The early French Army ground forces relied nearly entirely on foreign tanks due to a lack of domestically manufactured tanks. This is well reflected in the game, as the first French-made medium tank did not appear until well after World War II and into the Cold War era. Despite this, the M4A1 is a reliable medium tank capable of fighting most threats thanks to its effective 75 mm M3 tank gun as well as adequate mobility and armour. The installation of a primitive vertical stabilizer will aid players in making precise shots when they need to come to a halt quickly due to spotting enemies.

General info

Survivability and armour

Armourfront / side / back
Hull51 / 38 / 38
Turret76 / 51 / 51
Crew5 people
Visibility103 %

Armour type:

  • Cast homogeneous armour (hull, turret, cupola)
  • Rolled homogeneous armour (hull side - bottom)
Armour Front (Slope angle) Sides Rear Roof
Hull 19.5 mm (63-84°) Front glacis - Upper section
50.8 mm (48-63°) Front glacis - Centre section
34 + 25.4 mm (spherical) MG port
38.1 mm (spherical) Front glacis - Sides
50.8 mm (cylindrical) Transmission housing
38.1 mm (1-24°) Top
38.1 mm Bottom
38.1 mm Upper plate
38.1 mm (13°) Lower plate
38.1 mm (50°) Lower glacis
50.8 mm (27-39°) Front glacis
19.5 mm (0-28°) Turret area
19.5 mm (7°)
Engine bay - centre
19.5 mm (20-24°)
Engine bay - sides
Turret 50.8-76.2 mm (18-71°) Turret front
50.8 + 76.2 mm (cylindrical) Gun mantlet
50.8 mm (cylindrical) 50.8 mm (4°) 25.4 mm
Cupola 50.8 mm (spherical) 50.8 mm (spherical) Outer ring
25.4 mm Centre

Notes:

  • Suspension wheels are 15 mm thick while bogies are 10 mm thick and tracks are 20 mm thick.
  • Belly armour is 12.7 mm thick.
  • A small patch on the turret front right side is thinner (50.8 mm) than the rest (76.2 mm).
  • Bolt edges on the transmission housing are 101.6 mm thick.

The M4A1 is distinctive from its cast hull construction, causing it to have a curved hull shape. The front glacis armour has varying slope angles that can make shots bounce but also presents several weaknesses. The biggest is in the hull front and side joints with slightly flat angles when angling the tank, another major one is the cast construction which diminishes the labeled effectiveness of the front armour. Though its armour is still effective against certain enemy fire, one must take into account the very thin side armour (38.1 mm): anti-tank weaponry of any rank will be capable of penetrating this weak side armour so protect your flank.

Mobility

Speedforward / back
AB43 / 6 km/h
RB and SB38 / 5 km/h
Number of gears5 forward
1 back
Weight30.6 t
Engine power
AB763 hp
RB and SB400 hp
Power-to-weight ratio
AB24.9 hp/t
RB and SB13.1 hp/t
Game Mode Max Speed (km/h) Weight (tons) Engine power (horsepower) Power-to-weight ratio (hp/ton)
Forward Reverse Stock Upgraded Stock Upgraded
Arcade 43 6 30.6 620 763 20.26 24.93
Realistic 38 5 354 400 11.57 13.07

Beware of the very poor reverse speed as it only has one reverse gear. This affects the tank's ability to play in a defensive role.

Modifications and economy

Repair costBasic → Reference
AB873 → 1 123 Sl icon.png
RB1 003 → 1 290 Sl icon.png
SB1 247 → 1 604 Sl icon.png
Total cost of modifications13 860 Rp icon.png
19 850 Sl icon.png
Talisman cost860 Ge icon.png
Crew training9 200 Sl icon.png
Experts32 000 Sl icon.png
Aces270 Ge icon.png
Research Aces250 000 Rp icon.png
Reward for battleAB / RB / SB
50 / 80 / 90 % Sl icon.png
130 / 130 / 130 % Rp icon.png
Modifications
Mobility Protection Firepower
Mods new tank traks.png
Tracks
Research:
920 Rp icon.png
Cost:
1 300 Sl icon.png
115 Ge icon.png
Mods new tank suspension.png
Suspension
Research:
620 Rp icon.png
Cost:
890 Sl icon.png
75 Ge icon.png
Mods new tank break.png
Brake System
Research:
620 Rp icon.png
Cost:
890 Sl icon.png
75 Ge icon.png
Mods new tank filter.png
Filters
Research:
1 200 Rp icon.png
Cost:
1 700 Sl icon.png
150 Ge icon.png
Mods new tank transmission.png
Transmission
Research:
1 100 Rp icon.png
Cost:
1 600 Sl icon.png
135 Ge icon.png
Mods new tank engine.png
Engine
Research:
1 100 Rp icon.png
Cost:
1 600 Sl icon.png
135 Ge icon.png
Mods tank tool kit.png
Improved Parts
Research:
920 Rp icon.png
Cost:
1 300 Sl icon.png
115 Ge icon.png
Mods extinguisher.png
Improved FPE
Research:
620 Rp icon.png
Cost:
890 Sl icon.png
75 Ge icon.png
Mods tank reinforcement fr.png
Crew Replenishment
Research:
1 200 Rp icon.png
Cost:
1 700 Sl icon.png
150 Ge icon.png
Mods new tank horizontal aiming.png
Horizontal Drive
Research:
920 Rp icon.png
Cost:
1 300 Sl icon.png
115 Ge icon.png
Mods tank cannon.png
Adjustment of Fire
Research:
620 Rp icon.png
Cost:
890 Sl icon.png
75 Ge icon.png
Mods tank ammo.png
75mm_usa_APCBC_ammo_pack
Research:
620 Rp icon.png
Cost:
890 Sl icon.png
75 Ge icon.png
Mods new tank vertical aiming.png
Elevation Mechanism
Research:
1 200 Rp icon.png
Cost:
1 700 Sl icon.png
150 Ge icon.png
Mods art support.png
Artillery Support
Research:
1 100 Rp icon.png
Cost:
1 600 Sl icon.png
135 Ge icon.png
Mods tank ammo.png
75mm_us_M89_Smoke_ammo_pack
Research:
1 100 Rp icon.png
Cost:
1 600 Sl icon.png
135 Ge icon.png

Armaments

Main armament

Vertical stabilizer
Reduces the swing of the gun in one plane while moving
Ammunition90 rounds
Reloadbasic crew → aces
6.5 → 5.0 s
Vertical guidance-12° / 18°
Main article: M3 (75 mm)
75 mm M3 Turret rotation speed (°/s) Reloading rate (seconds)
Mode Capacity Vertical Horizontal Stabilizer Stock Upgraded Full Expert Aced Stock Full Expert Aced
Arcade 90 -12°/+18° ±180° Vertical 22.85 31.62 38.40 42.47 45.18 6.50 5.75 5.30 5.00
Realistic 14.28 16.80 20.40 22.56 24.00

The 75 mm M3 gun is mounted in the M34 gun mount with the periscopic, a skinny gun mount compared to the future M34A1 which all future 75 mm M4 Sherman guns are mounted. This lowers the area the gun mantlet covers to contribute to turret front armour, but does present a slightly greater gun depression by -2° than the future M34A1 mounts. Combined with the very fast turret traverse rate, fast reload time of 6.5 seconds and a vertical gun stabilizer, the 75 mm M3 cannon is capable of destroying nearly all armoured targets. The gun depression angle of -12° also makes this tank excel in hull down positions.

Ammunition

When discussing the M4A1's shells, one always has to account for the fact that it's a medium tank. This means short to medium engagement range, so realistically it can benefit more from its short-range penetration figures than long-range sniping tanks would.

  • M72 shot; AP - Solid shot, stock shell. An armour-piercing shell with acceptable penetration but poor post-penetration damage.
  • M48 shell; HE - A low-velocity shell useful against soft targets, in particular when hitting an open-topped vehicle. Harmless against any enclosed vehicle with more than 10 mm of armour.
  • M61 shot; APCBC - A capped armour-piercing shell with a better penetration than the M72 thanks to its ballistic cap and a good post-penetration damage thanks to its explosive filler.
  • M89; smoke shell - A shell deploying a smoke screen on impact, useful to blind enemy vehicles that are too remote for you to disable so that you can progress towards objectives.

Penetration statistics
Ammunition Type of
warhead
Penetration @ 0° Angle of Attack (mm)
10 m 100 m 500 m 1,000 m 1,500 m 2,000 m
M72 shot AP 91 88 78 67 57 49
M48 shell HE 10 10 10 10 10 10
M61 shot APCBC 104 102 93 84 75 68
Shell details
Ammunition Type of
warhead
Velocity
(m/s)
Projectile
mass (kg)
Fuse delay
(m)
Fuse sensitivity
(mm)
Explosive mass
(TNT equivalent) (g)
Ricochet
0% 50% 100%
M72 shot AP 619 6.3 - - - 47° 60° 65°
M48 shell HE 463 6.3 0.2 0.1 666 79° 80° 81°
M61 shot APCBC 618 6.79 1.2 14 63.7 48° 63° 71°
Smoke shell characteristics
Ammunition Velocity
(m/s)
Projectile
mass (kg)
Screen radius
(m)
Screen deploy
time (s)
Screen hold
time (s)
Explosive mass
(TNT equivalent) (g)
M89 259 3 9 5 20 50

Ammo racks

Ammo racks of the M4A1 (identical).
Full
ammo
1st
rack empty
2nd
rack empty
3rd
rack empty
4th
rack empty
5th
rack empty
6th
rack empty
7th
rack empty
8th
rack empty
Visual
discrepancy
90 82 (+8) 75 (+15) 72 (+18) 70 (+20) 54 (+36) 38 (+52) 22 (+68) (+89) Yes

Notes:

  • The visual discrepancy concerns rack 8: 28 shells are modeled but it contains only 21 shells.
  • Racks disappear after you've fired all shells in the rack.
  • Flanks and turret empty: 22 (+68) shells.

Machine guns

Ammunition600 rounds
Belt capacity200 rounds
Reloadbasic crew → aces
10.4 → 8.0 s
Fire rate575 shots/min
Vertical guidance-10° / 22°
Horizontal guidance-60° / 60°
Ammunition3 000 rounds
Belt capacity250 rounds
Reloadbasic crew → aces
10.4 → 8.0 s
Fire rate500 shots/min
12.7 mm M2HB
Mount Capacity (Belt) Fire rate Vertical Horizontal
Pintle 600 (200) 577 -10°/+22° ±60°

The roof-mounted M2HB .50 cal heavy machine gun is very good at knocking out tracks, punching through lightly armoured vehicles and shooting down low-flying aircraft. Use it sparsely because of its low ammo count.

7.62 mm M1919A4
Mount Capacity (Belt) Fire rate Vertical Horizontal
Coaxial 3,000 (250) 500 N/A N/A

The small calibre of the M1919A4 machine gun makes it largely ineffective against all armoured vehicles but the ones with an open compartment. It still can be used to ping targets as a rangefinding help or to mow down minor obstacles blocking your line of sight.

Usage in battles

The M4A1 Sherman plays greatly in an aggressive role. Firing on the move is not a difficult task with this tank due to the vertical stabilizer. You can use the "battle" cruise gear (press E once) to move at a slower speed so you can engage the vertical stabiliser on the move, without the need to stop the tank. This is beneficial to quickly push the attack. When you are under enemy fire, wiggle your hull slightly to increase the effective thickness a little and to throw the enemies' aim off. But if you know that a tank destroyer is present, do not wiggle at all, drive straight to your next cover.

The M4A1 is also excellent in a defensive role thanks to its good gun depression angle of -12°. The M4A1 can therefore utilise lots of slopes to conceal its hull and only expose its turret to engage advancing enemies. The vertical stabiliser greatly shortens the targeting time, again increasing the M4A1's survivability. Since the M4A1 would only expose the turret and is assisted by a vertical stabiliser, whereas attacking enemy tanks are usually moving in the open, the player should be more confident and aim carefully. Try knocking them out in a single hit.

The tall profile of the tank is an advantage and disadvantage. In the context of a hull-down position, it is an advantage due to you being able to angle the turret down over a hill or crest without having to pull further up the hill. The tall profile, however, does make you more visible and the tall hull makes it easy to set off an ammo rack.

Enemies worth noting:

M4A2/A4: these Sherman tanks are widely used by over 3 nations that spread across both the Allied and the Axis side, so no matter which nation you play they can be quite tough to destroy in the hands of a skilled tanker. Given the rather weak penetration of your short 75 mm gun, their hull can be almost impossible to penetrate when angled, hull down or 300 m away. For a M4A4, there are 2 apparent bulges on the upper front plate, a penetration through there is a guaranteed kill most of the times. But in case the opponent covers them up or when it's an M4A2, aim for the middle parts of the gun mantlet or the turret armour unprotected by the mantlet, you can at least make them defenseless. Note that their guns are equally weak against you, so wiggle around to disrupt their aim while you reload, you have a good chance of bouncing some shells.

KW I C 756 (r):

A vehicle that the M4 Sherman will have trouble against is this German KV-1. While the L-11 is underpowered, the ZiS-5 is potent enough to punch through the Sherman's front, and the Sherman is unable to penetrate the KV-1's thick armour especially with its add-on armour plates. If this heavy tank is encountered and it's angling the hull, aim at the gun mantlet as it is only 50 mm thick. You can knock out its gunner easily. Or shoot at the thin cupola, there's also some chance to kill the gunner. Of course, the best way is to shoot at its sides and rear without any angle, where its armour is unsloped, though it will still have to be at a close range to penetrate the armour. In addition, shots to the sides will most likely hit fuel tanks or ammunition storage, causing a fire or ammunition detonation and at best, time to reassess the situation.

Churchill I, Churchill III, Pz.Kpfw. Churchill:

The British Churchill heavy tanks can be challenging to destroy at a distance. They have quite strong armour and enough penetration to go through the M4's frontal armour, assisted with devices such as vertical stabiliser and smoke grenades. The best way is to get as close as possible, the ideal distance being within 200 m. If the Churchill is angling the hull but not the turret, shoot the turret. For the Churchill I, aim at the almost vertical areas of the curved turret cheeks to ensure your shells don't bounce off. For the Churchill III and the German-captured model, simply aim for their flat turret front which is at most 89 mm, easily penetrable by your 75 mm AP. The explosive filling can knock out most if not all crew. For their hull, only fire when it is not angling at all. The hull front is very laid back and can get obstructed by the large tracks and sprockets with slight angles, and the hull sides have multiple layers of angled armour that become almost impossible to be penetrated once angled. Note that you should also angle your hull when engaging if possible to increase your chance of survival. Also, utilise your vertical stabiliser.

Pz.IV F2/G/H/J:

The historical nemesis of any Sherman, the Panzer IV is one of the Sherman's biggest threats at this rank. The long barrel 75 mm gun will easily penetrate the Sherman from the front. The F2 variant is admittedly easy to deal with. A single APCBC to its hull or turret should end it pretty quickly, even at long range. The other variants are slightly harder to deal with. They have thicker hull armour, at 80 mm, which will be much harder to penetrate with the APCBC over 500 m. Luckily the turret armour remains the same at 50 mm. Either aim here with APCBC or sacrifice damage potential and use the AP round to penetrate the hull.

StuG III F/G:

Another historical nemesis of the Sherman, and another big threat. The StuG III packs the same punch as the Panzer IV line with its long barrel 75 mm gun, whilst losing the turret, which turns out to be both an advantage and a disadvantage. Lacking a turret means that it will have to traverse the whole vehicle to target an enemy, but it also means that it has a lower profile. The StuG's armour profile is also more complex than the Panzer IV, with less flat areas. Certain areas are sloped and very bouncy. Luckily, there is a big weak spot. There are two flat plates on the front of the hull. The flat plate on the right is the drivers port. Shoot that and you are able to kill the driver, gunner and loader in one go. This is a very efficient way to destroy this vehicle. With the F variant, you can use APCBC to instantly knock out this vehicle. With the G variant, it is more reliable to use AP at ranges within 500 m to ensure penetration.

R3 T20 FA-HS:

This speedy wheeled vehicle can circle around you with ease and wipe out all your crew with its fast firing autocannon. In a close encounter, never expose your side to it, and do not even angle your hull. Face your hull directly to the R3, because on each side of the cast hull, above the inducer wheel there is a triangular area that blends and connects the upper front plate to the side. By angling the hull, this triangle becomes unangled to the R3, making it easily penetrated, and the driver / gunner will usually get knocked out first. It is harder for the R3 to penetrate your unangled hull thus giving you more time to react and destroy it.

Pros and cons

Pros:

  • Familiar M4 Sherman game style
  • Good 75 mm gun, with adequate damage and a decent rate of fire
  • Excellent gun depression of -12° plus the angled frontal turret allows it to utilise hills very well
  • Well angled frontal armour; when angling the hull it can deflect some low calibre / low-penetrating shells like the 75 mm M1, 76 mm F-34 / ZiS-5
  • Very fast turret traverse speed allows it to deal with multiple threats quite easily
  • Adequate top speed allows it to get to positions in time, or to do tactical manoeuvres like flanking.
  • Pintle-mounted HMG provides anti-aircraft defence
  • Fitted with a vertical stabilizer, allowing more accurate fire on the move compared to other tanks, as well as better usage of shoot-n-scoot tactics

Cons:

  • Armour is not as strong against up-gunned vehicles like the Panzer IV F2 and the T-34 mod.1942
  • The best M61 shell struggles to penetrate heavy targets like Pz.Kpfw. Churchill and KW I C 756 (r)
  • Trajectory is curved and velocity is low due to its short barrel, thus distant/moving targets are hard to shoot at
  • 38.1 mm side armour is vulnerable to flankers like the Sd.Kfz.234/2
  • Narrow tracks offer poor ground flotation, thus poor off-road capabilities
  • Prone to damage by artillery barrages, tracks can be hit and the fuel supply can be ignited
  • Ammunition storage is vulnerable to cooking off
  • The cast hull creates frontal weak spots with very little effective thickness, e.g. the triangles between upper front plate and the side, and the curved hull hatches

History

Development

The Battle of France in 1940 proved to America that their current tank arsenal would not be able to withstand a German assault. The only tanks in their inventory at that time was the M2 Light Tanks and the M2 Medium Tank, both are inadequate against the German Panzer IIIs and the Panzer IVs. The US Army, in response, ordered for a tank armed with a 75 mm gun. While a 75 mm gun was available for use, a turret able to mount the gun was not. So while the turret and tank design underwent development, the 75 mm would be mounted on the stopgap design, the M3 Lee tank in a sponson mount. This interim design put the 75 mm on a lower and limited traverse mount that restricted its firing angle, but it did give the Allies a tank with the gun, so it was issued by the thousands until a better design could be made.

During the M3's development, the designs of the 75 mm armed vehicle were being drawn up and submitted by the Ordnance Department. Specifications on the tank design were strict, with restrictions made on the tank's height, width, and weight in order to make it able to be transported over bridges, roads, railroads, and on ships. These specifications would help the army by making the tank be very flexible on strategic, logistical, and tactical grounds. On April 1941, the Armored Force Board chose the simplest of the designs, which was a redesigned M3 hull and chassis with a turret mounting the 75 mm gun designated the T6, completed in September 1941. This tank would then designated the Medium Tank M4 in American service. The tank would become the most used Allied tank during World War II as it was lent out by the thousands in the Lend-Lease program to the Allied countries. The British called the M4 the "Sherman", which coined into the tank's name M4 Sherman that it would be known as in history. The production for the Shermans began on October 1941 and would continue to be produced until the end of the war in 1945 with around 50,000 units produced, making it the second most-produced tank in World War II before the T-34 tank.

Design

Many variants of the Shermans were produced, but they all followed a similar layout. The driver and bow gunner sat in the front driving compartment, the fighting compartment in the middle housed the turret its three crew member, and in the back was the engine compartment. The Sherman used many features present in previous American tank designs, the vertical volute suspension system (VVSS) and radial engine from the M2 Light Tanks, and the sloping armour of the M2 medium tanks. This became a contributing factor on the Sherman's reliability on the field, as most of the design flaws were ironed out with the previous tank designs. The tank mounted the 75 mm M3 gun, giving the tank very good AP and HE capabilities. The Sherman's turret traverse speed was very fast, able to traverse a full 360 degrees in only 15 seconds, which is considerably faster than the traverse speed on most German tanks. Another unique feature on the Sherman was the installation of a gyroscopic stabilizer on the gun and sight, making the Sherman one of the first produced tanks to incorporate those features. While the stabilization was only done for the vertical plane, it kept the gun stable enough to be able to shoot on the move effectively, with a study showing a 70 % hit probability on an enemy 300 to 1,200 yards away when moving at a speed of 15 mph. However, this feature was controversial among the crew and experiences with it vary.

The M4A1 Sherman model ran on a gasoline Continental R975C-1 radial engine and was one of the first models of the Sherman developed. The model in-game features the early M38 telescopic sight in the M4 periscope with no zoom, which was later replaced with a M55 telescopic sight in the gun mantlet by recommendation from the British.[1] The tank's hull was fully cast, giving the tank a distinctive rounded slope front and sides. Though the rounded shape gave the frontal armour uneven angling, it provided adequate protection up to 100 mm in thickness in certain areas. Casting the hull took less man hours to perform, but suffered from the limited capability of most American factories and was hard to repair on the field. Thus, welding was prioritized as the primary manufacturing method in the other Sherman variants.[2] Nevertheless, up to 6,281 M4A1s were produced from February 1942 to December 1943, out of the 49,234 Sherman units produced in the war.

French service

After the Fall of France, the Free French force served with the Allies. They soon relied on new modernising equipment from the United States Lend-Lease. From the period of 1943 to the end of the war, the United States supplied a total of 657 M4 Sherman tanks to the Free French, of which 383 were the M4A2 and 274 were the M4A4 Sherman tanks.[3] These tanks, along with M3A3 and M5A1 Stuart light tanks helped formed the Free French armoured divisions (Division Blindée (DB)), which themselves were modeled after the American armoured divisions. The Free French armoured divisions would be committed to the Battle of Normandy in 1944, with the 2nd DB composted entirely of M4A2 while the 1st and 5th DB came with a mixed assortment of M4A2 and M4A4. Replacing lost or worn-down equipment in the Free French armoured divisions led to the issuement of vehicles from the US Army inventory, leading to the presence of the M4, M4A1, and M4A3 Sherman models in the divisions.[4] They have also been seen using M4 Sherman models with different armaments, such as the 76 mm Gun M1 and the 105 mm howitzer.

Media

Skins
Videos

See also

Other M4A1 vehicles in the game

External links

References

  1. Zaloga Steven. Armored Thunderbolt: The U.S. Army Sherman in World War II Stackpole Books, 2008, "Baptism Of Fire"
  2. Zaloga Steven. Armored Thunderbolt: The U.S. Army Sherman in World War II Stackpole Books, 2008, "The School of Tank Technology"
  3. Zaloga Steven. Armored Thunderbolt: The U.S. Army Sherman in World War II Stackpole Books, 2008, "Appendix C"
  4. Vigneras, Marcel. United States Army in World War II: Special Studies. 3 Rearming the French. Washington, DC: Office of the Chief of Military History, Dep. of the Army, 1957. Print. pp.244-246


U.S. Army Ordnance Department/Corps*
Light tanks  T18E2 · M24 (Designed in collaboration with Cadillac)
M3 Stuart  M3 · M3A1 Stuart · M3A1 (USMC)
M5 Stuart  M5A1
Medium tanks  M3 Lee
M4 Sherman  M4 · M4A1 · M4A2 · M4A3 (105) · Calliope
  M4A1 (76) W · M4A2 (76) W · M4A3 (76) W
M26 Pershing  T20 · T25 · M26 · M26E1 · M26 T99
Patton Series  M46 · M46 "Tiger" · M47
Prototypes  T54E1 · T95E1
Heavy tanks  M103
M4 Jumbo  M4A3E2 · Cobra King · M4A3E2 (76) W
M6 Heavy  M6A1 · M6A2E1 · T1E1
M26 Pershing  T26E1-1 · T26E5
Prototypes  T14
T29  T29 · T30 · T34
T-32  T32 · T32E1
Tank destroyers  M3 GMC · M10 GMC · M56
M8 GMC  M8 HMC · M8A1 GMC
M36 GMC  M36 GMC · M36B2
Prototypes  T28 · T95
SPAAGs 
Production  M19 MGMC · M42
Export/Captured  ␗M8 HMC · SU-57
Stuart  Stuart I · Stuart III · ␗M3A3 Stuart · ␗M3A3 (1st PTG) · ▄M3A3 · ▄M3A3 Stuart · ▃Stuart VI (5th CAD) · ␗M5A1
Lee/Grant  ▂M3 Medium · ▃Grant I · Grant I
M4 Sherman  Sherman II · ▄M4A1 · ␗M4A1 (75) W · ▀M4 748 (a) · ▂M4A2 · ▄M4A3 (105) · ▅M4A3 (76) W · ▄M4A3E2
  ␗M4A4 · ␗M4A4 (1st PTG) · ▄Sherman V · ▄M4A4 · ▄Sherman I Composito
M26 Pershing  M26 "D.C.Ariete" · M26A1
M47 Patton  mKPz M47 G · ▅M47
M10 GMC  ␗M10 GMC · ▄M10 GMC
M36 GMC  ␗M36 GMC · M36B1 · ▅M36 · ▄M36B2
M19 MGMC  ▅M19A1
M42 MGMC  ▅M42 · ␗M42
  *The Ordnance Department was renamed to the Ordnance Corps after the Army Reorganization Act of 1950.

France medium tanks
M4 Derivatives  M4A1 (FL10) · M4A4 (SA50)
AMX-50  AMX M4 · AMX-50 (TOA100) · AMX-50 (TO90/930)
AMX-30  AMX-30 · AMX-30 (1972) · AMX-30B2 · AMX-30B2 BRENUS · AMX-30 ACRA · AMX-30 Super
AMX-32/40  AMX-32 · AMX-32 (105) · AMX-40
Leclerc  Leclerc · Leclerc S2 · Leclerc SXXI · Leclerc AZUR
Other  D2 · S.35 · Lorraine 40t
Germany  Panther "Dauphiné"
USA  ▄M4A1 · ▄M4A3 (105) · ▄M4A4 · ▄M26