M4A4 (China)

From War Thunder Wiki
Jump to: navigation, search
Rank VI | Premium | Golden Eagles
Chinese A-5C Pack
This page is about the medium tank M4A4 (China). For other M4 Shermans, see M4 Sherman (Family). For other uses, see M4 (Disambiguation).
cn_m4a4_sherman.png
GarageImage M4A4 (China).jpg
␗M4A4
AB RB SB
3.7 3.7 3.7
Class:
Research:14 000 Specs-Card-Exp.png
Purchase:32 000 Specs-Card-Lion.png
Show in game

Description

The M4A4 Sherman is the fifth variant of the early-generation Medium Tank M4 (Sherman) family. The only record of the M4A4 variant serving in the Chinese Nationalist Army is within the Chinese Expeditionary Forces (中國遠征軍), where the Chinese Kuomintang government equipped 32 such tanks through the lend-lease program and established the 1st Provisional Tank Group stationed in India, commanded by U.S. Army colonel Rothwell H. Brown. Following the end of World War II, Chinese Expeditionary Forces - the New First Army and the New Sixth Army - equipped with M4A4 Shermans participated in the Chinese Civil War. Both armies were defeated by the Chinese People's Liberation Army during the Liaoshen Campaign in Northeast China. Following the Chinese Civil War, a memorial for fallen Chinese Expeditionary Force soldiers was constructed in Tengchong, Yunnan.

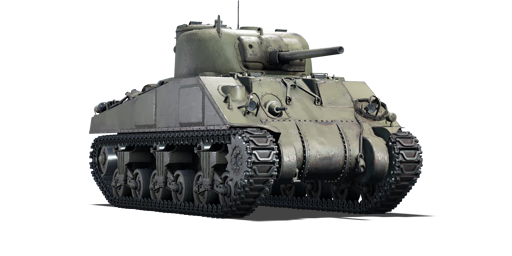
Introduced in Update 1.91 "Night Vision", the M4A4 was one of the few U.S.-built M4 Sherman medium tanks shipped to China during World War II. Armour arrangements are similar to the M4 variant, particularly the hatches that protrude from the hull's slope contour. These hatches should be recognized since they cause interruptions in the slope and hinder the overall effectiveness of the sloped armour. Although armour plates are welded in front of the discontinuities to provide some additional protection, this is still a significant weakness in the context of the frontal hull, and most experienced opponents would target it. The M4A4 variant additionally features a new composite Chrysler multibank engine (composed of five automobile engines), which necessitated additional space (the hull was enlarged by 15 cm).

General info

Survivability and armour

Armourfront / side / back
Hull50 / 38 / 38
Turret76 / 50 / 50
Crew5 people
Visibility103 %

Armour type:

  • Rolled homogeneous armour
  • Cast homogeneous armour (transmission housing, turret, gun mantlet)
Armour Front (Slope angle) Sides Rear Roof
Hull 50.8 mm (56°) Front glacis
50.8 mm (8-17°) + 25.4 mm (29°) Viewports
34 + 25.4 mm (spherical) MG port
50.8 mm (3°) Radio antenna bulge
50.8 mm (cylindrical) Transmission housing
38.1 mm
38.1 + 25.4 mm Ammo racks
38.1 mm (21°) Top
38.1 mm Bottom
19.5 mm Front section
12.7 mm (7°) Engine bay - centre
19.5 mm (23°) Engine bay - sides
Turret 76 mm (7-65°) Turret front
50.8 mm (9-26°) Turret front - gunner side
50.8 + 88.9 mm (cylindrical) Gun mantlet
50.8 mm (1-3°) Turret sides
50.8 mm (58-66°) Roof radius
50.8 mm (1-5°) Sponson
50.8 mm (21-65°) Roof slope
25.4 mm
Cupola 50.8 mm (16°) 25.4 mm

Notes:

  • Suspension wheels are 15 mm thick while tracks are 20 mm thick and bogies are 10 mm thick.
  • The belly of the tank is 12.7 mm thick.
  • The internal wall separating the crew compartment from the engine bay is 9.5 mm thick.

The hull is very similar to the American M4 Sherman, with a 50.8 mm thick upper glacis and protruding hatches interrupting the glacis (reinforced with appliqué armour). A weak spot is the radio antenna bulge on the machine gunner side. The hull sides feature appliqué armour plates covering the ammunition storage racks. The turret is also very similar but lacks the appliqué armour on the right cheek, leaving a small weakened zone in that area. Frontal protection is quite good for its rank and shots from smaller anti-tank guns can generally be shrugged off, particularly when hull down. However more powerful guns such as the Pz.IV F2's long 75 mm can destroy the tank easily, so care should be taken. The side armour is only 38.1 mm thick and can be easily penetrated by just about any anti-tank gun at your rank if not angled.

Mobility

Speedforward / back
AB45 / 6 km/h
RB and SB41 / 5 km/h
Number of gears5 forward
1 back
Weight32.2 t
Engine power
AB811 hp
RB and SB425 hp
Power-to-weight ratio
AB25.2 hp/t
RB and SB13.2 hp/t
Game Mode Max Speed (km/h) Weight (tons) Engine power (horsepower) Power-to-weight ratio (hp/ton)
Forward Reverse Stock Upgraded Stock Upgraded
Arcade 45 6 32.2 659 811 20.47 25.19
Realistic 41 5 376 425 11.68 13.2

Based on the chassis of the M4, the M4A4 (China) has the same good all-round mobility: the tank accelerates quickly and is able to reach a maximum speed of 44 km/h in a dozen of seconds. The brakes are powerful and will make the M4A4 skid rather than slow down when driving at maximum speed. The violent braking also causes the hull to wobble, making your targeting less accurate. The reverse speed is rather poor: it won't get you out of a dangerous situation quickly enough. The lack of neutral steering makes turning on the spot slow (2 km/h): make sure to build a little speed before turning and you'll turn much faster (11 km/h). Turning in reverse is equally slow (-2 km/h) Turning at full speed doesn't make you lose much speed as your acceleration is good. The offroad mobility is good: the M4A4 (China) reaches 16 km/h when fording, 17 km/h when driving uphill with some speed built-up but a mere 10 km/h uphill from a stop start. The tracks are large and grant you a decent mobility on hard (solid ground, roads) and soft terrain (mud, snow, sand). Light and medium obstacles (fences, posts, bushes and small trees) are not a problem but large obstacles will reduce your mobility: avoid them.

Modifications and economy

Repair costBasic → Reference
AB852 → 1 096 Sl icon.png
RB1 011 → 1 301 Sl icon.png
SB1 273 → 1 638 Sl icon.png
Total cost of modifications13 860 Rp icon.png
19 850 Sl icon.png
Talisman cost860 Ge icon.png
Crew training9 200 Sl icon.png
Experts32 000 Sl icon.png
Aces270 Ge icon.png
Research Aces250 000 Rp icon.png
Reward for battleAB / RB / SB
50 / 80 / 90 % Sl icon.png
130 / 130 / 130 % Rp icon.png
Modifications
Mobility Protection Firepower
Mods new tank traks.png
Tracks
Research:
920 Rp icon.png
Cost:
1 300 Sl icon.png
115 Ge icon.png
Mods new tank suspension.png
Suspension
Research:
620 Rp icon.png
Cost:
890 Sl icon.png
75 Ge icon.png
Mods new tank break.png
Brake System
Research:
620 Rp icon.png
Cost:
890 Sl icon.png
75 Ge icon.png
Mods new tank filter.png
Filters
Research:
1 200 Rp icon.png
Cost:
1 700 Sl icon.png
150 Ge icon.png
Mods new tank transmission.png
Transmission
Research:
1 100 Rp icon.png
Cost:
1 600 Sl icon.png
135 Ge icon.png
Mods new tank engine.png
Engine
Research:
1 100 Rp icon.png
Cost:
1 600 Sl icon.png
135 Ge icon.png
Mods tank tool kit.png
Improved Parts
Research:
920 Rp icon.png
Cost:
1 300 Sl icon.png
115 Ge icon.png
Mods extinguisher.png
Improved FPE
Research:
620 Rp icon.png
Cost:
890 Sl icon.png
75 Ge icon.png
Mods tank reinforcement cn.png
Crew Replenishment
Research:
1 200 Rp icon.png
Cost:
1 700 Sl icon.png
150 Ge icon.png
Mods new tank horizontal aiming.png
Horizontal Drive
Research:
920 Rp icon.png
Cost:
1 300 Sl icon.png
115 Ge icon.png
Mods tank cannon.png
Adjustment of Fire
Research:
620 Rp icon.png
Cost:
890 Sl icon.png
75 Ge icon.png
Mods tank ammo.png
75mm_usa_APCBC_ammo_pack
Research:
620 Rp icon.png
Cost:
890 Sl icon.png
75 Ge icon.png
Mods new tank vertical aiming.png
Elevation Mechanism
Research:
1 200 Rp icon.png
Cost:
1 700 Sl icon.png
150 Ge icon.png
Mods art support.png
Artillery Support
Research:
1 100 Rp icon.png
Cost:
1 600 Sl icon.png
135 Ge icon.png
Mods tank ammo.png
75mm_us_M89_Smoke_ammo_pack
Research:
1 100 Rp icon.png
Cost:
1 600 Sl icon.png
135 Ge icon.png
The first modifications that you should research are of course, Parts, FPE, and Crew Replenishment. Then the M61 shot should be prioritized to maximize your tank-killing capability. After that, you should research the firepower modifications. Finally, you should research the mobility modifications, and finally the rest of the modifications.

Armaments

Main armament

Vertical stabilizer
Reduces the swing of the gun in one plane while moving
Ammunition98 rounds
Reloadbasic crew → aces
6.5 → 5.0 s
Vertical guidance-10° / 25°
Main article: M3 (75 mm)

The M4A4's 75 mm gun is average for its rank, but it will still be able to knock out many of its common enemies with a single shot such as the Pz.IV F2, the T-34 and other M4 Shermans. It can also destroy more armoured targets like the KV-1 (L-11), albeit with more difficulty and precise aiming. However, the gun has a rather long reload time of 6.5 seconds stock, which is not ideal for dealing with multiple targets or sending a follow-up shot.

75 mm M3 Turret rotation speed (°/s) Reloading rate (seconds)
Mode Capacity Vertical Horizontal Stabilizer Stock Upgraded Full Expert Aced Stock Full Expert Aced
Arcade 98 -10°/+25° ±180° Vertical 22.85 31.62 38.40 42.47 45.18 6.50 5.75 5.30 5.00
Realistic 14.28 16.80 20.40 22.56 24.00

Ammunition

The main shell you should use is the M61 APCBC, which can punch through the most armour and has decent post-penetration damage. Around 20-25 of these rounds should be carried. You should also carry at least one HE shell, as you don't have a M2 heavy machine gun like other Shermans, so unarmoured vehicles like SPAAs will be hard to kill with just your paltry 7.62 mm machine gun. 2 or 3 smoke shells should also be carried in case you can't destroy an enemy and will have to settle for confusing it with smoke. In a pinch, these can also be used to hide from enemies. A couple AP rounds can also be carried, but the APCBC shot is better in all aspects.

Penetration statistics
Ammunition Type of
warhead
Penetration @ 0° Angle of Attack (mm)
10 m 100 m 500 m 1,000 m 1,500 m 2,000 m
M72 shot AP 91 88 78 67 57 49
M48 shell HE 10 10 10 10 10 10
M61 shot APCBC 104 102 93 84 75 68
Shell details
Ammunition Type of
warhead
Velocity
(m/s)
Projectile
mass (kg)
Fuse delay
(m)
Fuse sensitivity
(mm)
Explosive mass
(TNT equivalent) (g)
Ricochet
0% 50% 100%
M72 shot AP 619 6.3 - - - 47° 60° 65°
M48 shell HE 463 6.3 0.2 0.1 666 79° 80° 81°
M61 shot APCBC 618 6.79 1.2 14 63.7 48° 63° 71°
Smoke shell characteristics
Ammunition Velocity
(m/s)
Projectile
mass (kg)
Screen radius
(m)
Screen deploy
time (s)
Screen hold
time (s)
Explosive mass
(TNT equivalent) (g)
M89 259 3 9 5 20 50

Ammo racks

Full
ammo
1st
rack empty
2nd
rack empty
3rd
rack empty
4th
rack empty
5th
rack empty
6th
rack empty
7th
rack empty
8th
rack empty
Visual
discrepancy
98 91 (+7) 89 (+9) 86 (+12) 79 (+19) 62 (+36) 46 (+52) 31 (+67) 1 (+97) No
Ammo racks of the M4A4 (China)

Notes:

  • To go into battle with the turret basket empty of ammo, pack 79 (+19) shells (racks 1 to 4 emptied).
  • To go into battle with the turret basket and the flanks empty of ammo, pack 31 (+67) shells (racks 1 to 7 emptied).
  • The 8th rack is large and located in a weak spot: the bottom section of the armour. In case of penetration, there is a high risk of ammo rack detonation. Make sure not to expose your flanks unnecessarily.

Machine guns

Ammunition3 000 rounds
Belt capacity250 rounds
Reloadbasic crew → aces
10.4 → 8.0 s
Fire rate500 shots/min
Main article: M1919A4 (7.62 mm)

The M4A4 only has a coaxial 7.62 mm machine gun and lacks the powerful roof-mounted M2 Browning seen on other Sherman models. This makes fending off lightly-armoured and fast opponents like the Puma more difficult as the main gun must be used instead. The lone M1919A4 is also unlikely to do significant damage to incoming aircraft. Also, the M1919A4 is also not ideal for dealing with thinly armoured SPAAs, since the penetration is not impressive even for a machine gun.

7.62 mm M1919A4
Mount Capacity (Belt) Fire rate Vertical Horizontal
Coaxial 3,000 (250) 500 N/A N/A

Usage in battles

The M4 Sherman is a short to medium-range combat tank with good handling characteristics and equipped with an effective 75 mm gun, it can be an extremely useful asset in most battles.

In battle the M4 performs well as an all-rounder and jack-of-all-trades; the thick turret front and 10 degrees of gun depression make the tank ideal for taking hull-down positions which protect the thinner hull armour from being penetrated by enemy fire. The sloped front upper glacis, when angled, also provides good protection against enemy fire. An unusual - and useful - difference is that the upper glacis is sloped at 56 degrees rather than the standard 45 degrees, making it more of a threat and more powerful due to improving the chances of a round ricochet. The only downfall may be the 2 crew member position in the front that protrudes out to form a flat surface, but both are covered with an additional 20 mm plate. The reasonable mobility of the Sherman makes flanking a viable tactic. The main weakness of the M4 is the side armour - not only is it vertical and thin, but behind it most of the ammunition is stowed. The tall silhouette of the tank also makes finding suitable cover difficult. Overall, the M4 Sherman can be considered as an armoured jack-of-all-trades - it will serve a tanker well, however it will not excel in any particular role.

In battle, try to use terrain as cover. Hull-down positions are especially strong in the M4 Sherman, as it has a good 10 degrees of gun depression. The gun mantlet and turret are reasonably strong, but avoiding shots is still the best strategy. In this respect, a hull-down position hides the vulnerable hull. If this is not available, then angling the hull armour to present a greater slope is often a good idea, as this can bounce some low-powered cannon at any range and at longer ranges, render the hull impenetrable.

Another way to play the M4 Sherman is to tap into its traditional cavalry role, its mobility. The M4 Sherman is a great flanker as it is fast enough to get the jump on the enemy's side. Defeat the enemy at their weak front lines or go around the entire enemy force. Once in position at their sides or rear, ambush them. Ideally, the enemy should be too busy focusing on allies attacking in the front to notice the M4 instantly. Take out the weaker light or medium tanks, the 75 mm gun is not very ideal against heavy tanks like the KV-1 so take out its friends to allow allies more room to outmanoeuvre the KV tank. An organized attack will increase the M4 chances on the battlefield and success.

Compared to the contemporary T-34 (1943) in the PLA line of the Chinese tree, the M4A4 has worse mobility but enjoys vastly improved gun handling. They are good complements to each other, as the T-34 excels in fast, aggressive attacks while the M4A4 is good for methodical pushes and hull-down scenarios.

Enemies worth noting

M4A2 / M4A4: these Sherman tanks are widely used by over 3 nations that spread across both the Allied and the Axis side, so no matter which nation you play they can be quite tough to destroy in the hands of a skilled tanker. Given the rather weak penetration of your short 75 mm gun, their hull can be almost impossible to penetrate when angled, hull down or 300 m away. For a M4A4, there are 2 apparent bulges on the upper front plate, a penetration through there is a guaranteed kill most of the times. But in case the opponent covers them up or when it's a M4A2, aim for the middle parts of the gun mantlet or the turret armour unprotected by the mantlet, you can at least make them defenseless. Note that their guns are equally weak against you, so wiggle around to disrupt their aim while you reload, you have a good chance of bouncing some shells.

Churchill heavy tanks:

The Churchills, with their complex hulls and sturdy turrets, can be quite hard to kill at range. Again, manoeuvre as close to them as possible, the idea distance being no more than 200 m. If they are angling their hull but facing their turret at you, only go for the turret. For the Mk I Churchills, aim at the near-vertical part of their rounded cheeks to ensure successful penetrations. For the Mk III and the German Churchill, also aim for their flat turret which is at most 89 mm. The shell should go in easily and knock out most, if not all of the crew. Only when you are facing their hull without any angles should you shoot the hull, otherwise shoot the turret only, as their big tracks can easily get in front of the frontal hull. Also, if you are trying to get a flank shot on them, keep in mind that the Churchill's sides have multiple layers of armour, some of which are weirdly angled and can absorb plenty of shells.

Pz.IV F2/G/H/J

The historical nemesis of any Sherman, the Panzer IV is one of the Shermans biggest threats at this rank. The long-barreled 75 mm gun will easily penetrate the Sherman from the front. However, The common F2 variant is admittedly easy to deal with. A single APCBC to its hull or turret should end it pretty quickly, even at long range. The other variants are slightly harder to deal with. They have thicker hull armour, at 80 mm, which will be much harder to penetrate with the APCBC over 500 m. Luckily the turret armour remains the same at 50 mm. Either aim here with APCBC or sacrifice damage potential and use the AP round to penetrate the hull.

StuG III F / StuG III G:

Another historical nemesis of the Sherman, and another big threat. The StuG III packs the same punch as the Panzer IV line with its long barrel 75 mm gun, whilst losing the turret, which turns out to be both an advantage and a disadvantage. Lacking a turret means that it will have to traverse the whole vehicle to target an enemy, but it also means that it has a lower profile. The StuG's armour profile is also more complex than the Panzer IV, with less flat areas. Certain areas are sloped and very bouncy. Luckily, there is a big weak spot. There are two flat plates on the front of the hull. The flat plate on the right is the drivers port. Shoot that and you are able to kill the driver, gunner and loader in one go. This is a very efficient way to destroy this vehicle. With the F variant, you can use APCBC to instantly one-shot this vehicle. With the G variant, it is more reliable to use AP at ranges within 500 m to ensure penetration. Another way to destroy this vehicle is to flank it and do a quick shot to the side. As the StuG's side armour is mostly flat and weak, penetration will not be a problem. Aim for the centre to quickly destroy it, or if you can't, shoot the engine or the driver so it can't move. This way, the vehicle and its powerful gun will be stuck facing one direction, and you can quickly finish it off.

8,8 cm Flak 37 Sfl.

This German half-track is armed with a potent 88 mm gun that can easily knock you out in one shot. However, the gun has a long reload and the half-track has literally no armour to speak of. Also, its crew members are spread out, so unless you manage to hull break it, you're going to need multiple shots to put it down. The shell you should use while dealing with this is of course your HE shell, packed with over 600 g of explosive. First, you take out the gun. The HE shell will also knock out most of the crew members around it too, as an added bonus. Then, take out the two crew members in front of the Flak 37. This may require some more careful aiming, but if you manage to get a good shot, it will likely destroy the vehicle immediately.

Pros and cons

Pros:

  • Excellent gun depression of -10° plus the angled frontal turret allows it to utilise hills very well
  • Great penetration and post-penetration damage when using M61 shells; can frontally penetrate and one-shot most opponents like the Pz.IV F2, Chi-Nu and StuG III F
  • Great turret traverse speed allows it to deal with multiple threats easily
  • Adequate top speed allows it to get to positions in time, or to do tactical manoeuvres like flanking
  • Fitted with a vertical stabilizer, allowing more accurate fire on the move compared to other tanks, as well as better usage of shoot-n-scoot tactics

Cons:

  • Large profile and weak side armour; flankers like the Sd.kfz.234/2 can easily see and penetrate it
  • Frontal armour is still inadequate, will get frontally penetrated and one-shot by tanks like Pz.IV F2 / G, StuG III F / G, M10
  • The best M61 shell struggles to penetrate heavy targets like StuG III G, Churchill III or even the T-34 and M10 when angled
  • Trajectory is curved and velocity is low due to its short barrel, thus distant/moving targets are hard to shoot at
  • Hull traverse is quite slow, making it sluggish in a turn. Also the narrow tracks offer poor ground flotation, thus poor off-road capabilities. Can only reach its top speed on paved or hard surfaces
  • Lack of M2 Browning machine gun seen on most other Shermans means anti-aircraft defence is weak
  • Roof armour of 19.5 mm thick is vulnerable to airstrikes with AP cannons. For example the widely used M2 Browning which can penetrate up to 31 mm of armour.

History

Development

Due to a production shortage of Ford GAA V8 engines, the M4A4 was equipped with Chrysler A57 multibank engines instead. The production ran from July 1942 to November 1943, with 7,499 M4A4 produced. Because of the much more complex maintenance that the Chrysler engine required, the M4A4 was unpopular with American mechanics. Nearly all models were sent to the British, Soviets, and Chinese through Lend-lease.

During World War II, Chinese forces in India totally received 52 M4A4s, they were all deployed to the 1st Provisional Tank Group (1st PTG). The 1st PTG consisted of 7 battalions, the first three battalions were the main battle battalions and the rest were training battalions. While the 1st PTG was the best tank group of Chinese forces at the time, those tanks did not have the same layout due to lack of resources: some had .50 machine guns on the top of turret, some didn't. From the record and photo, the most complete M4A4 deployed to the 1st battalion is available in the game as the M4A4 (1st PTG).

Combat usage

China Burma India Theater

M4A4 Sherman tank with Chinese crew crosses Namtu River in Burma in 1945

The Allied ground forces needed to face their enemy - the Japanese Army - in the China Burma India theatre. On the battlefield, M3A3 Stuarts were used in engagements, but their armour was too thin to resist Japanese anti-tank cannons.

In 1943, Allied forces provided some M4s to British forces in India. At the same time, the 1st PTG was training in Bihar, they received 35 M4A4s from the US. During The Battle of Walawbum, some Stuarts were destroyed by Japanese artillery. Because of the shortcomings the M3A3 light tanks, Allied forces deployed the M4A4s to the 1st PTG to remedy the lack of armour and firepower of the whole tank group, this part was not listed into Lend-Lease.

The M4A4s were mainly deployed into the 1st and 2nd tank battalion of 1st PTG along existing Stuarts. In 1944, after the battle for dominating the Burma Road, Allied forces found that M3A3's armour was too weak for tank battles, the loss of crews and tanks made Allied forces realized that they need more powerful and solid tanks. they decided to provided 17 M4A4s to 1st PTG to improve its battle performance. Finally, the 1st PTG had received 52 M4A4s in total. While these tanks were provided to Chinese forces nominally, they were used by U.S. and Chinese forces together.

After World War II, the U.S. retrieved all M4s provided to the 1st PTG.

M4 Sherman in Taiwan

The armoured forces of the Republic of China Army, which were mainly equipped with Stuart light tanks and captured Japanese tanks, had repeatedly suffered defeats during the civil war. Major General Chiang Wei-kuo, Chief of staff of the Armoured Forces Command at the time, sought out US military surplus materials, especially armoured vehicles and tanks from Guam, Ryukyu, Philippines and other theaters, in order to arm his units.

President Chiang inspecting armoured units equipped with M4 Shermans.

While purchasing and repairing surplus equipment from the US military, Chiang asked the British government to purchase 100 M4 Sherman medium tanks, communicating via the British Consul General in Taipei, C. Krentz. At the time, numerous excess tanks were being demilitarized in the scrapyards throughout Europe, and the Consul General eventually obtained export licenses for 85 of those scrapped tanks.

In the process of purchasing these used tanks, Krentz obtained the tank export permit under the cover of transporting them back to the United States for restoration, while in reality the tanks were heading for Taiwan through the Suez Canal. Since the U.S. refused to provide any form of military assistance to Republic of China at the time, the Office of Chinese Affairs of the US Department of State requested the British Foreign Office to revoke the export permit of those Sherman tanks and detain the rest. Despite the obstruction by the United States, a total of 30 M4 Sherman tanks were loaded and delivered, arriving in Kaohsiung Port on December 12, 1949.

The M4 Sherman tanks that arrived in Taiwan included 6 M4A1 (76) Ws mounted with D82081 turret, 2 M4A1 (76) Ws mounted with D50878 turret, 22 remanufactured M4A4 and unknown number of M4A1 with 75 mm guns. As these scrap tanks had been demilitarized and Taiwan lacked the ability to repair their 76 mm tank cannons, all M4A1 (76) W tanks were re-equipped with 75 mm cannons instead. This batch of M4 Sherman tanks was officially equipped by the Republic of China Armoured Corps in June 1950, and was inspected by President Chiang Kai-shek on November 8, 1950. After the first batch of M18 Hellcat tank destroyers aided by the United States arrived in Taiwan in 1952, all M4 Shermans in the ROCA Armoured Forces were retired from active service. One remaining M4A1 (75) W and one M4A3 (early) are currently on public display in Chenk-Kung Hill Camp, Taichung.

Media

Skins
Videos

See also

Vehicles equipped with the same chassis

External links

Paste links to sources and external resources, such as:

  • topic on the official game forum;
  • other literature.


U.S. Army Ordnance Department/Corps*
Light tanks  T18E2 · M24 (Designed in collaboration with Cadillac)
M3 Stuart  M3 · M3A1 Stuart · M3A1 (USMC)
M5 Stuart  M5A1
Medium tanks  M3 Lee
M4 Sherman  M4 · M4A1 · M4A2 · M4A3 (105) · Calliope
  M4A1 (76) W · M4A2 (76) W · M4A3 (76) W
M26 Pershing  T20 · T25 · M26 · M26E1 · M26 T99
Patton Series  M46 · M46 "Tiger" · M47
Prototypes  T54E1 · T95E1
Heavy tanks  M103
M4 Jumbo  M4A3E2 · Cobra King · M4A3E2 (76) W
M6 Heavy  M6A1 · M6A2E1 · T1E1
M26 Pershing  T26E1-1 · T26E5
Prototypes  T14
T29  T29 · T30 · T34
T-32  T32 · T32E1
Tank destroyers  M3 GMC · M10 GMC · M56
M8 GMC  M8 HMC · M8A1 GMC
M36 GMC  M36 GMC · M36B2
Prototypes  T28 · T95
SPAAGs 
Production  M19 MGMC · M42
Export/Captured  ␗M8 HMC · SU-57
Stuart  Stuart I · Stuart III · ␗M3A3 Stuart · ␗M3A3 (1st PTG) · ▄M3A3 · ▄M3A3 Stuart · ▃Stuart VI (5th CAD) · ␗M5A1
Lee/Grant  ▂M3 Medium · ▃Grant I · Grant I
M4 Sherman  Sherman II · ▄M4A1 · ␗M4A1 (75) W · ▀M4 748 (a) · ▂M4A2 · ▄M4A3 (105) · ▅M4A3 (76) W · ▄M4A3E2
  ␗M4A4 · ␗M4A4 (1st PTG) · ▄Sherman V · ▄M4A4 · ▄Sherman I Composito
M26 Pershing  M26 "D.C.Ariete" · M26A1
M47 Patton  mKPz M47 G · ▅M47
M10 GMC  ␗M10 GMC · ▄M10 GMC
M36 GMC  ␗M36 GMC · M36B1 · ▅M36 · ▄M36B2
M19 MGMC  ▅M19A1
M42 MGMC  ▅M42 · ␗M42
  *The Ordnance Department was renamed to the Ordnance Corps after the Army Reorganization Act of 1950.

China medium tanks
ZTZ59  Type 59 · ZTZ59A · ZTZ59D1
ZTZ69  Type 69 · Type 69-IIa · T-69 II G
ZTZ88/96  ZTZ88A · ZTZ88B
  ZTZ96 · ZTZ96A · ZTZ96A (P)
ZTZ99  ZTZ99-II · ZTZ99-III
ZTZ99A  ZTZ99A · WZ1001(E) LCT
Export series  MBT2000 · VT-4A1
ROC  CM11
Other  Т-34-85 Gai · Object 122MT "MC"
Japan  ␗Chi-Ha · ␗Chi-Ha Kai
USA  ␗M4A4 · ␗M4A4 (1st PTG) · ␗M4A1 (75) W · ␗M48A1 · ␗M60A3 TTS
USSR  ␗T-34 (1943) · ␗Т-34-85 (S-53) · T-34-85 No.215 · Т-62 №545