Type 60 ATM

From War Thunder Wiki
Jump to: navigation, search
Rank IV USSR | Premium | Golden Eagles
Tu-1 Pack
jp_type_60_atm.png
GarageImage Type 60 ATM.jpg
ArtImage Type 60 ATM.png
Type 60 ATM
Research:35 000 Specs-Card-Exp.png
Purchase:210 000 Specs-Card-Lion.png
Show in game

Description

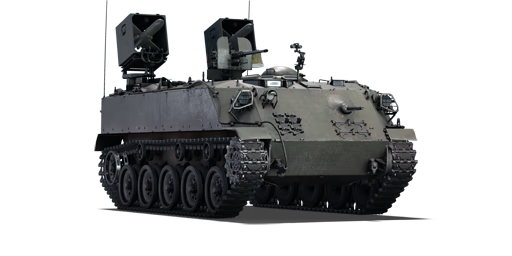
The Type 60 ATM was a missile-armed APC to motorize Japan's new development in anti-tank measures, the Type 64 MAT ATGM, which was armed on a multitude of vehicles.

The Type 60 ATM was introduced in Update 1.67 "Assault". It comes with plenty of disadvantages to work with, with minimal armour, and missiles that fly by wire, swapping vehicle control to missile control, and have very slow speed due to only being a gen 1 missile. However, this can be turned into an advantage considering the missiles fly in an upwards arc, allowing the Type 60 to hide behind solid cover and manoeuvre the missile around or over obstacles relatively easily.

General info

Survivability and armour

Armourfront / side / back
Hull20 / 12 / 20
Turret0 / 0 / 0
Crew6 people
Visibility71 %

While the armour of the Type 60 ATM's hull is immune small-calibre MG fire, heavy machine gun fire will penetrate from up close (under 500 m).Its roof armour is nonexistent: with only 8 mm thickness, every fighter in the game will succeed to strafe the Type 60 ATM and it's not unheard of to suffer overpressure from HEAT shells.

The armour of the Type 60 is too weak to sustain the blast damage from tanks exploding next to it. It is advisable to avoid close proximity to other tanks when possible to limit exposure from explosion shockwaves.

The hull is just exactly low enough to use every other hull-down position, that any normal tank would fail to use. As an example, one can use solid concrete roadblocks, building leftovers, solid construction details, random sized rocks, destroyed gas cisterns, destroyed tank hulls and so on as a protective cover. Here, only the launchers will be exposed. In some spots, the 12.7 mm machine gun will also be exposed.

Launchers themselves can be "broken" by machine guns, but the reload process will not reset. Loaded ATGMs are also resistant to attempts of setting them off and will merely briefly malfunction. Manual repair time for the launcher is about 5 seconds with untrained crew, which is faster than a field repair (takes 8 seconds), so most of the times it is not a concern for the tank. Because of that, damage to the launchers only really matters to the type 60 ATM if it is also set on fire, then it cannot continue to attack.

It is worth noting that Soviets can still load HE shells and just explode an entire tank by hitting the launcher, but not every one of them carries these shells. HESH shells are also able to send spall down from the launcher or the MG shield into the Type 60 or cause overpressure damage. HEAT shells hitting too close to the hull will also destroy the crew.

Being hit to the hull is strictly forbidden, as the compartment is not made with damage control in mind. Enemy attack planes diving down and blasting away with their autocannons and rockets can also penetrate the Type 60 frontally, so be wary of enemy aerial support. In AB, the Type 60 can sustain a hit to the upper part of the hull, but once it is penetrated, it goes down very easily regardless.

If hull must be exposed due to poor cover, only expose the left side, as it has less critical crew members and increases likelihood of back crew surviving and replacing the tank commander afterwards. Sometimes the Type 60 ATM can survive up to 4 snap shots per battle, just because enemy doesn't take it seriously or panic.

Armour type:

  • Rolled homogeneous armour
  • Cast homogeneous armour (Machine gun port, Cupola)
Armour Front (Slope angle) Sides Rear Roof
Hull 20 mm (35-43°) Front glacis
20 mm (30°) Lower glacis
20 mm (spherical) MG port
10 mm (1°) Driver viewport
12.7 mm 20 mm (1°) 10 mm
20 mm Driver hatch
Missile platform N/A 10 mm N/A 10 mm
Cupola 20 mm (conical) Base
10 mm (spherical) Dome
20 mm Outer ring
10 mm (spherical) Centre

Notes:

  • Suspension wheels and tracks are both 15 mm thick, while torsion bar chassis is 12 mm thick.
  • Belly armour is 10 mm thick.

Mobility

Speedforward / back
AB50 / 10 km/h
RB and SB46 / 10 km/h
Number of gears3 forward
1 back
Weight12.0 t
Engine power
AB420 hp
RB and SB220 hp
Power-to-weight ratio
AB35.0 hp/t
RB and SB18.3 hp/t
Game Mode Max Speed (km/h) Weight (tons) Engine power (horsepower) Power-to-weight ratio (hp/ton)
Forward Reverse Stock Upgraded Stock Upgraded
Arcade 50 10 12 312 420 26 35
Realistic 46 10 195 220 16.25 18.33

The Type 60 ATM can only move about as fast as an average medium tank. Acceleration is above average, especially when mobility upgrades are researched, but racing against enemy tanks is only recommended if any other option means certain doom.

The issue is the turning ability, as it is slow. It will be problematic to turn around in the middle of a warzone, so a decent hull-down or hiding position is almost always required for comfortable sniping, due to a very limited optics vision arc. It is still possible to turn around even when hiding behind medium tank hull remains, but there will be a high risk of getting sniped, if not extra careful.

The Type 60 ATM has poor resistance to ramming attempts - it may stand its ground against light tanks, but any medium tank should be able to move it, and heavier tanks can literally drive over it if Type 60 ATM is stuck against something.

Getting stuck on rocks is very bad for this tank, similar to Type 60 SPRG (C), so if trying to take over mountain position, make sure there is nothing below you, in case if tank will slide off it.

Modifications and economy

Repair costBasic → Reference
AB4 115 → 5 065 Sl icon.png
RB4 659 → 5 735 Sl icon.png
SB6 667 → 8 207 Sl icon.png
Total cost of modifications61 400 Rp icon.png
102 200 Sl icon.png
Talisman cost1 800 Ge icon.png
Crew training61 000 Sl icon.png
Experts210 000 Sl icon.png
Aces890 Ge icon.png
Research Aces570 000 Rp icon.png
Reward for battleAB / RB / SB
130 / 200 / 250 % Sl icon.png
178 / 178 / 178 % Rp icon.png
Modifications
Mobility Protection Firepower
Mods new tank traks.png
Tracks
Research:
6 100 Rp icon.png
Cost:
10 000 Sl icon.png
220 Ge icon.png
Mods new tank suspension.png
Suspension
Research:
3 500 Rp icon.png
Cost:
5 800 Sl icon.png
125 Ge icon.png
Mods new tank break.png
Brake System
Research:
3 500 Rp icon.png
Cost:
5 800 Sl icon.png
125 Ge icon.png
Mods new tank filter.png
Filters
Research:
7 700 Rp icon.png
Cost:
13 000 Sl icon.png
270 Ge icon.png
Mods new tank transmission.png
Transmission
Research:
6 600 Rp icon.png
Cost:
11 000 Sl icon.png
230 Ge icon.png
Mods new tank engine.png
Engine
Research:
6 600 Rp icon.png
Cost:
11 000 Sl icon.png
230 Ge icon.png
Mods tank tool kit.png
Improved Parts
Research:
6 100 Rp icon.png
Cost:
10 000 Sl icon.png
220 Ge icon.png
Mods extinguisher.png
Improved FPE
Research:
3 500 Rp icon.png
Cost:
5 800 Sl icon.png
125 Ge icon.png
Mods tank reinforcement jp.png
Crew Replenishment
Research:
7 700 Rp icon.png
Cost:
13 000 Sl icon.png
270 Ge icon.png
Mods airstrike.png
Airstrike
Research:
3 500 Rp icon.png
Cost:
5 800 Sl icon.png
125 Ge icon.png
Mods scouting.png
Improved optics
Research:
6 600 Rp icon.png
Cost:
11 000 Sl icon.png
230 Ge icon.png

Armaments

Main armament

2 x Type 64 MAT ATGM
Ammunition6 rounds
Reloadbasic crew → aces
13.0 → 10.0 s
Fire on the moveup to 5 km/h
Main article: Type 64 MAT
120 mm Type 64 MAT ATGM (x2) Reloading rate (seconds)
Capacity Vertical Horizontal Stabilizer Stock Full Expert Aced
6 N/A N/A N/A 13.00 11.50 10.60 10.00

As the slowest ATGM in the game mounted on an APC chassis, Type 64 MAT gives the Type 60 APC a bad taste to War Thunder players and so it is revered as the worst possible vehicle in-game. Though in weakness there's strength, because the Type 60 is considered very weak and most opponents will not fire upon the "harmless" APC once there are other targets in sight. The slow velocity of the missile helps to readjust it easier and allows user to hover it just above the ground to clearly see its current position and have it peak up or drop down just before the target if there's a small incline in between the target and the launcher system. Use these weaknesses to your advantage.

By memorizing launch patterns its possible to destroy tanks that you cannot even see.

The missiles are always launched upwards at about 40 degree arc, so they will almost never hit APC's own cover, but the minimal attack range when both carrier and the target are within default horizontal launch zone, on the same terrain elevation and default vertical launch angle is 160 m if aimed under the carrier, and about 220 m if aimed at the target. If the missile is launched when the hull is pointed up, the dead zone is increased. If it's necessary to attack targets closer than 200 m, it's necessary to use reverse terrain slope (to point the hull front down) to lower the launchers until the launcher aiming applications are visible on the screen in third person view, as close to the target as possible. This allows to launch the missiles straight wherever operator wants to, and they will continue to fly exactly where told to, but it's still impossible to control them mid-flight until they fly for about 200 m.

When firing from third person view in AB, keep in mind that the ATGM will only turn as far as the sniper crosshair goes, which is often unclear as the binoculars do not physically move on screen. Check sniper view beforehand if necessary.

Ammunition

Penetration statistics
Ammunition Type of
warhead
Penetration @ 0° Angle of Attack (mm)
10 m 100 m 500 m 1,000 m 1,500 m 2,000 m
Type 64 ATGM 500 500 500 500 500 500
Missile details
Ammunition Type of
warhead
Velocity
(m/s)
Range
(m)
Projectile
mass (kg)
Fuse delay
(m)
Fuse sensitivity
(mm)
Explosive mass
(TNT equivalent) (kg)
Ricochet
0% 50% 100%
Type 64 ATGM 85 1,800 15.7 0 0.1 4.55 80° 82° 90°
Notes:
  • While stat card states the max range is 1,800 m, in reality, it is less due to the missile losing fuel making course corrections. The resulting effective range is closer to 1,600 m.
  • In AB, rearming takes about 40 seconds once the launcher is empty and no partial rearming can be done on the capture point. Rearm only happens for one launcher at once, which means fully restocking will take you 80 seconds. Launcher still reloads during rearming, so you can fire away immediately after it's done.

Ammo racks

Ammo racks of the Type 60 ATM
Full
ammo
Visual
discrepancy
6 No

Notes:

  • It is not possible to select how many missiles to bring into battle.

Machine guns

Ammunition800 rounds
Belt capacity200 rounds
Reloadbasic crew → aces
10.4 → 8.0 s
Fire rate575 shots/min
Vertical guidance-5° / 25°
Horizontal guidance-45° / 45°
Ammunition1 500 rounds
Belt capacity250 rounds
Reloadbasic crew → aces
10.4 → 8.0 s
Fire rate500 shots/min

The Type 60 ATM comes equipped with a 12.7 mm M2HB Browning machine gun and a smaller 7.62 mm Browning machine gun.

The 7.62 mm, while useless against conventional tanks, can sometimes come in handy for clearing some debris and can convince some unarmored SPGs like M56 to leave you alone. The 12.7 mm machine gun serves a similar purpose, but it allows to fight and destroy some light tanks at close range, though something like AMX-13 will resist its fire from the front.

Both types of MGs are only able to fire at planes that try to strafe the vehicle directly, which is not very likely, so in case if an attacker is present on the field, the vehicle should just hide behind some hills or trees and hope the pilot isn't after it.

12.7 mm M2HB
Mount Capacity (Belt) Fire rate Vertical Horizontal
Pintle 800 (200) 577 -5°/+25° ±45°
7.62 mm M1919A4
Mount Capacity (Belt) Fire rate Vertical Horizontal
Coaxial 1,500 (250) 500 ±22° ±22°

Usage in battles

Firing procedure

The vehicle has two Type 64 ATGMs loaded at once, with four others being stored in the hull. These ATGMs can be launched from about a 30-degree horizontal arc in front of the hull, and can only be guided in about 25 degrees arc in AB. Only one missile can be controlled at a time.

You have the main camera leading indicator, which directs initial launch in both modes and helps to guide missiles in arcade battles. Sniper optics are only directed forward, so if you want to attack in AB or to check on a faraway target in RB, you have to first turn the entire hull towards them.

Type 64 missiles are on the same trigger, the vehicle always attempts to fire the right missile first. The only way to fire left missile first is by turning your main aiming reticle to the left just enough for right launcher to go offline, but not in the dead zone of left launcher yet. This makes firing training a bit unforgiving, as without knowing this you might deplete one of the launchers too soon in AB.

Missiles have about 500 mm of penetration at flat angle, which is enough to penetrate anything at its battle rating. While it's penetration numbers are nothing to be amazed of, it has 4.5 kilograms of explosive mass, which compensates for its low projectile "health" and allows it to do fatal damage even with 30 mm penetration left and causes extremely high overpressure damage if it is triggered. It's technically possible to even destroy T-64B with a good hit, because it can obliterate its fuel tanks and thus make the entire tank explode or hit it from an angle it is not built to deflect.

The missiles act differently in either game mode, and so the vehicle cannot be treated exactly the same in AB as in RB, which further increases training difficulty.

Due to extremely limited firing arc, if one wants to forcefully launch missile into enemy cover it is recommended to get as close or high above the target as possible. Being close allows to memorize specific launch angles and setups that allow to blindly hit enemy roof (like launching under yourself to hit a tank exactly 160 m away), having high ground in AB allows you to guide missile further into enemy cover when they realize that it, in fact, continues to curve into them and try to run away.

It is also possible to sidestep the missile, which most of BR ~8.0 light tanks will try to do, unless they do not notice ATGM somehow, or are too busy fighting something else.

In realistic battle, missile prefers to set itself into initial sniper crosshairs course before 210 m. If it was somehow launched straight, it will just fly straight. As soon as controls come online, it tends to go down a bit, so it's better to launch it properly to avoid further inconveniences, unless enemy tank stands exactly that far away. To steer the missile around, the user must press buttons assigned for tank movements (the vertical controls are inverted with W being "down" and S being "up"). It's vertical mobility is higher than horizontal, so it will easily go into enemy cover when prompted. It is technically easier to control from sniper seat in RB, as it helps to track missile position better, though not required, as it does not need direct line of sight to navigate and can be directed anywhere you want to.

To hit targets in cover far away, the operator must be very good at judging distances or guide missile close to the ground and use light emanations off it as a guide, then turn missile into enemy cover as it approaches them. As for tanks which stand in the open or with minimal cover, this brings no problems, as you just have to make it follow them. Try to keep some lead on the missile by moving it to the side a bit in case enemy tries to dodge the missile, as suddenly turning it horizontally might be difficult from your perspective. It also helps if hostiles fire machine guns at it, as it is easier for them to hit missiles that fly directly towards them, rather than missile that approaches them at an angle.

In arcade battle, Missile responds to SACLOS input (mouse movements) , so it can be somewhat curved around straight after launch sequence and does not prevent carrier from moving after launch, which allows the operator to push it even further behind cover, even in super inconvenient situations. Unfortunately, this brings some problems as well.

Msg-important.png Be aware, that while arcade mode allows Type 60 ATM to guide missiles with the mouse, it also restricts control of missiles - if sniper crosshairs can't be pointed towards the target, it will fail to guide the missile. SACLOS also makes them vulnerable to IRCM jamming. Sometimes, when sight towards the target is lost (target pointer is located behind the missile), the missile obeys mouse movements directly, allowing manual aim. When sight towards missile is also lost, it will stop responding and fly forward until it hit something. While manual aim is very powerful, it can be hard to pull off at times. If you do not want to deal with manual controls or indirect fire techniques, to snipe above cover pull tank optics out of cover, so it does not block the space in between camera and target and ensure that you can aim at the target directly. This, however, will almost definitely expose the machine gun shield to the opponent.

If it is necessary to use some hill to avoid being destroyed via countersnipe and enemy is 220+ m away, but you cannot guide missile at them, because binocular is too short to see them, or the hill makes the missile to launch into the sky thus to fail come down soon enough, launch the missile onto enemy position while standing as flat as possible (to reduce dead zone range), then climb your cover to push the front of the carrier up until you are able to aim at the target. This allows to correct the shot after it reaches operational range and maybe secure a hit without completely leaving the cover.

Long range sniping isn't much different from RB, you just have to aim at the enemy with your mouse instead of manually curving missile. You also can move while guiding it, though it is very hard to do on a move without aim assist (by default, right mouse button) due to a lack of stabiliser.

Semi-auto mode disallows the Type 60 ATM to attack tanks that are outside of sniper scope aim in AB, especially if they are way outside of horizontal launch zone at long ranges. But, if enemy tank is further than than 300 m and is about 30 degrees to your left or right, you can launch missile high-forward and turn the APC while dragging it to that side, then point at the enemy tank for a likely hit. Be aware that in AB the missile heavily dislikes being treated like a slingshot and will constantly drop downwards, which is why you should launch it higher than usual - do not let it hit the ground.

Combat tactics

The Type 60 ATM struggles in close quarters and is unsuited for direct urban combat. When playing the Type 60 ATGM consider all your flanking routes and hull-down positions as your high damage potential can be most effectively harnessed in these environments. Avoid all major sight-lines, and pick your targets carefully. The cover is your best friend, finding positions, where you can scout enemy vehicles for your team, can often be more beneficial than attempting to destroy enemy tanks yourself.

To get most out of the tank, one should find a hull-down position with a sight onto capture point or sniper line, to scout everyone, who is open for allied snipers, and then pick off pinned down opponents, forcing them to choose between being destroyed by ATGM or your allies.

Remember, the tank plays differently in AB and RB, experience from one mode is nearly irrelevant in another due to the differences in guidance types.

Here are some examples of close range crowd control:

The Type 60 ATM often plays out as a support vehicle instead of a tank destroyer, simply scouting enemy tanks and repairing damaged allies. Keep in mind, that enemy often likes to call artillery upon huge tank groups, and your tank can be destroyed on accident. It is safer to assist heavy hull-down tanks, as it's generally pointless to use artillery on them, and many may not even notice the Type 60 next to them. After you repaired the allied tank, immediately move away from them, as if they get destroyed, the shockwave will annihilate the Type 60 hull.

In AB it can also do some moral damage, as its presence alone forces the enemy to change plans or at least makes them prioritize you over a capture point. You shouldn't let this to get to your head, though, as you are unable to stop massive coordinated push alone. Still, the fear may stall enemy long enough for a vehicle to rearm.

As example, experienced type 60 ATM user can entrench it on river of Berlin map, making people who see ATGM for the first time to lose any will to attack B point at all, and seriously stalling the rest, although this requires meticulous training in launch techniques, as combat range there can quickly reach 20 meters, and ground isn't exactly even, often resulting in misses.

Examples of urban combat in arcade mode (In realistic mode, only try this at your own discretion):

In one-on-one situations, it is often better to fire only one launcher at the enemy, unless they try to push you, just to keep enemy guessing if it's even worth attacking you, instead of firing both missiles at once or doing nothing and letting them know, that you are harmless now.

The Type 60 ATM's biggest threats in battle are many. Avoid directly fighting all vehicles at all costs to prevent being destroyed - almost every shell at your battle rating will destroy Type 60 with ease. The vehicle will often face enemy frontally when you fire missiles, and that's where the three out of five of your crew are crammed together, two of which are the gunner and driver. However, do not shy away. If you are forced to stay within 160 m range of an enemy, at least try to find a slope that you can fire from while your teammates fight, or, if you see a light tank rushing in, attack it with your heavy machine gun.

As soon as the enemy tries to drop artillery on you, it's best to leave the position and move to a safer place. As such, always keep plan B in your head.

Try to use scouting to know the very moment your opponent drives out to attack your tank and try to blast them away with ATGM. If the direct confrontation with a light tank is inevitable - fire 12.7 mm MG at its sides as well and hope it penetrates them.

Counter-tactics

The biggest threat from this tank comes in form of its abilities to hide behind almost anything, retaliate despite heavy ammo rack damage and to fire over cover. In realistic battles, and even in arcade battles, if a player pays no attention, their tank can be suddenly hit by a gigantic HEAT bomb with the Type 60 as its sender. Being aware of its presence is the key to avoiding this.

For example, the Type 60's ATGM is very loud, so unless it was fired from 1.5 km away (almost maximum range for this tank), the sound of the missile launch will likely be audible. Do not ignore them, check if there is a missile coming for you, and if not - remember where the noise came from.

The only comfortable way to destroy hull-down Type 60 ATM relies on using chemical shells, preferably HE or HESH. If using HEAT, whenever a Type 60 ATM is spotted standing behind low cover, try to not focus on its launchers and instead try to spot machine gun shield on its right (left for an opposing player) and fire explosives at the lower part of the shield itself. It is much more likely then that the shock-wave will hit poor roof armour and annihilate tank crew.

Do note, that Type 60 ATM has two missiles at once and is rarely truly alone due to "scouting" ability, as it can manipulate its allies into helping it. Scouting also allows it to track tanks, even behind smoke screens and walls, for better missile accuracy.

Type 60 ATM has a rather long reload sequence and only 3 missiles for each rack. The ammo pool is not shared between them and it is clearly visible which rack is currently loaded, so a quick blitz during reload or rearm can put an end to it. To avoid being suddenly crushed by fatal "roof shot", ensure that you got closer than 160 m to it and there is no slope for it to try and point the launchers down, and push it around without stopping. Do note that while the exposed MG is a weakness of Type 60 ATM, it is still of 12.7 mm calibre and it can shred some light tanks and SPG at close range before they can even get a direct shot. If the rushing tanks have less than 29 mm of effective armour, they shouldn't approach Type 60 ATM directly.

If missiles were already launched, there are a few ways to protect the tank:

A) Attack active missiles with machine guns. Attacking missile racks is less effective (In Arcade Mode it only annoys them and doesn't even reset the reload). If laying down suppressive fire - the Type 60's right missile rack (left if facing the Type 60) almost always fires first.
As soon as missile fires off, try to fire in front of the missile path, as bullets do not teleport and may overshoot it. If missile is hit a few times it explodes.
Missile interception is often hard to do, if missile is guided at an angle and doesn't just fly straight towards the tank. It is generally useful for heavy tanks, which can't outrun it anyway, and medium tanks with high fire rate machine guns.
B) Run away from it, as it is very slow. To quickly change direction, the player's tank have to be mobile or at least to have great acceleration, thus this option is more suitable for light tanks and light tank destroyers. It is recommended to also fire machine guns at it as you go, since ATGM will now have to go after you in a straight line, increasing your chances of hitting it. Do note that if the Type 60 ATM operator is set on destroying a tank, they will try very hard to steer the missile into a moving target, so only stop after the missile passed the vehicle's position entirely. This tactic is more feasible in RB, as it is harder to control the missile there and it might miss.
C) Sacrifice cannon barrel or pull the engine forward to block missile. This will greatly reduce overall damage taken by tank and likely prevent the loss of entire crew in single hit. If lightly armoured tank takes ATGM hit into heavily armoured part, there is a chance it wont take overpressure damage. Avoid pulling fuel tanks forward, as type 64 MAT can cause entire tank to explode by destroying all of them in one hit.

Pros and cons

Pros:

  • Type 60 APC Hull:
    • Has scouting and can repair any allied tank faster as a support vehicle
    • Spaded version can reach maximum speed almost instantly in some cases, can compete with average medium tanks in terms of forward speed and hill climbing
    • With its very weak side armour, it fails to detonate APHE shells
  • Type 64 MAT Missile:
    • Good missile manoeuvrability - can compete with superior BAe Swingfire
    • Provides exceptional firepower compared to HEAT shells, due to increased payload and heavily reduced reliance on angle of impact
    • Upwards facing launchers can allow the vehicle to fire at enemy behind cover, although the setup is required
  • There are 2 launchers mounted on the Type 60 APC, allowing for a follow-up shot being made as the previous missile hits

Cons:

  • Type 60 APC Hull:
    • Highly visible with a very distinct profile, topped off by obvious launchers
    • Little to no armour, most shells immediately destroy this vehicle, although its engine can allow for some unexpected survival and retaliation, not taking this tank seriously can sometimes backfire
      • Even though its side armour is too thin to detonate APHE shells, the compact APC will almost always lose critical components such as:
        • Front: gunner, commander, driver
        • Middle: engine
        • Back: two loaders and/or ammo rack
      • Front and back armour are thick enough to detonate APHE rounds even though it will only withhold machine gun fire
    • Larger opponents may attempt to use their weight to crush this tank against a wall and drive over it, resulting in destruction
    • Limited turning ability, which sometimes forces it to expose itself to sniper fire
  • Type 64 MAT Missile:
    • Slow missile speed, to a point they can be easily shot mid-air or sidestepped by many tanks
    • Need a certain range for effective hit (maximum 1,600 m for long range, at least 160 m or a negative slope at close range, at least 210 m for a guidance system to start)
    • Need a visual target for an accurate hit, otherwise it heavily relies on operator skill to hit anything at all
  • Very limited main ammunition (6 missiles)
    • Reload per launcher is 13s which can mean a long downtime if both missiles are spent after quick succession
  • AB related:
    • Cannot be partially rearmed on capture point, forcing it to completely empty the ammunition, making it incapable of sustaining massive sieges on its own, even though it is difficult to force it out of cover
    • In all of suitable cover, vulnerable to tanks with chemical shells due to the exposed MG shield, particularly to the ones armed with HE/HESH
    • Missile can only be guided with sniper crosshairs, significantly inferior even to its own RB counterpart
  • RB related:
    • Can't move while the missile flies to the target because of manual input
    • It can be difficult to hit tanks if they move in circles around type 60 ATM

History

The Type 60 ATM was a Japanese Type 60 APC personnel carrier equipped with guided anti-tank Type 64 MAT missiles. The Type APC itself was developed by the Mitsubishi company in 1959 and officially put into service in 1960, becoming the first APC developed by Japan after the war. The Type 64 MAT (Anti-tank Missile) first-generation missiles, also known as KAM-3, were developed by the Kawasaki company and put into service in 1964.

The Type 64 MAT was an ordinary guided, wired HEAT missile, very reminiscent in its design of the German anti-tank Cobra and the Soviet 9M14 Malyutka, put into service several years before. The firing crew consisted of three people, and the vehicle aimed by sending a signal from the control unit along a wire connected to the rear of the missile. The wired aiming system limited the maximum cruising speed and flight range of the missile, but was extremely reliable and cheap to produce.

Containers of these missiles were used as portable weapons, and were also installed on jeeps and APCs. In total, roughly 430 standard models of the Type 60 APC were produced, and around 220 Type 64 MAT missile systems, but the precise number of APCs equipped with the missiles is unknown.

- From Devblog

Media

Skins
Images
Videos

See also

Other vehicles of similar configuration and role

External links


Mitsubishi Heavy Industries Ltd. (三菱重工業株式会社)
Ground Vehicles 
APC  Type 60 · SUB-I-II
IFV  Type 89
MCV  Type 16 (P) · Type 16 (FPS) · Type 16
SPH  Type 75 · Type 99
SPAAG  Type 87
Main Battle Tanks 
Type 61  ST-A1 · ST-A2 · ST-A3 · Type 61
Type 74  ST-B2 · Type 74 (C) · Type 74 (E) · Type 74 (F) · Type 74 (G)
Type 90  Type 90 · Type 90 (B)
Type 10  TKX (P) · TKX · Type 10
Air Vehicles 
Jet Fighters 
F-86  F-86F-30 ▅* · F-86F-40 ▅* · F-86F-40 JASDF▅*
F-104  F-104J*
F-1  T-2 Early · T-2 · F-1
F-4  F-4EJ Phantom II* · F-4EJ ADTW* · F-4EJ Kai Phantom II*
F-15  F-15J*
Naval Vehicles 
Patrol Boats (PT) 
No. 7 class  PT-8 (PT-808)
No. 11 class  PT-15 (PT-815)
Destroyers (DD) 
Harukaze-class  JDS Harukaze (DD-101)
Ayanami-class  JDS Ayanami (DD-103)
  MHI's shipyards are positioned in Kobe, Nagasaki, and Shimonoseki
  * Licensed Production / Variants
See also  Mitsubishi Aircraft Company (1928-1945) · Mitsubishi Heavy Industries Ltd. (1938-1945) · Mitsubishi Shipbuilding Company (1884-1945)
  North American Aviation · Lockheed · McDonnell Aircraft Corporation

Japan tank destroyers
Ro-Go Derivatives  Ro-Go Exp.
Chi-Ha Derivatives  Ho-Ni I · Ho-Ni III · Ho-Ro · Chi-Ha LG
Ho-Ri  Ho-Ri Prototype · Ho-Ri Production
Other  Na-To
JGSDF 
SPRG  Type 60 (C)
SPH  Type 75 · Type 99
ATGM  Type 60 ATM
Rocket  Type 75 MLRS
USA  ▅M36