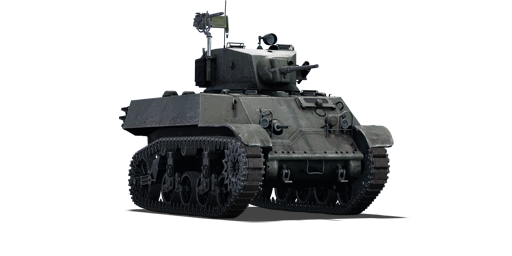
M3A3 Stuart (France)
This page is about the light tank M3A3 Stuart (France). For other versions, see M3 Stuart (Family). For other uses, see M3 (Disambiguation). |
Contents
Description
France operated a large number of M3A3s leased from the United States, part of the 651 light tanks operated by Free France. The 2nd Armored Division was the largest user of this tanks, meanwhile the 1st and 5th divisions operated a mix of M3A3s and M5A1s. The tanks were usually designated for recon roles and sometimes infantry support, although regular Shermans or self propelled howitzers were preferred for this. The units were kept available in Recon Armored units at the battalion level. The tanks were operated from D-Day to the end of World War II.
It was introduced in Update 1.97 "Viking Fury". The M3A3 offers a good platform with a mediocre firepower for its BR. Being a Stuart, it has a very good mobility, but it has a lacklustre cannon, while the penetration is not usually a problem the tank does suffer from mediocre ammunition, and the Stuart's high speed makes it hard to aim with the stabilizer, since this stops working at high speeds. The tank however is very fast and nimble, and because of its small size, it is able to evade danger in most situations.

General info
Survivability and armour
Armour type:
- Rolled homogeneous armour (hull, turret)
- Cast homogeneous armour (gun mantlet, MG port, transmission carter)
Armour | Front (Slope angle) | Sides | Rear | Roof |
---|---|---|---|---|
Hull | 25.4 mm (40°) Upper Glacis - Cheeks 25 mm (44-50°) Upper Glacis - Top 20 mm (spherical) MG port 50 mm (23-29°) Upper Glacis - joint plate 50 mm (44-46°) Upper Glacis - Bottom 44.4 mm (25-43°) Lower Glacis |
25.4 mm (20°) Top 25.4 mm Bottom |
12.7 mm (40-59°) + 4 mm Upper glacis 25.4 mm (cylindrical) + 4 mm Upper plate 25.4 mm (8°) Upper plate - Cheeks 25.4 mm (21°) Lower glacis |
25 mm (40°) Front glacis 12.7 mm (16°) Centre and rear |
Turret | 38.1 mm (12-14°) Turret front 50.8 mm (spherical) + 38.1 mm (12-14°) Gun mantlet |
31.75 mm 15 mm Add-on tracks |
31.75 mm | 12.7 mm (16°) Front 12.7 mm Centre 12.7 mm (16°) Rear |
Notes:
- Suspension wheels, tracks and bogies are 15 mm thick.
- Mudguards and the rear storage box are 4 mm thick.
The frontal armour on the ▄M3A3 Stuart is pretty tough for a light tank with 25 mm on the front & sides of the hull, and a large, 50 mm thick gun mantlet covering up most of its frontal turret. When angled correctly it can bounce off quite a few shots. However it can still be easily penetrated by average guns at its battle rating. From the front, the 4 crew members are sitting pretty close together, making it highly possible to get all knocked out at once by a shell with explosive filler like the Soviet 45 mm AP or the German short 75 mm APHE. The transmission and the engine are all quite small and low, and the ammunition stowage racks are also small, reducing the chance of being immobile or suffering ammo rack detonation. There is also an empty area under the turret servants and in front of the driving compartment, which will absorb those shells with weak damage.
Mobility
Game Mode | Max Speed (km/h) | Weight (tons) | Engine power (horsepower) | Power-to-weight ratio (hp/ton) | |||
---|---|---|---|---|---|---|---|
Forward | Reverse | Stock | Upgraded | Stock | Upgraded | ||
Arcade | 65 | 8 | 14.4 | 406 | 500 | 28.19 | 34.72 |
Realistic | 59 | 7 | 232 | 262 | 16.11 | 18.19 |
One of the best aspects of the ▄M3A3 Stuart is its superior mobility. It has a top speed of 58 km/h and doesn't lose too much speed on soft terrains as it's tracked, making it one of the fastest tanks at the BR alongside with the famous BT series tanks. The turning ability is also amazing, since the hull is short and wide enough, allowing it to turn agilely. However, when trying to stop the tank while it is travelling at full speed, the brakes tend to be inefficient, giving it a long braking distance and making it very sluggish when stopping.
Modifications and economy
Armaments
Main armament
37 mm M6 | Turret rotation speed (°/s) | Reloading rate (seconds) | |||||||||||
---|---|---|---|---|---|---|---|---|---|---|---|---|---|
Mode | Capacity | Vertical | Horizontal | Stabilizer | Stock | Upgraded | Full | Expert | Aced | Stock | Full | Expert | Aced |
Arcade | 174 | -10°/+20° | ±180° | Vertical | 19.0 | 26.4 | 32.0 | 35.4 | 37.7 | 3.77 | 3.34 | 3.07 | 2.90 |
Realistic | 11.9 | 14.0 | 17.0 | 18.8 | 20.0 |
The ▄M3A3 Stuart is armed with an 37 mm M6 cannon as its main armament, the gun still packs a fierce punch if aiming at the correct area and firing at the correct distance. It is a small calibre fast-firing gun with a maximum penetration of 84 mm at 100 m (M51B1 shell), being able to penetrate most of the opponents it will face. While it lacks the post-penetration damage to knock out most enemy tanks, it can quickly finish them off with its fast reload. The penetration and trajectory drop significantly beyond 500 m. Note that the gun has a vertical stabiliser, giving the player a huge advantage in some cases, but keep in mind that the stabiliser only works when the tank is slower than 10 km/h.
Ammunition
Penetration statistics | |||||||
---|---|---|---|---|---|---|---|
Ammunition | Type of warhead |
Penetration @ 0° Angle of Attack (mm) | |||||
10 m | 100 m | 500 m | 1,000 m | 1,500 m | 2,000 m | ||
M74B1 | AP | 79 | 76 | 65 | 54 | 45 | 37 |
M51B1 | APCBC | 87 | 84 | 73 | 60 | 50 | 41 |
Shell details | ||||||||||||
---|---|---|---|---|---|---|---|---|---|---|---|---|
Ammunition | Type of warhead |
Velocity (m/s) |
Projectile mass (kg) |
Fuse delay (m) |
Fuse sensitivity (mm) |
Explosive mass (TNT equivalent) (g) |
Ricochet | |||||
0% | 50% | 100% | ||||||||||
M74B1 | AP | 883 | 0.87 | - | - | - | 47° | 60° | 65° | |||
M51B1 | APCBC | 883 | 0.87 | - | - | - | 48° | 63° | 71° |
Ammo racks
Full ammo |
1st rack empty |
2nd rack empty |
3rd rack empty |
4th rack empty |
Visual discrepancy |
---|---|---|---|---|---|
174 | 131 (+43) | 87 (+87) | 44 (+130) | 1 (+173) | Yes |
Notes:
- Racks disappear after you've fired all shells in the rack.
- The visual discrepancy concerns the total number of shells as well as the number of shells per rack:
- 144 shells are modeled but you can pack 174 shells.
- Rack 1 is modeled as 3 shells but contains 43 shells.
- Rack 2 is modeled as 52 shells but contains 44 shells.
- Rack 3 is modeled as 24 shells but contains 43 shells.
- Rack 4 is modeled as 55 shells but contains 44 shells.
- To go into battle with the turret and the flanks empty of ammo, pack 44 (+130) shells (racks 1 to 3 emptied).
Machine guns
7.62 mm M1919A4 | ||||
---|---|---|---|---|
Mount | Capacity (Belt) | Fire rate | Vertical | Horizontal |
Pintle | 4,500 (250) | 500 | -10°/+70° | -60°/+15° |
Coaxial | 3,250 (250) | 500 | N/A | N/A |
The M3A3 has two M1919A4 machine guns, one being coaxial to the main gun and the other roof-mounted. The two machine guns can quickly incapacitate the exposed crews on some vehicles or do some serious damage to those low-flying aircraft. The machine gun will only destroy poorly protected vehicles such as AS 42, FlakPanzer I and GAZ-AAA. The penetration of around 10 mm is not enough to go through the frontal armour of those light armoured tank destroyers like SU-5-1, Panzerjager 1 or 15cm sIG 33 B Sfl.
Usage in battles
The M3A3 Stuart is best used as a point-capper and a hit-n-run tank. Its extreme mobility gives the player uncountable ways to play with the enemy. At the start of a battle, it can quickly cap a nearby point first, but note that some wheeled vehicles, like the Sd.Kfz.234 series in a mixed battle can still outrun the M3A3 on-road, therefore posing a great threat. Or it can get to an ambush position near the point and wait until the prey comes. With its reliable gun, the M3A3 should be able to destroy the first wave of enemies easily and quickly.
In the middle stages of a battle, the M3A3 can utilise its excellent mobility and get to wherever needs help while carefully looking around. If the M3A3 unexpectedly encounter an enemy in its path, don't panic! Circle around the enemy and try to force it to turn, this way it usually cannot aim at the M3A3 accurately, then reduce the M3A3's speed down under 10 km/h and keep moving. Now the M3A3's stabiliser will give the tank a great chance to hit while on the move as it stabilises the gun when the tank is under 10 km/h, making it easier time to put the gun on target while moving compared to the enemy.
The frontal armour of this tank is also quite good at a distance. Find a building or a big rock as cover and angle the hull for about 40 degrees. When ready to fire, go out of cover and stop once the 37 mm gun is exposed, don't go out too much or the thin side armour will be exposed to be hit. Keep in mind that with this tactic the player should only engage the low-penetrating enemies at more than 400 m, as their penetration will drop significantly at that distance while the M3A3 can still penetrate 73 mm of armour, which is enough to go through most of its opponents like the T-50, SU-76M or Crusader Mk III.
Enemies worth noting:
Specific enemy vehicles that bear mentioning are firstly any Germans with the 20 mm KwK/FlaK38 cannon, this gun might be small but can have up to 64 mm of penetration, which is enough to go through the M3A3 almost anywhere. These guns can also fire 10 rounds at 280 rounds/min before having to reload the clip, meaning that they will very easily take out your crew before you have a chance to respond. To counter, the best chance you have is to angle your frontal armour which can make it difficult for the PzGr 40 rounds to penetrate. The Russian T-50 and T-126 are vehicles you will also see commonly, these have fairly thick and angled frontal armour that will prevent you from easily getting through. These tanks can also carry an APHEBC round that will destroy you in one shot with little difficulty, to counter you should use your speed to attempt to get a side shot into either the turret or engine. If the T-50 cannot move you can outrun its turret and finish it without much difficulty.
It is likely that the M3A3 will encounter some rough heavies, like the Matilda III and the B1 bis. The best tactic against these types of targets is to use the M3A3's fast speed, get within 200 m from them and attack, with shooting at point-blank range being the most effective way. Before conducting an attack, check the M3A3's and the enemy's surroundings to make sure no one will ambush the M3A3. While charging, use the M3A3's quick turns to suddenly change direction to avoid being shot if they are aiming and firing at the M3A3. Once the tank is at the ideal distance, manoeuvre so that the gun is perpendicular to their armour. Do not shoot if the enemy is angling! The small calibre 37 mm gun is very likely to bounce off or not penetrate against sloped armour.
For the Matilda III, shoot at the middle of the near-vertical frontal plate to knock out the driver first, since the 37 mm shell is not enough to knock out the gunner after penetrating. Once it is immobile, go to its side and finish it by shooting its hull sides. Or, shoot the right side of the gun mantlet to disable its gunner. For the best chance of penetration, do not shoot its turret side.
For the B1, either aim for the near-vertical frontal armour plate at the right side of the hull, or the turret ring to incapacitate the commander/gunner, or simply move to its side and knock out the crews one by one by hitting its flat side armour.
Pros and cons
Pros:
- Great firepower: cannon has good penetration, excellent rate of fire and gun depression of -10 degrees, allowing the M3 to manoeuvre to any terrain and adapt to it well
- Excellent acceleration, top speed and turning ability on all terrains; easily outruns common opponents like the Pz.III and Crusader
- Access to a vertical stabiliser which most tanks don't have, giving it an advantage in a sudden encounter
- Respectable sloped armour that, if angled, might bounce some shells from a distance, such as the 37 mm M6 on other M3 Stuarts
- Small turret profile makes it harder to get hit
Cons:
- Weak armour against high-penetration shells like the 76 mm F-34/ZIS-5
- Its shells do not have explosive filler, severely limiting the post-penetration effect especially against spacious tanks like the LVT(A)(1)
- Inefficient brakes when trying to stop the tank at full speed
- Hull is fairly tall for a light tank and the crews are closely packed, reducing its survivability
- While fast, it is still slower than the Sd.Kfz.234 series on the road
History
The US lend-leased a total of 651 light tanks to the Free French forces, including 273 M3A3s, delivered prior to D-Day. All the light tanks of 2nd French Armoured Div. were M3A3s during the 1944 fighting in France. 1st and 5th Divisions had a mix of M3A3 and M5A1. Three of the five armoured recon battalions integral to the Free French infantry divisions also had a mixed fleet, while the 2 non-divisional armoured recon battalions, the 1st and 2nd Spahis Algeriens, were entirely M3A3-equipped. They would continue in service from D-Day until the end of the war in Europe.
Media
- Skins
- Videos
See also
- Vehicles equipped with the same chassis
- Other vehicles of similar configuration and role
External links
France light tanks | |
---|---|
AMC.34/35 | AMC.34 YR · AMC.35 (ACG.1) |
H.35/39 | H.35 · H.39 · H.39 "Cambronne" |
AMX-13 | AMX-13 (FL11) · AMX-13-M24 · AMX-13 · AMX-13 (SS.11) · AMX-13-90 · AMX-13 (HOT) |
Wheeled | AML-90 · AMX-10RC · Vextra 105 |
AMD.35 | AMD.35 · AMD.35 (SA35) |
E.B.R. | E.B.R. (1951) · E.B.R. (1954) · E.B.R. (1963) |
Other | FCM.36 · R.35 (SA38) · Char 25t · MARS 15 · VBCI-2 (MCT30) |
Austria | SK-105A2 |
Great Britain | ▄Crusader Mk.II |
USA | LVT-4/40 · ▄M3A3 Stuart |