M4A2

From War Thunder Wiki
Jump to: navigation, search
RANK 6 BRITAIN
Rooikat 105 PACK
This page is about the American medium tank M4A2. For other M4 Shermans, see M4 Sherman (Family). For other uses, see M4 (Disambiguation).
us_m4a2_sherman.png
GarageImage M4A2.jpg
ArtImage M4A2.png
ArtImage2 M4A2.png
M4A2
AB RB SB
4.0 4.0 4.0
Class:
Research:6 900 Specs-Card-Exp.png
Purchase:32 000 Specs-Card-Lion.png
Show in game

Description

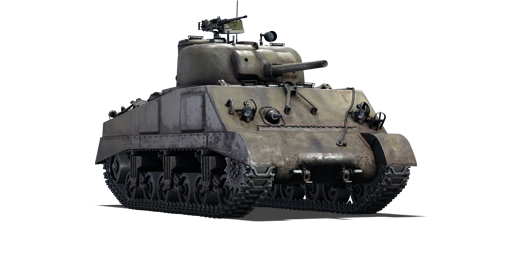
The M4A2 Sherman is the third variant of the early-generation Medium Tank M4 (Sherman) family. In April 1942, the M4A2 was designed with a new General Motors 6046 engine (two GM 6-71 General Motors Diesel engines combined together), welded hull with increased appliqué armour on the hull sides, and gunner position (left side of the turret). Approximately 8,053 units were manufactured till May 1944. Early M4A2s had small hatches and protruding drivers' and co-drivers hoods (similar to the previous M4 variant), a 57° sloped hull's upper front armour plate, and dry ammo stowage bins. The Fisher Body Tank Plant later improved the M4A2 design, adding a one-piece hull's upper front armour plate with a 47° slope, but retained dry ammo bins and appliqué armour. Late-production M4A2s were equipped with an upgraded General Motors 6046 diesel engine with 410 horsepower and were primarily used by the British Army and US Marine Corps. The M4A2 variant saw very limited combat in the US Army, with the majority transferring to the British Army, with some transferring to the Soviet Army and the US Marine Corps. Since the USSR only used diesel-powered tanks, this was the primary chosen variant for the Soviet lend-lease programme. From April 1942 to July 1945, 10,968 units of all turret types were built in six facilities.

Introduced in Update 1.45 "Steel Generals", the M4A2 variant is without a doubt one of the best of the early-generation M4 Sherman variants. The M4A2 is one of the few early M4 Sherman variants having an uninterrupted, fully welded hull's upper front armour plate that slopes at 47°. This eliminates the earlier M4A1 and M4 variants' key frontal hull weak points. However, this is insignificant since the majority of adversaries have greatly upgraded their firepower and will easily penetrate the M4A2 regardless. The appliqué armour on the right side of the frontal turret gun mantlet has also been removed. As a result, a weak area on the turret cheek appears, which can be easily penetrated by even weak and small calibre tank guns.

General info

Survivability and armour

Smoke grenades
Creation of a smoke screen in front of the vehicle
Armourfront / side / back
Hull38 / 38 / 38
Turret76 / 51 / 51
Crew5 people
Visibility103 %

The M4A2 has above-average survivability, with improved armour protection over previous Sherman models against common enemy tanks like the early T-34 and Panzer IV. If angled, hull down, and firing from a higher elevation, the armour can protect the crew and bounce a few shells from the 76 mm cannon found on early Soviet T-34 tanks, but it can still be easily penetrated by German Panzer IV tanks from any distance. Despite having five crew members, the close placement of the crews frequently results in the tank being destroyed immediately if enemy shells successfully penetrate. The tank's armour along its add-on armour allow for slightly more aggressive gameplay than previous Sherman tanks, but do not think it makes the M4A2 impervious to any enemy fire. When placed in an uptier, where enemies have increasingly powerful cannon that can easily penetrate the M4A2's armour, the survivability will decrease significantly.

Armour type:

  • Rolled homogeneous armour (Hull, turret roof)
  • Cast homogeneous armour (Turret, lower glacis, MG port)
Armour Front (Slope angle) Sides Rear Roof
Hull 63.5 mm (47°) Upper glacis
51-108 mm (12-56°) Transmission housing
38.1 mm 38.1 mm (7-10°) 19.5 mm
Turret 76 mm (3-65°) Turret front
89 + 51 mm (2-62°) Gun mantlet
51 mm (2-64°) 51 mm (2-60°) 19.5 mm
Cupola 51 mm 51 mm 51 mm 19.5 mm

Notes:

  • Suspension wheels are 15 mm thick, the bogies are 10 mm, and the tracks are 20 mm thick.
  • Small applique panels are placed on the side hull armour over the ammunition, increasing armour by 25.4 mm.
  • A small patch on the turret front right side is thinner (51 mm) than the rest (76 mm).
  • There is a 9.5 mm thick sheet of armour dividing the engine bay and crew compartment.

Mobility

Speedforward / back
AB53 / 7 km/h
RB and SB48 / 7 km/h
Number of gears5 forward
1 back
Weight32.5 t
Engine power
AB782 hp
RB and SB410 hp
Power-to-weight ratio
AB24.1 hp/t
RB and SB12.6 hp/t

The M4A2's mobility is good, with a quick acceleration and a high top speed. Because it lacks neutral steering, turning in this tank can be slow from stationary.

Game Mode Max Speed (km/h) Weight (tons) Engine power (horsepower) Power-to-weight ratio (hp/ton)
Forward Reverse Stock AoA Stock Upgraded Stock Upgraded
Arcade 53 7 31.3 1.15 635 782 20.26 24.06
Realistic 48 7 363 410 11.58 12.62

Modifications and economy

Repair costBasic → Reference
AB686 → 1 101 Sl icon.png
RB812 → 1 304 Sl icon.png
SB1 049 → 1 684 Sl icon.png
Total cost of modifications13 810 Rp icon.png
19 850 Sl icon.png
Talisman cost860 Ge icon.png
Crew training9 200 Sl icon.png
Experts32 000 Sl icon.png
Aces270 Ge icon.png
Research Aces250 000 Rp icon.png
Reward for battleAB / RB / SB
50 / 80 / 90 % Sl icon.png
130 / 130 / 130 % Rp icon.png
Modifications
Mobility Protection Firepower
Mods new tank traks.png
Tracks
Research:
920 Rp icon.png
Cost:
1 300 Sl icon.png
135 Ge icon.png
Mods new tank suspension.png
Suspension
Research:
620 Rp icon.png
Cost:
890 Sl icon.png
90 Ge icon.png
Mods new tank break.png
Brake System
Research:
620 Rp icon.png
Cost:
890 Sl icon.png
90 Ge icon.png
Mods new tank filter.png
Filters
Research:
690 Rp icon.png
Cost:
1 000 Sl icon.png
100 Ge icon.png
Mods new tank transmission.png
Transmission
Research:
900 Rp icon.png
Cost:
1 300 Sl icon.png
135 Ge icon.png
Mods new tank engine.png
Engine
Research:
900 Rp icon.png
Cost:
1 300 Sl icon.png
135 Ge icon.png
Mods tank tool kit.png
Improved Parts
Research:
920 Rp icon.png
Cost:
1 300 Sl icon.png
135 Ge icon.png
Mods extinguisher.png
Improved FPE
Research:
620 Rp icon.png
Cost:
890 Sl icon.png
90 Ge icon.png
Mods tank reinforcement us.png
Crew Replenishment
Research:
690 Rp icon.png
Cost:
1 000 Sl icon.png
100 Ge icon.png
Mods tank additional armor.png
Add-on Armor
Research:
900 Rp icon.png
Cost:
1 300 Sl icon.png
135 Ge icon.png
Mods new tank horizontal aiming.png
Horizontal Drive
Research:
920 Rp icon.png
Cost:
1 300 Sl icon.png
135 Ge icon.png
Mods tank cannon.png
Adjustment of Fire
Research:
620 Rp icon.png
Cost:
890 Sl icon.png
90 Ge icon.png
Mods tank ammo.png
75mm_usa_APCBC_ammo_pack
Research:
620 Rp icon.png
Cost:
890 Sl icon.png
90 Ge icon.png
Mods new tank vertical aiming.png
Elevation Mechanism
Research:
690 Rp icon.png
Cost:
1 000 Sl icon.png
100 Ge icon.png
Mods tank ammo.png
75mm_usa_APCR_ammo_pack
Research:
690 Rp icon.png
Cost:
1 000 Sl icon.png
100 Ge icon.png
Mods smoke screen.png
Smoke grenade
Research:
690 Rp icon.png
Cost:
1 000 Sl icon.png
100 Ge icon.png
Mods art support.png
Artillery Support
Research:
900 Rp icon.png
Cost:
1 300 Sl icon.png
135 Ge icon.png
Mods tank ammo.png
75mm_us_M89_Smoke_ammo_pack
Research:
900 Rp icon.png
Cost:
1 300 Sl icon.png
135 Ge icon.png

It is advisable to research Parts first, then Fire Protection Equipment, then the M61 shot round. Following that, engine upgrades are advisable, as the tank is much less manoeuvrable than it could be when it is stock.

Armaments

Main armament

Vertical stabilizer
Reduces the swing of the gun in one plane while moving
Ammunition97 rounds
Reloadbasic crew → aces
6.5 → 5.0 s
Vertical guidance-10° / 25°
Main article: M3 (75 mm)
75 mm M3 Turret rotation speed (°/s) Reloading rate (seconds)
Mode Capacity Vertical Horizontal Stabilizer Stock Upgraded Full Expert Aced Stock Full Expert Aced
Arcade 97 -10°/+25° ±180° Vertical 22.8 31.6 38.4 42.5 45.2 6.50 5.75 5.30 5.00
Realistic 14.3 16.8 20.4 22.6 24.0

Ammunition

Penetration statistics
Ammunition Type of
warhead
Penetration @ 0° Angle of Attack (mm)
10 m 100 m 500 m 1,000 m 1,500 m 2,000 m
M72 shot AP 91 88 78 67 57 49
M48 shell HE 10 10 10 10 10 10
M61 shot APCBC 104 102 93 84 75 68
T45 shot APCR 139 135 121 105 91 79
Shell details
Ammunition Type of
warhead
Velocity
(m/s)
Projectile
mass (kg)
Fuse delay
(m)
Fuse sensitivity
(mm)
Explosive mass
(TNT equivalent) (g)
Ricochet
0% 50% 100%
M72 shot AP 619 6.3 - - - 47° 60° 65°
M48 shell HE 463 6.3 0.2 0.1 666 79° 80° 81°
M61 shot APCBC 618 6.79 1.2 14 63.7 48° 63° 71°
T45 shot APCR 868 3.81 - - - 66° 70° 72°
Smoke shell characteristics
Ammunition Velocity
(m/s)
Projectile
mass (kg)
Screen radius
(m)
Screen deploy
time (s)
Screen hold
time (s)
Explosive mass
(TNT equivalent) (g)
M89 259 3 9 5 20 50

Ammo racks

Full
ammo
1st
rack empty
2nd
rack empty
3rd
rack empty
4th
rack empty
5th
rack empty
6th
rack empty
7th
rack empty
8th
rack empty
Visual
discrepancy
97 91 (+6) 88 (+9) 86 (+11) 78 (+19) 63 (+34) 45 (+52) 31 (+66) (+96) No
Ammo racks of the M4 Sherman.

Notes:

  • To go into battle with the turret basket empty of ammo, pack 78 (+19) shells (racks 1 to 4 emptied).
  • To go into battle with the turret basket and the flanks empty of ammo, pack 31 (+66) shells (Racks 1 to 7 empty).
  • The 8th rack is large and located at a weak spot: the bottom section of the armour. In case of penetration, there is a high risk of ammo rack detonation. Make sure not to expose your flanks unnecessarily.

Machine guns

Ammunition400 rounds
Belt capacity200 rounds
Reloadbasic crew → aces
10.4 → 8.0 s
Fire rate575 shots/min
Vertical guidance-10° / 25°
Horizontal guidance-60° / 60°
Ammunition3 000 rounds
Belt capacity250 rounds
Reloadbasic crew → aces
10.4 → 8.0 s
Fire rate500 shots/min
12.7 mm M2HB
Mount Capacity (Belt) Fire rate Vertical Horizontal
Pintle 400 (200) 577 -10°/+25° ±60°
7.62 mm M1919A4
Mount Capacity (Belt) Fire rate Vertical Horizontal
Coaxial 3,000 (250) 500 N/A N/A

Usage in battles

The general playstyle of this tank is to be a support tank. This tank does not have the armour to function effectively on the front lines. Surviving on the front lines will be quite hard, though not impossible. Try to stay in the 2nd or 3rd line and support the team, or hide behind heavily armoured teammates and help them assault the enemy. Capturing objectives is also a good use for this vehicle, thanks to its speed. Be wary of German tanks, as well as T-34s. German vehicles have guns that can easily penetrate the M4A2's armour even if angled well. It is best to use hull down tactics, or shoot first and knock-out their gunner. T-34s are much tougher, but have weaker guns. They can still very easily one shot the M4A2 from the side, so keep the sides protected. T-34s have fairly thin armour but it is highly sloped, and if angled are hard to destroy with hull shots. It i advised to aim for the turret ring for a consistent knock-out of the enemy vehicle, or the turret cheeks to knock out the turret crew, and most likely the breech.

The best tactic to use is to not stay in the same place. Move after every shot so the enemy has to relocate you or potentially move themselves, leaving them exposed. Any accurate return fire from tanks at your tier will likely result in your incapacitation or destruction, so try to keep enemies from knowing where you are at all, and aim to kill with the first shot.

Arcade Battles
When in this game mode: The tank is fast, but weakly armoured. Its gun is pretty decent with enough penetration to take on most opponents with accurate fire. Capture zones and support the team by firing at enemy medium tanks.

Realistic Battles and Simulator Battles
The tank performs its role as medium tank very well. Both speed and strong frontal armour give this tank an edge over the enemy in a head-on engagement. However, it has very thin side armour that can be penetrated by essentially any tank, as well as many vehicles armed with autocannons. Watching the sides and rear is very important, and neglecting to protect them can often result in a destroyed M4A2.

When engaging enemy vehicles it is recommended to turn into their fire with the front of the tank. The M4A2's glacis is thicker than most installed on tanks at its BR, and this can often save the tank from an untimely end. However, if the engagement begins with you taking a shot to the side it is unlikely you will get the chance to fight back, so always try to have your front toward the enemy to begin with.

When fighting against the M4A2, try to flank it if possible, as a side shot under the turret will be an almost guaranteed kill. A shot to the side of the turret will kill the turret crew, and a second shot once the crew has replenished will generally kill the tank. If forced to engage from the front, remember that you need about 110 mm of penetration to get through the upper glacis reliably. If you have this, you will be able to kill the tank easily. With a weaker gun, you will have to aim. Weak points include the very top of the lower glacis, which is almost flat; the machine gun port, which will result in a kill of at least half the crew if penetrated; the bottom right turret cheek (left from the attacker's viewpoint), which is much thinner than the rest of the turret; and the cupola, which if hit with an APHE shell will result in a kill of most of the turret crew. All of these weak points are quite difficult to hit, especially from range, and it may be better to retreat if you don't feel confident in your shot or if the Sherman is hull down.

Enemies worth noting:

M4A2/M4A4 (1st PTG): these Sherman tanks are widely used by both the Allied and the Axis side, so no matter which nation you play they can be quite tough to destroy in the hands of a skilled tanker. Given the rather weak penetration of your short 75 mm gun, their hull can be almost impossible to penetrate when angled, hull down or 300 m away. For an M4A4, there are 2 apparent bulges on the upper front plate, a penetration through there can guarantee a knock out most of the times. But in case the opponent covers them up or when it's an M4A2, aim for the middle parts of the gun mantlet or the turret armour unprotected by the mantlet, you can at least make them defenceless. Note that their guns are equally weak against you, so wiggle around to disrupt their aim while you reload, you have a good chance of bouncing some shells.

KW I C 756 (r) - An opponent the M4 Sherman will have trouble with is this upgunned German KV-1. Although the earlier KV-1's L-11 cannon lacks power, the newly-equipped German KwK40 cannon is more than enough to penetrate the Sherman's front, while the Sherman still cannot reliably penetrate the KV-1's thick armour, especially when it has additional armour plates. If you see this heavy tank angling its hull, aim for the gun mantlet as it is only 50 mm thick. You can easily take out his gunner, gun breech, etc. Or shoot at the thin commander's cupola, there is a chance to knock out the gunner too. Of course, the best method is to shoot from the side and from behind without angling, where the KV-1's armour is not angled, although you still need to get as close as possible to penetrate its armour. Additionally, side shots are likely to damage its fuel tank or ammunition storage and cause a fire or ammunition explosion. In a standoff, you can try angling your hull to make your well-sloped frontal hull more effective.

Churchill heavy tanks - The Churchills, with their complex hulls and sturdy turrets, can be quite hard to penetrate at range. Again, manoeuvre as close to them as possible, the ideal distance being no more than 200 m. If they are angling their hull but facing their turret at you, only go for the turret. For the Mk I Churchills, aim at the near-vertical part of their rounded cheeks to ensure successful penetrations. For the Mk III and the German Churchill, also aim for their flat turret which is at most 89 mm. The shell should go in easily and knock out most, if not all of the crew. Only when you are facing their hull without any angles should you shoot the hull, otherwise shoot the turret only, as their big tracks can easily get in front of the frontal hull. The side hull have multiple layers of armour, some of which are weirdly angled and can absorb plenty of shells.

Pz.IV F2/G/H/J - The historical nemesis of any Sherman, the Panzer IV is one of the Shermans biggest threats at this rank. The long barrel 75 mm gun will easily penetrate the Sherman from the front. The F2 variant is admittedly easy to deal with. A single APCBC to its hull or turret should end it pretty quickly, even at long range. The other variants are slightly harder to deal with. They have thicker hull armour, at 80 mm, which will be much harder to penetrate with the APCBC over 500 m. Luckily the turret armour remains the same at 50 mm. Either aim here with APCBC or sacrifice damage potential and use the AP round to penetrate the hull.

StuG III F/G - Another historical nemesis of the Sherman, and another big threat. The StuG III packs the same punch as the Panzer IV line with its long barrel 75 mm gun, whilst losing the turret, which turns out to be both an advantage and a disadvantage. Lacking a turret means that it will have to traverse the whole vehicle to target an enemy, but it also means that it has a lower profile. The StuG's armour profile is also more complex than the Panzer IV, with less flat areas. Certain areas are sloped and very bouncy. Luckily, there is a big weak spot. There are two flat plates on the front of the hull. The flat plate on the right is the drivers port. Shoot that and you are able to incapacitate the driver, gunner and loader in one go. This is a very efficient way to destroy this vehicle. With the F variant, you can use APCBC to instantly knock out this vehicle with a single shot. With the G variant, it is more reliable to use AP at ranges within 500 m to ensure penetration.

Pros and cons

Pros:

  • Excellent gun depression of -10° plus the angled frontal turret allows it to utilise hills very well
  • Great firepower: adequate penetration and post-penetration damage when using M61 shells; can frontally penetrate and knock out most opponents like the Pz.IV F2, Chi-Nu and StuG III F with a single shot. It also has APCR for hitting thick, flat armour up close, for example the Pz.Kpfw. Churchill
  • Great turret traverse speed allows it to deal with multiple threats easily
  • Well angled frontal hull provides protection against small calibre / low-penetration guns (e.g. 75 mm M3, 50 mm KwK39), and even large calibre guns when angled correctly. The side armour can be boosted with add-on armour
  • Adequate top speed allows it to get to positions in time, or to do tactical manoeuvres like flanking
  • Pintle-mounted HMG provides an anti-aircraft defence or anti-tank duty against tanks like Marder III
  • Fitted with a vertical stabilizer, allowing more accurate fire on the move compared to other tanks, as well as better usage of shoot-n-scoot tactics

Cons:

  • Large profile and weak side armour; flankers like the Sd.kfz.234/2 can easily see and penetrate it
  • Frontal armour is still inadequate, will get penetrated and knocked out by tanks like Pz.IV F2/G, StuG III F/G, M10 by a single shot
  • M61 and T45 all struggle to penetrate angled targets like StuG III G, Churchill Mk.III or even the T-34 and M10
  • Trajectory is curved and velocity is low due to its short barrel, thus distant/moving targets are hard to shoot at
  • Hull traverse is quite slow, making it sluggish in a turn. Also the narrow tracks offer poor ground flotation, thus poor off-road capabilities. Can only reach its top speed on paved or hard surfaces
  • Roof armour of 19.5 mm thick is vulnerable to airstrikes with AP cannons. For example the widely used MG151 15/20 mm
  • Acceleration even more sluggish than previous Shermans due to the two tons weight increase

History

Development

The Battle of France in 1940 proved to America that their current tank arsenal would not be able to withstand a German assault. The only tanks in their inventory at that time was the M2 Light Tanks and the M2 Medium Tank, both are inadequate against the German Panzer IIIs and the Panzer IVs. The US Army, in response, ordered for a tank armed with a 75 mm gun. While a 75 mm gun was available for use, a turret able to mount the gun was not. So while the turret and tank design underwent development, the 75 mm would be mounted on the stopgap design, the M3 Lee tank in a sponson mount. This interim design put the 75 mm on a lower and limited traverse mount that restricted its firing angle, but it did give the Allies a tank with the gun, so it was issued by the thousands until a better design could be made.

During the M3's development, the designs of the 75 mm armed vehicle were being drawn up and submitted by the Ordnance Department. Specifications on the tank design were strict, with restrictions made on the tank's height, width, and weight in order to make it able to be transported over bridges, roads, railroads, and on ships. These specifications would help the army by making the tank be very flexible on strategic, logistical, and tactical grounds. On April 1941, the Armored Force Board chose the simplest of the designs, which was a redesigned M3 hull and chassis with a turret mounting the 75 mm gun designated the T6, completed in September 1941. This tank would then designated the Medium Tank M4 in American service. The tank would become the most used Allied tank during World War II as it was lent out by the thousands in the Lend-Lease program to the Allied countries. The British called the M4 the "Sherman", which coined into the tank's name M4 Sherman that it would be known as in history. The production for the Shermans began on October 1941 and would continue to be produced until the end of the war in 1945 with around 50,000 units produced, making it the second most-produced tank in World War II before the T-34 tank.

Design

Many variants of the Shermans were produced, but they all followed a similar layout. The driver and bow gunner sat in the front driving compartment, the fighting compartment in the middle housed the turret its three crew member, and in the back was the engine compartment. The Sherman used many features present in previous American tank designs, the vertical volute suspension system (VVSS) and radial engine from the M2 light tanks, and the sloping armour of the M2 Medium. This became a contributing factor on Sherman's reliability on the field, as most of the design flaws were ironed out with the previous tank designs. The tank-mounted the 75 mm M3 gun, giving the tank very good AP and HE capabilities. The Sherman's turret traverse speed was very fast, able to traverse a full 360 degrees in only 15 seconds, which is considerably faster than the traverse speed on most German tanks. Another unique feature on the Sherman was the installation of a gyroscopic stabilizer on the gun and sight, making the Sherman one of the first produced tanks to incorporate those features. While the stabilization was only done for the vertical plane, it kept the gun stable enough to be able to shoot on the move effectively, with a study showing a 70 % hit probability on an enemy 300 to 1,200 yards away when moving at a speed of 15 mph. However, this feature was controversial among the crew and experiences with it vary.

The M4A2 Sherman model ran on a GM 6046 diesel engine. The Sherman model in-game is one of the later production models, featuring improvements on the turret and hull design to maximize armour thickness. The tank's hull was welded, with the earlier models having the front armour plate placed on a 56-degree sloping angle. However, this design had protrusions on the driver and assistant driver hatches that created "shot traps" as these protrusions gave less protection than the frontal armour plate. This was fixed on later models with a 47-degree angling instead, which eliminated the shot traps and made the frontal armour more effective than before. Up to 8,053 M4A2s were produced from April 1942 to May 1944, out of the 49,234 Sherman units produced in the war. Throughout the war, the M4A2 was mostly given out to other allies or used by the US Marine Corps as the US Army doctrine called for the use of only gasoline-engine Shermans such as the M4A3.

Combat usage

European theater

The Shermans first saw combat in the North African Campaign in the Second Battle of El Alamein on October 1942 in the hands of the British. It was much quicker to reinforce the British armoured divisions with the more than 300 M4 Shermans sent to North Africa than it was to create new American ones. It proved much better than the German Panzer IIIs and Panzer IVs, able to eliminate them at distances more than 2,000 yards away. The Americans received their first Shermans in the next month in Operation Torch. However better the Shermans were to the German tanks at the time, the Allied armoured units still suffered casualties against the German tanks and anti-tank guns, most notably in the Battle of Kasserine Pass. In Italy, the Shermans proved much more mobile than the German Panzers, able to travel cross-country on the hilly terrain with ease. However, it was at this stage that the Sherman's shortcoming began to take face in the advent of the newer German tanks, the Tiger Is and Panthers. These two tanks featured armour that proved impenetrable when fired at the front, and with guns that could take out the Shermans from farther than the Sherman's effective combat range. The Shermans have to hit the side of these tanks for penetration, and at ranges that were considered suicidal. Although programs were initiated to up-gun the Sherman with a 76 mm gun, American leaders determine that the Panther and Tigers would not be produced in large quantities and were not as great as a threat as these two vehicles could still be destroyed by the 75 mm gun and standard anti-tank equipment.

During the Invasion of France, it was clear that the Sherman's current build with a 75 mm gun was no longer going to cut it against the German armoured forces. While the Sherman was adequate against what little Panzer III and IVs the Germans have left and against infantry and fortifications with the 75 mm gun, the Panthers and Tigers were in much large quantity than expected, and proved better in armour and firepower to the Shermans. Though in the bocage country of France, the Allies lost more tanks to hidden anti-tank guns and infantry weapons than to tanks. Despite these losses, the mass production of M4 Sherman back in the United States ensured that enough tanks were available for the Allied Forces as they spearhead through France, plus the lack of any other capable tanks meant they had to use the Shermans for the time being. The large quantities of Shermans produced during the war gave the Allied armoured units a major advantage of being fully equipped as the German panzer divisions were rarely in full strength, with some US infantry divisions having more tracked vehicles than some of the panzer divisions. Due to the high attrition rates, tank crews sometimes add improvised armour onto their Shermans in the form of sandbags and logs in hopes of increased survival, but these were determined to be ineffective from evaluations. A more effective method was to have metal armour welded on in improvisation, and an official project was made for such "assault tanks" that ended with the M4A3E2 "Jumbos" with 250 made for the Battle of Normandy. During the Battle of Normandy, the first 76 mm Shermans on the M4A1 were put into combat in Operation Cobra in limited numbers. The Allies continued to primarily use the 75 mm Shermans until the Battle of the Bulge in Winter 1944, when the commanders request only 76 mm Shermans to be brought into Europe as the battle showed the intense armour disparity with the German's large numbers of Panthers and Tiger II's. While new units arriving in Europe were armed exclusively with 76 mm armed-Shermans, the veteran units kept the 75 mm Shermans, to which it continued to do well against softer targets with little threat from German armour due to their extreme declining numbers.

Pacific theater

The M4 Sherman's importance in the Pacific theatre was less than that of the European theatre due to the different tactical doctrine established from the amphibious nature of combat. Only about 20 tank battalions fielded by the US Army were sent to support the Pacific theatre of operations, compared to the total of 16 armoured divisions and 70 tank battalions they have in service. The low priority in tanks was due to the following reasons. Firstly, the jungle terrain on most of the islands fought for against the Japanese were unsuitable for the deployment of large-scale armoured units, relegating armour support to light tanks such as the M3 Stuarts. Secondly, the Japanese forces' armoured units were rather inferior to the American tank forces by 1943. While the Japanese Type 95 Ha-Go tank was comparable to the M2A4 light tank, the Shermans out gun these tanks by a large margin. Such a large margin that the tank crew prefer to use high-explosive shots against the Japanese tank than regular armour-piercing as the AP rounds would penetrate straight through without causing much damage in the interior of the tank. The Japanese developed the Type 3 Chi-Nu and the Type 4 Chi-To to fight back the Shermans, but these two never saw combat as they were kept at the Japanese Homeland for the defence against the Allied invasion.

The Shermans, when deployed, were superior to most of the Japanese anti-tank equipment and often were essential to some of the Marine's advances on some of the island assaults. In 1945, the equipping of flamethrower Shermans known as M4A3R3, nicknamed "Zippos", were a significant boost to the infantry's firepower in having a very long range of fire compared to the standard infantry-modelled flamethrowers with the benefit of being in an armoured vehicle. The Zippos are able to flush out enemy combatants from within heavily fortified bunkers and caves that would be dangerous for even flamethrower infantry to take out. The Japanese solution against the Shermans, other than with their 47 mm anti-tank guns, were often suicidal tactics ranging from placing satchel charges right onto the tank, using pole-mounted anti-tank mines to reach and destroy the tank or even simply throwing oneself underneath a tank with mine or other explosive and triggering it manually.

Lend-Lease

The Sherman tank was given out in large numbers to American Allies during World War II under the Lend-Lease policy. While America retained about 20,361 Shermans in the Army and Marine Corps, 17,184 went to Britain (about 34% of Shermans produced and 78% of Shermans given out) and the Soviet Union obtained 4,102 Shermans.[1] China obtained 812 Shermans, Brazil with 53, and New Zealand and Australia for 153 Shermans total. Other countries using the Shermans were Poland, Free France, and Czechoslovakia. The British deployed the Sherman among their armoured squadrons in such a large number to become the standard tank of their armoured forces. The increased threat of German tanks in the European theatre also provoked the British to up-gun the M4 Sherman with a more capable gun, resulting in the Firefly.

Post-War

After the war, the Shermans continued serving America and its allies as the M4A3E8 with a new suspension and 76 mm gun. The M26 Pershing that was introduced late in World War II was phased out for the Shermans due to its unreliability, and the Sherman stayed until the M46 Patton was introduced. After being phased out of American service, many other countries still used the Sherman as their main tank, mainly Israel where they up-gun the tank with the much powerful post-war French 75 mm and 105 mm guns as the M-50 and M-51 respectively (nicknamed "Super Shermans"). These proved successful as they were able to fight against the Soviet-supplied T-54 tanks and T-34-85s in Middle East service, proving the Sherman as a successful and adaptable design for many years to come.


Archive of the in-game description

The second mass produced modification differed from the M4 in that two GMC 671 diesel engines were installed to make up for the Continental's insufficiencies. The engine and transmission were pulled from M3A3 and M3A5 medium tanks. In April 1942 the first M4A2 prototype was tested, with full-scale production subsequently beginning.

The tank had a welded hull, and the front plate initially had viewing slits cut out, though armour covers were later welded on and periscopes added. From the beginning of 1944 the front plate was made from a single piece, while the driver and gunner hatches were moved to the roof of the hull. The angle of the frontal armour went from 56° to 47° from vertical. The low-revving diesel engine gave the M4A2 better off-road ability and significantly more range as opposed to carburetor engines.

Approximately 8,000 M4A2s were produced between April 1942 and December 1943.

The tanks saw action in Africa and Italy, on the Western and Eastern fronts, and on Pacific islands through 1945. Lend-Lease included 1,992 of them delivered to the USSR.

In 1943 problems with the M4A2 were exposed by the Russian winter: those sent to the USSR had a smooth rubber protector for their tracks that made it tough to move across frozen roads. The difficulty finding traction was further complicated by a high center of gravity, giving the tank a habit of flipping over. Overall, it was the equivalent of the Soviet T-34 and was used similarly. The Sherman was much quieter than Soviet tanks, also lending itself to more effective infantry fire from behind its armour while on the move due to its lighter suspension.


Media

Skins

See also

Vehicles equipped with the same chassis (M4A2)

External links

References

  1. Zaloga Steven. Armored Thunderbolt: The U.S. Army Sherman in World War II Stackpole Books, 2008, "The British Sherman"


U.S. Army Ordnance Department/Corps*
Light tanks  T18E2 · M24 (Designed in collaboration with Cadillac)
M3 Stuart  M3 · M3A1 Stuart · M3A1 (USMC)
M5 Stuart  M5A1
Medium tanks  M3 Lee
M4 Sherman  M4 · M4A1 · M4A2 · M4A3 (105) · Calliope
  M4A1 (76) W · M4A2 (76) W · M4A3 (76) W
M26 Pershing  T20 · T25 · M26 · M26E1 · M26 T99
Patton Series  M46 · M46 "Tiger" · M47
Prototypes  T54E1 · T95E1
Heavy tanks  M103
M4 Jumbo  M4A3E2 · Cobra King · M4A3E2 (76) W
M6 Heavy  M6A1 · M6A2E1 · T1E1
M26 Pershing  T26E1-1 · T26E5
Prototypes  T14
T29  T29 · T30 · T34
T-32  T32 · T32E1
Tank destroyers  M3 GMC · M10 GMC · M56
M8 GMC  M8 HMC · M8A1 GMC
M36 GMC  M36 GMC · M36B2
Prototypes  T28 · T95
SPAAGs 
Production  M19 MGMC · M42
Export/Captured  ␗M8 HMC · SU-57
Stuart  Stuart I · Stuart III · ␗M3A3 Stuart · ␗M3A3 (1st PTG) · ▄M3A3 · ▄M3A3 Stuart · ▃Stuart VI (5th CAD) · ␗M5A1
Lee/Grant  ▂M3 Medium · ▃Grant I · Grant I
M4 Sherman  Sherman II · ▄M4A1 · ␗M4A1 (75) W · ▀M4 748 (a) · ▂M4A2 · ▄M4A3 (105) · ▅M4A3 (76) W · ▄M4A3E2
  ␗M4A4 · ␗M4A4 (1st PTG) · ▄Sherman V · ▄M4A4 · ▄Sherman I Composito
M26 Pershing  M26 "D.C.Ariete" · M26A1
M47 Patton  mKPz M47 G · ▅M47
M10 GMC  ␗M10 GMC · ▄M10 GMC
M36 GMC  ␗M36 GMC · M36B1 · ▅M36 · ▄M36B2
M19 MGMC  ▅M19A1
M42 MGMC  ▅M42 · ␗M42
  *The Ordnance Department was renamed to the Ordnance Corps after the Army Reorganization Act of 1950.

USA medium tanks
M2  M2
M3  M3 Lee · ▃Grant I
M4  M4 · Calliope · M4A1 · M4A1 (76) W · M4A2 · M4A2 (76) W · M4A3 (105) · M4A3 (76) W · M4/T26
M26 Pershing  T20 · T25 · M26 · M26 T99 · M26E1
M46/47/48 Patton  M46 · M46 "Tiger" · M47 · M48A1 · T54E1 · T54E2
M60  M60 · M60A1 (AOS) · M60A1 RISE (P) · M60A2 · M60A3 TTS · M728 CEV · 120S
MBT-70  MBT-70 · XM803
M1 Abrams  XM1 (Chrysler) · XM1 (GM)
  M1 Abrams · M1 KVT · IPM1
  M1A1 · M1A1 HC · M1A1 Click-Bait
  M1A2 Abrams · M1A2 SEP · M1A2 SEP V2
Other  T95E1
Australia  M1A1 AIM
Canada  M4A5
Israel  ▃Magach 3 (ERA) · ▃Merkava Mk.1 · ▃Merkava Mk.2B · ▃Merkava Mk.3D
Turkey  M60 AMBT