T26E1-1

From War Thunder Wiki
Jump to: navigation, search
Rank VI | Premium | Golden Eagles
Challenger DS Pack
This page is about the American heavy tank T26E1-1. For the other T26, see T26E5.
T26E1-1
us_t26e4_superpershing.png
GarageImage T26E1-1.jpg
ArtImage T26E1-1.png
T26E1-1
AB RB SB
6.7 6.7 6.7
Class:
Research:31 000 Specs-Card-Exp.png
Purchase:200 000 Specs-Card-Lion.png
Show in game

Description

With the development of the T26E3 Pershing tank, the US Army found themselves with an adequate heavy tank for the European theater, but it was still not to parity with the latest German heavy tank, the Tiger II. The long 88 mm KwK43 cannon proves superior to the 90 mm M3 cannon on the Pershing, and so the US Army Ordnance Department developed a new gun to improve the 90 mm cannon's penetration capability, the 90 mm T15. This was successfully installed into a T26E1 prototype, informally designated T26E1-1. The vehicle found itself sent to Europe for combat trials in March 1945. The soldiers of the 3rd Armored Division received the tank and provided additional protection with add-on armour plates on the turret and hull. Seeing some combat service against the Germans, the tank would serve until the end of the war, when it was scrapped sometime in the post-war period.
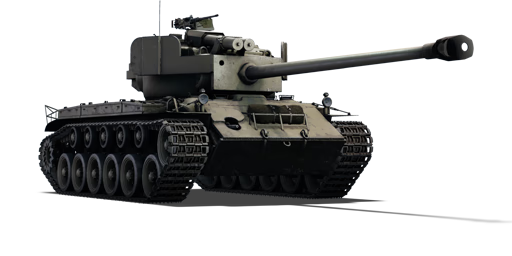
The Heavy Tank T26E1-1 "Super Pershing" was introduced in Update 1.57 "Battle March" and while it takes the basis of a normal M26 Pershing, it is presented with an increase in armour and firepower. While the T26E1-1 is weighed down by the additional armour, the 90 mm T15E1 gun can allow the vehicle to knock out even the heaviest tanks it faces in battle rating. However, the long reload means that one cannot be too careless with how they use the cannon, so take care not to take the vehicle into close quarters brawling situations.

General info

Survivability and armour

Armourfront / side / back
Hull101 / 76 / 51
Turret101 / 76 / 76
Crew5 people
Visibility105 %

Armour type:

  • Cast homogeneous armour (Front, Turret)
  • Rolled homogeneous armour (Side, Rear, Roof, Turret appliqué armour)
  • Structural steel (Hull appliqué armour, Rear turret counterweight)
Armour Front (Slope angle) Sides Rear Roof
Hull 101.6 (42-46°) + 38.1 (47°) + 38.1 mm (57°)
Front glacis
162.5 (25-60°) + 38.1 (47°) + 38.1 mm (57°)
Upper front glacis
76.2 mm (53°) + 38.1 (41°) + 38.1 mm (48°)
Lower glacis
76.2 mm Front
50.8 mm (0-2°) Rear
50.8 mm (4°) Top
22.2 mm (68°) Lower
22.2 mm
Turret 101.6 mm (1-55°) Turret front
114.3 (1-84°) + 80 mm (3°) Gun mantlet
76.2 mm (2-54°) 76.2 (0-79°) + 100 mm (3°) 25.4 mm
Cupola 76.2 mm 76.2 mm 76.2 mm 25.4 mm

Notes:

  • Suspension wheels and tracks are 20 mm thick.
  • The left turret side has a few tracks welded on, providing an additional 30 mm of armour where they are.
  • The "ear flaps" on the turret provide 38.1 mm of armour. The steel on the gun mantlet gives an additional 80 mm of armour.
  • Front glacis have sheets of 38.1 mm armour added on, sloped at varying angles.

Mobility

Speedforward / back
AB43 / 14 km/h
RB and SB41 / 13 km/h
Number of gears6 forward
2 back
Weight49.9 t
Engine power
AB954 hp
RB and SB500 hp
Power-to-weight ratio
AB19.1 hp/t
RB and SB10.0 hp/t
Game Mode Max Speed (km/h) Weight (tons) Engine power (horsepower) Power-to-weight ratio (hp/ton)
Forward Reverse Stock Upgraded Stock Upgraded
Arcade 43 14 49.9 646 954 12.95 19.12
Realistic 41 13 442 500 8.86 10.02

Modifications and economy

Repair costBasic → Reference
AB4 402 → 5 445 Sl icon.png
RB4 697 → 5 810 Sl icon.png
SB6 407 → 7 925 Sl icon.png
Total cost of modifications52 800 Rp icon.png
91 600 Sl icon.png
Talisman cost1 700 Ge icon.png
Crew training57 000 Sl icon.png
Experts200 000 Sl icon.png
Aces800 Ge icon.png
Research Aces520 000 Rp icon.png
Reward for battleAB / RB / SB
130 / 180 / 210 % Sl icon.png
172 / 172 / 172 % Rp icon.png
Modifications
Mobility Protection Firepower
Mods new tank traks.png
Tracks
Research:
2 600 Rp icon.png
Cost:
4 500 Sl icon.png
130 Ge icon.png
Mods new tank suspension.png
Suspension
Research:
3 000 Rp icon.png
Cost:
5 200 Sl icon.png
150 Ge icon.png
Mods new tank break.png
Brake System
Research:
3 000 Rp icon.png
Cost:
5 200 Sl icon.png
150 Ge icon.png
Mods new tank filter.png
Filters
Research:
3 300 Rp icon.png
Cost:
5 700 Sl icon.png
165 Ge icon.png
Mods new tank transmission.png
Transmission
Research:
8 600 Rp icon.png
Cost:
15 000 Sl icon.png
420 Ge icon.png
Mods new tank engine.png
Engine
Research:
8 600 Rp icon.png
Cost:
15 000 Sl icon.png
420 Ge icon.png
Mods tank tool kit.png
Improved Parts
Research:
2 600 Rp icon.png
Cost:
4 500 Sl icon.png
130 Ge icon.png
Mods extinguisher.png
Improved FPE
Research:
3 000 Rp icon.png
Cost:
5 200 Sl icon.png
150 Ge icon.png
Mods tank reinforcement us.png
Crew Replenishment
Research:
3 300 Rp icon.png
Cost:
5 700 Sl icon.png
165 Ge icon.png
Mods new tank horizontal aiming.png
Horizontal Drive
Research:
2 600 Rp icon.png
Cost:
4 500 Sl icon.png
130 Ge icon.png
Mods tank ammo.png
90mm_us_M82_APCBC_ammo_pack
Research:
2 600 Rp icon.png
Cost:
4 500 Sl icon.png
130 Ge icon.png
Mods tank cannon.png
Adjustment of Fire
Research:
3 000 Rp icon.png
Cost:
5 200 Sl icon.png
150 Ge icon.png
Mods new tank vertical aiming.png
Elevation Mechanism
Research:
3 300 Rp icon.png
Cost:
5 700 Sl icon.png
165 Ge icon.png
Mods tank ammo.png
90mm_us_T44_APCR_ammo_pack
Research:
3 300 Rp icon.png
Cost:
5 700 Sl icon.png
165 Ge icon.png

As with every ground vehicle, Parts and FPE are an absolute top-priority. Following that both types of shells should be researched. Either Adjustment of Fire or Suspension should be researched as the second module in tier II, depending on playstyle. If undecided choose Adjustment of Fire. Mandatory modifications in tier III are T44 shot and Crew Replenishment. After that: Filters, then Engine, then Transmission for improved mobility, in that particular order due to the efficiency in Rp icon.pngRP/hp increase. Further modifications at will.

Armaments

Main armament

Ammunition42 rounds
First-order10 rounds
Reloadbasic crew → aces
16.2 → 12.5 s
Vertical guidance-10° / 20°
Main article: T15E1 (90 mm)

The T26E1-1 utilizes a very powerful 90 mm T15E1 cannon, nearly identical to the gun on the T32. The gun's greatest weakness is its reload time, allowing more than sufficient time for the enemy to move out of their cover, aim, and take a shot. Therefore, staying in cover between shots and near friendlies is advantageous. A mix of T41 APCBC and T44 APCR shells is recommended as a typical load-out.

90 mm T15E1 Turret rotation speed (°/s) Reloading rate (seconds)
Mode Capacity Vertical Horizontal Stabilizer Stock Upgraded Full Expert Aced Stock Full Expert Aced
Arcade 42 -10°/+20° ±180° N/A 19.4 26.9 32.6 36.1 38.4 16.25 14.38 13.25 12.50
Realistic 14.3 16.8 20.4 22.6 24.0

Ammunition

For less mobile tanks usually a mix shells is recommended, with the T26E1-1 being no different. For Arcade Battles, 15 shells is typically sufficient, majority APCBC with roughly 3-5 APCR shells dedicated to enemies with tougher armour. The APCBC shell is a good default for a majority of targets, it typically should be loaded when venturing towards the unknown.

  • T43 shot - APBC - Acceptable performance against majority of targets
  • T42 shell - HE - Usable nearly exclusively against soft targets. Due to long reload time it's typically safer to use other shells than committing to the HE, and simply using the .50 cal machine gun on soft targets.
  • T41 - APCBC - Deadliest round, very wide spalling effect post-penetration.
  • T44 shot - APCR - Much higher penetration, suitable against more heavily-armoured targets, however it has the narrowest cone of post-penetration shrapnel leading to potentially reduced lethality, depending on shot placement.

Penetration statistics
Ammunition Type of
warhead
Penetration @ 0° Angle of Attack (mm)
10 m 100 m 500 m 1,000 m 1,500 m 2,000 m
T43 shot APBC 211 208 193 177 162 148
T42 shell HE 26 25 24 22 20 18
T41 APCBC 224 220 205 187 171 157
T44 shot APCR 336 330 304 274 248 223
Shell details
Ammunition Type of
warhead
Velocity
(m/s)
Projectile
mass (kg)
Fuse delay
(m)
Fuse sensitivity
(mm)
Explosive mass
(TNT equivalent) (g)
Ricochet
0% 50% 100%
T43 shot APBC 975 10.9 - - - 47° 60° 65°
T42 shell HE 975 10.6 0.2 0.1 925 79° 80° 81°
T41 APCBC 975 10.91 1.2 14 137.2 48° 63° 71°
T44 shot APCR 1,143 7.6 - - - 66° 70° 72°

Ammo racks

Full
ammo
1st
rack empty
2nd
rack empty
3rd
rack empty
4th
rack empty
5th
rack empty
6th
rack empty
7th
rack empty
8th
rack empty
9th
rack empty
Visual
discrepancy
42 39 (+3) 35 (+7) 31 (+11) 27 (+15) 23 (+19) 19 (+23) 15 (+27) 11 (+31) (+41) No
Ammo racks of the T26E1-1

Notes:

  • Ammo rack 9 is a ready rack, and takes priority in being filled at the beginning of the battle.
  • Full reload speed will be realized as long as ammo exists in the ready rack. If the ready rack is empty, a penalty to reload speed will occur.
  • Not firing when the gun is loaded will load ammo from racks 1-8 into rack 9, as long as there is ammo in racks 1-8. Firing will interrupt the loading of ready racks.

Machine guns

Ammunition600 rounds
Belt capacity200 rounds
Reloadbasic crew → aces
10.4 → 8.0 s
Fire rate575 shots/min
Vertical guidance-10° / 70°
Horizontal guidance-60° / 60°
Ammunition5 000 rounds
Belt capacity250 rounds
Reloadbasic crew → aces
10.4 → 8.0 s
Fire rate500 shots/min
12.7 mm M2HB
Mount Capacity (Belt) Fire rate Vertical Horizontal
Pintle 600 (200) 577 -10°/+70° ±60°
7.62 mm M1919A4
Mount Capacity (Belt) Fire rate Vertical Horizontal
Coaxial 5,000 (250) 500 N/A N/A

Usage in battles

The T26E1-1 is a mid-range assault tank, perfect for pushing the enemy on offense, but far less capable when it comes to defensive action. It features strong frontal armour, bouncing nearly all of the shells found in its BR range, unless hit in one of several weak spots, or at an unlucky angle (e.g. lower frontal plate when going over the hill). The key to staying alive is staying on the move, even if only moving two metres front and back, making sure these small, but numerous weak spots remain difficult to hit. The vehicle's strong reverse gear helps with staying mobile. Unlike T34, simply staying hull-down in the T26E1-1 is not viable due to weak spots on the top of the turret and bottom of the turret cheeks. It's best to hide the entire hull of the vehicle between shots, letting allies lure the attention of enemy vehicles.

Due to the vehicle's low mobility, weak side armour, and very long reload time, the T26E1-1 is weakest when it is alone. These traits leave the vehicle prone to being overwhelmed or flanked when it is without support from teammates. Situational awareness and map knowledge is key to effectively use this vehicle's strengths. While pushing in to enemy lines in the T26E1-1, it is best to utilize the vehicle's strong frontal armour by staying in the front line of your team's advance. You must however also be mindful of accidentally overextending to protect the weak side armour from enemy flanking manoeuvres. If need be, tactical retreats and relocation to more favorable positions is always the best choice, as a single penetration to the T26E1-1's weaker side armour can mean a loss of mobility, leaving the vehicle unable to turn its thicker armour to the enemy.

Specific enemies worth noting

  • T-44 - The T-44's armour can be tricky to penetrate. Unless the side of the tank is exposed, it can be very difficult to penetrate the vehicle's hull from the front using any of the T26E1-1's ammunition, regardless the range or angle. If facing a T-44 from the front, the turret cheeks are likely the safest weak spot to target.
  • Tiger II (H) - At all ranges, the Tiger II(H)'s upper and lower frontal hull plates are impossible for any of the T26E1-1's shells to penetrate. The only large, reliable weak spots are the turret cheeks, though be warned, Tiger II(H)'s gun mantlet can make the cheeks difficult to hit. The machine gun port on the front of the hull is also a viable weak spot, though it can be unreliable.
  • M-51 - The M-51's stock OCC 105 F1 HEAT shell can reliably penetrate the T26E1-1 from any range, making it a very dangerous threat, despite being at a lower BR than the T26E1-1. Protracted long range engagements with the M-51 should be avoided.
  • IS-2 - Due to the IS-2's hull shape, its armour can be penetrated by the T26E1-1, but not reliably. The IS-2's main gun has a far longer reload time the the T26E1-1, so once the IS-2 fires the T26E1-1 can close the distance to conveniently fire into a weak spot in the IS-2's armour, such as the lower plate, turret cheeks, and driver's view port. However, it should be noted that below 500 m range the IS-2 can reliably penetrate the T26E1-1's hull, and less reliably, the turret cheeks. Given the amount of explosive filler in the IS-2's shells, a single shell penetrating the T26E1-1 is likely to destroy the tank.
  • Lightly-armoured vehicles - As the main gun on the T26E1-1 has a long reload time, vehicles that the .50 cal machine gun can easily destroy, should be destroyed with said machine gun. With the notable exception of BMPs, the .50 cal is capable of quickly dealing with many lightly-armoured vehicles, and using it for such allows the main gun to be ready to deal with heavier targets.

Pros and cons

Pros:

  • The added spaced armour makes this tank very resilient to common guns like the Tiger II's 88 mm and even large calibre HE shells. Despite it's numerous weak points, the armour can be relied upon unless enemy is allowed time to carefully aim at the weak spots
  • An excellent selection of shells:
    • Default shell has good penetration values and a decent post-penetration spalling effects despite being solid shot
    • T41 is able to knock out or cripple most enemies while also having more than adequate penetration for the BR
    • The T44 APCR shell can penetrate up to 336 mm, rivalling or even beating some rank VI APFSDS ammunition
  • -10° gun depression is on par, if not better, than most other vehicles
  • The roof mounted .50 cal machine gun can deal with a number of lightly-armoured targets, an occasional low-flying aircraft, or the destruction of the tracks on other tanks

Cons:

  • Several weak spots on the armour allow enemies to penetrate it, if the tank is stationary:
    • The weak armour on the top of the turret makes it difficult to engage in a long-range sniping, and forces the entire tank into hiding behind hard cover while the main gun is reloading
    • The vertical aiming drive can be damaged by simply shooting the two springs on the turret roof with machine guns
    • Penetration of the left side of the turret is likely to detonate ammunition the stored there, so extra-care should be taken to protect it
  • Even with an aced crew, the gun will take 12.5 seconds to reload, being outmatched by a vast majority of vehicles at the same BR, thus trading shots with enemy tanks without ample hard cover is ill-advised

History

Development

The M26 Pershing helped the American armoured forces by bringing the 90 mm Gun M3 into service on a tank mount, as opposed to the M36 which entered service prior to the M26, but was not considered a tank by the US Army. The gun was similar in performance to the German's Tiger Is 8.8 cm KwK36 cannon, but Army Ordnance wanted something to match the more powerful 8.8 cm KwK43 cannon on the Tiger II. The development to match this cannon made the T15 90 mm gun. The gun was 73 calibres long, compared to the 90 mm Gun M3's 53 calibre length. The first produced guns were called the T15E1 and had large, fixed ammunition. To test the gun's viability in the tank, the gun was mounted onto the very first production T26, T26E1 tank serial #1, registration #0103292, with the conversions being done by the Wellman Engineering Company. This upgraded tank was titled the T26E1-1 by means of a painted-on designation on the turret's left side to distinguish the design, although this title was not official, and few if any sources refer to it as such. The extreme length of the T15E1 gun barrel caused the manufacturers to add a very prominent counter balance on the mantlet, which could be seen on the left side of the turret when facing it. The T26E1-1 tank was sent to Aberdeen Proving Grounds on 12 January 1945 for testing purposes.[1]

In March 1945, following the Aberdeen tests, the T26 tanks mounting the T15 gun was officially classified as the T26E4. As such, the mentioned T26E1-1 would be classified as the first of the T26E4 models, with an initial procurement plan for 1,000 more units. The first T26E4 (henceforth referred to as T26E1-1) would be the only M26 model with the T15 gun to see service in Europe. Among the troops, the T26E1-1 in Europe would be known by its eponymous name "Super Pershing" when compared alongside to the normal M26 Pershing.[1]

Combat usage

The T26E1-1 "Super Pershing" was sent to Europe and arrived in 15 March 1945 and assigned to the 3rd Armored Division. In its introduction, the "Super Pershing" was given additional armour by the maintenance crew in hopes to keep it up to date against the heavier German tanks. The front hull had two large pieces of metal welded onto it, each 38 mm in thickness, with a space in between the metal pieces. These metal pieces were sloped more than the hull armour it was over. An additional armour piece was welded on the turret mantlet, the metal was taken from a Panther turret and was about 80 mm thick when welded onto the turret.[1] The T15E1 gun had much promise to the crew when using the tank, as the gun could reliably penetrate the frontal hull of a Panther tank, a feat not many other American tank gun could claim at the time.

The T26E1-1's performance in battle is largely written in the accounts of John P. Irwin, who was the tank gunner of the only active "Super Pershing" in the war. He mentions of three prominent combat actions with the T26E1-1, each one destroying the enemy with little difficulty. Records show that the T26E1-1 destroyed a total of three tanks and captured one after an extended firefight that left the opposing tank out of ammunition. The T26E1-1 allegedly fought against a Tiger during the Battle of Dessau on April 21st, which ended when the Tiger commander had their tank climb debris, allowing gunner Corporal John P. Irwin to disable the German tank with one shot.[2] However, there is no supporting evidence to back up Irwin's claim that he encountered a Tiger in Dessau as the nearby Tiger tank units had been destroyed or surrendered by Irwin's encounter date.[3]

Legacy and similar vehicles

The T26E1-1 continued as an idea long after the war was over, with the next development arming the long 90 mm cannon in the T26E3 tank models, but the cannons used the new two-piece ammunition gun T15E2 rather than the one-piece one in the T15E1 when it was found that the long 50 inch rounds made loading prohibitive in the M26 turret. 25 of these tanks were built and were designated the T26E4. Another development was to convert normal M26 Pershings to mounting the T54 cannon, another development of the T15E1 which featured shorter ammunition. These tanks were redesignated the M26E1, but work was halted due to issues with the guns and a cut in project funds.[1]

Media

Skins
Videos

See also

External links

References

  1. 1.0 1.1 1.2 1.3 Hunnicutt, R.P. Pershing: A History of the Medium Tank T20 Series U.S.A.: Feist Publications, 1971
  2. Irwin, J. P. (2002). Chapter 9. In Another River, Another Town.
  3. Zaloga, S.J. (2017). "The Super Pershing in Combat". In Pershing vs Tiger: Germany 1945.


U.S. Army Ordnance Department/Corps*
Light tanks  T18E2 · M24 (Designed in collaboration with Cadillac)
M3 Stuart  M3 · M3A1 Stuart · M3A1 (USMC)
M5 Stuart  M5A1
Medium tanks  M3 Lee
M4 Sherman  M4 · M4A1 · M4A2 · M4A3 (105) · Calliope
  M4A1 (76) W · M4A2 (76) W · M4A3 (76) W
M26 Pershing  T20 · T25 · M26 · M26E1 · M26 T99
Patton Series  M46 · M46 "Tiger" · M47
Prototypes  T54E1 · T95E1
Heavy tanks  M103
M4 Jumbo  M4A3E2 · Cobra King · M4A3E2 (76) W
M6 Heavy  M6A1 · M6A2E1 · T1E1
M26 Pershing  T26E1-1 · T26E5
Prototypes  T14
T29  T29 · T30 · T34
T-32  T32 · T32E1
Tank destroyers  M3 GMC · M10 GMC · M56
M8 GMC  M8 HMC · M8A1 GMC
M36 GMC  M36 GMC · M36B2
Prototypes  T28 · T95
SPAAGs 
Production  M19 MGMC · M42
Export/Captured  ␗M8 HMC · SU-57
Stuart  Stuart I · Stuart III · ␗M3A3 Stuart · ␗M3A3 (1st PTG) · ▄M3A3 · ▄M3A3 Stuart · ▃Stuart VI (5th CAD) · ␗M5A1
Lee/Grant  ▂M3 Medium · ▃Grant I · Grant I
M4 Sherman  Sherman II · ▄M4A1 · ␗M4A1 (75) W · ▀M4 748 (a) · ▂M4A2 · ▄M4A3 (105) · ▅M4A3 (76) W · ▄M4A3E2
  ␗M4A4 · ␗M4A4 (1st PTG) · ▄Sherman V · ▄M4A4 · ▄Sherman I Composito
M26 Pershing  M26 "D.C.Ariete" · M26A1
M47 Patton  mKPz M47 G · ▅M47
M10 GMC  ␗M10 GMC · ▄M10 GMC
M36 GMC  ␗M36 GMC · M36B1 · ▅M36 · ▄M36B2
M19 MGMC  ▅M19A1
M42 MGMC  ▅M42 · ␗M42
  *The Ordnance Department was renamed to the Ordnance Corps after the Army Reorganization Act of 1950.

USA heavy tanks
M4 Jumbo  M4A3E2 · Cobra King · M4A3E2 (76) W
M6  T1E1 · M6A1 · M6A2E1
T26  T26E1-1 · T26E5
T29/30/34  T29 · T30 · T34
T32  T32 · T32E1
M103  M103
Others  T14