M26

From War Thunder Wiki
Jump to: navigation, search
RANK 6 BRITAIN
Rooikat 105 PACK
This page is about the American medium tank M26. For other versions, see M26 (Family).
M26
us_m26_pershing.png
GarageImage M26.jpg
ArtImage M26.png
M26
AB RB SB
6.7 6.7 6.7
Class:
Research:63 000 Specs-Card-Exp.png
Purchase:200 000 Specs-Card-Lion.png
Show in game

Description

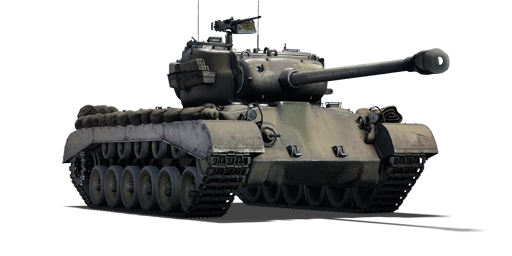
Though the M4 Sherman is ubiquitous among the Allied forces of World War II, the Americans began to seek out a potential replacement. The start of the search began in the T20 medium tank. As the war raged, the technological arms race introduced newer requirements from the tank, such as the request for more firepower and armour over the M4. The culmination of the design work led to the T26E3 heavy tank, which featured thicker sloped armour, a 90 mm gun, and torsion bar suspension. The T26E3 would be adopted as the M26 Pershing, but arrived in early 1945, too late to significantly impact the course of World War II. After being reclassified as a medium tank in the post-war period, the M26 continued to see service in the Korean War before being retired.

The Medium Tank M26 Pershing was added alongside the American ground tree in Update 1.45 "Steel Generals". The play style is a considerable departure from the more mobile and lighter M4 Shermans that players would be used to now. At the same time, its specifications are fairly middle-of-the-road. The M26 lacks speed to be a quick responder. Armour is improved over the M4, but many of the higher-velocity cannons employed by other tanks at its rank can penetrate its armour. The 90 mm damage can be devastating, especially the post-penetration damage of the 90 mm M82 round, but the penetration is such that it may not penetrate the front glacis of most vehicles it faces. The M26 requires a skilled player to make the most of its strength and limitations, but can provide very promising gameplay in the right hands and situations.

General info

Survivability and armour

Armourfront / side / back
Hull101 / 76 / 51
Turret101 / 76 / 76
Crew5 people
Visibility105 %

Armour type:

  • Cast homogeneous armour (Front, turret)
  • Rolled homogeneous armour (Side, Rear, Roof)
Armour Front (Slope angle) Sides Rear Roof
Hull 101.6 mm (42-46°) Front Glacis
162.5 mm (25-60°) Upper front glacis
76.2 mm (28-53°) Lower Glacis
76.2 mm (0-1°) Front
50.8 mm (0-3°) Rear
50.8 mm (7°) Top
22.2 mm (71°) Bottom
22.2 mm
Turret 101.6 mm (1-55°) Turret front
114.3 mm (1-84°) Gun mantlet
76.2 mm (2-54°) 76.2 mm (0-79°) 25.4 mm
Cupola 76.2 mm 76.2 mm 76.2 mm 25.4 mm

Notes:

  • Suspension wheels and tracks are 20 mm thick.
  • Belly armour is 25.4 mm thick.

Mobility

Speedforward / back
AB54 / 18 km/h
RB and SB49 / 16 km/h
Number of gears6 forward
2 back
Weight41.6 t
Engine power
AB954 hp
RB and SB500 hp
Power-to-weight ratio
AB22.9 hp/t
RB and SB12.0 hp/t
Game Mode Max Speed (km/h) Weight (tons) Engine power (horsepower) Power-to-weight ratio (hp/ton)
Forward Reverse Stock Upgraded Stock Upgraded
Arcade 54 18 41.6 775 954 18.63 22.93
Realistic 49 16 442 500 10.63 12.02

Modifications and economy

Repair costBasic → Reference
AB3 325 → 4 279 Sl icon.png
RB3 870 → 4 980 Sl icon.png
SB4 954 → 6 375 Sl icon.png
Total cost of modifications52 800 Rp icon.png
90 900 Sl icon.png
Talisman cost1 700 Ge icon.png
Crew training57 000 Sl icon.png
Experts200 000 Sl icon.png
Aces800 Ge icon.png
Research Aces520 000 Rp icon.png
Reward for battleAB / RB / SB
120 / 180 / 210 % Sl icon.png
172 / 172 / 172 % Rp icon.png
Modifications
Mobility Protection Firepower
Mods new tank traks.png
Tracks
Research:
2 600 Rp icon.png
Cost:
4 500 Sl icon.png
145 Ge icon.png
Mods new tank suspension.png
Suspension
Research:
2 400 Rp icon.png
Cost:
4 100 Sl icon.png
135 Ge icon.png
Mods new tank break.png
Brake System
Research:
2 400 Rp icon.png
Cost:
4 100 Sl icon.png
135 Ge icon.png
Mods new tank filter.png
Filters
Research:
4 400 Rp icon.png
Cost:
7 600 Sl icon.png
250 Ge icon.png
Mods new tank transmission.png
Transmission
Research:
4 300 Rp icon.png
Cost:
7 400 Sl icon.png
240 Ge icon.png
Mods new tank engine.png
Engine
Research:
4 300 Rp icon.png
Cost:
7 400 Sl icon.png
240 Ge icon.png
Mods tank tool kit.png
Improved Parts
Research:
2 600 Rp icon.png
Cost:
4 500 Sl icon.png
145 Ge icon.png
Mods extinguisher.png
Improved FPE
Research:
2 400 Rp icon.png
Cost:
4 100 Sl icon.png
135 Ge icon.png
Mods tank reinforcement us.png
Crew Replenishment
Research:
4 400 Rp icon.png
Cost:
7 600 Sl icon.png
250 Ge icon.png
Mods new tank horizontal aiming.png
Horizontal Drive
Research:
2 600 Rp icon.png
Cost:
4 500 Sl icon.png
145 Ge icon.png
Mods tank ammo.png
90mm_us_M82_APCBC_ammo_pack
Research:
2 600 Rp icon.png
Cost:
4 500 Sl icon.png
145 Ge icon.png
Mods tank cannon.png
Adjustment of Fire
Research:
2 400 Rp icon.png
Cost:
4 100 Sl icon.png
135 Ge icon.png
Mods tank ammo.png
90mm_us_M304_APCR_ammo_pack
Research:
2 400 Rp icon.png
Cost:
4 100 Sl icon.png
135 Ge icon.png
Mods new tank vertical aiming.png
Elevation Mechanism
Research:
4 400 Rp icon.png
Cost:
7 600 Sl icon.png
250 Ge icon.png
Mods art support.png
Artillery Support
Research:
4 300 Rp icon.png
Cost:
7 400 Sl icon.png
240 Ge icon.png
Mods tank ammo.png
90mm_us_M313_Smoke_ammo_pack
Research:
4 300 Rp icon.png
Cost:
7 400 Sl icon.png
240 Ge icon.png

The best thing to do for this tank is getting "Parts", "FPE", "M82 Shot", and "M304 Shot" as fast as you can. With M304 shot you'll be a lot stronger on the field as you'll be able to penetrate relatively any medium and most heavies. However, you are subject to get hit in the side or front many times and will need the FPE and parts to repair on the field or you'll become burnt toast. After you've unlocked these modules, it's best to work down by putting manoeuvrability as a priority.

Armaments

Main armament

Ammunition70 rounds
First-order10 rounds
Reloadbasic crew → aces
9.7 → 7.5 s
Vertical guidance-10° / 20°
Main article: M3 (90 mm)
90 mm M3 Turret rotation speed (°/s) Reloading rate (seconds)
Mode Capacity Vertical Horizontal Stabilizer Stock Upgraded Full Expert Aced Stock Full Expert Aced
Arcade 70 -10°/+20° ±180° N/A 20.0 27.7 33.6 37.2 39.5 9.75 8.63 7.95 7.50
Realistic 12.5 14.7 17.9 19.7 21.0

Ammunition

Penetration statistics
Ammunition Type of
warhead
Penetration @ 0° Angle of Attack (mm)
10 m 100 m 500 m 1,000 m 1,500 m 2,000 m
T33 shot APBC 175 172 160 146 134 122
M82 shot APCBC 185 182 169 155 142 130
M304 shot APCR 287 281 259 234 211 191
M71 shell HE 20 20 18 17 16 16
Shell details
Ammunition Type of
warhead
Velocity
(m/s)
Projectile
mass (kg)
Fuse delay
(m)
Fuse sensitivity
(mm)
Explosive mass
(TNT equivalent) (g)
Ricochet
0% 50% 100%
T33 shot APBC 853 10.91 - - - 47° 60° 65°
M82 shot APCBC 853 10.91 1.2 14 137.2 48° 63° 71°
M304 shot APCR 1,021 7.62 - - - 66° 70° 72°
M71 shell HE 823 10.55 0.2 0.1 1,210 79° 80° 81°
Smoke shell characteristics
Ammunition Velocity
(m/s)
Projectile
mass (kg)
Screen radius
(m)
Screen deploy
time (s)
Screen hold
time (s)
Explosive mass
(TNT equivalent) (g)
M313 821 10.7 9 5 20 50

Ammo racks

Full
ammo
1st
rack empty
2nd
rack empty
3rd
rack empty
4th
rack empty
5th
rack empty
6th
rack empty
7th
rack empty
8th
rack empty
9th
rack empty
Visual
discrepancy
70 65 (+5) 56 (+14) 48 (+22) 40 (+30) 32 (+38) 24 (+46) 17 (+53) 11 (+59) (+69) No
Ammo racks of the M26

Notes:

  • Shells are modeled individually and disappear after having been shot or loaded.
  • 1 shell from rack 7 is fired after rack 1 is emptied. For the purpose of clarity, it is counted as belonging to rack 2 in the table above.
  • Rack 9 is a first stage ammo rack. It totals 10 shells and gets filled first when loading up the tank.
  • This rack is also emptied early: the rack depletion order at full capacity is: 9 - 1 - 2 - etc. until 8.
  • If you pack 17 (+53) shells, it will keep most of the hull empty of ammo.
  • Full reload speed will be realized as long as shells are available in the ready rack 9. If the ready rack is empty, a penalty to reload speed will occur.
  • Simply not firing when the gun is loaded will move ammo from racks 1-8 into rack 9. Firing will interrupt the restocking of the ready rack.

Machine guns

Ammunition600 rounds
Belt capacity200 rounds
Reloadbasic crew → aces
10.4 → 8.0 s
Fire rate575 shots/min
Vertical guidance-10° / 50°
Horizontal guidance-120° / 120°
Ammunition5 000 rounds
Belt capacity250 rounds
Reloadbasic crew → aces
10.4 → 8.0 s
Fire rate500 shots/min
12.7 mm M2HB
Mount Capacity (Belt) Fire rate Vertical Horizontal
Pintle 600 (200) 577 -10°/+50° ±120°

The roof-mounted M2HB .50 cal heavy machine gun is very good at knocking out tracks, punching through lightly armoured vehicles and shooting down low-flying aircraft. Use it sparingly because of its low ammo count.

7.62 mm M1919A4
Mount Capacity (Belt) Fire rate Vertical Horizontal
Coaxial 5,000 (250) 500 N/A N/A

The small calibre of the M1919A4 machine gun makes it largely ineffective against all armoured vehicles but the ones with an open compartment. It still can be used to ping targets as a rangefinding help or to mow down minor obstacles blocking your line of sight.

Usage in battles

Combat tactics

The M26 can perform in many different roles in battle. It can be used for supporting heavy tanks with long reload time as IS-2 or T32 or it can take part in flanking manoeuvres: your speed and agility are not brilliant but sufficient for that role. It can also be successful in sniping and ambushing situations. Use the lower profile of the Pershing compared to the Shermans to navigate through. Your depression angle allows you to shoot from upper positions without exposing too much yourself. That's an advantage compared to most Soviet vehicles which have close to no gun depression angle.

The 90 mm M3 gun owns a wide selection of ammunition to be used. The M82 APCBC with an explosive filler is extremely deadly; commonly, a successful penetration with this shell can lead to a single-shot knock-out on a vehicle. The downside of M82 is that it has below average penetration for the rank this vehicle sits at, but it still has enough penetration to penetrate many of the vehicles found at its BR. The M26 also has access to the M304 APCR shot, which has 287 mm of penetration on flat armour. The M304 quickly loses its penetration against angled armour, so despite the high flat penetration, in practice it feels like only a minor increase in penetration compared to M82. In addition, the post-penetration damage of M304 is very limited. This means you need to target crew positions or modules and aim at (almost) vertical armour. Against a Tiger II (H), this means aiming for the turret right side if he is looking directly at you on the gunner side. However, the M304 has some good uses; more heavily-armoured spots such as the Tiger I and II (H)'s turret front, and even the flat frontal armor of the Ferdinand and Jagdtiger, can be penetrated fairly reliably. Thus it is advised to take at least some M304 rounds for these more heavily-armoured targets.

Although you are moderately armoured for your class, most enemies can easily destroy you at this rank if you expose your tank too much. To reduce direct impacts in frontal engagements angle the Pershing, the V-shape frontal armour can deflect some shots. The M26's armour is decent enough for angling tactics, and against weaker guns the armor will hold. Your lower glacis is a weak spot, so try to keep it hidden from the enemy.

One downside to the Pershing is the engine: the power-to-weight ratio is poor (it uses the same engine as the late series M4 Sherman tanks while being nearly 8 tons heavier) and does not allow for very quick manoeuvring. Being slightly underpowered, the M26 has a hard time climbing hills.

Urban maps (Poland, Eastern Europe, Hürtgen Forest, Cologne) are perfect for ambushing, use your moderate speed to catch off-guard heavier enemy tanks. Drop arty in front of suspected enemy positions if you need to cross a street and relocate, the smoke screen will cover you.

If you've been able to flank an enemy, your first shot is decisive. Always shoot to disable the gun first (gunner or breech). The M304 APCR generally has a better chance of penetration compared to the M82 APCBC, though with a side shot the M82 round is sufficient to reliably penetrate and will guarantee heavy damage upon successful penetration. Considering the 90 mm M3's subpar reload, care should be taken not to miss. If you have a side shot on a turretless tank destroyer such as a Jagdpanther or Ferdinand, just aim at the engine and you will have the time to finish it without retaliatory fire.

Arcade Battles

In arcade battles, it is much harder to flank and ambush enemy tanks because of the tag system (player name). However, the tank is still very playable and you can do different tactics depending on the situation. For urban environments, it's best to move with the team and only poke your head out when you have a good shot and the enemy tank isn't aimed at you. In open terrain, you will still be able to use the hills to your advantage and side-shot / pot-shot enemy tanks. The main rule here is don't show your sides and stay low.

Realistic/Simulator Battles

In realistic and simulator battles, The M26 shouldn't be in the toughest part of the match facing very heavily armoured enemies. It's better to stay behind front lines supporting or try a flanking manoeuvre, you can't be spotted in the mini-map. The high battle rating means you can be up-tiered and fight Cold War era tanks in simulator mode. The compression and matchmaking can put you into situations where enemies are especially hard to penetrate, even from the sides.

Pros and cons

Pros:

  • Side armour is adequate enough for angling tactics
  • Generally adequate all-round armour resists weaker guns and may stop stronger guns
  • Good top armour resists aircraft gun strafes
  • Low profile, excels at a hull down position
  • Good high speed handling
  • Fast reverse speed
  • Very fast turret rotation
  • The M82 shot has a high chance of knocking out most tanks in one shot
  • Top-mounted .50 cal machine gun is useful against aircraft and open-topped or lightly-armoured vehicles
  • M304 APCR round has very high penetration power against flat surfaces

Cons:

  • While its armour is decent, it can still be penetrated frontally by more powerful cannons and should not be fully relied upon
  • Lower glacis and hull machine gun are weak spots
  • Slow acceleration; rarely able to reach its top speed
  • Sluggish handling at low speed
  • 90 mm gun has a long reload time
  • 90 mm gun has some difficulty penetrating better-armoured foes

History

Development

The development of this tank can be traced to the number of tank prototypes produced in the Spring of 1942 as a replacement for the M4 Shermans then in use.[1] One of these prototypes was the T20 medium tank, which was more heavily armoured than the Sherman. This eventually developed to the T22 and T23 designs with different transmissions, all of which were in the rear of the vehicle instead of the front like the Shermans. These designs were comparable to a T-34-85, but these were not quickly adopted over the M4 as the M4 performed fabulously in combat in Africa and Italy.

Development continued with different interests in 1944, starting around the concept to mount a 90 mm cannon to fight the heavily armoured German tanks and fortifications in Europe. The first was the T25 series, which was an up-gunned T23 with a 90 mm gun, but they also designed a bigger and more armoured design T26.[1] The design held the 90 mm cannon and a front armour thickness of 102 mm thick and sloped. However, the design has a weight of about 40 tons, which decreased its mobility and durability as it still uses the old Sherman engine. Though starting with an electric drive, the design proved too complicated for field use and was replaced by a torqmatic transmission in the T26E1. The designs were eventually finalized as the T26E3, which would be the production version of the T26E1. Production started in November 1944, with 10 being produced by the end of the month, 30 by December, 70 in January 1945, and 132 by February.[1] It would take a few months for even the T26E3s built in November to get to Europe, hence why the first models did not appear in Europe until January 1945. The T26E3 would be adopted by the US Army as the Heavy Tank M26 Pershing with a total of 2,212 units produced.

The reasons why the M26 Pershing was delayed since its time as the T20 series brought much controversy. Today it is agreed that the reasons why the Pershings did not get into combat faster were the combination of the Tank Destroyer Doctrine, logistics, and complacency. The TD doctrine dictated that tank destroyers were the primary anti-tank force while the armoured forces were a support and exploitation force, so tank firepower against other tanks was not prioritized, leading to much opposition when Ordnance attempts to develop heavy tanks with the 90 mm cannons. Logistics for supplying a battlefield more than 3,000 miles away from the factories would prove more difficult if the M26 Pershing and its ammo must be supplied as well when the more common Sherman could be easily supplied. Complacency in the Army Ground Forces brought by the overwhelming performance of the Sherman in the opening stages of World War II set the belief that the M4 and their 75/76 mm cannons would be adequate in future combat, which resulted in it becoming outgunned by newer and better German tanks.

Combat usage

Zebra mission

The deployment of the M26 Pershings (still called T26E3s at the time as they are not formally adopted) in Europe was made under the Zebra Mission headed by General Barnes. The Zebra Mission was a form of combat evaluation of the M26 tanks in Europe. In January 1945, the shipment of M26 tanks deployed in December 1944 arrived at Antwerp with only 20 tanks. The tanks first arrived at Paris in February 1945 with General Barnes and a few high-ranking officers from the Tank Automotive Command, Army Ground Forces, and Aberdeen Proving Grounds. Two civilians also arrived from Fisher Tank Arsenal and Aberdeen Proving Ground, the latter an expert on the 90 mm guns. These men helped expedite the training and equipping of the 20 M26 tanks into the units. General Eisenhower assigned the M26 in the 12th Army Group under General Omar Bradley, who sent them to First Army and split them among the 3rd and 9th Armored Divisions. The officers and the new tank crew members spend the period from 11 February to the 23rd training in the new tanks for familiarization.[1]

The M26 tanks underwent their first combat mission on February 25th. 3rd Armored Division attacked across the Roer River, with the 9th following three days later. On the 26th, the first M26 Pershing knocked out in combat was reported at Elsdorf. The Pershing named "Fireball" in F Company, 33rd Armored regiment was penetrated by a German Tiger I tank through the gun mantlet; this killed the gunner and loader instantly. After firing two more shots that damaged the components of "Fireball", the Tiger itself tried to reverse away from the position and disabled itself on debris. The captured loader of the Tiger crew confirmed the kill, as well as photographic evidence. "Fireball" was sent back for repairs and was ready for action again on March 7th. On the same day of "Fireball's" loss, an M26 in E Company at Eldsorf managed to destroy a Tiger I and two Panzer IVs. The Tiger I was hit approximately 900 m out with an HVAP round, with a second T33 AP shot causing a catastrophic explosion, the two Panzer IVs were also knocked out with the AP rounds. The same crew killed another Panzer IV as they drove towards Cologne. Another Pershing was disabled on March 1st by artillery fire, killing the tank commander Sergeant Kay and causing massive damage to components of the M26, forcing it back to be repaired for several weeks. Other Pershing breakdowns include engine failures and components breaking, but these were all fixed easily in a few days.[1]

Around March 6th, a Pershing led by a Captain Gray was ambushed by a Nashorn that penetrated the front armour at a range of 300 m. The crew all survived, but their Pershing became the only one of the original 20 that arrived to not make it through the war. The same day in Cologne, a Pershing from E Company, 32nd Armored Regiment headed by Sergeant Earley destroyed a Panther tank in front of the Cologne Cathedral, which was famously captured on film by Jim Bates from Signal Corps. Around the same time, a Pershing from D Company destroyed a Tiger I with two AP rounds, and another Pershing from G Company took out a Panzer IV with three M82 APCBC rounds. Other resistance faced at Cologne and the approach to the Rhine River were emplaced anti-aircraft guns, but the high explosive payload in the 90 mm proved very effective in destroying them. A platoon of five Pershings led by Lt. Grimball in March 7th and 8th assisted in the taking of the Ludendorff Bridge in the Battle of Remagen. The bridge was damaged during the battle, but was still intact, though the M26 Pershings were unable to cross it compared to the M4 Shermans and tank destroyers due to their heavier weight and width, an indication on how the M26 Pershings are not logistically sound in Europe's infrastructure. It would not be until March 12th when ferries are made available to transport the Pershings across the Rhine. In March 25th, additional shipping of M26s arrived at Europe, a total of 40 tanks, 22 going to 2nd Armored Division and 18 going to the 5th. Additional Pershings came in from then until the end of the war on VE Day at 8 May 1945; by that time, a total of 310 Pershings have made it to Europe, 200 in combat units, and only the first 20 ever seeing action against the enemy.[1]

The end of the war in Europe shifted attention to the Pacific Theater, where the Battle of Okinawa was still underway. The increasing US armoured losses due to the Japanese 47 mm anti-tank guns and the demands for a better tank by US tankers caused Ordnance to send a mission similar to the Zebra Mission to reinforce the US troops at Okinawa. The ship carrying the Pershings left on May 31st and was expected to reach Okinawa at June 30th, but constant stops due to transport priorities caused the tanks to arrive July 21st, at which point hostilities ended a month ago. Nevertheless, the Pershings were still unloaded via landing crafts tanks (LCT) on July 30th. Only 4 of the 12 Pershings were unloaded before the rest was diverted to Naha due to typhoon warnings. The Pershings on Okinawa were to be allocated to the 193rd and 711th Tank Battalion with familiarization starting on August 10th. However, training stopped when Japan surrendered on August 15th, 1945, ending the Pershing's combat life during World War II.[1]

Post World War II

After World War II, the M26 Pershing was reclassified as the Medium Tank M26 Pershing to fill the army's tank needs, but its specifications were not satisfactory for the role of it due to low mobility and heavyweight. Despite that, the M26 Pershings became urgently needed when the North Korea People's Army suddenly attack South Korea, armed with the Soviet-supplied T-34-85s. South Korea and the US Forces stationed there had no armour except the M24 light tank and no adequate anti-tank weaponry to fight off the T-34 onslaught. A search for any suitable armour commenced in Japan and the US Army was able to procure three M26 Pershings at Ordnance storage. Though in a poor state, they were quickly refurbished and landed in Korea on 16 July 1950, the only medium tanks available in Korea. These three tanks moved to the front line on July 28 and fought with North Korean forces on the 31st, but were lost when the engines overheated due to lack of fan belts.[1]

Following this event, more medium tanks were sent from the United States to Korea, mainly the 6th, 70th, and 73rd Tank Battalions armed with M4A3 Shermans, Pershings, and M46 Pattons. The 8072nd Tank Battalion from Japan was also sent, redesignated the 89th when it arrived to Korea. All the Tank Battalions arrive at Korea around August 8th. The first combat mission with the Pershings in this group was at the north of Taegu, a location known as the "Bowling Alley". It was here that the Pershings faced off against three T-34-85s and managed to destroy them.[1] The M26 proved to be more than a match against the T-34-85s as it could penetrate through the T-34-85 front and back when using HVAP ammo, while the T-34-85 couldn't even penetrate the front of the Pershing.[2] After November 1950, the lack of enemy tanks and the mechanical deficiency the Pershing has compared to the Shermans caused many of them to be shipped back to the states in 1951 and were replaced by the improved M46 Patton tanks, which were upgraded M26 Pershings made to be more reliable. The Patton series of tanks would basically be based off the M26 Pershing's design.

The M26 served its last few years in the American occupation zone in Europe and were supplied to America's Allies during the Cold War. Belgium received 426 units of this tank, and France and Italy received Pershings as well, though later replaced by the M47 Pattons.


Archive of the in-game description

The M26 Pershing heavy tank was a development of the T26, in turn one of the M6's prototype descendants. Its story began in 1942, when U.S. Army Ordnance received the go-ahead to begin working on the M20 medium tank. It did not turn out to be particularly successful, though it boasted potential for modernization.

In 1943 and 1944 several T22 and T23 prototypes and experimental models were built. However, their weapon calibre had fallen behind current requirements and in 1944 priorities shifted to a program developing T25 and T26 tanks with 90 mm cannons. The T26 appeared to be the more promising option. It was equipped with a Torquematic hydraulic transmission, torsion bar suspension, and cast hull, while its significantly increased weight and sized resulted in a move to the heavy tank category.

At the beginning of 1945 several pre-production T26E3 models were released, 20 of which were sent to Europe for combat trials. Tankers reported that the T26E3 was a match for the Pz.V and Pz.VI, even somewhat outperforming them in manoeuvrability. One 1945 battle saw a T26E3 taking out two Pz.IV medium tanks and one Pz.VI heavy tank.

By the summer of 1945 the T26E3 was officially accepted as the M26 Pershing, with a total of 2,222 produced. The M26 did not have a chance to fully prove itself, though it was shown to be a capable weapon against heavy armour.

The M26 really only saw combat during the Korean War in 1950-1953, where it was up against Soviet T-34s and 85s. The American heavy tanks outgunned the T-34 and were better armoured, though they were much less manoeuvrable and reliable. The M26's running gear had much more trouble in the mountainous conditions as opposed to its experience in Europe, and it had practically no advantages over Soviet medium tanks in close combat.


Media

Skins
Videos

See also

Other vehicles of similar configuration and role

External links

References

  1. 1.0 1.1 1.2 1.3 1.4 1.5 1.6 1.7 1.8 Hunnicutt, R.P. Pershing: A History of the Medium Tank T20 Series U.S.A.: Feist Publications, 1971
  2. Zaloga Steven. T-34-85 vs M26 Pershing: Korea 1950 Great Britain: Osprey Publishing Ltd., 2010


U.S. Army Ordnance Department/Corps*
Light tanks  T18E2 · M24 (Designed in collaboration with Cadillac)
M3 Stuart  M3 · M3A1 Stuart · M3A1 (USMC)
M5 Stuart  M5A1
Medium tanks  M3 Lee
M4 Sherman  M4 · M4A1 · M4A2 · M4A3 (105) · Calliope
  M4A1 (76) W · M4A2 (76) W · M4A3 (76) W
M26 Pershing  T20 · T25 · M26 · M26E1 · M26 T99
Patton Series  M46 · M46 "Tiger" · M47
Prototypes  T54E1 · T95E1
Heavy tanks  M103
M4 Jumbo  M4A3E2 · Cobra King · M4A3E2 (76) W
M6 Heavy  M6A1 · M6A2E1 · T1E1
M26 Pershing  T26E1-1 · T26E5
Prototypes  T14
T29  T29 · T30 · T34
T-32  T32 · T32E1
Tank destroyers  M3 GMC · M10 GMC · M56
M8 GMC  M8 HMC · M8A1 GMC
M36 GMC  M36 GMC · M36B2
Prototypes  T28 · T95
SPAAGs 
Production  M19 MGMC · M42
Export/Captured  ␗M8 HMC · SU-57
Stuart  Stuart I · Stuart III · ␗M3A3 Stuart · ␗M3A3 (1st PTG) · ▄M3A3 · ▄M3A3 Stuart · ▃Stuart VI (5th CAD) · ␗M5A1
Lee/Grant  ▂M3 Medium · ▃Grant I · Grant I
M4 Sherman  Sherman II · ▄M4A1 · ␗M4A1 (75) W · ▀M4 748 (a) · ▂M4A2 · ▄M4A3 (105) · ▅M4A3 (76) W · ▄M4A3E2
  ␗M4A4 · ␗M4A4 (1st PTG) · ▄Sherman V · ▄M4A4 · ▄Sherman I Composito
M26 Pershing  M26 "D.C.Ariete" · M26A1
M47 Patton  mKPz M47 G · ▅M47
M10 GMC  ␗M10 GMC · ▄M10 GMC
M36 GMC  ␗M36 GMC · M36B1 · ▅M36 · ▄M36B2
M19 MGMC  ▅M19A1
M42 MGMC  ▅M42 · ␗M42
  *The Ordnance Department was renamed to the Ordnance Corps after the Army Reorganization Act of 1950.

USA medium tanks
M2  M2
M3  M3 Lee · ▃Grant I
M4  M4 · Calliope · M4A1 · M4A1 (76) W · M4A2 · M4A2 (76) W · M4A3 (105) · M4A3 (76) W · M4/T26
M26 Pershing  T20 · T25 · M26 · M26 T99 · M26E1
M46/47/48 Patton  M46 · M46 "Tiger" · M47 · M48A1 · T54E1 · T54E2
M60  M60 · M60A1 (AOS) · M60A1 RISE (P) · M60A2 · M60A3 TTS · M728 CEV · 120S
MBT-70  MBT-70 · XM803
M1 Abrams  XM1 (Chrysler) · XM1 (GM)
  M1 Abrams · M1 KVT · IPM1
  M1A1 · M1A1 HC · M1A1 Click-Bait
  M1A2 Abrams · M1A2 SEP · M1A2 SEP V2
Other  T95E1
Australia  M1A1 AIM
Canada  M4A5
Israel  ▃Magach 3 (ERA) · ▃Merkava Mk.1 · ▃Merkava Mk.2B · ▃Merkava Mk.3D
Turkey  M60 AMBT