M4

From War Thunder Wiki
Jump to: navigation, search
Rank VI | Premium | Golden Eagles
Challenger DS Pack
This page is about the American medium tank M4. For other versions, see M4 Sherman (Family). For other uses, see M4 (Disambiguation).
us_m4_sherman.png
GarageImage M4.jpg
ArtImage M4.png
M4
AB RB SB
3.7 3.7 3.7
Class:
Research:5 600 Specs-Card-Exp.png
Purchase:22 000 Specs-Card-Lion.png
Show in game

Description

Entering production just a month after the M4A1, the M4 Sherman is the second variant of the early-generation Medium Tank M4 (Sherman) family. The Continental R975 radial engine from the M3 and M3A1 light tanks was utilised in the M4 variant. Before the M4 variant even went into production, the great majority of its weaknesses were sorted out. This greatly contributed to the overall M4 Sherman medium tank's reputation for dependability and ease of maintenance. The M4 variant had a welded body and a cast turret that housed the 75 mm M3 tank gun from the M3 Lee. Some early-production M4s have three hull machine guns and two turret-mounted machine guns. The hull weapons were all M1919A4 light machine guns, two fixed and one in a ball mount for use by the co-drivers, but these were quickly removed in the late-production M4s. For practically the entire production run, the turret armament remained unchanged: the 75 mm M3 tank gun with the M1919A4 coaxial light machine gun and the M2HB Browning heavy machine gun mounted on the roof. From July 1942 to January 1944, a total of 6,748 units of the M4 variant were produced, as well as 1,641 units of the modified M4 (105) variant outfitted with a 105 mm howitzer for infantry support. The gun mantlet was improved as well, from the M34 to the more protected M34A1. The turret would be the same as that seen on all early-generation M4 Sherman variants and would be interchangeable.

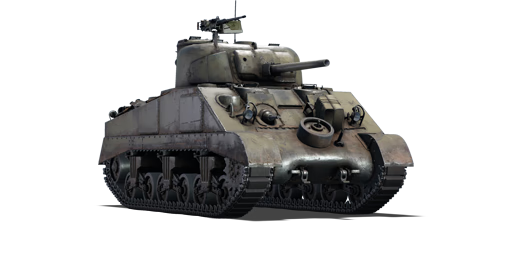
Introduced in Update 1.45 "Steel Generals", the M4 is the continuation of the M4 Sherman medium tank family. It was painted in the U.S. Army's standard olive-drab green camouflage. The hull of the M4 variant is welded, resulting in a sharper-edged hull shape than the cast hull of the M4A1 variant. All M4 Sherman early-generation variants had the same cast turret and featured a better-protected M34A1 gun mount for the 75 mm M3 tank gun (excluding the M4A1). The glacis of the hull slopes at 56 degrees, as is typical of early-generation M4 Sherman variants. It is vital to pay attention to the hatches that protrude from the hull's sloping contour, as these cause interruptions in the slope and hinder the overall efficacy of the sloped armour. To give additional protection, armour plates are welded in front of the interruptions. However, this remained a significant weakness from the frontal hull context, and most experienced opponents will aim for it. Other highlights on the front glacis include the bundled desert-coloured jerry cans in the driver's region and the road wheel directly on the transmission cover. Furthermore, the additional appliqué armour plates over the sponson ammunition area on the side hull was another distinguishing feature of the M4 Sherman medium tanks. While this provides some protection, it also serves as an indication for the opponent to aim for ammo rack detonation. Overall, the playstyle is extremely similar to all early-generation M4 Sherman variants.

General info

Survivability and armour

Armourfront / side / back
Hull50 / 38 / 38
Turret76 / 50 / 50
Crew5 people
Visibility103 %

Armour type:

  • Rolled homogeneous armour (Front, Side, Rear, Hull roof)
  • Cast homogeneous armour (Turret, Transmission area)
Armour Front (Slope angle) Sides Rear Roof
Hull 50.8 mm (56°) Front glacis
50.8 mm (12-56°) Transmission area
50.8 (13-20°) + 25.4 mm (35°) Protruding hatches
38.1 mm
38.1 + 25.4 mm Appliqué addition
38.1 mm (0-10°) Top
25.4 mm (33-64°) Bottom
19.5 mm Sides
12.7 mm Engine deck and center
Turret 76.2-88.9 mm (4-67°) Turret front
50.8 + 88.9 mm Gun mantlet
50.8 mm (0-68°) 50.8 mm (2-66°) 25.4 mm
Cupola 50.8 mm 50.8 mm 50.8 mm 25.4 mm

Notes:

  • Suspension wheels are 15 mm thick, bogies are 10 mm thick, and tracks are 20 mm thick.
  • Front armour has two protruding areas for driver and co-driver hatches. These are weak points as they present a flat armour surface.
  • Belly armour is 12.7 mm thick.

Though most high-end anti-tank weapons can cleave through the M4 Sherman's front armour rather easily, some smaller-calibre weapons less than 75 mm would have some trouble going against the front armour. In these cases, aim for weak points like the protruding hatches in the front sloping armour, the crest of the transmission housing, where the slope is minimum in both areas or the machine gun port from the hull. The turret has a very robust construction so if there is no faith in penetrating through the front hull easily, don't bother trying to penetrate the turret from the front except for the very small weak point on the gunner's position of the turret.

If a shot can be made to the M4 Sherman's sides, send it towards the front half of the tank where it would either cripple the crew or ignite one of the ammunition racks strewn all over the internals.

Mobility

Speedforward / back
AB43 / 6 km/h
RB and SB38 / 5 km/h
Number of gears5 forward
1 back
Weight30.6 t
Engine power
AB763 hp
RB and SB400 hp
Power-to-weight ratio
AB24.9 hp/t
RB and SB13.1 hp/t
Game Mode Max Speed (km/h) Weight (tons) Engine power (horsepower) Power-to-weight ratio (hp/ton)
Forward Reverse Stock Upgraded Stock Upgraded
Arcade 43 6 30.6 620 763 20.26 24.93
Realistic 38 5 354 400 11.57 13.07

The M4 is powered with an engine adequate for its weight class. While accelerating up to this speed can be sluggish at first, the M4 takes to a running start after Gear 4.

Modifications and economy

Repair costBasic → Reference
AB716 → 921 Sl icon.png
RB823 → 1 059 Sl icon.png
SB1 047 → 1 347 Sl icon.png
Total cost of modifications10 390 Rp icon.png
13 830 Sl icon.png
Talisman cost750 Ge icon.png
Crew training6 300 Sl icon.png
Experts22 000 Sl icon.png
Aces210 Ge icon.png
Research Aces220 000 Rp icon.png
Reward for battleAB / RB / SB
40 / 70 / 80 % Sl icon.png
124 / 124 / 124 % Rp icon.png
Modifications
Mobility Protection Firepower
Mods new tank traks.png
Tracks
Research:
690 Rp icon.png
Cost:
910 Sl icon.png
105 Ge icon.png
Mods new tank suspension.png
Suspension
Research:
470 Rp icon.png
Cost:
620 Sl icon.png
70 Ge icon.png
Mods new tank break.png
Brake System
Research:
470 Rp icon.png
Cost:
620 Sl icon.png
70 Ge icon.png
Mods new tank filter.png
Filters
Research:
870 Rp icon.png
Cost:
1 200 Sl icon.png
130 Ge icon.png
Mods new tank transmission.png
Transmission
Research:
840 Rp icon.png
Cost:
1 100 Sl icon.png
125 Ge icon.png
Mods new tank engine.png
Engine
Research:
840 Rp icon.png
Cost:
1 100 Sl icon.png
125 Ge icon.png
Mods tank tool kit.png
Improved Parts
Research:
690 Rp icon.png
Cost:
910 Sl icon.png
105 Ge icon.png
Mods extinguisher.png
Improved FPE
Research:
470 Rp icon.png
Cost:
620 Sl icon.png
70 Ge icon.png
Mods tank reinforcement us.png
Crew Replenishment
Research:
870 Rp icon.png
Cost:
1 200 Sl icon.png
130 Ge icon.png
Mods new tank horizontal aiming.png
Horizontal Drive
Research:
690 Rp icon.png
Cost:
910 Sl icon.png
105 Ge icon.png
Mods tank cannon.png
Adjustment of Fire
Research:
470 Rp icon.png
Cost:
620 Sl icon.png
70 Ge icon.png
Mods tank ammo.png
75mm_usa_APCBC_ammo_pack
Research:
470 Rp icon.png
Cost:
620 Sl icon.png
70 Ge icon.png
Mods new tank vertical aiming.png
Elevation Mechanism
Research:
870 Rp icon.png
Cost:
1 200 Sl icon.png
130 Ge icon.png
Mods art support.png
Artillery Support
Research:
840 Rp icon.png
Cost:
1 100 Sl icon.png
125 Ge icon.png
Mods tank ammo.png
75mm_us_M89_Smoke_ammo_pack
Research:
840 Rp icon.png
Cost:
1 100 Sl icon.png
125 Ge icon.png

Obvious first choice for research would be Parts in tier I. For the tier II it might be worth a risk to go for M61 shot first, as its such a significant improvement over the stock shell. The other option being FPE. On tier III Filters and Crew Replenishment are very important, and in tier IV further mobility improvements with the Engine and then Transmission should be prioritized. Once done - Horizontal Drive and two modifications responsible for accuracy or Artillery Support. The least important module to research is the M89 shell due to its extremely situational use.

Armaments

Main armament

Vertical stabilizer
Reduces the swing of the gun in one plane while moving
Ammunition97 rounds
Reloadbasic crew → aces
6.5 → 5.0 s
Vertical guidance-10° / 25°
Main article: M3 (75 mm)

75 mm M3 gun is a competent, well-handling gun for a medium tank. Even without any modifications, its ability to fulfil its role, though where it begins to shine is with the M61 shot. Default, M72, suffers from issues typical to US and British sold shots - poor post-penetration effects. This means it's preferable to take down enemy gunner first, usually by hitting the right side of the turret.

75 mm M3 Turret rotation speed (°/s) Reloading rate (seconds)
Mode Capacity Vertical Horizontal Stabilizer Stock Upgraded Full Expert Aced Stock Full Expert Aced
Arcade 97 -10°/+25° ±180° Vertical 22.85 31.62 38.40 42.47 45.18 6.50 5.75 5.30 5.00
Realistic 14.28 16.80 20.40 22.56 24.00

Ammunition

When discussing M4 shells, one always has to account for the fact that it's a medium tank. This means short to medium engagement range, so realistically it can benefit more from its short-range penetration figures than long-range sniping tanks would.

  • M72 shot; AP - Solid shot, stock shell. Acceptable penetration, poor post-penetration damage.
  • M48 shell; HE - Low-velocity shell useful against soft targets, in particular when hitting an open-topped vehicle. Harmless against any vehicle with more than 10 mm of armour.
  • M61 shot; APCBC - This shell has a better penetration than the M72 thanks to its ballistic cap and a good post-penetration damage thanks to its explosive filler.
  • M89; smoke shell - Useful to blind enemy vehicles that are too remote for you to disable so that you can progress towards objectives.

Penetration statistics
Ammunition Type of
warhead
Penetration @ 0° Angle of Attack (mm)
10 m 100 m 500 m 1,000 m 1,500 m 2,000 m
M72 shot AP 91 88 78 67 57 49
M48 shell HE 10 10 10 10 10 10
M61 shot APCBC 104 102 93 84 75 68
Shell details
Ammunition Type of
warhead
Velocity
(m/s)
Projectile
mass (kg)
Fuse delay
(m)
Fuse sensitivity
(mm)
Explosive mass
(TNT equivalent) (g)
Ricochet
0% 50% 100%
M72 shot AP 619 6.3 - - - 47° 60° 65°
M48 shell HE 463 6.3 0.2 0.1 666 79° 80° 81°
M61 shot APCBC 618 6.79 1.2 14 63.7 48° 63° 71°
Smoke shell characteristics
Ammunition Velocity
(m/s)
Projectile
mass (kg)
Screen radius
(m)
Screen deploy
time (s)
Screen hold
time (s)
Explosive mass
(TNT equivalent) (g)
M89 259 3 9 5 20 50

Ammo racks

Full
ammo
1st
rack empty
2nd
rack empty
3rd
rack empty
4th
rack empty
5th
rack empty
6th
rack empty
7th
rack empty
8th
rack empty
Visual
discrepancy
97 91 (+6) 88 (+9) 86 (+11) 78 (+19) 63 (+34) 45 (+52) 31 (+66) (+96) No
Ammo racks of the M4

Notes:

  • To go into battle with the turret basket empty of ammo, pack 78 (+19) shells (racks 1 to 4 emptied).
  • To go into battle with the turret basket and the flanks empty of ammo, pack 31 (+66) shells (racks 1 to 7 emptied).
  • The 8th rack is large and located in a weak spot: the bottom section of the armour. In case of penetration, there is a high risk of ammo rack detonation. Make sure not to expose your flanks unnecessarily.

Machine guns

Ammunition600 rounds
Belt capacity200 rounds
Reloadbasic crew → aces
10.4 → 8.0 s
Fire rate575 shots/min
Vertical guidance-10° / 25°
Horizontal guidance-60° / 60°
Ammunition3 000 rounds
Belt capacity250 rounds
Reloadbasic crew → aces
10.4 → 8.0 s
Fire rate500 shots/min

The M4 Sherman is armed with two machine guns, a 12.7 mm heavy machine gun on the pintle-mount atop the M4 Sherman turret, the famous .50 cal "Ma Deuce" machine gun. This weapon is the same type as the one used in American aircraft, though at a slower fire rate. However, this leads to the anti-aircraft power of the weapon as most formidable against low strafing attacking aircraft.

The second machine gun is a general-purpose 7.62 mm M1919A4 Browning machine gun mounted in the coaxial position. A typical machine gun not too unlike on many other vehicles, the machine gun is just average.

12.7 mm M2HB
Mount Capacity (Belt) Fire rate Vertical Horizontal
Pintle 600 (200) 577 -10°/+25° ±60°
7.62 mm M1919A4
Mount Capacity (Belt) Fire rate Vertical Horizontal
Coaxial 3,000 (250) 500 N/A N/A

Usage in battles

The M4 Sherman is an effective medium-range combat tank. Equipped with a fast-firing 75 mm gun and with good handling characteristics, the M4 can be an extremely useful asset in most battles.

In battle the M4 performs well as an all-rounder; the thick turret front and 10 degrees of gun depression make the tank ideal for taking hull-down positions which protect the thinner hull armour from being penetrated by enemy fire. The sloped front upper glacis, when angled, also provides good protection against enemy fire. An unusual - and useful - difference is that the upper glacis is sloped at 56 degrees rather than the standard 45 degrees, making it more of a threat and more powerful due to improving the chances of a round ricochet. The only downfall may be the 2 crew member position in the front that protrudes out to form a flat surface, but both are covered with an additional 20 mm plate. The reasonable mobility of the Sherman makes flanking a viable tactic. The main weakness of the M4 is the side armour - not only is it vertical and thin, but behind it most of the ammunition is stowed. The tall silhouette of the tank also makes finding suitable cover difficult. Overall, the M4 Sherman can be considered as an armoured jack-of-all-trades - it will serve a tanker well, however it will not excel in any particular role.

In battle, try to use terrain as cover. Hull-down positions are especially strong in the M4 Sherman, as it has a good 10 degrees of gun depression. The gun mantlet and turret are reasonably strong, but avoiding shots is still the best strategy. In this respect, a hull-down position hides the vulnerable hull. If this is not available, then angling the hull armour to present a greater slope is often a good idea, as this can bounce some low-powered cannon at any range and at longer ranges, render the hull impenetrable.

Another way to play the M4 Sherman is to tap into its traditional cavalry role, its mobility. The M4 Sherman is a great flanker as it is fast enough to get the jump on the enemy's side. Defeat the enemy at their weak front lines or go around the entire enemy force. Once in position at their sides or rear, ambush them. Ideally, the enemy should be too busy focusing on allies attacking in the front to notice the M4 instantly. Take out the weaker light or medium tanks, the 75 mm gun is not very ideal against heavy tanks like the KV-1 so take out its friends to allow allies more room to outmanoeuvre the KV tank. An organized attack will increase the M4 chances on the battlefield and success.

The presence of a pivot-mounted .50 calibre machine gun gives the Sherman some flexibility. It can engage softer targets such as some tank destroyers and many SPAAGs at short ranges when loading a HE shell would be inconvenient. While not ideal, they provide the Sherman tank with some measure of protection against aircraft- sometimes enough to dissuade a pilot from making another pass. It can be an effective rang-finder for targets at longer ranges where the M1919 in the turret would be less effective. While it pales in comparison to the destructive effect of tank guns, it provides the Sherman with some flexibility over other comparable vehicles, who are restricted to their rifle-calibre coaxial machine guns.


There will be concerns about certain vehicles:

M4A2 / A4 - These Sherman tanks are widely used by over 3 nations that spread across both the Allied and the Axis side, so no matter which nation you play they can be quite tough to destroy in the hands of a skilled tanker. Given the rather weak penetration of your short 75 mm gun, their hull can be almost impossible to penetrate when angled, hull down or 300 m away. For a M4A4, there are 2 apparent bulges on the upper front plate, a penetration through there can guarantee a knock-out most of the times. But in case the opponent covers them up or when it's a M4A2, aim for the middle parts of the gun mantlet or the turret armour unprotected by the mantlet, you can at least make them defenseless. Note that their guns are equally weak against you, so wiggle around to disrupt their aim while you reload, you have a good chance of bouncing some shells.

Churchill I, Churchill III, Pz.Kpfw. Churchill - The Churchills, with their complex hulls and sturdy turrets, can be quite hard to penetrate at range. Again, manoeuvre as close to them as possible, the idea distance being no more than 200 m. If they are angling their hull but facing their turret at you, only go for the turret. For the Mk I Churchills, aim at the near-vertical part of their rounded cheeks to ensure successful penetrations. For the Mk III and the German Churchill, also aim for their flat turret which is at most 89 mm. The shell should go in easily and knock out most, if not all of the crew. Only when you are facing their hull without any angles should you shoot the hull, otherwise shoot the turret only, as their big tracks can easily get in front of the frontal hull. The side hull have multiple layers of armour, some of which are weirdly angled and can absorb plenty of shells.

KV-1 and variants - A vehicle that the M4 Sherman will have trouble against is the KV-1. While the L-11 is underpowered, the ZiS-5 is potent enough to punch through the Sherman's front, and the Sherman is unable to penetrate the KV-1's thick frontal armour. If this heavy tank is encountered, try to shoot it in its sides and rear, where its armour is thinner and unsloped, though it will still have to be at a close range to penetrate the armour. In addition, shots to the sides will most likely hit fuel tanks or ammunition storage, causing a fire or ammunition detonation and at best, time to reassess the situation.

Panzer IV F2/G/H/J - The historical nemesis of any Sherman, the Panzer IV is one of the Shermans biggest threats at this rank. The long barrel 75 mm gun will easily penetrate the Sherman from the front. The F2 variant is admittedly easy to deal with. A single APCBC to its hull or turret should end it pretty quickly, even at long range. The other variants are slightly harder to deal with. They have thicker hull armour, at 80 mm, which will be much harder to penetrate with the APCBC over 500 m. Luckily the turret armour remains the same at 50 mm. Either aim here with APCBC or sacrifice damage potential and use the AP round to penetrate the hull.

StuG III F/G - Another historical nemesis of the Sherman, and another big threat. The StuG III packs the same punch as the Panzer IV line with its long barrel 75 mm gun, whilst losing the turret, which turns out to be both an advantage and a disadvantage. Lacking a turret means that it will have to traverse the whole vehicle to target an enemy, but it also means that it has a lower profile. The StuG's armour profile is also more complex than the Panzer IV, with less flat areas. Certain areas are sloped and very bouncy. Luckily, there is a big weak spot. There are two flat plates on the front of the hull. The flat plate on the right is the drivers port. Shoot that and you are able to knock out the driver, gunner and loader in one go. This is a very efficient way to destroy this vehicle. With the F variant, you can use APCBC to instantly knock out this vehicle with a single shot. With the G variant, it is more reliable to use AP at ranges over 500 m to ensure penetration.

Pros and cons

Pros:

  • Excellent gun depression of -10° plus the angled frontal turret allows it to utilise hills very well
  • Great penetration and post-penetration damage when using M61 shells; can frontally penetrate and knock out most opponents like the Pz.IV F2, Chi-Nu and T-34 with a single shot
  • Great turret traverse speed allows it to deal with multiple threats easily
  • Capable armour when angled and at a distance
  • Adequate top speed allows it to get to positions in time, or to do tactical manoeuvres like flanking
  • Pintle-mounted HMG provides an anti-aircraft defence or anti-tank duty against tanks like Marder III
  • Fitted with a vertical stabilizer, allowing more accurate fire on the move compared to other tanks, as well as better usage of shoot-n-scoot tactics

Cons:

  • Large profile and weak side armour; flankers like the Sd.Kfz.234/2 can easily see and penetrate it
  • Frontal armour is still inadequate, it will get frontally penetrated and knocked out with a single shot by tanks like Pz.IV F2/G, StuG III F/G or M10
  • The best M61 shell struggles to penetrate heavy targets like KV-1 (ZiS-5), Churchill III or even the T-34 and M10 when angled
  • Trajectory is curved and velocity is low due to its short barrel, thus distant/moving targets are hard to shoot at
  • Hull traverse is quite slow, making it sluggish in a turn. Also the narrow tracks offer poor ground flotation, thus poor off-road capabilities. Can only reach its top speed on paved or hard surfaces
  • Roof armour of 19.5 mm thick is vulnerable to aircraft strafing runs with AP rounds. For example the widely used M2 Browning

History

The Battle of France in 1940 proved to America that their current tank arsenal would not be able to withstand a German assault. The only tanks in their inventory at that time was the M2 light tank and the M2 medium tank, both are inadequate against the German Panzer IIIs and the Panzer IVs. The US Army, in response, ordered for a tank armed with a 75 mm gun. While a 75 mm gun was available for use, a turret able to mount the gun was not. So while the turret and tank design underwent development, the 75 mm would be mounted on the stopgap M3 Lee tank in a sponson mount. This interim design put the 75 mm on a lower and limited traverse mount that restricted its firing angle, but it did give the Western Allies a tank with the gun, so it was issued by the thousands until a better design could be produced.

During the M3 medium's development, the designs of the 75 mm armed vehicle were being drawn up and submitted by the Ordnance Department. Specifications on the tank design were strict in order to maximize logistical support. Restrictions were made on the tank's height, width, and weight in order to make it able to be transported over bridges, roads, railroads, and on naval ships. These specifications would help the Army by making the tank be very flexible on strategic, logistical, and tactical grounds. On April 1941, the Armored Force Board chose the simplest of the designs, which was a redesigned M3 hull and chassis with a turret mounting the 75 mm gun designated the T6, completed in September 1941. This tank would then designated the Medium Tank M4 in American service. The tank would eventually become the most used Allied tank during World War II as it was lent out by the thousands in the Lend-Lease program to the Allied countries. The British designated the M4 the "Sherman", which coined into the tank's name M4 Sherman that it would be known as in history. The production for the Shermans began on October 1941 and would continue to be produced until the end of the war in 1945 with around 50,000 units produced, making it the second most-produced tank in World War II before the T-34 tank.

Design

Many variants of the Shermans were produced, but they all followed a similar layout. The driver and bow gunner sat in the front driving compartment, the fighting compartment in the middle housed the turret its three crew member, and in the back was the engine compartment. The Sherman used many features present in previous American tank designs, the vertical volute suspension system (VVSS) and radial engine from the M2 Light Tanks, and the sloping armour of the M2 Medium Tanks. This became a contributing factor on the Sherman's reliability on the field, as most of the design flaws were ironed out with the previous tank designs. The tank-mounted the 75 mm M3 gun, giving the tank very good AP and HE capabilities. The Sherman's turret traverse speed was very fast, able to traverse a full 360 degrees in only 15 seconds, which is considerably faster than the traverse speed on most German tanks. Another unique feature on the Sherman was the installation of a gyroscopic stabilizer on the gun and sight, making the Sherman one of the first produced tanks to incorporate those features. While the stabilization was only done for the vertical plane, it kept the gun stable enough to be able to shoot on the move effectively, with a study showing a 70 % hit probability on an enemy 300 to 1,200 yards away when moving at a speed of 15 mph. However, this feature was controversial among the crew and experiences with it vary.

The M4 Sherman model ran on a gasoline Continental R975 radial engine and was one of the first models of the Sherman developed. The early M4 Sherman featured the M38 telescopic sight in the M4 periscope with no zoom, but experience in North Africa and recommendations from the British changed the sight into the M55 telescopic sight integrated into the gun mantlet.[1] This change in optics required appliqué armour to be added at the turret area in front of the gunner since the modification left the area weaker than the overall turret. This problem would be fixed in later-production models of the M4 Sherman. The tank's hull was welded, with the front armour plate placed on a 56-degree sloping angle. An early design defect with the design was the protruding armoured hatches for the driver and assistant driver. These protrusions create "shot traps" as they were in a near vertical position that gave less protection on the front armour than the sloping areas. This was fixed on later models as well. Up to 6,748 M4A1s were produced from July 1942 to January 1944, out of the 49,234 total Sherman units produced in the war.

Combat usage

European Theater

The Shermans first saw combat in the North African Campaign in the Second Battle of El Alamein on October 1942 in the hands of the British. It was much quicker to reinforce the British armoured divisions with the more than 300 Shermans sent to North Africa than it was to create new American ones. It proved much better than the German Panzer IIIs and Panzer IVs, able to eliminate them at distances more than 2,000 yards away. The Americans received their first Shermans in the next month in Operation Torch. However better the Shermans were to the German tanks at the time, the Allied armoured units still suffered casualties against the German tanks and anti-tank guns, most notably in the Battle of Kasserine Pass. In Italy, the Shermans proved much more mobile than the German Panzers, able to travel cross-country on the hilly terrain with ease. However, it was at this stage that the Sherman's shortcoming began to take face in the advent of the newer German tanks, the Tiger Is and Panthers. These two tanks featured armour that proved impenetrable when fired at the front, and with guns that could take out the Shermans from farther than the Sherman's effective combat range. The Shermans have to hit the side of these tanks for penetration and at ranges that were considered suicidal. Although programs were initiated to up-gun the Sherman with a 76 mm gun, American leaders determine that the Panther and Tigers would not be produced in large quantities and were not as great as a threat as these two vehicles could still be destroyed by the 75 mm gun and standard anti-tank equipment.

During the invasion of France, it was clear that the Sherman's current build with a 75 mm gun was no longer going to cut it against the German armoured forces. While the Sherman was adequate against what little Panzer III and IVs the Germans have left and against infantry and fortifications with the 75 mm gun, the Panthers and Tigers were in much large quantity than expected, and proved better in armour and firepower to the Shermans. Though in the bocage country of France, the Allies lost more tanks to hidden anti-tank guns and infantry weapons than to tanks. Despite these losses, the mass production of M4 Sherman back in the United States ensured that enough tanks were available for the Allied Forces as they spearhead through France, plus the lack of any other capable tanks meant they had to use the Shermans for the time being. The large quantities of Shermans produced during the war gave the Allied armoured units a major advantage of being fully equipped as the German panzer divisions were rarely in full strength, with some US infantry divisions having more tracked vehicles than some of the panzer divisions. Due to the high attrition rates, tank crews sometimes add improvised armour onto their Shermans in the form of sandbags and logs in hopes of increased survival, but these were determined to be ineffective from evaluations. A more effective method was to have metal armour welded on in improvisation, and an official project was made for such "assault tanks" that ended with the M4A3E2 "Jumbos" with 254 made for the fighting in Europe. The Allies continued to use 75 mm Shermans until the Battle of the Bulge in Winter 1944, when the commanders request only 76 mm Shermans to be brought into Europe as the battle showed the intense armour disparity with the German's large numbers of Panthers and Tiger II tanks. While new units arriving in Europe were armed exclusively with 76 mm armed-Shermans, the veteran units kept the 75 mm Shermans, to which it continued to do well against softer targets with little threat from German armour due to their declining numbers.

Pacific Theater

The M4 Sherman's importance in the Pacific theatre was less than that of the European theatre due to the different tactical doctrine established from the amphibious nature of combat. Only about 20 tank battalions fielded by the US Army were sent to support the Pacific theatre of operations, compared to the total 16 armoured divisions and 70 tank battalions they have in service. The low priority in tanks was due to the following reasons. Firstly, the jungle terrain on most of the islands fought on was unsuitable for the deployment of large-scale armoured units, relegating armour support to light tanks such as the M3 Stuarts. Secondly, the Japanese forces' armoured units were rather inferior to the American tank forces by 1943. While the Japanese Type 95 Ha-Go tank was comparable to the M2A4 Light Tank, the Shermans out gun these tanks by a large margin. Such a large margin that the tank crew prefer to use high-explosive shots against the Japanese tank than regular armour-piercing as the AP rounds would penetrate straight through without causing much damage in the interior of the tank. The Japanese developed the Type 3 Chi-Nu and the Type 4 Chi-To to fight back the Shermans, but these two never saw combat as they were kept at the Japanese homeland for the defence against the Allied invasion.

The Shermans, when deployed, were superior to most of the Japanese anti-tank equipment and often were essential to some of the Marines advances on some of the island assaults. In 1945, the equipping of flamethrower Shermans known as M4A3R3, nicknamed "Zippos", were a significant boost to the infantry's firepower in having a very long range of fire compared to the standard infantry-modelled flamethrowers with the benefit of being in an armoured vehicle. The Japanese solution against the Shermans, other than with their 47 mm anti-tank guns, were often suicidal tactics ranging from placing satchel charges right onto the tank, using pole-mounted anti-tank mines to reach and destroy the tank or even simply throwing oneself underneath a tank with mine or other explosive and triggering it manually.

Lend-Lease

The Sherman tank was given out in large numbers to American Allies during World War II under the Lend-Lease policy. While America retained about 20,361 Shermans in the Army and Marine Corps, 17,184 went to Britain (about 34% of Shermans produced and 78% of Shermans given out) and the Soviet Union obtained 4,102 Shermans.[2] China obtained 812 Shermans, Brazil with 53, and New Zealand and Australia for 153 Shermans total. Other countries using the Shermans were Poland, Free France, and Czechoslovakia. The British deployed the Sherman among their armoured squadrons in such a large number to become the standard tank of their armoured forces. The increased threat of German tanks in the European theatre also provoked the British to up-gun the M4 Sherman with a more capable gun, resulting in the Firefly.

Post-War

After the war, the Shermans continued serving America and its allies as the M4A3E8 with a new suspension and the 76 mm gun. The M26 Pershing that was introduced late in World War II was phased out for the Shermans due to its unreliability, and the Sherman stayed until the M46 Patton was introduced. After being phased out of American service, many other countries still used the Sherman as their main tank, mainly Israel where they up-gun the tank with the much powerful post-war French 75 mm and 105 mm gun as the M-50 and M-51 respectively (nicknamed "Super Shermans"). These proved successful as they were able to fight against the Soviet-supplied T-54 tanks and T-34-85s in Middle East service, proving the Sherman as a successful and adaptable design for many years to come.


Archive of the in-game description

The Americans did an excellent job recognizing the problems with the M3's main-calibre weaponry being mounted in a side sponson. Immediately after it began full-scale production, they began work on a new, more modern tank with a 75 mm cannon in a fully traversing turret. Its prototype, termed the T6, was ready for trials at the Aberdeen Proving Ground in September 1941.

The M4 was a medium tank boasting a welded hull, a cast turret, and the 350 hp Continental R-975, a gas-powered radial engine. Design of the M4 began in 1941, and by July 1942 it was ready for full-scale production. Between July 1942 and January 1944, 6,748 M4s rolled off the line. The tank's welded hull boosted its ammunition capacity in comparison with cast hulls by expanding its internal armoured capacity. The hull's front plate initially had viewing slits, though armour covers were welded over them and periscopes were added. The front part of the hull's gear compartment on older models consisted of three sections bolted together. Tanks had a narrow mantlet for the M34 artillery mount, while subsequent units employed a fully cast forward hull section and M34A1 artillery mount with a wide mantlet. The last batches, which were made beginning at the end of 1943, had the front of their hulls made from cast and rolled pieces. At the beginning of 1944 the frontal plate became one piece, moving the driver and gunner hatches to the top of the hull. The angled frontal armour went from 56° to 47° from vertical.

The Pressed Steel Car Company kicked off production of the first M4 tanks in July 1942. Four more companies were added later.

M4 tanks saw combat in Africa, Italy, the Western front, and the Pacific islands through 1945.

Shermans proved a strong option with good reliability and manoeuvrability in addition to armament and armour suiting its roll as a medium tank.


Media

Skins
Videos

See also

Vehicles equipped with the same chassis

External links

References

  1. Zaloga Steven. Armored Thunderbolt: The U.S. Army Sherman in World War II Stackpole Books, 2008, "Baptism Of Fire"
  2. Zaloga Steven. Armored Thunderbolt: The U.S. Army Sherman in World War II Stackpole Books, 2008, "The British Sherman"


USA medium tanks
M2  M2
M3  M3 Lee · ▃Grant I
M4  M4 · Calliope · M4A1 · M4A1 (76) W · M4A2 · M4A2 (76) W · M4A3 (105) · M4A3 (76) W · M4/T26
M26 Pershing  T20 · T25 · M26 · M26 T99 · M26E1
M46/47/48 Patton  M46 · M46 "Tiger" · M47 · M48A1 · T54E1 · T54E2
M60  M60 · M60A1 (AOS) · M60A1 RISE (P) · M60A2 · M60A3 TTS · M728 CEV · 120S
MBT-70  MBT-70 · XM803
M1 Abrams  XM1 (Chrysler) · XM1 (GM)
  M1 Abrams · M1 KVT · IPM1
  M1A1 · M1A1 HC · M1A1 Click-Bait
  M1A2 Abrams · M1A2 SEP · M1A2 SEP V2
Other  T95E1
Australia  M1A1 AIM
Canada  M4A5
Israel  ▃Magach 3 (ERA) · ▃Merkava Mk.1 · ▃Merkava Mk.2B · ▃Merkava Mk.3D
Turkey  M60 AMBT