Sherman II

From War Thunder Wiki
Jump to: navigation, search
VTOL | Rank 5 USA
AV-8A Harrier Pack
This page is about the British medium tank Sherman II. For other versions, see M4 Sherman (Family).
uk_sherman_ii.png
GarageImage Sherman II.jpg
ArtImage Sherman II.png
Sherman II
AB RB SB
3.7 3.7 3.7
Class:
Research:14 000 Specs-Card-Exp.png
Purchase:32 000 Specs-Card-Lion.png
Show in game

Description

The Sherman II was identical to the M4A1 variant of the Sherman deployed by the U.S. Army ground forces, except it had access to the late-war armour-piercing composite rigid (APCR) ammunition. The British acquired many more Shermans than any other Allied nation: 17,181 units (approximately 34% of all M4 Sherman medium tanks constructed). The British supported and supplied free Polish and Czechoslovak government-in-exile armoured units with M4A1, M4A2, and M4A4 variants.

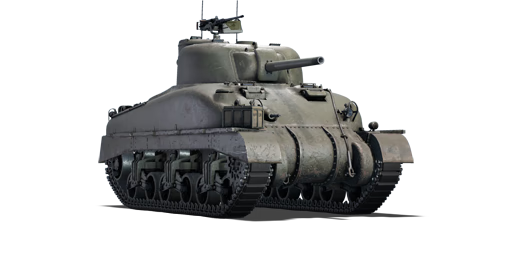
Introduced in Update 1.65 "Way of the Samurai", the Sherman II supplies the British Army ground forces with the first U.S. medium tank under the lend-lease programme in World War II. The playstyles are identical to M4A1 in the U.S. Army ground forces. The Sherman II is defined by its curved hull shape due to its cast hull construction. This causes the hull's upper front armour plate to have a variable slope angle throughout the upper glacis, but it also introduces a number of weaknesses. The first is in the frontal hull and side joints, which have relatively flat angles despite the tank being angled, and the second is in the cast construction, which affects the overall effectiveness of the frontal hull armour. The final are the view blocks on the frontal hull's top. Despite this, its armour remains effective against enemy fire from lesser calibre guns. The 75 mm M3 tank gun is mounted in the M34 gun mantlet with the periscope, a smaller gun mount than the future M34A1 gun mantlet, which will be installed in all future 75 mm M4 Sherman variants. This lessens the frontal turret's overall protection while also presenting a somewhat larger gun depression by -2° than the future M34A1 mantlet.

General info

Survivability and armour

Armourfront / side / back
Hull51 / 38 / 38
Turret76 / 51 / 51
Crew5 people
Visibility103 %

Armour type:

  • Cast homogeneous armour
  • Rolled homogeneous armour (Lower side hull)
Armour Front (Slope angle) Sides Rear Roof
Hull 38.1-50.8 mm (48°-72°) Front glacis
50.8 mm (11-58°) Transmission area
38.1 mm (1-71°) Top
38.1 Bottom
38.1 mm (0-69°) Top
38.1 mm (13-51°)
19.5 mm
Turret 76.2 mm (2-66°) Turret front
50.8 mm (3-49°) Gun mantlet
50.8 mm (0-65°) 50.8 + 4 mm (0-60°) 25.4 mm
Cupola 50.8 mm 50.8 mm 50.8 mm 25.4 mm

Notes:

  • Suspension wheels are 15 mm thick, bogies are 10 mm thick, and tracks are 20 mm thick.
  • Sand skirts on the suspension sides are 4 mm thick.
  • Front armour slope not even, lower part is weaker than top.
  • A small patch on the turret front right side is thinner (50.8 mm) than the rest (76.2 mm).
  • Bolt edges on the transmission housing are 101.6 mm thick.

Mobility

Speedforward / back
AB43 / 6 km/h
RB and SB38 / 5 km/h
Number of gears5 forward
1 back
Weight30.6 t
Engine power
AB763 hp
RB and SB400 hp
Power-to-weight ratio
AB24.9 hp/t
RB and SB13.1 hp/t
Game Mode Max Speed (km/h) Weight (tons) Engine power (horsepower) Power-to-weight ratio (hp/ton)
Forward Reverse Stock Upgraded Stock Upgraded
Arcade 43 6 30.6 620 763 20.26 24.93
Realistic 38 5 354 400 11.57 13.07

Modifications and economy

Repair costBasic → Reference
AB852 → 1 096 Sl icon.png
RB1 011 → 1 301 Sl icon.png
SB1 273 → 1 638 Sl icon.png
Total cost of modifications13 740 Rp icon.png
19 950 Sl icon.png
Talisman cost860 Ge icon.png
Crew training9 200 Sl icon.png
Experts32 000 Sl icon.png
Aces270 Ge icon.png
Research Aces250 000 Rp icon.png
Reward for battleAB / RB / SB
50 / 80 / 90 % Sl icon.png
130 / 130 / 130 % Rp icon.png
Modifications
Mobility Protection Firepower
Mods new tank traks.png
Tracks
Research:
920 Rp icon.png
Cost:
1 300 Sl icon.png
120 Ge icon.png
Mods new tank suspension.png
Suspension
Research:
620 Rp icon.png
Cost:
890 Sl icon.png
80 Ge icon.png
Mods new tank break.png
Brake System
Research:
620 Rp icon.png
Cost:
890 Sl icon.png
80 Ge icon.png
Mods new tank filter.png
Filters
Research:
870 Rp icon.png
Cost:
1 300 Sl icon.png
115 Ge icon.png
Mods new tank transmission.png
Transmission
Research:
1 100 Rp icon.png
Cost:
1 600 Sl icon.png
145 Ge icon.png
Mods new tank engine.png
Engine
Research:
1 100 Rp icon.png
Cost:
1 600 Sl icon.png
145 Ge icon.png
Mods tank tool kit.png
Improved Parts
Research:
920 Rp icon.png
Cost:
1 300 Sl icon.png
120 Ge icon.png
Mods extinguisher.png
Improved FPE
Research:
620 Rp icon.png
Cost:
890 Sl icon.png
80 Ge icon.png
Mods tank reinforcement uk.png
Crew Replenishment
Research:
870 Rp icon.png
Cost:
1 300 Sl icon.png
115 Ge icon.png
Mods new tank horizontal aiming.png
Horizontal Drive
Research:
920 Rp icon.png
Cost:
1 300 Sl icon.png
120 Ge icon.png
Mods tank cannon.png
Adjustment of Fire
Research:
620 Rp icon.png
Cost:
890 Sl icon.png
80 Ge icon.png
Mods tank ammo.png
75mm_usa_APCBC_ammo_pack
Research:
620 Rp icon.png
Cost:
890 Sl icon.png
80 Ge icon.png
Mods new tank vertical aiming.png
Elevation Mechanism
Research:
870 Rp icon.png
Cost:
1 300 Sl icon.png
115 Ge icon.png
Mods tank ammo.png
75mm_usa_APCR_ammo_pack
Research:
870 Rp icon.png
Cost:
1 300 Sl icon.png
115 Ge icon.png
Mods art support.png
Artillery Support
Research:
1 100 Rp icon.png
Cost:
1 600 Sl icon.png
145 Ge icon.png
Mods tank ammo.png
75mm_us_M89_Smoke_ammo_pack
Research:
1 100 Rp icon.png
Cost:
1 600 Sl icon.png
145 Ge icon.png

Armaments

Main armament

Vertical stabilizer
Reduces the swing of the gun in one plane while moving
Ammunition90 rounds
Reloadbasic crew → aces
6.5 → 5.0 s
Vertical guidance-12° / 18°
Main article: M3 (75 mm)
75 mm M3 Turret rotation speed (°/s) Reloading rate (seconds)
Mode Capacity Vertical Horizontal Stabilizer Stock Upgraded Full Expert Aced Stock Full Expert Aced
Arcade 90 -12°/+18° ±180° Vertical 22.85 31.62 38.40 42.47 45.18 6.50 5.75 5.30 5.00
Realistic 14.28 16.80 20.40 22.56 24.00

Ammunition

When discussing the Sherman II's shells, one always has to account for the fact that it's a medium tank. This means short to medium engagement range, so realistically it can benefit more from its short-range penetration figures than long-range sniping tanks would.

  • M72 shot - AP - Solid shot, stock shell. Acceptable penetration, poor post-penetration damage.
  • M48 shell - HE - Low-velocity shell useful against soft targets, in particular when hitting an open-topped vehicle. Harmless against any vehicle with more than 10 mm of armour.
  • M61 shot - APCBC - This shell has a better penetration than the M72 thanks to its ballistic cap and a good post-penetration damage thanks to its explosive filler.
  • T45 shot- APCR - Subcalibre round with high penetration but only on flat surfaces, poor post-penetration damage. Good option against the T14.
  • M89 smoke shell - Useful to blind enemy vehicles that are too remote for you to disable so that you can progress towards objectives.

Penetration statistics
Ammunition Type of
warhead
Penetration @ 0° Angle of Attack (mm)
10 m 100 m 500 m 1,000 m 1,500 m 2,000 m
M72 shot AP 91 88 78 67 57 49
M48 shell HE 10 10 10 10 10 10
M61 shot APCBC 104 102 93 84 75 68
T45 shot APCR 139 135 121 105 91 79
Shell details
Ammunition Type of
warhead
Velocity
(m/s)
Projectile
mass (kg)
Fuse delay
(m)
Fuse sensitivity
(mm)
Explosive mass
(TNT equivalent) (g)
Ricochet
0% 50% 100%
M72 shot AP 619 6.3 - - - 47° 60° 65°
M48 shell HE 463 6.3 0.2 0.1 666 79° 80° 81°
M61 shot APCBC 618 6.79 1.2 14 63.7 48° 63° 71°
T45 shot APCR 868 3.81 - - - 66° 70° 72°
Smoke shell characteristics
Ammunition Velocity
(m/s)
Projectile
mass (kg)
Screen radius
(m)
Screen deploy
time (s)
Screen hold
time (s)
Explosive mass
(TNT equivalent) (g)
M89 259 3 9 5 20 50

Ammo racks

Ammo racks of the M4A1 (identical).
Full
ammo
1st
rack empty
2nd
rack empty
3rd
rack empty
4th
rack empty
5th
rack empty
6th
rack empty
7th
rack empty
8th
rack empty
Visual
discrepancy
90 82 (+8) 75 (+15) 72 (+18) 70 (+20) 54 (+36) 38 (+52) 22 (+68) (+89) Yes

Notes:

  • The visual discrepancy concerns rack 8: 28 shells are modeled but it contains only 21 shells.
  • Racks disappear after you've fired all shells in the rack.
  • Flanks and turret empty: 22 (+68) shells.

Optics

Sherman II Optics
Which ones Default magnification Maximum magnification
Main Gun optics x1.85 x3.5
Comparable optics M4A2

Machine guns

Ammunition600 rounds
Belt capacity200 rounds
Reloadbasic crew → aces
10.4 → 8.0 s
Fire rate575 shots/min
Vertical guidance-10° / 22°
Horizontal guidance-60° / 60°
Ammunition3 000 rounds
Belt capacity250 rounds
Reloadbasic crew → aces
10.4 → 8.0 s
Fire rate500 shots/min
12.7 mm M2HB
Mount Capacity (Belt) Fire rate Vertical Horizontal
Pintle 600 (200) 576 -10°/+22° ±60°
7.62 mm M1919A4
Mount Capacity (Belt) Fire rate Vertical Horizontal
Coaxial 3,000 (250) 500 N/A N/A

Usage in battles

The best use of the Sherman II is in defence or in an exploitation movement.

In the defence: hull-down position. Find a terrain like a hill where the Sherman can inch forward, exposing only the turret, yet be able to aim down most of the horizon with the 75 mm gun. This allows the Sherman to use the most of the turret and gun mantlet armour as well as minimizing the amount of the body able to be hit by incoming enemy fire while dishing out quite a considerable amount of fire towards the enemy with a fast-firing 75 mm gun. If enemy fire at the hull-down position intensifies or wound the crew members, simply reversing can put the Sherman under adequate cover and reposition for another attempt to attack the enemy.

In exploitation, attack enemy utilizing the Sherman's adequate speed and handling. Manoeuvre into enemy territory scanning for targets. A benefit of the fast reloads and the traverse rate of the Sherman is that it allows for quick reaction to enemies spotted at various directions. Remember, the general rule of tank combat, the first person to shoot generally wins the battle. As such, it is imperative for the success of this tactic to attack an enemy not aware of the Sherman's presence and movement. As such, an unaware enemy will probably be exposing their weak points such as the side armour, allowing for a well-placed 75 mm shot to damage the interior. Try not to be caught up in one position as being stuck in one place will cause the enemy to eventually swarm the Sherman and destroy it.

While the Sherman isn't a purpose-built brawler, it can perform decently in that role. The frontal armour cannot be relied on, but a combination of proper positioning and careful angling can deflect some less-potent guns. As is the case with its American cousins, the Sherman II is equipped with a gyroscopic stabilizer effective at speeds up to 25 km/h (15.5 mph). This ability to shoot accurately on the move is a significant advantage in close quarters combat and meeting engagements, as the few seconds an enemy takes to stop and aim is ample time for the Sherman II to turn them into a burning wreck.

Enemies worth noting:

  • M4A2 / A4 - These Sherman tanks are widely used by over 3 nations that spread across both the Allied and the Axis side, so no matter which nation you play they can be quite tough to destroy in the hands of a skilled tanker. Given the rather weak penetration of your short 75 mm gun, their hull can be almost impossible to penetrate when angled, hull down or 300 m away. For a M4A4, there are 2 apparent bulges on the upper front plate, a penetration through there is a guaranteed kill most of the times. But in case the opponent covers them up or when it's a M4A2, aim for the middle parts of the gun mantlet or the turret armour unprotected by the mantlet, you can at least make them defenseless. Note that their guns are equally weak against you, so wiggle around to disrupt their aim while you reload, you have a good chance of bouncing some shells.
  • KW I C 756 (r) - A tough tank that the M4 Sherman will experience difficulty against is this German upgunned KV-1. While the preceding KV-1's L-11 cannon is not as powerful, the 75 mm KwK40 is considerably much more powerful against the Sherman's frontal armour, and the Sherman can't easily penetrate the KV-1's thick armour particularly when it has extra armour plates attached. In the event that this hefty tank is spotted and it's angling against you, focus on the gun mantlet as it is only 50 mm thick. You can knock out its turret crew and/or armament without any problem. Or on the other hand take shots at the tall commander's cupola, there's some opportunity to take out the gunner from there. Obviously, the most ideal way is to fire shots at its sides from as close as you can get, where its armour is unsloped. Moreover, shots to the sides will undoubtedly hit its fuel tanks or ammo racks, causing a fire or ammo explosion. Remember to utilise your superior (although not excellent) mobility plus your vertical stabiliser when dealing against such heavy tanks.
  • Churchill III heavy tanks - The Churchills, with their complex hulls and sturdy turrets, can be quite hard to kill at range. Again, manoeuvre as close to them as possible, the ideal distance being no more than 200 m. If they are angling their hull but facing their turret at you, only go for the turret. For the Mk I Churchills, aim at the near-vertical part of their rounded cheeks to ensure successful penetrations. For the Mk III and the German Churchill, also aim for their flat turret which is at most 89 mm. The shell should go in easily and knock out most, if not all of the crew. Only when you are facing their hull without any angles should you shoot the hull, otherwise shoot the turret only, as their big tracks can easily get in front of the frontal hull. The side hull have multiple layers of armour, some of which are weirdly angled and can absorb plenty of shells.
  • Pz.IV F2/G/H/J - The historical nemesis of any Sherman, the Panzer IV is one of the Sherman's biggest threats at this rank. The long barrel 75 mm gun will easily penetrate the Sherman from the front. The F2 variant is admittedly easy to deal with. A single APCBC to its hull or turret should end it pretty quickly, even at long range. The other variants are slightly harder to deal with. They have thicker hull armour, at 80 mm, which will be much harder to penetrate with the APCBC over 500 m. Luckily the turret armour remains the same at 50 mm. Either aim here with APCBC or sacrifice damage potential and use the AP round to penetrate the hull.
  • StuG III F/G - Another historical nemesis of the Sherman, and another big threat. The StuG III packs the same punch as the Panzer IV line with its long barrel 75 mm gun, whilst losing the turret, which turns out to be both an advantage and a disadvantage. Lacking a turret means that it will have to traverse the whole vehicle to target an enemy, but it also means that it has a lower profile. The StuG's armour profile is also more complex than the Panzer IV, with less flat areas. Certain areas are sloped and very bouncy. Luckily, there is a big weak spot. There are two flat plates on the front of the hull. The flat plate on the right is the drivers port. Shoot that and you are able to kill the driver, gunner and loader in one go. This is a very efficient way to destroy this vehicle. With the F variant, you can use APCBC to instantly knock out this vehicle with one hit. With the G variant, it is more reliable to use AP at ranges within 500 m to ensure penetration.
  • R3 T20 FA-HS - This speedy wheeled vehicle can circle around you with ease and wipe out all your crew with its fast firing autocannon. In a close encounter, never expose your side to it, and do not even angle your hull. Face your hull directly to the R3, because on each side of the cast hull, above the inducer wheel there is a triangular area that blends and connects the upper front plate to the side. By angling the hull, this triangle becomes unangled to the R3, making it easily penetrated, and the driver / gunner will usually get knocked out first. It is harder for the R3 to penetrate your unangled hull thus giving you more time to react and destroy it.

Pros and cons

Pros:

  • Excellent gun depression -12° plus the angled frontal turret allows it to utilise hills very well
  • Great penetration and post-penetration damage when using M61 shells; can frontally penetrate and knock out most opponents with a single shot
  • Has access to APCR ammunition, effective against thick but flat armour like that of the Pz.Kpfw. Churchill
  • Great turret traverse speed allows it to deal with multiple threats easily
  • Adequate top speed allows it to get to positions in time, or to do tactical manoeuvres like flanking
  • Pintle-mounted HMG provides an anti-aircraft defence or anti-tank duty against tanks like Marder III
  • Fitted with a vertical stabilizer, allowing more accurate fire on the move compared to other tanks, as well as better usage of shoot-n-scoot tactics

Cons:

  • Frontal armour is still inadequate, will get frontally penetrated and knocked out by tanks with a single shot
  • Large profile and weak side armour; flankers like the Sd.kfz.234/2 or GAZ trucks can easily see and penetrate it
  • When opponents are angling, both AP and APCR struggle to penetrate heavy tanks
  • Narrow tracks offer poor ground flotation, thus poor off-road capabilities. Can only reach its top speed on paved or hard surfaces
  • Prone to damage by artillery barrages, tracks can be hit and the fuel supply can be ignited
  • Ammunition storage is vulnerable to detonation
  • May tip over when travelling across steep inclines
  • The cast hull creates frontal weak spots with very little effective thickness, e.g. the triangles between upper front plate and the side, and the curved hull hatches

History

Development

The Battle of France in 1940 proved to America that their current tank arsenal would not be able to withstand a German assault. The only tanks in their inventory at that time was the M2 Light Tanks and the M2 Medium Tank, both are inadequate against the German Panzer IIIs and the Panzer IVs. The US Army, in response, ordered for a tank armed with a 75 mm gun. While a 75 mm gun was available for use, a turret able to mount the gun was not. So while the turret and tank design underwent development, the 75 mm would be mounted on the stopgap design, the M3 Lee tank in a sponson mount. This interim design put the 75 mm on a lower and limited traverse mount that restricted its firing angle, but it did give the Allies a tank with the gun, so it was issued by the thousands until a better design could be made.

During the M3's development, the designs of the 75 mm armed vehicle were being drawn up and submitted by the Ordnance Department. Specifications on the tank design were strict in order to maximize logistical support. Restrictions were made on the tank's height, width, and weight in order to make it able to be transported over bridges, roads, railroads, and on naval ships. These specifications would help the Army by making the tank be very flexible on strategic, logistical, and tactical grounds. On April 1941, the Armored Force Board chose the simplest of the designs, which was a redesigned M3 hull and chassis with a turret mounting the 75 mm gun designated the T6, completed in September 1941. This tank would then designated the Medium Tank M4 in American service. The tank would eventually become the most used Allied tank during World War II as it was lent out by the thousands in the Lend-Lease program to the Allied countries. The British called the M4 the "Sherman", which coined into the tank's name M4 Sherman that it would be known as in history. The production for the Shermans began on October 1941 and would continue to be produced until the end of the war in 1945 with around 50,000 units produced, making it the second most-produced tank in World War II before the T-34 tank.

Design

Many variants of the Shermans were produced, but they all followed a similar layout. The driver and bow gunner sat in the front driving compartment, the fighting compartment in the middle housed the turret its three crew member, and in the back was the engine compartment. The Sherman used many features present in previous American tank designs, the vertical volute suspension system (VVSS) and radial engine from the M2 Light Tanks, and the sloping armour of the M2 Medium Tanks. This became a contributing factor on the Sherman's reliability on the field, as most of the design flaws were ironed out with the previous tank designs. The tank mounted the 75 mm M3 gun, giving the tank very good AP and HE capabilities. The Sherman's turret traverse speed was very fast, able to traverse a full 360 degrees in only 15 seconds, which is considerably faster than the traverse speed on most German tanks. Another unique feature on the Sherman was the installation of a gyroscopic stabilizer on the gun and sight, making the Sherman one of the first produced tanks to incorporate those features. While the stabilization was only done for the vertical plane, it kept the gun stable enough to be able to shoot on the move effectively, with a study showing a 70 % hit probability on an enemy 300 to 1,200 yards away when moving at a speed of 15 mph. However, this feature was controversial among the crew and experiences with it vary.

The M4A1 Sherman model (known in British nomenclature as the Sherman II) ran on a gasoline Continental R975C-1 radial engine and was one of the first models of the Sherman developed. The model in-game features the early M38 telescopic sight in the M4 periscope with no zoom, which was later replaced with a M55 telescopic sight in the gun mantlet by recommendation from the British.[1] The tank's hull was fully cast, giving the tank a distinctive rounded slope front and sides. Though the rounded shape gave the frontal armour uneven angling, it provided adequate protection up to 100 mm in thickness in certain areas. Cast armour was used because casting took less man hours to perform, but suffered from the limited capability of most American factories and was hard to repair on the field. Thus, welding was prioritized as the primary manufacturing method in the other Sherman variants.[2] Nevertheless, up to 6,281 M4A1s were produced from February 1942 to December 1943, out of the 49,234 Sherman units produced in the war.

British nomenclature

The British had a different naming convention with their equipment than the Americans. It is this naming system that actually gave the M4 Medium tank their namesake "Sherman". As the American differentiate the M4 models with letter and numbers such as M4, M4A1, M4A2, and M4A3. The British use roman numerals past the name "Sherman". Thus, the nomenclature translate to:

  • Sherman I - M4
  • Sherman II - M4A1
  • Sherman III - M4A2
  • Sherman IV - M4A3
  • Sherman V - M4A4
  • Sherman VII - M4A6

Past these designation, there would be a letter to signify differences in model design. A designation ending with "A" indicates the usage of the 76 mm gun. A designation ending with "B" indicates the usage of the 105 mm howitzer. A designation ending with "Y" would indicate the usage of the Horizontal Volute Suspension System (HVSS). Finally, a designation ending with "C" indicates the usage of the 17-pdr gun, essentially translating to the Firefly. There was a word addition "Hybrid" exclusive to the Sherman I variant, meaning the M4 Hybrid design which used a cast front armour, but a welded rear design.[3]

Media

Skins

See also

Other M4A1 vehicles in the game

External links

References

  1. Zaloga Steven. Armored Thunderbolt: The U.S. Army Sherman in World War II Stackpole Books, 2008, "Baptism Of Fire"
  2. Zaloga Steven. Armored Thunderbolt: The U.S. Army Sherman in World War II Stackpole Books, 2008, "The School of Tank Technology"
  3. Christopher John. Sherman M4 Medium Tank Amberley Publishing, 2014


U.S. Army Ordnance Department/Corps*
Light tanks  T18E2 · M24 (Designed in collaboration with Cadillac)
M3 Stuart  M3 · M3A1 Stuart · M3A1 (USMC)
M5 Stuart  M5A1
Medium tanks  M3 Lee
M4 Sherman  M4 · M4A1 · M4A2 · M4A3 (105) · Calliope
  M4A1 (76) W · M4A2 (76) W · M4A3 (76) W
M26 Pershing  T20 · T25 · M26 · M26E1 · M26 T99
Patton Series  M46 · M46 "Tiger" · M47
Prototypes  T54E1 · T95E1
Heavy tanks  M103
M4 Jumbo  M4A3E2 · Cobra King · M4A3E2 (76) W
M6 Heavy  M6A1 · M6A2E1 · T1E1
M26 Pershing  T26E1-1 · T26E5
Prototypes  T14
T29  T29 · T30 · T34
T-32  T32 · T32E1
Tank destroyers  M3 GMC · M10 GMC · M56
M8 GMC  M8 HMC · M8A1 GMC
M36 GMC  M36 GMC · M36B2
Prototypes  T28 · T95
SPAAGs 
Production  M19 MGMC · M42
Export/Captured  ␗M8 HMC · SU-57
Stuart  Stuart I · Stuart III · ␗M3A3 Stuart · ␗M3A3 (1st PTG) · ▄M3A3 · ▄M3A3 Stuart · ▃Stuart VI (5th CAD) · ␗M5A1
Lee/Grant  ▂M3 Medium · ▃Grant I · Grant I
M4 Sherman  Sherman II · ▄M4A1 · ␗M4A1 (75) W · ▀M4 748 (a) · ▂M4A2 · ▄M4A3 (105) · ▅M4A3 (76) W · ▄M4A3E2
  ␗M4A4 · ␗M4A4 (1st PTG) · ▄Sherman V · ▄M4A4 · ▄Sherman I Composito
M26 Pershing  M26 "D.C.Ariete" · M26A1
M47 Patton  mKPz M47 G · ▅M47
M10 GMC  ␗M10 GMC · ▄M10 GMC
M36 GMC  ␗M36 GMC · M36B1 · ▅M36 · ▄M36B2
M19 MGMC  ▅M19A1
M42 MGMC  ▅M42 · ␗M42
  *The Ordnance Department was renamed to the Ordnance Corps after the Army Reorganization Act of 1950.

Britain medium tanks
Valentine  Valentine I · Valentine IX · Valentine XI
Cromwell  Cromwell I · Cromwell V · Cromwell V (RP-3)
Cromwell derivatives  Challenger · Avenger · Comet I · Comet I "Iron Duke IV" · Charioteer Mk VII
Centurion  Centurion Mk 1 · Centurion Mk.2 · Centurion Mk 3 · Centurion Mk.5 AVRE · Centurion Mk 10 · Centurion Action X · FV4202
Vickers MBT  Vickers Mk.1 · Vickers Mk.3 · Vickers Mk.7
Chieftain  Chieftain Mk 3 · Chieftain Mk 5 · Chieftain Mk 10
Challenger 1  Challenger Mk.2 · Challenger Mk.3 · Challenger DS
Challenger 2  Challenger 2 · Challenger 2 (2F) · Challenger 2 TES · Challenger 2 OES · Challenger 2E · Challenger 2 Black Night
Challenger 3  Challenger 3 TD
Australia  A.C.I · A.C.IV · Centurion Mk.5/1
South Africa  Olifant Mk.1A · Olifant Mk.2 · TTD
India  Vijayanta · Bhishma TWMP
Israel  ▄Sho't Kal Dalet
Jordan  Khalid
Sweden  ▄Strv 81 (RB 52)
USA  Grant I · Sherman II · Sherman Firefly · Sherman IC "Trzyniec"