M3A1 Stuart

From War Thunder Wiki
Jump to: navigation, search
Rank VI Israel | Premium | Golden Eagles
Merkava Mk.2D Pack
This page is about the American light tank M3A1 Stuart. For other versions, see M3 Stuart (Family). For other uses, see M3 (Disambiguation).
M3A1 Stuart
us_m3a1_stuart.png
GarageImage M3A1 Stuart.jpg
ArtImage M3A1 Stuart.png
M3A1 Stuart
AB RB SB
2.0 2.3 2.3
Class:
Research:5 900 Specs-Card-Exp.png
Purchase:6 300 Specs-Card-Lion.png
Show in game

Description

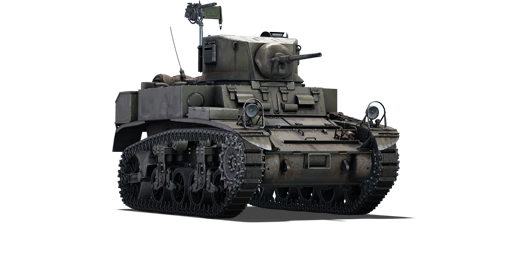
The M3A1 is the second variant of the M3 light tank family. The M3A1 features a new turret with turret basket and a removed cupola. A new main gun vertical stabilizer was installed, and the sponson machine guns were removed. It entered World War II in May 1942, with enhanced turret protection than the previous variant, M3, incorporating the "turret basket" and a taller 7.62 mm M1919A4 light machine gun mount for light anti-aircraft roles. The sponson machine guns on both sides of the hull were removed at that stage, as the three remaining machine guns on the main hull were deemed adequate for anti-infantry purposes. They also had a better vertical stabilizer than the earlier M3 Stuart. During World War II, a total of 4,621 M3A1 were manufactured, with the last delivered in February 1943.

Introduced in Update 1.45 "Steel Generals", the M3A1 is a continuation of the M3 light tank family that shares many similarities with other U.S. Army light tanks of rank I. The M3A1 saw substantial action in their first major campaign in the west, the North African invasion (Operation Torch) in November 1942. They had some success against early enemies' light tanks, but they were highly vulnerable to up-gunned Panzer III and Panzer IV, due to the flat squared hull.

General info

M3A1 takes hits while engaging enemy vehicles.

Survivability and armour

Armourfront / side / back
Hull38 / 25 / 25
Turret38 / 32 / 32
Crew4 people
Visibility89 %

Being a light tank the M3A1 has fairly thin armour, it can generally protect against most machine guns and some smaller (20 mm) cannons, but will usually not stand up against the main weapons of most enemy tanks at its BR. There is a fair amount of empty space inside the tank, this means that some poorly placed shots can go through your tank without causing much damage.

Armour type:

  • Rolled homogeneous armour
  • Cast homogeneous armour (gun mantlet, transmission housing)
Armour Front Sides Rear Roof
Hull 38.1 mm (18°) Upper plate
25.4 mm Crew compartment sides
15.8 mm (70°) Lower glacis
44.4 mm (cylindrical) Transmission housing
25.4 mm 12.7 mm Upper plate
25.4 mm (20°) Lower plate
15.8 mm (20°) Front glacis
12.7 mm
Turret 38.1 mm (6°) Turret front
50.8 mm (spherical) Gun mantlet
31.75 mm (cylindrical) 12.7 mm (15°) Front
12.7 mm Rear

Notes:

  • Suspension wheels, tracks, and torsion bars are 15 mm thick.
  • Belly armour is 12.7 mm thick.
  • Mudguards and storage boxes are 4 mm thick.

Mobility

Speedforward / back
AB65 / 8 km/h
RB and SB59 / 7 km/h
Number of gears5 forward
1 back
Weight12.9 t
Engine power
AB500 hp
RB and SB262 hp
Power-to-weight ratio
AB38.8 hp/t
RB and SB20.3 hp/t
Demonstration of the slow and fast turning of the M3A1

The M3A1 has competitive mobility with a ratio of 20.8 hp per ton. At lower speeds (5-10 km/h) the turning can feel rather sluggish, but once a bit of forward movement is applied and the speed is increased the turning will feel much smoother and faster. The forward drive of the M3A1 can max out at 47 km/h off-road and 58 km/h on-road which will usually allow you to reach capture points or desirable camping spots quickly. The 6 km/h reverse speed of the M3A1 is certainly usable in most situations.

Game Mode Max Speed (km/h) Weight (tons) Engine power (horsepower) Power-to-weight ratio (hp/ton)
Forward Reverse Stock Upgraded Stock Upgraded
Arcade 65 8 12.9 406 500 31.47 38.76
Realistic 59 7 232 262 17.98 20.31

Modifications and economy

Repair costBasic → Reference
AB249 → 320 Sl icon.png
RB294 → 378 Sl icon.png
SB368 → 473 Sl icon.png
Total cost of modifications5 940 Rp icon.png
4 500 Sl icon.png
Talisman cost410 Ge icon.png
Crew training1 800 Sl icon.png
Experts6 300 Sl icon.png
Aces75 Ge icon.png
Research Aces135 000 Rp icon.png
Reward for battleAB / RB / SB
20 / 20 / 20 % Sl icon.png
106 / 106 / 106 % Rp icon.png
Modifications
Mobility Protection Firepower
Mods new tank traks.png
Tracks
Research:
300 Rp icon.png
Cost:
230 Sl icon.png
55 Ge icon.png
Mods new tank suspension.png
Suspension
Research:
330 Rp icon.png
Cost:
250 Sl icon.png
60 Ge icon.png
Mods new tank break.png
Brake System
Research:
330 Rp icon.png
Cost:
250 Sl icon.png
60 Ge icon.png
Mods new tank filter.png
Filters
Research:
500 Rp icon.png
Cost:
380 Sl icon.png
90 Ge icon.png
Mods new tank transmission.png
Transmission
Research:
640 Rp icon.png
Cost:
480 Sl icon.png
115 Ge icon.png
Mods new tank engine.png
Engine
Research:
640 Rp icon.png
Cost:
480 Sl icon.png
115 Ge icon.png
Mods tank tool kit.png
Improved Parts
Research:
300 Rp icon.png
Cost:
230 Sl icon.png
55 Ge icon.png
Mods extinguisher.png
Improved FPE
Research:
330 Rp icon.png
Cost:
250 Sl icon.png
60 Ge icon.png
Mods tank reinforcement us.png
Crew Replenishment
Research:
500 Rp icon.png
Cost:
380 Sl icon.png
90 Ge icon.png
Mods new tank horizontal aiming.png
Horizontal Drive
Research:
300 Rp icon.png
Cost:
230 Sl icon.png
55 Ge icon.png
Mods tank ammo.png
37mm_usa_m3_APC_ammo_pack
Research:
300 Rp icon.png
Cost:
230 Sl icon.png
55 Ge icon.png
Mods tank cannon.png
Adjustment of Fire
Research:
330 Rp icon.png
Cost:
250 Sl icon.png
60 Ge icon.png
Mods new tank vertical aiming.png
Elevation Mechanism
Research:
500 Rp icon.png
Cost:
380 Sl icon.png
90 Ge icon.png
Mods art support.png
Artillery Support
Research:
640 Rp icon.png
Cost:
480 Sl icon.png
115 Ge icon.png

Armaments

Main armament

Vertical stabilizer
Reduces the swing of the gun in one plane while moving
Ammunition106 rounds
Reloadbasic crew → aces
3.7 → 2.9 s
Vertical guidance-10° / 20°
Main article: M6 (37 mm)

Main weapon on the M3A1 is a 37 mm M6 cannon featuring two rounds, AP & APCBC. This is a fairly standard gun for early American tanks as it is also featured on the M5A1, M22 & LVT(A)(1) although some of these vehicles also include a HE round that the M3A1 lacks. This gun packs a fierce punch if aiming at the correct area and firing at the correct distance. It is a small calibre fast-firing gun with a maximum penetration of 84 mm at 100 m (M51B1 shell), being able to penetrate most of the opponents it will face. The penetration power and gun accuracy drop a lot beyond 500 m and become unreliable past 700 m. The gun is equipped with a vertical stabiliser, giving the M3A1 Stuart a huge advantage in some cases as you can fire precisely while moving, but keep in mind that it activates only when the tank is driving under 10 km/h.

While it lacks the post-penetration damage to disable most enemies in one shot, it can quickly finish them off with its fast reload. Knowledge of enemy vehicle layouts is essential with ammunition lacking post-penetration explosive damage. Make sure to target modules and crew positions to maximise the damage. Disabling the enemy gunner on your first shot will be critical to win engagements as you'll most likely need several shots to destroy an enemy vehicle.

37 mm M6 Turret rotation speed (°/s) Reloading rate (seconds)
Mode Capacity Vertical Horizontal Stabilizer Stock Upgraded Full Expert Aced Stock Full Expert Aced
Arcade 106 -10°/+20° ±180° Vertical 19.04 26.35 32.00 35.39 37.65 3.77 3.33 3.07 2.90
Realistic 11.90 14.00 17.00 18.80 20.00

Ammunition

Penetration statistics
Ammunition Type of
warhead
Penetration @ 0° Angle of Attack (mm)
10 m 100 m 500 m 1,000 m 1,500 m 2,000 m
M74B1 AP 79 76 65 54 45 37
M51B1 APCBC 87 84 73 60 50 41
Shell details
Ammunition Type of
warhead
Velocity
(m/s)
Projectile
mass (kg)
Fuse delay
(m)
Fuse sensitivity
(mm)
Explosive mass
(TNT equivalent) (g)
Ricochet
0% 50% 100%
M74B1 AP 883 0.87 - - - 47° 60° 65°
M51B1 APCBC 883 0.87 - - - 48° 63° 71°

Ammo racks

Ammo racks of the M3A1 Stuart
Full
ammo
1st
rack empty
2nd
rack empty
3rd
rack empty
Visual
discrepancy
106 99 (+7) 52 (+54) (+105) No

Machine guns

Ammunition3 000 rounds
Belt capacity250 rounds
Reloadbasic crew → aces
10.4 → 8.0 s
Fire rate500 shots/min
Ammunition3 250 rounds
Belt capacity250 rounds
Reloadbasic crew → aces
10.4 → 8.0 s
Fire rate500 shots/min

The M3A1 employs a turret top MG and a coaxial MG, both of which are the same 7.62 mm M1919A4 type, these guns are limited to a single AP & T belt type with up to 10 mm of penetration. The machine guns are useful against low-flying biplanes and can help provide deterrence against enemy ground attack aircraft.

7.62 mm M1919A4
Mount Capacity (Belt) Fire rate Vertical Horizontal
Coaxial 3,250 (250) 500 - -
Pintle 3,000 (250) 500 -5°/+70° ±60°

Usage in battles

M3A1 attacking a StuG III

Due to its light armour it is advisable not to use the M3A1 frontally at closer ranges, especially not against higher ranked enemy vehicles that will go through your strongest frontal armour (50.8 mm) without issue. The ideal tactic to use is to employ your competitive speed to flank the enemy and find a position that will allow you to attack them with little resistance. Even in a match against higher ranked enemy vehicles your rounds will have no issue going through the side armour of said enemy vehicles, common maps such as Eastern Europe and Cargo Port offer clear opportunities to flank the enemy vehicles with good amounts of cover. This is especially clear on Eastern Europe where you can flank on the other side of the river that runs through the map, this puts you at close range to the side of enemy vehicles, allowing you to prevent them reaching capture points such as the central B point.

To take down enemy vehicles it is advisable to destroy both their turret and engine to prevent escape and stop them engaging you or your allies, due to the fast reload (at best 2.9s) you can hit both parts of an enemy quickly, usually before they can fire back. If they are still not dead after the gun and engine have been hit, shots into the crew compartment should finish the job, but most enemy's are usually killed by the first 2 shots. It is common for any side shot against an enemy to penetrate and cause a fair level of damage, even if the enemy is not killed, your fast reload will grant you a second chance quickly to place an adjusted shot into the enemy. Even at longer ranges the M3A1 can be a competent sniper, especially if facing lighter vehicles with flat armour or the side armour of a targeted enemy, firing from long range is another way to ensure that your light armour does not hold you back, being at long range will usually prevent or make it difficult for enemy's to successfully hit your vehicle.

Enemies worth noting:

Specific enemy vehicles that bear mentioning are firstly any Germans with the 20 mm KwK38 or FlaK38 cannons, these guns might be small in calibre but can have up to 48 mm of penetration, which is enough to go through the M3A3. Combined with a rate of fire of 280 rounds per minute, and a very short reload time, these guns will very easily take out your crew before you have a chance to respond. To counter these opponents, the best chance you have is to angle your frontal armour which can make it difficult for their PzGr 40 HVAP-T rounds to penetrate. The Russian T-50 and T-126 are vehicles you will also see commonly, these have fairly thick and angled frontal armour that will prevent you from easily getting through. These tanks can also carry an APHEBC round that will destroy you in one shot with little difficulty, to counter you should use your speed to attempt to get a side shot into either the turret or engine. If the T-50 cannot move you can outrun its turret and finish it without much difficulty.

It is likely that the M3A1 will encounter some rough heavies, like the Matilda III and the B1 bis. The best tactic against these types of targets is to use the M3A1's fast speed, get within 200 m from them and attack, with shooting at point-blank range being the most effective way. Before conducting an attack, check the M3A1's and the enemy's surroundings to make sure no one will ambush the M3A1. While charging, use the M3A1's quick turns to suddenly change direction to avoid being shot if they are aiming and firing at the M3A1. Once the tank is at the ideal distance, manoeuvre so that the gun is perpendicular to their armour. Do not shoot if the enemy is angling! The small calibre 37 mm gun is very likely to bounce off or not penetrate against sloped armour.

For the Matilda III, shoot at the middle of the near-vertical frontal plate to knock out the driver first, since the 37 mm shell is not enough to knock out the gunner after penetrating. Once it is immobile, go to its side and finish it by shooting its hull sides. Or, shoot the right side of the gun mantlet to disable its gunner. For best chance of penetration, do not shoot its turret side.

For the B1, either aim for the near-vertical frontal armour plate at the right side of the hull, or the turret ring to incapacitate the commander/gunner, or simply move to its side and knock out the crews one by one by hitting its flat side armour.

M3A1 flanking on Eastern Europe

Pros and cons

Pros:

  • Great cannon with good penetration, excellent rate of fire and gun depression; it can effectively penetrate common opponents like the Pz.II and Chi-Ha, as well as heavy targets like the B1 bis or Matilda III
  • Excellent acceleration, top speed and turning ability on all terrains; easily outruns slower opponents like the Pz.III
  • Access to a vertical stabiliser which most tanks don't have, it is an advantage in close quarter encounters
  • Respectable frontal armour that, if angled, might bounce some shells from a distance (e.g. Japanese 37 mm/German 20 mm)
  • Small turret profile makes it harder to get hit when hull-down
  • Empty space below the turret crew can absorb poorly aimed shots, they tend to not do much damage

Cons:

  • Weak armour against high-penetration shells like 50 mm KwK39 or 76 mm F-34
  • Its shells do not have explosive filler, severely limiting the post-penetration effect especially against spacious tanks like the LVT(A)(1)
  • Inefficient brakes when trying to stop the tank at full speed
  • Hull is fairly tall for a light tank and the crews are closely packed, reducing its survivability

History

Development

The American light tank design prior to World War II, the M2 light tank, was seen as obsolete after observing Germany's Panzer forces tear through Europe. The design was to be upgraded with more armour, a better suspension, and a new gun recoil system. The revised version was designated the Light Tank M3, which the British named the Stuart. At its basis, the light tank had a 37 mm cannon with a similar layout as the M2 light tank, with the radial engine at the rear and the transmission on the front, though the radial engine was in high demand so the Guiberson diesel T-1210 were fitted in some models to substitute the engine. The design used the VVSS bogie system seen on previous American tank designs. The tank had a crew of four: driver, assistant driver, gunner, and commander, who doubled as the loader.

The first variant of the M3 Stuart light tank was very similar to the M2 light tanks. It had five machine gun armaments scattered around like the M2 but featured better armour and a better cannon with the 37 mm M6 cannon. The design did not have a turret basket for the crew and it was constructed out of rivets, which increased the chance of spalling in the tank. Nevertheless, the first variant M3 saw about 5,811 units produced. The second variant, the Light Tank M3A1 Stuart, featured a new turret with no cupola on it, plus an added gun stabilizer. The machine guns on the hull sides were removed, so now the total machine guns were reduced from five to three. The design also featured a welded armour design to remove the weakness of riveted armour. 4,621 of this variant was produced from May 1942 to February 1943. The most used variant, the M5A1 Stuart, had a completely redesigned hull and turret, with the hull most notably having a full sloping frontal armour than the previous designs. This variant had about 6,810 units produced. All in all, the M3 light tank design and its variants were produced in massive quantities from March 1941 to October 1943 with a total of 25,000 units produced.

Combat usage

The British were the first to use the M3 Stuart in Africa in 1941, using it in Operation Crusader. However, the result ended with heavy losses, due to the better training the German Afrika Korps had compared to the British tank doctrine. The encounter also pointed out many flaws in the M3, mainly the cramped interior and limited operational range, but was praised for its high mobility and reliability when compared to the British contemporary designs. In 1942, the Stuarts were generally kept as recon units rather than combat units, and some were even modified to improve speed and range by removing the turret, and others were converted to armoured personnel carriers and command vehicles. Though the British used it extensively, it was still in small proportion compared to American usage. The Soviet Union was also another user of the M3 but found it unfavourable due to their own logistics, plus it was not made to withstand the Russian Rasputitsa or even the winter. The Soviet eventually turned down any more offers for the Stuart by 1943. The M3s also supported the British and Chinese forces in Asia against the Japanese Army, and also France and Yugoslavia in Europe against the German Wehrmacht.

The Americans used it widely in both operational theatres. In the Pacific, the M3s were the first tanks America used in a tank vs. tank operation against the Imperial Japanese Army, where five M3s fought Type 95 Ha-Gos in the Phillippines. Though the Stuarts were newer than the Japanese tank designs by about five years, they were seen as equal in performance and firepower, but the M3 benefited by the support of the American industry arm. The Stuarts served in the Pacific slightly better than its heavier counterparts such as the M4 Shermans due to its lighter weight and manoeuvrability in the poor jungle terrain, but the M3 Stuarts in the Pacific were gradually replaced by M4 Shermans due to heavy losses from its thinner armour. The M3 was also some of the first US tanks to be converted into flamethrower tanks, named as the "Satan". The Satan tanks provided favourable results to the concept of a flamethrower tank and were replaced by flamethrower-equipped M4 Shermans in 1945.

In Europe, the M3 formed a large part of the American tank battalions, though following the British path by sidelining the Stuarts from combat duties after heavy losses and to serve alongside Shermans as scouting units. A typical tank battalion for the US Army consisted of three companies of Shermans and one of Stuarts. Other than scouting, the M3s were also used in cavalry roles and infantry support since their cannon are unable to compete with the German tank designs. Despite their dwindling capabilities in battle, the M3 was kept in service up until the end of the war due to the large production numbers.

After World War II, the Stuarts were given out as cheap surplus, countries such as China, India, and Pakistan picked up a few and used them in their conflicts. Portuguese also picked up a few M3s for the war in Angola, and the South African Corps continued using the Stuarts until 1955, where some were still kept in service until 1968 due to available parts. Today, Paraguay is still a user of the M3 light tanks, though as the only tracked armour used in the country.

The Stuart light tank design was also quite versatile that it was made into different variants for different roles on the battlefield. It served as an infantry support vehicle as to the 75 mm GMC M8 and experiments were also taken to see if it could be adapted to an anti-aircraft gun and a flamethrower as well. However, the M3 was becoming an ageing design with inferior armour, cramped interior layout, and a small 37 mm gun, so a program to replace the light tank began in 1943 and became the M24 Chaffee, which would eventually replace the M3 Light Tank mostly after World War II.


Archive of the in-game description

Production of the M3A1 Stuart modification got underway in April 1942, with its primary changes affecting turret construction. The turret was a horseshoe-shaped M3, though it did not have a cupola, and two triangular hatches on its roof served as exits for the crew. The gunner and reloader had periscopes. The turret rotated using a power traverse as opposed to the manually rotated M3. Its faster rotation speed required changes in its construction, in particular a basket fitted with seats for the crew members.

The M23 mantlet was fitted with a 37 mm M6 cannon featuring a gyro stabilizer that significantly boosted accuracy while on the move. That did, however, require more training for gunners, a difficult assignment under battlefield conditions. The sponson-mounted immobile M1919A4 machine guns were replaced with additional ammunition storage, pushing the tank's capacity to 116 shells and 6,400 bullets.

From April to August of 1942 the M3A1 was produced alongside the M3. Changes were made gradually, meaning that some later M3s featured welded bodies and new turrets. They lacked, however, the basket and power traverse, and were called Stuart Hybrids. Some early M3A1s had sponson-mounted machine guns (the intervening models plugged up the openings) and riveted bodies. By the end of February 1943, 4,621 M3A1s had been assembled, 211 of them with the Guiberson T-1020-4 engines (called Stuart IVs by the British). It is worth noting that the M3A1s with welded bodies should have been designated M3A2s, though that never actually happened.


Media

Skins
Videos

See also

Other vehicles of similar configuration and role

External links


U.S. Army Ordnance Department/Corps*
Light tanks  T18E2 · M24 (Designed in collaboration with Cadillac)
M3 Stuart  M3 · M3A1 Stuart · M3A1 (USMC)
M5 Stuart  M5A1
Medium tanks  M3 Lee
M4 Sherman  M4 · M4A1 · M4A2 · M4A3 (105) · Calliope
  M4A1 (76) W · M4A2 (76) W · M4A3 (76) W
M26 Pershing  T20 · T25 · M26 · M26E1 · M26 T99
Patton Series  M46 · M46 "Tiger" · M47
Prototypes  T54E1 · T95E1
Heavy tanks  M103
M4 Jumbo  M4A3E2 · Cobra King · M4A3E2 (76) W
M6 Heavy  M6A1 · M6A2E1 · T1E1
M26 Pershing  T26E1-1 · T26E5
Prototypes  T14
T29  T29 · T30 · T34
T-32  T32 · T32E1
Tank destroyers  M3 GMC · M10 GMC · M56
M8 GMC  M8 HMC · M8A1 GMC
M36 GMC  M36 GMC · M36B2
Prototypes  T28 · T95
SPAAGs 
Production  M19 MGMC · M42
Export/Captured  ␗M8 HMC · SU-57
Stuart  Stuart I · Stuart III · ␗M3A3 Stuart · ␗M3A3 (1st PTG) · ▄M3A3 · ▄M3A3 Stuart · ▃Stuart VI (5th CAD) · ␗M5A1
Lee/Grant  ▂M3 Medium · ▃Grant I · Grant I
M4 Sherman  Sherman II · ▄M4A1 · ␗M4A1 (75) W · ▀M4 748 (a) · ▂M4A2 · ▄M4A3 (105) · ▅M4A3 (76) W · ▄M4A3E2
  ␗M4A4 · ␗M4A4 (1st PTG) · ▄Sherman V · ▄M4A4 · ▄Sherman I Composito
M26 Pershing  M26 "D.C.Ariete" · M26A1
M47 Patton  mKPz M47 G · ▅M47
M10 GMC  ␗M10 GMC · ▄M10 GMC
M36 GMC  ␗M36 GMC · M36B1 · ▅M36 · ▄M36B2
M19 MGMC  ▅M19A1
M42 MGMC  ▅M42 · ␗M42
  *The Ordnance Department was renamed to the Ordnance Corps after the Army Reorganization Act of 1950.

USA light tanks
LVT  LVT(A)(1) · ○LVT(A)(1) · LVT(A)(4)
M2  M2A2 · M2A4 · M2A4 (1st Arm.Div.)
M3/M5 Stuart  M3 Stuart · M3A1 Stuart · M3A1 (USMC) · M5A1 · M5A1 TD · ▃Stuart VI (5th CAD)
M22 Locust  M22
M24 Chaffee  M24 · M24 (TL)
M18 Hellcat  M18 GMC · M18 "Black Cat" · Super Hellcat
M41 Walker Bulldog  M41A1
M551 Sheridan  M551 · M551(76)
M3 Bradley  M3 Bradley · M3A3 Bradley
Wheeled  M8 LAC · T18E2 · M1128 · M1128 Wolfpack
Other  M8A1 GMC · T92 · T114 · HSTV-L · CCVL · XM8 · AGS