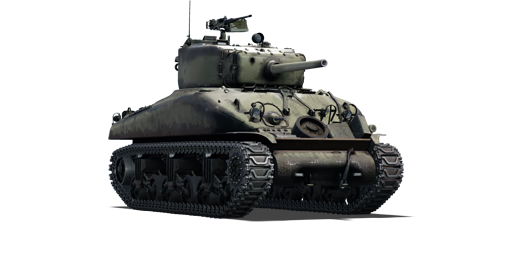
M4A1 (75) W (China)
This page is about the medium tank M4A1 (75) W (China). For other versions, see M4 Sherman (Family). For other uses, see M4 (Disambiguation). |
Contents
Description
The ␗Medium Tank M4A1 (75) W Sherman is a unique Sherman variant due to its nature as a retrofitted tank using parts of different models of M4 Shermans. In this case, these were the six Sherman tanks with the cast hull of the M4A1 (76) W (distinguished by the travel lock of the original 76 mm M1 gun) and its iconic D82081 (full-sized mantlet) turret, but only armed with a less powerful 75 mm M3 cannon. These tanks were part of the post-Civil War order of supplementary tanks for the ROCA from Great Britain, delivered in late 1949 after the loss of most of Mainland China. As the ROCA later adopted M18 GMC as their main tank, these Shermans were soon retired in 1952.
It was introduced in Update 1.91 "Night Vision". The M4A1 (75) W combines the hull and turret of the M4A1 (76) W with the earlier 75 mm gun, which means it has a more armoured turret than the other Shermans at the same BR, but the M4A1 hull presents large weakspots. This, combined with its good gun depression, means it is very effective when in a hull-down position.
General info
Survivability and armour
The armour layout of the M4A1 (75) W is identical to that of the M4A1 (76) W, turret- and hull-wise. Taking out a M4A1 (75) W is not a difficult task to do for most cannons it will face. It can take a few hits from Panzer IIIs that are equipped with the 50 mm KwK39 cannon, Shermans equipped with the 75 mm M3 cannon and T-34s and KV-1s equipped with the 76 mm L-11 cannon that will have a difficulty to reliably penetrate the M4A1 (75) W's armour. Meanwhile most guns above its BR will penetrate the armour with ease. However, even up-gunned tanks can have a hard time penetrating it with the sloped armour the M4A1 models are shaped with.
Armour type:
- Cast homogeneous armour
- Rolled homogeneous armour (Hull sides, Belly)
Armour | Front (Slope angle) | Sides | Rear | Roof |
---|---|---|---|---|
Hull | 63.5 mm (40-62°) Front glacis 63.5 mm (16-59°) Transmission housing |
38.1 mm | 38.1 mm (17°) Top 38.1 mm (16-52°) Bottom |
19.5 mm |
Turret | 63.5 mm (0-51°) Turret front 88.9 mm (5-19°) Gun mantlet |
63.5 mm (1-20°) | 63.5 mm (0-57°) | 25.4 mm |
Cupola | 63.5 mm | 63.5 mm | 63.5 mm | 25.4 mm |
Notes:
- Suspension wheels are 15 mm thick, bogies are 10 mm thick, and tracks are 20 mm thick.
- Front armour slope not even, lower part is weaker than top.
- Belly armour is 25.4 mm thick.
Mobility
Game Mode | Max Speed (km/h) | Weight (tons) | Engine power (horsepower) | Power-to-weight ratio (hp/ton) | |||
---|---|---|---|---|---|---|---|
Forward | Reverse | Stock | Upgraded | Stock | Upgraded | ||
Arcade | 43 | 6 | 32.7 | 620 | 763 | 18.96 | 23.33 |
Realistic | 39 | 6 | 354 | 400 | 10.83 | 12.23 |
The M4A1 (75) W (China) has got a decent speed of 38 km/h (42 km/h AB), with a relative bad acceleration that makes it an easy prey for enemy vehicles when it have just started its movement. The reverse speed of 4 km/h (5 km/h AB) would make it important to not peek too much outside of cover. Even though it have a relative bad acceleration, it can still move its hull relative fast to throw off incoming shells. The narrow tracks on the tank gives it a hard time to get a good grip on soft soil when in movement, making movement more efficient when on solid ground or road when wanting to move it around.
Modifications and economy
Armaments
Main armament
75 mm M3 | Turret rotation speed (°/s) | Reloading rate (seconds) | |||||||||||
---|---|---|---|---|---|---|---|---|---|---|---|---|---|
Mode | Capacity | Vertical | Horizontal | Stabilizer | Stock | Upgraded | Full | Expert | Aced | Stock | Full | Expert | Aced |
Arcade | 71 | -10°/+25° | ±180° | Vertical | 22.8 | 31.6 | 38.4 | 42.5 | 45.2 | 6.50 | 5.75 | 5.30 | 5.00 |
Realistic | 14.3 | 16.8 | 20.4 | 22.6 | 24.0 |
Ammunition
Penetration statistics | |||||||
---|---|---|---|---|---|---|---|
Ammunition | Type of warhead |
Penetration @ 0° Angle of Attack (mm) | |||||
10 m | 100 m | 500 m | 1,000 m | 1,500 m | 2,000 m | ||
M72 shot | AP | 91 | 88 | 78 | 67 | 57 | 49 |
M48 shell | HE | 10 | 10 | 10 | 10 | 10 | 10 |
M61 shot | APCBC | 104 | 102 | 93 | 84 | 75 | 68 |
Shell details | ||||||||||||
---|---|---|---|---|---|---|---|---|---|---|---|---|
Ammunition | Type of warhead |
Velocity (m/s) |
Projectile mass (kg) |
Fuse delay (m) |
Fuse sensitivity (mm) |
Explosive mass (TNT equivalent) (g) |
Ricochet | |||||
0% | 50% | 100% | ||||||||||
M72 shot | AP | 619 | 6.3 | - | - | - | 47° | 60° | 65° | |||
M48 shell | HE | 463 | 6.3 | 0.2 | 0.1 | 666 | 79° | 80° | 81° | |||
M61 shot | APCBC | 618 | 6.79 | 1.2 | 14 | 63.7 | 48° | 63° | 71° |
Smoke shell characteristics | ||||||
---|---|---|---|---|---|---|
Ammunition | Velocity (m/s) |
Projectile mass (kg) |
Screen radius (m) |
Screen deploy time (s) |
Screen hold time (s) |
Explosive mass (TNT equivalent) (g) |
M89 | 259 | 3 | 9 | 5 | 20 | 50 |
Ammo racks
Full ammo |
1st rack empty |
2nd rack empty |
3rd rack empty |
Visual discrepancy |
---|---|---|---|---|
71 | 66 (+5) | 31 (+40) | 1 (+70) | No |
Note:
- Shells are modeled individually and disappear from the rack after having been shot or loaded.
Machine guns
12.7 mm M2HB | ||||
---|---|---|---|---|
Mount | Capacity (Belt) | Fire rate | Vertical | Horizontal |
Pintle | 600 (200) | 576 | -10°/+30° | ±60° |
7.62 mm M1919A4 | ||||
---|---|---|---|---|
Mount | Capacity (Belt) | Fire rate | Vertical | Horizontal |
Coaxial | 3,000 (250) | 500 | N/A | N/A |
Usage in battles
Similar to the other 75 mm Shermans, the M4A1 (75) W has a good gun that can take out most opponents even when uptiered. The tank can handle itself against enemies, but it's never a problem to work with your team in it, cover your allies when they are moving forward. The M4A1 (75) W's vertical stabilizer allows it to aim during stops or at low speed, providing a major advantage in engagements with other medium tanks, though other Shermans and some US and British tanks also have access to one. While rival M4 tanks would not be a threat to a seasoned player, they can prove a nuisance to beginners.
The M4A1 (75) W has effective frontal armour for most common enemies you will face in a downtier, but the armour is relative weak against enemies in an uptier. Enemies that should be prioritized in deadliness are mainly tank destroyers since their guns will easily penetrate the M4A1's armour.
When facing these dangerous enemies, it is best to move around them and flank their sides, especially since vehicles like the Jagdpanzer IV or SU-85 have strong sloped armour that makes the 75 mm M3 inefficient against the front plate.
Against the M4A1 (75) W
Light tank/SPAA - Light vehicles with below-average penetration may struggle to fight an M4A1 frontally. Take advantage of weak spots: the hull side armour at the front wraps into the upper front plate, forming a visible and thin triangular section on each side right above the front sprocket wheel. It is only 38 mm thick like the side and is much thinner than the front plate, so as long as a round has ~55 mm penetration, it can penetrate them and knock out some crew. The top of the upper front plate has the thin hull roof wrap down, allowing for easy penetration. The spherical hull MG has thin armour, but is hard to hit, and its shape can cause ricochets, but penetrating this area guarantees a crew kill. SPAAs, with their rapid-firing autocannons, will make short work of the thin side armour by firing long bursts across the entire side if it is exposed. Other than these areas, the M4A1 is quite sturdy, with a strong front plate and turret.
Medium tanks/Heavy tanks - For medium and heavy tanks, the above weak spots are even easier to exploit. Some might be wanting to shoot the turret, but American turrets are popular for their sturdiness. Although the thickness of the turret front is 63 mm, the gun mantlet, covering most of the turret front, is actually 88 mm with slight angles. There are also thick framing around the gun barrel and the edge of the mantlet that can go up to 300 mm in thickness. Therefore for common medium tanks with average cannons, it is best to avoid the mantlet from the front. If you face an M4A1 that's hull-down, you can shoot the front turret roof with APHE, which despite its angling is still thin and can be easily penetrated.
Tank destroyers - These vehicles with more powerful guns can generally easily penetrate the M4A1's hull. If you are to fire at the turret front, avoid the edges of the gun mantlet and the surroundings of the gun barrel, as the armour there is much thicker.
Enemies worth noting:
M4A2/A4 - These Sherman tanks are widely used by over 3 nations that spread across both the Allied and the Axis side, so no matter which nation you play they can be quite tough to destroy in the hands of a skilled tanker. Given the rather weak penetration of your short 75 mm gun, their hull can be almost impossible to penetrate when angled, hull down or 300 m away. For an M4A4, there are 2 bulges on the upper front plate, a penetration through there is a guaranteed kill most of the times. But in case the opponent covers them up or when it's an M4A2, aim for the middle parts of the gun mantlet or the turret armour unprotected by the mantlet, you can at least make them defenceless. Note that their guns are equally weak against you, so wiggle around to disrupt their aim while you reload, you have a good chance of bouncing some shells.
KV-1 (ZiS-5) - While the L-11 is underpowered, the ZiS-5 is potent enough to punch through the Sherman's front, and the Sherman is unable to penetrate the KV-1's thick armour especially with its add-on armour plates. If this heavy tank is encountered and it's angling the hull, you can aim at the gun breech as its flat armour can be somewhat reliably penetrated. If it is directly facing you, you can shoot at the driver's port or hull mg to easily take out the entire crew. Take advantage of your stabilizer to fire before the KV-1.
Churchill I, Churchill III, Pz.Kpfw. Churchill - The Churchills, with their complex hulls and sturdy turrets, can be quite hard to kill at range. Again, manoeuvre as close to them as possible, the ideal distance being no more than 200 m. If they are angling their hull but facing their turret at you, go for the turret as their big tracks can easily get in front of the frontal hull. . For the Mk I Churchills, aim at the flattest part of their rounded cheeks to ensure successful penetrations. For the Mk III and the German Churchill, shoot at the turret front or roof. The shell should go in easily and knock out most, if not all of the crew. If you are facing an unangled Churchill you can shoot the hull, as your shells can easily penetrate their flat front. The huge side hull is easily penetrated, but you should take care around the side doors and turret rear, as they can be quite thick.
Pz.IV G, H and J - The historical nemesis of the Sherman, the later Panzer IVs are one of the Sherman's more serious threats at this rank. The long barrel 75 mm gun will easily penetrate the Sherman from the front. However their flat armour allows them to easily be penetrated in return. Under 500 m, the front and turret are easily penetrated, but after that, it is advised to aim for the turret.
StuG III F/G - Another historical nemesis of the Sherman, and another big threat. The StuG III packs the same punch as the Panzer IV line with its long barrel 75 mm gun, whilst losing the turret. Lacking a turret means that it will have to traverse the whole vehicle to target an enemy, but it also means that it has a lower profile. The StuG's armour profile is also more complex than the Panzer IV, with less flat areas. Certain areas are sloped and very bouncy. Luckily, there are big weak spots, two flat plates at the front and thin front sides. The right side contains the driver gunner and commander, while the left contains the ammo and loader, shooting either of them will easily knock it out with a single shot.
R3 T20 FA-HS - This speedy wheeled vehicle can circle around you with ease and take out all your crew with its fast-firing autocannon. In a close encounter, never expose your side to it, and do not even angle your hull. Face your hull directly to the R3, as angling it will only expose your frontal weak spots. You can use your HMG to easily kill the R3 with its good penetration and rate of fire.
Pros and cons
Pros:
- Sloped hull armour and thick frontal turret can deflect shells sometimes
- APCBC shell is effective against common opponents
- Vertical stabiliser allows the tank to fire on the move, or shoot first in a sudden encounter
- Quick turret traverse
- Fast reload
- Effective in rough terrain and hull-down positions due to its 10° gun depression and 90+ mm gun mantlet
- HMG can effectively damage light vehicles (R3 T20, VFW) or shoot down aircraft
- Wet ammo stowage reduces chance of being ammo-racked
Cons:
- Narrow tracks make it sluggish at turning
- Weak 38 mm side, even rank I vehicles can penetrate
- Gun has somewhat slow velocity and a curved trajectory. Makes it harder to aim at far targets
- High profile compared to other medium tanks
- Armour can't resist tanks like Pz.IV H or 76 mm Sherman
- The cast hull creates frontal weak spots with very little effective thickness, ie. the triangles between upper front plate and the side, and the curved hull hatches
History
The armoured forces of the Republic of China Army, which were mainly equipped with Stuart light tanks and captured Japanese tanks, had repeatedly suffered defeats during the civil war. Major General Chiang Wei-kuo, Chief of staff of the Armored Forces Command at the time, sought out US military surplus materials, especially armoured vehicles and tanks from Guam, Ryukyu, Philippines and other theaters, in order to arm his units.
While purchasing and repairing surplus equipment from the US military, Chiang asked the British government to purchase 100 M4 Sherman medium tanks, communicating via the British Consul General in Taipei, C. Krentz. At the time, numerous excess tanks were being demilitarized in the scrapyards throughout Europe, and the Consul General eventually obtained export licenses for 85 of those scrapped tanks.
In the process of purchasing these used tanks, Krentz obtained the tank export permit under the cover of transporting them back to the United States for restoration, while in reality the tanks were heading for Taiwan through the Suez Canal. Since the U.S. refused to provide any form of military assistance to Republic of China at the time, the Office of Chinese Affairs of the US Department of State requested the British Foreign Office to revoke the export permit of those Sherman tanks and detain the rest. Despite the obstruction by the United States, a total of 30 M4 Sherman tanks were loaded and delivered, arriving in Kaohsiung Port on December 12, 1949.
The M4 Sherman tanks that arrived in Taiwan included 6 M4A1 (76) Ws mounted with D82081 turret, 2 M4A1 (76) Ws mounted with D50878 turret, and 22 M4A4 remanufacturing models. As these scrap tanks had been demilitarized and Taiwan lacked the ability to repair their 76 mm tank cannons, all M4A1 (76) W tanks were re-equipped with 75 mm cannons instead. This batch of M4 Sherman tanks was officially equipped by the Republic of China Armoured Corps in June 1950, and was inspected by President Chiang Kai-shek on November 8, 1950. After the first batch of M18 Hellcat tank destroyers from the United States arrived in Taiwan in 1952, all M4 Shermans in the ROCA Armoured Forces were retired from active service. One remaining M4A1 (75) W is currently on public display in Chenk-Kung Hill Camp, Taichung.
Media
- Skins
- Videos
See also
Links to the articles on the War Thunder Wiki that you think will be useful for the reader, for example:
- reference to the series of the vehicles;
- links to approximate analogues of other nations and research trees.
External links
Paste links to sources and external resources, such as:
- topic on the official game forum;
- other literature.
China medium tanks | |
---|---|
ZTZ59 | Type 59 · ZTZ59A · ZTZ59D1 |
ZTZ69 | Type 69 · Type 69-IIa · T-69 II G |
ZTZ88/96 | ZTZ88A · ZTZ88B |
ZTZ96 · ZTZ96A · ZTZ96A (P) | |
ZTZ99 | ZTZ99-II · ZTZ99-III |
ZTZ99A | ZTZ99A · WZ1001(E) LCT |
Export series | MBT-2000 · VT4A1 |
ROC | CM11 |
Other | Т-34-85 Gai · Object 122MT "MC" |
Japan | ␗Chi-Ha · ␗Chi-Ha Kai |
USA | ␗M4A4 · ␗M4A4 (1st PTG) · ␗M4A1 (75) W · ␗M48A1 · ␗M60A3 TTS |
USSR | ␗T-34 (1943) · ␗Т-34-85 (S-53) · T-34-85 No.215 · Т-62 №545 |