Type 75 SPH

From War Thunder Wiki
Jump to: navigation, search
RANK 6 BRITAIN
Rooikat 105 PACK
This page is about the Japanese SPH Type 75 SPH. For other versions, see Type 73 (Family).
Type 75 SPH
jp_type_75.png
GarageImage Type 75 SPH.jpg
ArtImage Type 75 SPH.png
Type 75 SPH
AB RB SB
6.7 6.3 6.3
Research:63 000 Specs-Card-Exp.png
Purchase:200 000 Specs-Card-Lion.png
Show in game

Description

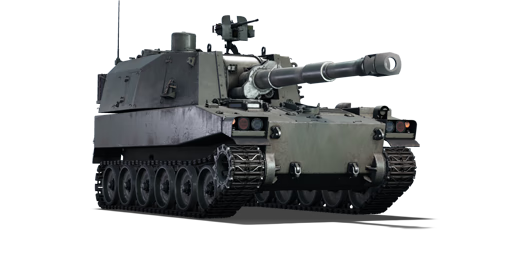
The Type 75 155 mm SPH (75式自走155mmりゅう弾砲) belonged to the second generation of Japanese self-propelled howitzers, along with the Type 74 105 mm SPH. These models were designed to replace the US-leased M44 155mm SPH and M52 105mm SPH, respectively. Development kicked off in 1965, aligning with the initiation of development phases for the Type 74 MBT and Type 73 APC, resulting in shared component usage. Following NATO standardization, the calibre of the new SPH was set at 155 mm. The prototype stage, initiated in 1969 under the 155HSP program, saw MHI developing the hull, while JSW worked on the domestic 155 mm cannon. Various iterations of the 155HSP, testing barrel lengths (L/24 & L/30), auto-loader mechanics, and additional features, culminated in the finalization of the vehicle in December 1974 as the Type 75 155 mm SPH, equipped with the domestic JSW L/30.

It was introduced in Update 1.91 "Night Vision". The standout feature of the Type 75, when compared to counterparts like the M109, 2S3M, and similar vehicles, is the use of an automated 10-second loading feed. The L/30, while reasonably sized, provides slightly higher velocity than the 155 L/24 of the M109(G) but exhibits a greater drop than the 155 L/39 of the M109A1 or 152 mm Warsaw Pact cannons. However, this drop can be mitigated by loading the domestic Type 75 HE shell, albeit at the expense of lower HE filler for increased velocity. The armour, typical of many self-propelled howitzers, only offers protection against distant rifle calibre fire and explosion fragments, rendering it unreliable in direct combat.

Nicknames
  • JGSDF Abbreviation: 75HSP / SP - (Howitzer) Self-Propelled

General info

Survivability and armour

Armourfront / side / back
Hull30 / 30 / 30
Turret30 / 30 / 30
Crew6 people
Visibility96 %

The armour of Type 75 SPH resists 7.62 mm machine gun fire from any side and can sustain 12.7 mm rounds when angled from any side, however, the hull is made out of aluminium, so it's actual effective armour is around 15 mm. Because of that, the tank can be knocked out by large-calibre HE shells.

For that reason, it is not recommended to drive to hostile tanks closer than 300 m and slightly angle to avoid being shot with MG from the side and about 700 m to avoid unnecessary damage. Slightly angle the tank towards passageways to have a chance of making a reply shot. Do not angle too much, to avoid exposing your sides or triggering fuses on rank V APHE, which mostly has 19 mm trigger with exception of German and some US tanks which have 14 mm sensitive fuse.

Front of the hull can take the most of the MG punishment due to various modules taking damage for the crew, with high chance of just being set on fire instead, however, if enemy aims for the turret they will eventually hit weaker flat parts and hit the non-critical crew with a chance of taking out the gunner. Keep your opponents on your left to prevent that from happening.

The right front side of the hull houses the driver. They are sealed away from turret compartment by the engine and fuel tanks. The turret houses the rest of the crew. Quite often, explosive damage to one section does nothing to the other, however, pure AP shells can potentially penetrate modules and destroy crew in both of the sections, or hit the charges on the floor of the turret.

Armour type:

  • Aluminium alloy 7039 (hull, turret)
Armour Front (Slope angle) Sides Rear Roof
Hull 30 mm (13°) Front glacis
30 mm (52°) Lower glacis
30 mm Top
30 mm Bottom
30 mm (1°) 25 mm
5 mm Radiators
Turret 30 mm (13-16°) Turret front
30 mm Gun mantlet
20 mm Barrel shroud
30 mm (13-47°) 30 mm (1°) 25 mm
30 mm Gun mantlet

Notes:

  • Suspension wheels and tracks are 20 mm thick.
  • Belly armour is 25 mm thick.
  • Belly armour above tracks is 35 mm thick.
  • One 8 mm structural steel plate separates the engine compartment from the crew compartments.

Mobility

Speedforward / back
AB52 / 21 km/h
RB and SB48 / 19 km/h
Number of gears8 forward
2 back
Weight25.3 t
Engine power
AB992 hp
RB and SB520 hp
Power-to-weight ratio
AB39.2 hp/t
RB and SB20.6 hp/t
Game Mode Max Speed (km/h) Weight (tons) Engine power (horsepower) Power-to-weight ratio (hp/ton)
Forward Reverse Stock Upgraded Stock Upgraded
Arcade 52 21 25.3 738 992 29.17 39.21
Realistic 48 19 460 520 18.18 20.55

The Type 75 SPH can move surprisingly fast and can challenge the T-54 (1947) when driving on flat terrain.

The problems start when the terrain is less than perfectly flat, as Type 75 SPH's suspension is very stiff. Something as mundane as trenches will not just slow down stock Type 75 SPH, but stop it entirely and leave it struggling to drive over it. Upgrades to chassis make this problem less jarring but it still exists.

Modifications and economy

Repair costBasic → Reference
AB3 529 → 4 668 Sl icon.png
RB3 784 → 5 006 Sl icon.png
SB5 271 → 6 973 Sl icon.png
Total cost of modifications52 700 Rp icon.png
90 700 Sl icon.png
Talisman cost1 700 Ge icon.png
Crew training57 000 Sl icon.png
Experts200 000 Sl icon.png
Aces800 Ge icon.png
Research Aces520 000 Rp icon.png
Reward for battleAB / RB / SB
120 / 190 / 250 % Sl icon.png
172 / 172 / 172 % Rp icon.png
Modifications
Mobility Protection Firepower
Mods new tank traks.png
Tracks
Research:
2 600 Rp icon.png
Cost:
4 500 Sl icon.png
145 Ge icon.png
Mods new tank suspension.png
Suspension
Research:
2 400 Rp icon.png
Cost:
4 100 Sl icon.png
135 Ge icon.png
Mods new tank break.png
Brake System
Research:
2 400 Rp icon.png
Cost:
4 100 Sl icon.png
135 Ge icon.png
Mods new tank filter.png
Filters
Research:
3 300 Rp icon.png
Cost:
5 700 Sl icon.png
185 Ge icon.png
Mods new tank transmission.png
Transmission
Research:
5 700 Rp icon.png
Cost:
9 800 Sl icon.png
320 Ge icon.png
Mods new tank engine.png
Engine
Research:
5 700 Rp icon.png
Cost:
9 800 Sl icon.png
320 Ge icon.png
Mods tank tool kit.png
Improved Parts
Research:
2 600 Rp icon.png
Cost:
4 500 Sl icon.png
145 Ge icon.png
Mods extinguisher.png
Improved FPE
Research:
2 400 Rp icon.png
Cost:
4 100 Sl icon.png
135 Ge icon.png
Mods tank reinforcement jp.png
Crew Replenishment
Research:
3 300 Rp icon.png
Cost:
5 700 Sl icon.png
185 Ge icon.png
Mods new tank horizontal aiming.png
Horizontal Drive
Research:
2 600 Rp icon.png
Cost:
4 500 Sl icon.png
145 Ge icon.png
Mods tank ammo.png
155mm_M110_Smoke_ammo_pack
Research:
2 600 Rp icon.png
Cost:
4 500 Sl icon.png
145 Ge icon.png
Mods tank cannon.png
Adjustment of Fire
Research:
2 400 Rp icon.png
Cost:
4 100 Sl icon.png
135 Ge icon.png
Mods tank ammo.png
155mm_M107_HE_PF_ammo_pack
Research:
2 400 Rp icon.png
Cost:
4 100 Sl icon.png
135 Ge icon.png
Mods new tank vertical aiming.png
Elevation Mechanism
Research:
3 300 Rp icon.png
Cost:
5 700 Sl icon.png
185 Ge icon.png
Mods tank ammo.png
155mm_Type_75_HE_ammo_pack
Research:
3 300 Rp icon.png
Cost:
5 700 Sl icon.png
185 Ge icon.png
Mods night vision device.png
NVD
Research:
5 700 Rp icon.png
Cost:
9 800 Sl icon.png
320 Ge icon.png

Armaments

Night vision device
Improves visibility by enhancing natural light or active illumination.

Main armament

155 mm NSJ L/30 cannon
Autoloader
Automatically feeds projectiles into the breech. The speed does not depend on the skills of the loader
Ammunition28 rounds
First-order18 rounds
Reload10.0 s
Vertical guidance-5° / 65°
Main article: NSJ L/30 (155 mm)
In arcade mode, Type 75 SPH can act even as artillery - find a target about 1,200 meters away, go to sniper seat, aim at them, adjust the gun distance to their position and fire. There is nothing they can do about it because you can fire like this even over mountains. This trick is unlikely to work in RB due to inferior rangefinding capability.

155 mm cannon of this tank destroyer is capable of launching High Explosive shells at the enemy. It does not carry any other offensive ammunition, however, it carries three different types of HE. What separates its gun from most of other "Demolition tanks" is that it has the autoloader, which allows it to reload at least three times faster than the ones that do not, which is insane. As a side effect, the reload speed is not affected by the crew skills and status and will always remain the same.

The gun is surprisingly accurate even when stock at up to ~700 m ranges and can still hit even past 1 kilometre away. While it does not hit the exact mark, it is usually good enough. However, when braking, the gun can bounce, so some care should be taken when fighting at close range.

When compared to the clearly similar artillery tanks, the Type 75 SPH's weapon claims the middle ground with a focus on combat support and versatility.

155 mm NSJ L/30 Turret rotation speed (°/s) Reloading rate (seconds)
Mode Capacity Vertical Horizontal Stabilizer Stock Upgraded Full Expert Aced Autoloader
Arcade 28 -5°/+65° ±180° - 10.6 14.6 17.8 19.6 20.9 10.00
Realistic 7.1 8.4 10.2 11.3 12.0

Ammunition

  • M107: Your stock HE shell. It can essentially destroy almost any tank that doesn't have ERA shielding in one hit. As with other HE tanks, like the Ho-Ro, it can't penetrate armour directly on many tanks, so one has to aim for cupolas, machine guns, chassis and other weak spots. For example the M103 have great frontal armour, but it can be simply shot at the turret base, and the shockwave will breach hull roof armour and hit the ammo rack located just below the turret in the hull, resulting in instant destruction.
  • M107 (PF): Also an HE shell like the M107, but with a 3 m proximity fuse, so it does not explode upon impact but earlier instead, when the radio fuse (inside the shell) detects an obstacle nearby. Notice that this is a proximity fuse, and not a radio fuse. This means that the fuse will not detect the aircraft unless in immediate proximity (3 m radius).
  • Type 75: This HE shell doesn't have a proximity fuse, but its muzzle velocity is faster, which make it more reliable at over 1 km range and allows for significantly easier and faster aim in RB. It was achieved by reducing its penetration power.
  • M110: It is also possible to fire a smoke shell to blind enemy snipers or to hide someone on your team.

Penetration statistics
Ammunition Type of
warhead
Penetration @ 0° Angle of Attack (mm)
10 m 100 m 500 m 1,000 m 1,500 m 2,000 m
M107 HE 61 61 61 61 61 61
M107 (PF) HE-VT 61 61 61 61 61 61
Type 75 HE 54 54 54 54 54 54
Proximity-fused shell details
Ammunition Type of
warhead
Velocity
(m/s)
Projectile
mass (kg)
Fuse delay
(m)
Fuse sensitivity
(mm)
Arming
distance (m)
Trigger
radius (m)
Explosive mass
(TNT equivalent) (kg)
Ricochet
0% 50% 100%
M107 HE 580 43.1 0 0.1 - - 9.14 79° 80° 81°
M107 (PF) HE-VT 580 43.1 - - 300 3 9.14 79° 80° 81°
Type 75 HE 720 43.6 0 0.1 - - 6.80 79° 80° 81°
Smoke shell characteristics
Ammunition Velocity
(m/s)
Projectile
mass (kg)
Screen radius
(m)
Screen deploy
time (s)
Screen hold
time (s)
Explosive mass
(TNT equivalent) (g)
M110 563 40.8 25 5 30 50

Ammo racks

Ammo racks of the Type 75 SPH
Full
ammo
Ammo
part
1st
rack empty
2nd
rack empty
3rd
rack empty
Visual
discrepancy
28 Projectiles
Propellants
19 (+9)
19 (+9)
10 (+18)
(+27)
(+27)
N/A
No

Notes:

  • Projectiles and propellant bags are modeled individually and disappear after having been shot or loaded.

Projectiles:

  • Racks 2 and 3 (autoloader magazines) are first stage ammo racks. They total 18 shells.
  • These racks get filled first when loading up the tank and are also emptied first.
  • As it is equipped with an autoloader, manual reloading of the gun is not possible.
  • Once the autoloader magazines have been depleted, you can't shoot until the loader has restocked the autoloader. The restocking time is longer than the normal reload time of the gun. Take this into account when playing.
  • Simply not firing when the gun is loaded will move ammo from rack 1 into racks 2 and 3. Firing will interrupt the restocking of the ready racks.
  • The depletion order at full capacity is: 2 - 3 - 1.

Propellants:

  • Rack 2 contains 18 propellant bags (14 from the forward rack + 4 from the rear rack)
  • Rack 1 contains only 10 bags on the rear rack.
  • Simply not firing when the gun is loaded will move ammo from rack 1 into rack 2. Firing will interrupt the restocking of the ready racks.
  • The depletion order at full capacity is: 2 - 1.

Optics and night vision

Type 75 SPH Optics
Type of optic Magnification Night Vision Devices
Image Intensifier Thermal Imager
Resolution
Notes
Resolution Light Mult Noise Level
Gunner's Sight X4 N/A N/A N/A Not Fitted
Commander's View X6 N/A N/A N/A Not Fitted
Driver's View X1 / 3PV 800X600 ___ high Not Fitted Only useable with an upgrade

Machine guns

Ammunition600 rounds
Belt capacity200 rounds
Reload8.0 s
Fire rate575 shots/min
Vertical guidance-8° / 45°
Main article: M2HB (12.7 mm)
12.7 mm M2HB
Mount Capacity (Belt) Fire rate Vertical Horizontal
Pintle 600 (200) 575 -8°/+45° ±180°
  • The roof mounted 12.7 mm M2HB machine gun can be used to repel hostile light tanks and low flying aircraft.

Usage in battles

This vehicle is very powerful with its high explosive and fuze shells, however it comes at a cost. The Type 75 is the very definition of a glass cannon: this vehicle is incredible at close range engagements, but can not snipe long distances as it is an artillery howitzer. It is recommended that you watch your surroundings as this vehicle has so little armour that machines guns alone can penetrate your armour. Used right, this vehicle can dominate the battlefield as its proximity fuze shell can easily take out an enemy behind cover.

It is highly recommended to become familiar with large maps. Experiment on large maps using some landmarks to help with long distance aiming.

The Type 75 has an almost unique ability to annihilate tanks that are hiding behind cover completely, which is usually something only an ATGM carrier can do. Its HE shells allow to exploit weak spots and openings in the armour of battle tanks, which are normally not penetrable by contact explosives, although it's not 100% reliable and might take several shots. The HE-VT shell with a proximity fuse is perfect to engage targets while staying behind cover. Keep in mind that it must still fly at least 300 m away from your tank to activate, so it will not work at close range.

It will also react to the ground surface, so try to overshoot your opponent so that the shell remains higher than 3 m from the ground before it reaches your target. In many cases, the proximity fuse shell will detonate before reaching the enemy, due to nearby obstacles accidentally triggering the fuse.

Not every tank should be attacked with a proximity shell, as it's not always beneficial. For example, Soviet medium and heavy tanks do not have any glaring weak spots, which can be potentially hit by an airburst shockwave, so they should only be attacked by normal HE ammo. On contrary, their SPAA and light tanks are as vulnerable as they are dangerous, and so it is reasonable to try and spend some proximity shells to weed them out, instead of leaving your cover and risking being annihilated by suppressing fire.

Pros and cons

Pros:

  • Unlike almost all other heavy demolition tanks, like the FV4005 and the 2S3M, the Type 75 has a fully automatic autoloader and will always reload about as fast as a medium tank
  • The low velocity of the stock shell makes it possible to fire from behind some hills while keeping most of the Type 75 hidden
  • Has the privilege of the proximity fuse shell, which allows tank destroyers to take out enemies behind cover and exploit their normally untouchable weaknesses
  • Angled turret can sustain a point-blank fire of 12.7 mm and some damage can be taken without instantly exploding the tank or reducing reload speed down to 1.5 minutes like in the case of FV4005, although an enemy should be kept on the left side to have a chance of survival

Cons:

  • Can be destroyed easily by large-calibre explosive shells or ATGM hitting the turret or the back of the tank, the operator can't be oblivious of their surroundings
  • Most of critical components and crew are located in the turret, meaning it can be destroyed or incapacitated in one good hit to the turret
  • Turret is rather slow, though movements are mostly smooth
  • 12.7 mm rounds have no problem penetrating the front of the turret
  • Noticeably bouncy when braking

History

Development of the Type 75 self-propelled howitzer began in the late 1960s, when Japan sought to procure a mobile self-propelled artillery unit alongside a smaller caliber SPG. This resulted in the creation of the Type 75 and Type 74, respectively.

The Type 75's design was largely based on that of the existing Type 74 SPG and Type 73 APCs, sharing many components and even assembly lines, all in an effort to reduce costs and save resources. Development was split between two Japanese companies, with Mitsubishi Heavy Industries developing the chassis, while Japan Steel Works developed the turret and cannon.

Two prototypes were ready by the early 1970s, differing only in the type of loading mechanism used. Trials of these prototypes were conducted between 1973 - 1974. In October 1975, based on the test results, the prototype with a drum-fed autoloading mechanism was picked for series production.

Production of the Type 75 commenced in 1975 and went on until 1988, when all of the initially ordered 201 units were built. Although the Type 75 is still in active service with the JGSDF since their initial introduction in 1975, the number of units has gradually been decreasing in recent years as the Type 75 is slowly being phased out and replaced by the Type 99 155mm self-propelled howitzer.

The Type 75 has not yet participated in any combat operations during its service life and has been exclusively operated by the JGSDF thus far.

- From Devblog

Media

Skins
Videos

See also

External links


Mitsubishi Heavy Industries Ltd. (三菱重工業株式会社)
Ground Vehicles 
APC  Type 60 · SUB-I-II
IFV  Type 89
MCV  Type 16 (P) · Type 16 (FPS) · Type 16
SPH  Type 75 · Type 99
SPAAG  Type 87
Main Battle Tanks 
Type 61  ST-A1 · ST-A2 · ST-A3 · Type 61
Type 74  ST-B2 · Type 74 (C) · Type 74 (E) · Type 74 (F) · Type 74 (G)
Type 90  Type 90 · Type 90 (B)
Type 10  TKX (P) · TKX · Type 10
Air Vehicles 
Jet Fighters 
F-86  F-86F-30 ▅* · F-86F-40 ▅* · F-86F-40 JASDF▅*
F-104  F-104J*
F-1  T-2 Early · T-2 · F-1
F-4  F-4EJ Phantom II* · F-4EJ ADTW* · F-4EJ Kai Phantom II*
F-15  F-15J*
Naval Vehicles 
Patrol Boats (PT) 
No. 7 class  PT-8 (PT-808)
No. 11 class  PT-15 (PT-815)
Destroyers (DD) 
Harukaze-class  JDS Harukaze (DD-101)
Ayanami-class  JDS Ayanami (DD-103)
  MHI's shipyards are positioned in Kobe, Nagasaki, and Shimonoseki
  * Licensed Production / Variants
See also  Mitsubishi Aircraft Company (1928-1945) · Mitsubishi Heavy Industries Ltd. (1938-1945) · Mitsubishi Shipbuilding Company (1884-1945)
  North American Aviation · Lockheed · McDonnell Aircraft Corporation

Japan tank destroyers
Ro-Go Derivatives  Ro-Go Exp.
Chi-Ha Derivatives  Ho-Ni I · Ho-Ni III · Ho-Ro · Chi-Ha LG
Ho-Ri  Ho-Ri Prototype · Ho-Ri Production
Other  Na-To
JGSDF 
SPRG  Type 60 (C)
SPH  Type 75 · Type 99
ATGM  Type 60 ATM
Rocket  Type 75 MLRS
USA  ▅M36