M6A2E1

From War Thunder Wiki
Jump to: navigation, search
M6A2E1
us_m6a2e1.png
GarageImage M6A2E1.jpg
ArtImage M6A2E1.png
M6A2E1
AB RB SB
6.7 6.7 6.7
Show in game
MARKET

Description

America's primary heavy tank for the majority of World War II was the Heavy Tank M6 that saw production in 1942. However, the US Armored Force saw no need for a heavy tank and so the M6 heavy tank production was cancelled after 40 vehicles were produced. Despite that, Ordnance Department continued to envision new utilities for the heavy tank and developed an upgunned M6A2E1 with a 105 mm T5E1 gun in anticipation of fighting fortifications in Europe. Planning to convert their existing heavy tanks with a new gun and uparmoured front hull for this role, it was ultimately rejected by General Eisenhower in August 1944 as impractical for the European theater. Only two M6A2E1s without the uparmoured front hull were constructed in order to test components for the T29 heavy tank.
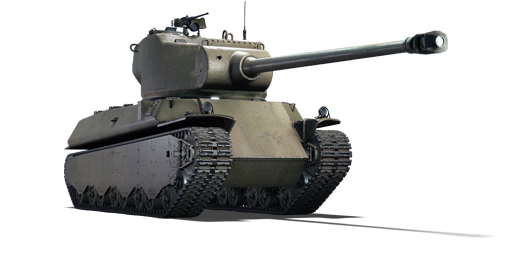
The Heavy Tank M6A2E1 in War Thunder, a premium vehicle introduced during Update "Ixwa Strike" as a reward for Battle Pass: Season III, "Strength athletics", presents itself in its full might with the 105 mm gun and a stronger front hull glacis. The profile of the tank is large, with the gun and turret being gigantic compared to the size of the hull. The 105 mm can handle the majority of the enemy the Heavy Tank M6A2E1 will encounter, though this is balanced by the fact that the hull is very vulnerable. The only respectable armour is the hull and turret front, but the former can be rather easily penetrated by other heavy tank armament except in very long ranges. The best armour on the Heavy Tank M6A2E1 is the turret front, which pairs well with a hull-down gameplay and the turret's -10 degree gun depression for fighting the enemy. The main complication then for players is to find a suitable enough terrain that can hide the majority of the vulnerable hull while giving the turret the clearance needed to attack the enemy.

General info

Survivability and armour

Armourfront / side / back
Hull140 / 60 / 41
Turret229 / 89 / 208
Crew5 people
Visibility214 %

The M6A2E1 has overall a good armour: the round turret is extremely thick, stops most shells, with the exception of APDS and HEATFS projectiles. Taller than the M6A1, the M6A2E1 will be easily spotted and targeted by enemy players with its huge turret. The reinforced front hull armour can bounce a shot: the UFP lower section is surprisingly thick (thanks to the hull's shape) and can absorb the common 88 mm Tiger II shells when hit there, making hull down tactics even more effective. Being a large vehicle, a hit to the hull will usually mean only losing one crew member as the crew sits well spaced. The M6A2E1 has a thick turret rear that makes destroying this tank from behind a tough task, leaving the player a chance to respond to the attack. The engine and the transmission are all positioned in the back, absorbing shells from the rear and making frontal shots unable to immobilize the tank.

However, several weak spots are easy to penetrate. The angled hull cheeks of the frontal hull armour prevent effective angling and are so thinly armoured that even low tier tank destroyers can penetrate. The turret ring itself is a weak spot easy to target from any direction, most likely immobilizing the tank if the penetration is successful. The left upper front part of the turret, while small and thus difficult to target, is also a weak spot (thin and flat).

Armour type:

  • Rolled homogeneous armour (sideskirts, hull front - appliqué armour , hull roof - engine compartment, cupola roof)
  • Cast homogeneous armour (hull, turret, gun mantlet, cupola)
Armour Front (Slope angle) Sides Rear Roof
Hull 50.4 mm (44°) + 112 mm (29°) Upper glacis
50.4 mm (46°) + 133 mm (cylindrical) Lower glacis
70 mm (26°) Corners
58 mm (30°) Top
51 + 25.4 mm Bottom
42 mm (16°) Top
22-105 mm Bottom
16 - 22 mm
25.4 mm Engine compartment
5 mm Engine vents
Turret 230-275 mm Turret front
133-235 mm Gun mantlet
84 mm Upper turret front
65-89 mm 210-230 mm Top
125-220 mm Bottom
25-32 mm
27-31 mm Front
Cupola 76.2 mm 76.2 mm 76.2 mm 25.4 mm

Notes:

  • Suspension wheels are 15 mm thick, tracks are 30 mm thick, and bogies are 10 mm thick.

Mobility

Reverse gearbox
Forward and backward movement is possible at the same maximum speed
Speedforward / back
AB31 / 31 km/h
RB and SB29 / 29 km/h
Number of gears6 forward
6 back
Weight69.9 t
Engine power
AB1 526 hp
RB and SB800 hp
Power-to-weight ratio
AB21.8 hp/t
RB and SB11.4 hp/t
Game Mode Max Speed (km/h) Weight (tons) Engine power (horsepower) Power-to-weight ratio (hp/ton)
Forward Reverse Stock Upgraded Stock Upgraded
Arcade 31 31 69.9 1,033 1,526 14.78 21.83
Realistic 29 29 708 800 10.13 11.44

Modifications and economy

Repair cost
AB3 725 Sl icon.png
RB3 858 Sl icon.png
SB5 280 Sl icon.png
Crew training10 000 Sl icon.png
Experts440 000 Sl icon.png
Aces1 100 Ge icon.png
Research Aces1 380 000 Rp icon.png
Reward for battleAB / RB / SB
Talisman.png 2 × 150 / 210 / 240 % Sl icon.png
Talisman.png 2 × 196 / 196 / 196 % Rp icon.png
Modifications
Mobility Protection Firepower
Mods new tank traks.png
Tracks
Mods new tank suspension.png
Suspension
Mods new tank break.png
Brake System
Mods new tank filter.png
Filters
Mods new tank transmission.png
Transmission
Mods new tank engine.png
Engine
Mods tank tool kit.png
Improved Parts
Mods extinguisher.png
Improved FPE
Mods tank reinforcement us.png
Crew Replenishment
Mods new tank horizontal aiming.png
Horizontal Drive
Mods tank ammo.png
105mm_us_T13_APCBC_ammo_pack
Mods tank cannon.png
Adjustment of Fire
Mods tank ammo.png
105mm_us_T29E3_APCR_ammo_pack
Mods new tank vertical aiming.png
Elevation Mechanism

Armaments

Main armament

Ammunition60 rounds
First-order12 rounds
Reloadbasic crew → aces
20.0 → 15.4 s
Vertical guidance-10° / 15°
Main article: T5E1 (105 mm)
105 mm T5E1 Turret rotation speed (°/s) Reloading rate (seconds)
Mode Capacity Vertical Horizontal Stabilizer Stock Upgraded Full Expert Aced Stock Full Expert Aced
Arcade 60 -10°/+15° ±180° N/A 14.6 20.2 24.5 27.1 28.8 20.02 17.71 16.32 15.40
Realistic 10.7 12.6 15.3 16.9 18.0

Ammunition

Penetration statistics
Ammunition Type of
warhead
Penetration @ 0° Angle of Attack (mm)
10 m 100 m 500 m 1,000 m 1,500 m 2,000 m
T32 APCBC 256 253 238 221 205 190
T13 APCBC 253 250 236 219 204 190
T29E3 APCR 292 287 266 242 220 200
T30E1 HE 27 27 25 23 21 20
Shell details
Ammunition Type of
warhead
Velocity
(m/s)
Projectile
mass (kg)
Fuse delay
(m)
Fuse sensitivity
(mm)
Explosive mass
(TNT equivalent) (g)
Ricochet
0% 50% 100%
T32 APCBC 914 17.7 - - - 48° 63° 71°
T13 APCBC 899 18.59 1.2 19 177.38 48° 63° 71°
T29E3 APCR 1,128 11.2 - - - 66° 70° 72°
T30E1 HE 945 15.2 0.2 0.1 1,550 79° 80° 81°

Ammo racks

Ammo racks of the M6A2E1
Full
ammo
Ammo
type
1st
rack empty
2nd
rack empty
3rd
rack empty
4th
rack empty
5th
rack empty
Visual
discrepancy
60 Projectiles
Propellants
49 (+11)
37 (+23)
37 (+23)
25 (+35)
25 (+35)
13 (+47)
13 (+47)
(+59)
(+59)
N/A
No

Notes:

  • The M6A2E1 uses two-piece ammunition, composed of projectiles (yellow) and propellant bags (orange). Both have separate racks.
  • As they are modeled by sets of 2, projectiles and propellant bags disappear from the rack only after you fire both shells in the set.
  • To keep the hull empty of ammo, pack 13 (+47) shells.
  • For projectiles:
    • Rack 5 is a first stage ammo rack. It totals 12 projectiles and gets filled first when loading up the tank.
    • This racks is also emptied early: the rack depletion order at full capacity is: 5 - 1 - 2 - 3 - 4.
    • Simply not firing when the gun is loaded will move ammo from racks 1-4 into racks 5. Firing will interrupt the restocking of the ready racks.
  • For propellants:
    • Rack 4 is a first stage ammo rack. It totals 12 propellant charges and gets filled first when loading up the tank.
    • This racks is also emptied early: the rack depletion order at full capacity is: 4 - 1 - 2 - 3.
    • Simply not firing when the gun is loaded will move ammo from racks 1-3 into racks 4. Firing will interrupt the restocking of the ready racks.

Machine guns

Ammunition600 rounds
Belt capacity200 rounds
Reloadbasic crew → aces
10.4 → 8.0 s
Fire rate575 shots/min
Vertical guidance-10° / 50°
Horizontal guidance-120° / 120°
Ammunition4 000 rounds
Belt capacity250 rounds
Reloadbasic crew → aces
10.4 → 8.0 s
Fire rate500 shots/min
12.7 mm M2HB
Mount Capacity (Belt) Fire rate Vertical Horizontal
Pintle 600 (200) 577 -10°/+50° ±120°
7.62 mm M1919A4
Mount Capacity (Belt) Fire rate Vertical Horizontal
Coaxial 4,000 (250) 500 N/A N/A

Usage in battles

When driving the M6A2E1, one will easily notice the tank's turret is near indestructible: it can resist many shots as long as they aren't aimed at a trap shot or to the upper turret. The hull, however, isn't as indestructible: it may bounce a shot or two but it's not really reliable, especially with weak hull cheeks that any shot with explosive filler will instantly penetrate.

The M6A2E1 can do reasonably well in not extremely uneven terrain thanks to the depression angle of -10° and the tank's height can also be beneficial for shooting over cover that other vehicles wouldn't be able to, sometimes taking enemies by surprise.

With this tank, one of the most suitable strategies is to snipe. You have two ammunition options, APCBC with extra penetration or APCBC with explosive filler, both being devastating (105 mm shells create a lot of spalling). Find a suitable spot, try to expose only the turret, and deal with enemies coming at you. Most enemies will hopelessly shoot at your mantlet, some players will exploit your weak spots on the turret or may have high penetration HEATFS or APDS (uptiers are very dangerous for this tank and should play much more defensively). Your reload time is considerably long, so staying behind cover is the best thing possible when reloading. Your reverse speed thankfully lets you get away from a lot of dangerous situations faster than other tanks.

Despite having imperfect armour and notable weak spots, a lot of enemies in a downtier won't know how to penetrate with such a big target (only 4 weak spots presented, both hull cheeks, turret ring and turret upper front, with the trap shot being a matter of luck) and planes won't have an easy time damaging the M6A2E1 with their cannons. Use that to your advantage should it come to close quarters combat, aim the gun at them, facing your hull towards them, and whatever you do, don't stay still, wiggle your hull left and right to increase chances of ricochet to ensure survival.

In downtiers your armour (even the hull) begins to shine, but so does the fact most enemies at that BR use way more explosive filler APCBC shells preventing angling of any sort, making you way tougher at distances beyond 500 m, where hitting your weak spots is way harder. In case you can't hide your hull, attempt to make it face straight at your enemy, most common guns won't be able to get through your hull, let alone your turret, don't push it though, only rely on your armour if there's no alternative, because despite distances, weak spots are still a thing, and so is the trap shot to your mantlet.

It could be said that the M6A2E1's role is similar to that of its younger brother the M6A1, with the exception that the turret is stronger, is slightly slower and, although with fewer guns, it has a really hard hitting one on the turret, it can take a few lucky hits and punish those who cross its path from long ranges.

Pros and cons

Pros:

  • Powerful 105 mm gun with access to APCBC, both with and without explosive filler, and APCR shells
  • Extremely thick armour in some places
  • Has a reverse gearbox, can go same speed backwards as forwards
  • Good gun depression allows for hull down tactics
  • .50 cal MG on the roof allows fending off planes and soft targets
  • Its tall profile allows to shoot over obstacles other tanks are usually blocked by

Cons:

  • The armour presents several weak spots that are easy to target for enemy players
  • Poor top speed of 31/29 km/h (AB/RB)
  • Mediocre acceleration
  • Tall profile, huge target
  • Long reload time
  • Trap shot on the turret that can easily take out the entire crew in a single hit

History

Devblog

In the midst of World War II at the American Baldwin Locomotive Works (BLW) began production of an experimental series of heavy tanks, which were supposed to form the image of the new American "heavies" both for the US Army service, and for lend-lease to the Allies. The initial design for all three versions was the M6 ​​heavy tank, on the basis of which they tested new hull features, improved transmission, better armour protection and increased firepower. In August 1944, the factory received a recommendation to modernize the most promising of their experimental projects - T1E1 heavy tank, which was to be assigned the M6A2 index.

The modernization involved the installation of additional armour plates on the frontal part of the hull, as well as the installation of a new turret to accommodate a new 105mm cannon. The first two M6A2E1 units from the experimental series were sent to field tests, where they showed low dynamic qualities. Even an incompletely loaded tank ((63,5 tons out of the designed 69,8)) could not overcome a 24 degree slope and literally got stuck in the ground. The second unit, intended for firing tests, revealed the need for radical improvements in the turret and gun, which were later implemented for the T29 heavy tank. As a result, by December of 1944, all three BLW designed experimental versions of the tank based on the M6 were declared obsolete. Both M6A2E1 prototypes were scrapped, with the only surviving T1E1 currently on display at the US Army Ordnance Museum in Aberdeen.

Media

Skins
Images
Videos

See also

Related development
  • T1E1 / M6A2 - Heavy tank prototype that was the basis of the M6A2E1.
  • T1E3 / M6A1 - Heavy tank production variant

External links


USA heavy tanks
M4 Jumbo  M4A3E2 · Cobra King · M4A3E2 (76) W
M6  T1E1 · M6A1 · M6A2E1
T26  T26E1-1 · T26E5
T29/30/34  T29 · T30 · T34
T32  T32 · T32E1
M103  M103
Others  T14

USA premium ground vehicles
Light tanks  LVT(A)(4) · M2A4 (1st Arm.Div.) · M3A1 (USMC) · ▃Stuart VI (5th CAD) · M8 LAC · M8A1 GMC
  M18 "Black Cat" · Super Hellcat · T18E2 · M551(76) · T114 · M1128 Wolfpack
Medium tanks  ▃Grant I · M4A5 · Calliope · T20 · M26 T99 · M26E1 · M46 "Tiger" · T54E1 · T54E2 · ▃Magach 3 (ERA) · M728 CEV
  XM1 (GM) · XM1 (Chrysler) · M1 KVT
Heavy tanks  T14 · Cobra King · M6A2E1 · T29 · T30
Tank destroyers  T28 · T55E1