Difference between revisions of "A.C.I"
Colok76286 (talk | contribs) (Edits) |
Toxicwaste23 (talk | contribs) (→Usage in battles) (Tag: Visual edit) |
||
| (9 intermediate revisions by 5 users not shown) | |||
| Line 12: | Line 12: | ||
{{Specs-Tank-Armour}} | {{Specs-Tank-Armour}} | ||
<!-- ''Describe armour protection. Note the most well protected and key weak areas. Appreciate the layout of modules as well as the number and location of crew members. Is the level of armour protection sufficient, is the placement of modules helpful for survival in combat? If necessary use a visual template to indicate the most secure and weak zones of the armour.'' --> | <!-- ''Describe armour protection. Note the most well protected and key weak areas. Appreciate the layout of modules as well as the number and location of crew members. Is the level of armour protection sufficient, is the placement of modules helpful for survival in combat? If necessary use a visual template to indicate the most secure and weak zones of the armour.'' --> | ||
| − | In general, the A.C.I is very good at head-on engagements, due to its very well | + | In general, the A.C.I is very good at head-on engagements, due to its very well armored front for its BR . The sides are with a thickness of only around 45 mm relatively good penetrable at 2.7. Tanks using large-calibre HE shells are dangerous, because of the overpressure mechanics that will often take out the driver and the machine gunner as well as the transmission. The lower front is quite vulndrable, if shot, the transmission will most likely break down, the crew won't take damage usually. |
'''Armour type:''' <!-- The types of armour present on the vehicle and their general locations --> | '''Armour type:''' <!-- The types of armour present on the vehicle and their general locations --> | ||
| Line 37: | Line 37: | ||
<!-- ''Write about the mobility of the ground vehicle. Estimate the specific power and manoeuvrability, as well as the maximum speed forwards and backwards.'' --> | <!-- ''Write about the mobility of the ground vehicle. Estimate the specific power and manoeuvrability, as well as the maximum speed forwards and backwards.'' --> | ||
| − | {{tankMobility|abMinHp= | + | {{tankMobility|abMinHp=511|rbMinHp=292}} |
=== Modifications and economy === | === Modifications and economy === | ||
| Line 60: | Line 60: | ||
|- | |- | ||
! ''Arcade'' | ! ''Arcade'' | ||
| − | | rowspan="2" | 130 || rowspan="2" | -10°/+20° || rowspan="2" | ±180° || rowspan="2" | N/A || | + | | rowspan="2" | 130 || rowspan="2" | -10°/+20° || rowspan="2" | ±180° || rowspan="2" | N/A || 17.1 || 23.7 || 28.8 || 31.9 || 33.9 || rowspan="2" | 3.64 || rowspan="2" | 3.22 || rowspan="2" | 2.97 || rowspan="2" | 2.80 |
|- | |- | ||
! ''Realistic'' | ! ''Realistic'' | ||
| − | | | + | | 10.7 || 12.6 || 15.3 || 16.9 || 18.0 |
|- | |- | ||
|} | |} | ||
==== Ammunition ==== | ==== Ammunition ==== | ||
| − | { | + | {| class="wikitable sortable" style="text-align:center" width="100%" |
| + | ! colspan="8" | Penetration statistics | ||
| + | |- | ||
| + | ! rowspan="2" data-sort-type="text" | Ammunition | ||
| + | ! rowspan="2" | Type of<br>warhead | ||
| + | ! colspan="6" | Penetration @ 0° Angle of Attack (mm) | ||
| + | |- | ||
| + | ! 10 m !! 100 m !! 500 m !! 1,000 m !! 1,500 m !! 2,000 m | ||
| + | |- | ||
| + | | Shot Mk.1 AP/T || AP || 72 || 68 || 52 || 37 || 27 || 19 | ||
| + | |- | ||
| + | | Shell Mk.2 || HE || 4 || 4 || 4 || 4 || 4 || 4 | ||
| + | |- | ||
| + | | Shot Mk.IXB APCBC/T || APCBC || 89 || 86 || 77 || 66 || 57 || 50 | ||
| + | |- | ||
| + | | Shell Mk.1 AP/T || APHE || 66 || 62 || 49 || 36 || 26 || 20 | ||
| + | |- | ||
| + | |} | ||
| + | {| class="wikitable sortable" style="text-align:center" width="100%" | ||
| + | ! colspan="10" | Shell details | ||
| + | |- | ||
| + | ! rowspan="2" data-sort-type="text" | Ammunition | ||
| + | ! rowspan="2" | Type of<br>warhead | ||
| + | ! rowspan="2" | Velocity<br>(m/s) | ||
| + | ! rowspan="2" | Projectile<br>Mass (kg) | ||
| + | ! rowspan="2" | Fuse delay<br>(m) | ||
| + | ! rowspan="2" | Fuse sensitivity<br>(mm) | ||
| + | ! rowspan="2" | Explosive Mass<br>(TNT equivalent) (g) | ||
| + | ! colspan="3" | Ricochet | ||
| + | |- | ||
| + | ! 0% !! 50% !! 100% | ||
| + | |- | ||
| + | | Shot Mk.1 AP/T || AP || 792 || 1.08 || N/A || N/A || N/A || 47° || 60° || 65° | ||
| + | |- | ||
| + | | Shell Mk.2 || HE || 687 || 1.34 || 0 || 0.1 || 85 || 79° || 80° || 81° | ||
| + | |- | ||
| + | | Shot Mk.IXB APCBC/T || APCBC || 792 || 1.24 || N/A || N/A || N/A || 48° || 63° || 71° | ||
| + | |- | ||
| + | | Shell Mk.1 AP/T || APHE || 792 || 1.08 || 1.2 || 9 || 20.9 || 47° || 60° || 65° | ||
| + | |- | ||
| + | |} | ||
==== [[Ammo racks]] ==== | ==== [[Ammo racks]] ==== | ||
| − | [[File:Ammoracks_{{PAGENAME}}.png|right|thumb|x250px|[[Ammo racks]] of the {{PAGENAME}}]] | + | <!-- [[File:Ammoracks_{{PAGENAME}}.png|right|thumb|x250px|[[Ammo racks]] of the {{PAGENAME}}]] --> |
| − | <!-- '''Last updated: | + | <!-- '''Last updated:''' --> |
{| class="wikitable" style="text-align:center" | {| class="wikitable" style="text-align:center" | ||
|- | |- | ||
| Line 84: | Line 124: | ||
! Visual<br>discrepancy | ! Visual<br>discrepancy | ||
|- | |- | ||
| − | | '''130''' || | + | | '''130''' || __ ''(+__)'' || __ ''(+__)'' || __ ''(+__)'' || __ ''(+__)'' || __ ''(+__)'' || __ ''(+__)'' || __ |
|- | |- | ||
|} | |} | ||
| − | |||
| − | |||
| − | |||
| − | |||
=== Machine guns === | === Machine guns === | ||
| Line 109: | Line 145: | ||
== Usage in battles == | == Usage in battles == | ||
<!-- ''Describe the tactics of playing in the vehicle, the features of using vehicles in the team and advice on tactics. Refrain from creating a "guide" - do not impose a single point of view but instead give the reader food for thought. Describe the most dangerous enemies and give recommendations on fighting them. If necessary, note the specifics of the game in different modes (AB, RB, SB).'' --> | <!-- ''Describe the tactics of playing in the vehicle, the features of using vehicles in the team and advice on tactics. Refrain from creating a "guide" - do not impose a single point of view but instead give the reader food for thought. Describe the most dangerous enemies and give recommendations on fighting them. If necessary, note the specifics of the game in different modes (AB, RB, SB).'' --> | ||
| − | The A.C. | + | The A.C.1's armour is great for brawling and medium range skirmishes and coupled with a good gun this tank has the perk of being called a cross between a heavy and tank destroyer. The armour is best used when rushing point zones although if you get spotted enemies will know how to dispatch you, if you get spotted or you are nervous about rushing cap points tag along with a teammate or call upon air support from any airborne teammates. On urban maps avoid the middle parts of the map and avoid showing your sides as 44 mm of armour won't save you from a broadside, instead use your great reload to blow tracks and follow up with the gun barrels of enemies if the enemy can pen your armour then call an artillery strike and depart. As an all rounder (meaning it has a balanced setup of firepower, armour and mobility) the A.C.1 is in some respects a contender for the Soviet T-34 medium tank and can go head-to-head although it isn't very reliable against later variants of the T-34. |
| − | Notable enemies | + | Notable enemies are: German mediums like Panzer IV, Pazer III. Marder III H, Jagdpanzers. KV-1, T-34 and similar vehicles. |
=== Pros and cons === | === Pros and cons === | ||
<!-- ''Summarise and briefly evaluate the vehicle in terms of its characteristics and combat effectiveness. Mark its pros and cons in a bulleted list. Try not to use more than 6 points for each of the characteristics. Avoid using categorical definitions such as "bad", "good" and the like - use substitutions with softer forms such as "inadequate" and "effective".'' --> | <!-- ''Summarise and briefly evaluate the vehicle in terms of its characteristics and combat effectiveness. Mark its pros and cons in a bulleted list. Try not to use more than 6 points for each of the characteristics. Avoid using categorical definitions such as "bad", "good" and the like - use substitutions with softer forms such as "inadequate" and "effective".'' --> | ||
| − | '''Pros:''' | + | '''Pros:''' |
| − | * Diversely sloped frontal hull | + | * Diversely sloped frontal hull armor is sturdy against common foes, like [[M3 Stuart (Family)|M3A3 Stuart]] and [[M5 Stuart (Family)|M5 Stuart]], [[T-50]] |
* Outstanding gun depression, allowing hull-down tactics | * Outstanding gun depression, allowing hull-down tactics | ||
* Can easily frontally engage most enemies | * Can easily frontally engage most enemies | ||
| Line 141: | Line 177: | ||
* [https://live.warthunder.com/feed/camouflages/?vehicle=uk_ac1_sentinel Skins and camouflages for the {{PAGENAME}} from live.warthunder.com.] | * [https://live.warthunder.com/feed/camouflages/?vehicle=uk_ac1_sentinel Skins and camouflages for the {{PAGENAME}} from live.warthunder.com.] | ||
| − | |||
| − | |||
| − | |||
| − | |||
== See also == | == See also == | ||
| Line 150: | Line 182: | ||
* ''reference to the series of the vehicles;'' | * ''reference to the series of the vehicles;'' | ||
* ''links to approximate analogues of other nations and research trees.'' --> | * ''links to approximate analogues of other nations and research trees.'' --> | ||
| − | + | ''Links to the articles on the War Thunder Wiki that you think will be useful for the reader, for example:'' | |
| − | * | + | * ''reference to the series of the vehicles;'' |
| − | + | * ''links to approximate analogues of other nations and research trees.'' | |
| − | |||
| − | |||
| − | * | ||
== External links == | == External links == | ||
Revision as of 08:03, 5 February 2022


Contents
Description
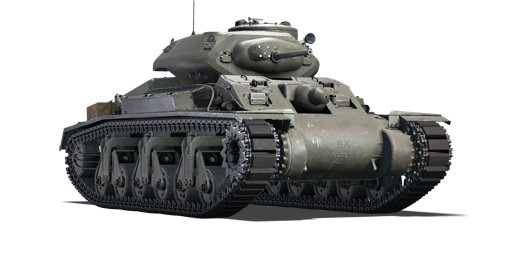
The Cruiser tank A.C. Mark I is a premium gift rank II British medium tank with a battle rating of 3.3 (AB) and 3.0 (RB/SB). It was introduced during Update "Winged Lions" as a reward for the 2021 Operation W.I.N.T.E.R. event.
General info
Survivability and armour
In general, the A.C.I is very good at head-on engagements, due to its very well armored front for its BR . The sides are with a thickness of only around 45 mm relatively good penetrable at 2.7. Tanks using large-calibre HE shells are dangerous, because of the overpressure mechanics that will often take out the driver and the machine gunner as well as the transmission. The lower front is quite vulndrable, if shot, the transmission will most likely break down, the crew won't take damage usually.
Armour type:
| Armour | Front (Slope angle) | Sides | Rear | Roof |
|---|---|---|---|---|
| Hull | ___ mm | ___ mm Top ___ mm Bottom |
___ mm | ___ - ___ mm |
| Turret | ___ - ___ mm Turret front ___ mm Gun mantlet |
___ - ___ mm | ___ - ___ mm | ___ - ___ mm |
| Cupola | ___ mm | ___ mm | ___ mm | ___ mm |
Notes:
Mobility
| Game Mode | Max Speed (km/h) | Weight (tons) | Engine power (horsepower) | Power-to-weight ratio (hp/ton) | |||
|---|---|---|---|---|---|---|---|
| Forward | Reverse | Stock | Upgraded | Stock | Upgraded | ||
| Arcade | 54 | 7 | 26 | 511 | 649 | 19.65 | 24.96 |
| Realistic | 49 | 6 | 292 | 340 | 11.23 | 13.08 | |
Modifications and economy
| Mobility | Protection | Firepower | ||||||||||||||||||||
|---|---|---|---|---|---|---|---|---|---|---|---|---|---|---|---|---|---|---|---|---|---|---|
|
|
|
Because it is a premium tank, the A.C.I comes with all its modifications already researched.
Armaments
Main armament
| 40 mm QF 2-pounder | Turret rotation speed (°/s) | Reloading rate (seconds) | |||||||||||
|---|---|---|---|---|---|---|---|---|---|---|---|---|---|
| Mode | Capacity | Vertical | Horizontal | Stabilizer | Stock | Upgraded | Full | Expert | Aced | Stock | Full | Expert | Aced |
| Arcade | 130 | -10°/+20° | ±180° | N/A | 17.1 | 23.7 | 28.8 | 31.9 | 33.9 | 3.64 | 3.22 | 2.97 | 2.80 |
| Realistic | 10.7 | 12.6 | 15.3 | 16.9 | 18.0 | ||||||||
Ammunition
| Penetration statistics | |||||||
|---|---|---|---|---|---|---|---|
| Ammunition | Type of warhead |
Penetration @ 0° Angle of Attack (mm) | |||||
| 10 m | 100 m | 500 m | 1,000 m | 1,500 m | 2,000 m | ||
| Shot Mk.1 AP/T | AP | 72 | 68 | 52 | 37 | 27 | 19 |
| Shell Mk.2 | HE | 4 | 4 | 4 | 4 | 4 | 4 |
| Shot Mk.IXB APCBC/T | APCBC | 89 | 86 | 77 | 66 | 57 | 50 |
| Shell Mk.1 AP/T | APHE | 66 | 62 | 49 | 36 | 26 | 20 |
| Shell details | |||||||||
|---|---|---|---|---|---|---|---|---|---|
| Ammunition | Type of warhead |
Velocity (m/s) |
Projectile Mass (kg) |
Fuse delay (m) |
Fuse sensitivity (mm) |
Explosive Mass (TNT equivalent) (g) |
Ricochet | ||
| 0% | 50% | 100% | |||||||
| Shot Mk.1 AP/T | AP | 792 | 1.08 | N/A | N/A | N/A | 47° | 60° | 65° |
| Shell Mk.2 | HE | 687 | 1.34 | 0 | 0.1 | 85 | 79° | 80° | 81° |
| Shot Mk.IXB APCBC/T | APCBC | 792 | 1.24 | N/A | N/A | N/A | 48° | 63° | 71° |
| Shell Mk.1 AP/T | APHE | 792 | 1.08 | 1.2 | 9 | 20.9 | 47° | 60° | 65° |
Ammo racks
| Full ammo |
1st rack empty |
2nd rack empty |
3rd rack empty |
4th rack empty |
5th rack empty |
6th rack empty |
Visual discrepancy |
|---|---|---|---|---|---|---|---|
| 130 | __ (+__) | __ (+__) | __ (+__) | __ (+__) | __ (+__) | __ (+__) | __ |
Machine guns
| 7.7 mm Vickers | ||||
|---|---|---|---|---|
| Mount | Capacity (Belt) | Fire rate | Vertical | Horizontal |
| Coaxial | 4,250 (250) | 390 | N/A | N/A |
Usage in battles
The A.C.1's armour is great for brawling and medium range skirmishes and coupled with a good gun this tank has the perk of being called a cross between a heavy and tank destroyer. The armour is best used when rushing point zones although if you get spotted enemies will know how to dispatch you, if you get spotted or you are nervous about rushing cap points tag along with a teammate or call upon air support from any airborne teammates. On urban maps avoid the middle parts of the map and avoid showing your sides as 44 mm of armour won't save you from a broadside, instead use your great reload to blow tracks and follow up with the gun barrels of enemies if the enemy can pen your armour then call an artillery strike and depart. As an all rounder (meaning it has a balanced setup of firepower, armour and mobility) the A.C.1 is in some respects a contender for the Soviet T-34 medium tank and can go head-to-head although it isn't very reliable against later variants of the T-34.
Notable enemies are: German mediums like Panzer IV, Pazer III. Marder III H, Jagdpanzers. KV-1, T-34 and similar vehicles.
Pros and cons
Pros:
- Diversely sloped frontal hull armor is sturdy against common foes, like M3A3 Stuart and M5 Stuart, T-50
- Outstanding gun depression, allowing hull-down tactics
- Can easily frontally engage most enemies
- Fast reload allows quick follow-up shots
Cons:
- Only 44 mm of side armour
- Painfully slow reverse speed of -4 km/h
- Tightly packed crew
- Frontal turret armour is quite weak
- Slow acceleration
History
Describe the history of the creation and combat usage of the vehicle in more detail than in the introduction. If the historical reference turns out to be too long, take it to a separate article, taking a link to the article about the vehicle and adding a block "/History" (example: https://wiki.warthunder.com/(Vehicle-name)/History) and add a link to it here using the main template. Be sure to reference text and sources by using <ref></ref>, as well as adding them at the end of the article with <references />. This section may also include the vehicle's dev blog entry (if applicable) and the in-game encyclopedia description (under === In-game description ===, also if applicable).
Media
- Skins
See also
Links to the articles on the War Thunder Wiki that you think will be useful for the reader, for example:
- reference to the series of the vehicles;
- links to approximate analogues of other nations and research trees.
External links
| New South Wales Railway Company | |
|---|---|
| Medium tanks | A.C.I · A.C.IV |
| Britain medium tanks | |
|---|---|
| Valentine | Valentine I · Valentine IX · Valentine XI |
| Cromwell | Cromwell I · Cromwell V · Cromwell V (RP-3) |
| Cromwell derivatives | Challenger · Avenger · Comet I · Comet I "Iron Duke IV" · Charioteer Mk VII |
| Centurion | Centurion Mk 1 · Centurion Mk.2 · Centurion Mk 3 · Centurion Mk.5 AVRE · Centurion Mk 10 · Centurion Action X · FV4202 |
| Vickers MBT | Vickers Mk.1 · Vickers Mk.3 · Vickers Mk.7 |
| Chieftain | Chieftain Mk 3 · Chieftain Mk 5 · Chieftain Mk 10 |
| Challenger 1 | Challenger Mk.2 · Challenger Mk.3 · Challenger DS |
| Challenger 2 | Challenger 2 · Challenger 2 (2F) · Challenger 2 TES · Challenger 2 OES · Challenger 2E · Challenger 2 Black Night |
| Challenger 3 | Challenger 3 TD |
| Australia | A.C.I · A.C.IV · Centurion Mk.5/1 |
| South Africa | Olifant Mk.1A · Olifant Mk.2 · TTD |
| India | Vijayanta · Bhishma TWMP |
| Israel | ▄Sho't Kal Dalet |
| Jordan | Khalid |
| Sweden | ▄Strv 81 (RB 52) |
| USA | Grant I · Sherman II · Sherman Firefly · Sherman IC "Trzyniec" |
| Britain premium ground vehicles | |
|---|---|
| Light tanks | A13 Mk I (3rd R.T.R.) · A13 Mk II 1939 · AEC Mk II · Crusader "The Saint" · Rooikat 105 |
| Medium tanks | A.C.I · Grant I · Cromwell V (RP-3) · Sherman IC "Trzyniec" · A.C.IV · Comet I "Iron Duke IV" |
| Centurion Mk.2 · ▄Strv 81 (RB 52) · Centurion Mk.5 AVRE · Centurion Mk.5/1 · ▄Sho't Kal Dalet · Centurion Action X | |
| Vijayanta · Khalid · Challenger DS · Challenger 2 OES | |
| Heavy tanks | Independent · Matilda Hedgehog · Excelsior · TOG II · Churchill Crocodile · Black Prince |
| Tank destroyers | Alecto I · Achilles (65 Rg.) · QF 3.7 Ram |
