Rooikat 105

From War Thunder Wiki
Jump to: navigation, search
This page is about the British light tank Rooikat 105. For other versions, see Rooikat (Family).
Rooikat 105
uk_rooikat_105_td.png
GarageImage Rooikat 105.jpg
Rooikat 105
AB RB SB
9.0 9.3 9.3
Show in game
STORE

Description

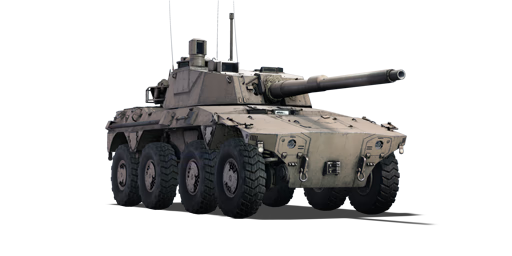
In 1990, a programme was initiated by Reumech OMC to upgrade the Rooikat for the international market, with the intent of increasing its potency against other armoured vehicles. It was upgunned with the GT-7 105 mm cannon, a domestic variant of the ubiquitous Royal Ordnance L7 built by Denel, and made able to accept a range of NATO ammunition to improve compatibility with any potential customers. It was also equipped with updated features such as a new thermal imaging system. The Rooikat 105 was completed in 1994 and demonstrated to the SANDF, who decided that they were satisfied with the base model. The subsequent offering on the export market was also met with a lack of interest. Only a single prototype of the vehicle was ever constructed.

Introduced in Update 1.97 "Viking Fury", the Rooikat 105 builds upon its predecessor Rooikat Mk.1D with more powerful armament and ammunition, while retaining the latter's excellent mobility. Able to be equipped with the powerful DM33 APFSDS round, the Rooikat 105 has more than sufficient firepower for any opponent it may face — combined with its outstanding mobility both on and off road, and excellent gun handling characteristics, it can excel in any role, be it long-range sniping, flanking, or even close range brawling. Players will also greatly appreciate the new thermal sight for the gunner, making identifying enemy targets a cinch.

General info

Survivability and armour

Smoke grenades
Creation of a smoke screen in front of the vehicle
ESS
Creation of a smoke screen in the direction of movement of the vehicle
Armourfront / side / back
Hull30 / 25 / 20
Turret25 / 25 / 15
Crew4 people
Visibility84 %

The armour thickness ranges from 15 mm on the sides of the lower front plate to 30 mm near the gun breech of rolled homogeneous armour. This will protect the crew from small arms fire only, most 20 mm guns and above can penetrate the armour with relative ease. Most HE and HESH shells will overpressure the vehicle.

Wheels and suspension arms are made from 10 mm of structural steel.

The internal modules are relatively far apart and create a rather big empty space in the center of the vehicle. This gives it a small chance to survive APDS shells from the side when the turret is turned 90 degrees to either side, when the turret is pointed forward or backward, it fills this space with the ready ammo rack. Ammunition is also stored in the upper sides of the hull, as well as the rear of the turret.

The driver sits alone in the front of the vehicle while the commander, gunner and loader are placed rather high in the vehicle. This gives the turret crew a decent chance to survive side hits to the hull. A hit on the lower plate's left side (viewed from the front) will most likely kill the gunner, commander and driver and therefore destroy the vehicle.

Artillery strikes are lethal to the Rooikat.

Armour type:

  • Rolled homogeneous armour (hull, turret, cupola)
  • Wheel (tires, torsion bars)
Armour Front (Slope angle) Sides Rear Roof
Hull 25 mm (77°) Upper glacis - Centre
10 mm (75°) Upper glacis - Sides
30 mm (23°) Lower glacis - Centre
15 mm (23°) Lower glacis - Sides
20 mm (25°) Top
25 mm (0-9°) Bottom
20 mm Upper plate
20 mm (29°) Lower plate
25 mm (13°) Front glacis - Centre
10 mm (15°) Front glacis - Sides
20 mm (0-13°) Driver compartment
10 mm (0-17°) Crew compartment
5 mm Radiator vents
Turret 25 mm (26-28°) Turret front
25 mm Gun mantlet - external
30 mm (cylindrical) Gun mantlet - internal
25 mm (12-16°) 15 mm (15°) 15 mm (9-12°)
Cupola 25 mm (cylindrical) Base
25 mm (spherical) Dome

Notes:

  • Tires and torsion bars are 10 mm thick.
  • Belly armour is 15 mm thick.
  • The internal part of the gun mantlet overlaps with parts of the turret front.

Mobility

Speedforward / back
AB134 / 41 km/h
RB and SB121 / 37 km/h
Number of gears12 forward
4 back
Weight28.5 t
Engine power
AB1 082 hp
RB and SB567 hp
Power-to-weight ratio
AB38.0 hp/t
RB and SB19.9 hp/t

Mobility is extremely good. The engine will propel the vehicle to 130 km/h (AB) / 120 km/h (RB/SB) maximum on roads, though the average speed is around 40 to 65 km/h in light terrain, but acceleration is relatively poor. The wheeled chassis will allow to turn the vehicle without losing too much speed, though turning on the spot is not possible. Its two frontal axles pivot give it a gigantic turn radius, meaning that manoeuvring inside cities can range from difficult to nearly impossible. When crossing deep snow or sand the driver sometimes can't decide which gear to use and the vehicle will be stuck at the speed of that specific gear change even if it potentially has the power to go faster. Performance on any sort of incline is pretty poor with low power making some normally accessible slopes impossible to climb, care should be taken so as to not get stuck at the bottom of a trough. It is potentially very fast on paved roads and hard terrain but loses out on soft terrain and speed-wise to some vehicles, like the Centauro and the Type 16.

Game Mode Max Speed (km/h) Weight (tons) Engine power (horsepower) Power-to-weight ratio (hp/ton)
Forward Reverse Stock Upgraded Stock Upgraded
Arcade 134 41 28.5 879 1,082 30.84 37.96
Realistic 121 37 501 567 17.58 19.89

Modifications and economy

Repair cost
AB2 676 Sl icon.png
RB2 841 Sl icon.png
SB3 489 Sl icon.png
Crew training10 000 Sl icon.png
Experts1 010 000 Sl icon.png
Aces2 100 Ge icon.png
Research Aces2 020 000 Rp icon.png
Reward for battleAB / RB / SB
Talisman.png 2 × 130 / 170 / 220 % Sl icon.png
Talisman.png 2 × 226 / 226 / 226 % Rp icon.png
Modifications
Mobility Protection Firepower
Mods new wheels.png
Tires
Mods new car suspension.png
Suspension
Mods new tank break.png
Brake System
Mods new tank filter.png
Filters
Mods new tank transmission.png
Transmission
Mods new tank engine.png
Engine
Mods tank tool kit.png
Improved Parts
Mods extinguisher.png
Improved FPE
Mods tank reinforcement uk.png
Crew Replenishment
Mods smoke screen.png
Smoke grenade
Mods new tank horizontal aiming.png
Horizontal Drive
Mods engine smoke screen system.png
ESS
Mods tank ammo.png
105mm_usa_M735_APDS_FS_ammo_pack
Mods tank cannon.png
Adjustment of Fire
Mods airstrike.png
Airstrike
Mods tank ammo.png
105mm_usa_HESH_ammo_pack
Mods new tank vertical aiming.png
Elevation Mechanism
Mods scouting.png
Improved optics
Mods thermal sight.png
NVD
Mods scout streak.png
Scout UAV
Mods art support.png
Artillery Support
Mods tank laser rangefinder.png
Laser rangefinder
Mods tank ammo.png
105mm_DM33_APDS_FS_ammo_pack

Armaments

Laser rangefinder
Reduces the error and increases the maximum measurable distance of the rangefinder
Night vision device
Improves visibility by enhancing natural light or active illumination.
Thermal imager
Allows to see thermal radiation in the infrared range day and night

Main armament

Two-plane stabilizer
Reduces the swing of the gun in two planes while moving
Ammunition32 rounds
First-order16 rounds
Reloadbasic crew → aces
8.7 → 6.7 s
Vertical guidance-10° / 20°
Main article: GT-7 (105 mm)

The vehicle is armed with the South African GT-7 105 mm rifled cannon, which is almost identical to the L7A3 used on the German Leopard and Leopard A1A1. It gets the same ammunition choices of DM12 HEATFS, DM512 HESH, and DM23 APFSDS, in addition to the improved DM33 APFSDS shell, as well as the same reload speed. The gun elevation speed is atrocious: the user has to be aware of the gun's current angle when fighting in close quarters. This can cause you to lose duels or make you overshoot in hectic close quarters engagements.

105 mm GT-7 Turret rotation speed (°/s) Reloading rate (seconds)
Mode Capacity Vertical Horizontal Stabilizer Stock Upgraded Full Expert Aced Stock Full Expert Aced
Arcade 32 -10°/+20° ±180° Two-plane 38.1 52.7 64.0 70.8 75.3 8.71 7.70 7.10 6.70
Realistic 23.8 28.0 34.0 37.6 40.0

Ammunition

The HEATFS and APFSDS can easily deal with most enemies presented at its battle-rating. The HESH is very situational, but might be good for light-skinned vehicles or helicopters. It is usually best to mostly take APFSDS shells, since it can easily handle every vehicle type, but unlike HEATFS doesn't detonate on bushes or fences and isn't stopped by ERA.

Penetration statistics
Ammunition Type of
warhead
Penetration @ 0° Angle of Attack (mm)
10 m 100 m 500 m 1,000 m 1,500 m 2,000 m
DM12 HEATFS 400 400 400 400 400 400
DM512 HESH 127 127 127 127 127 127
DM23 APFSDS 337 335 330 322 314 306
DM33 APFSDS 408 405 398 389 379 370
Shell details
Ammunition Type of
warhead
Velocity
(m/s)
Projectile
mass (kg)
Fuse delay
(m)
Fuse sensitivity
(mm)
Explosive mass
(TNT equivalent) (kg)
Ricochet
0% 50% 100%
DM12 HEATFS 1,174 10.5 0.05 0.1 1.27 65° 72° 77°
DM512 HESH 732 11.2 0.1 4 4.31 73° 77° 80°
DM23 APFSDS 1,455 4.2 - - - 78° 80° 81°
DM33 APFSDS 1,455 3.79 - - - 78° 80° 81°

Ammo racks

Ammo racks of the Rooikat 105
Full
ammo
1st
rack empty
2nd
rack empty
3rd
rack empty
4th
rack empty
5th
rack empty*
6th
rack empty*
Visual
discrepancy
32 29 (+3) 25 (+7) 21 (+11) 17 (+15) (+24) (+31) No

To be noted that both 5th and 6th racks are First-stage ammo stowages.

Machine guns

Ammunition3 000 rounds
Belt capacity250 rounds
Reloadbasic crew → aces
10.4 → 8.0 s
Fire rate500 shots/min
7.62 mm Browning MG4
Mount Capacity (Belt) Fire rate Vertical Horizontal
Coaxial 3,000 (250) 500 N/A N/A

Usage in battles

The Rooikat 105 is as fast as a cheetah, travelling at 120 km/h in RB and 130 km/h in AB. It is as nimble and powerful as an African rock python. Both of these almighty animals have one major weakness - they both lack protection, which is the same for the Rooikat 105.

A main advantage of the Rooikat 105 is its ability to capitalise on its speed,.It is able to find a concealed spot and wait for its prey to cross into its sights. The Rooikat 105 features an up-gunned cannon, from 76 mm to 105 mm, an increase of 38%. Which means it's a 38% larger round hitting the target. Its GT-7 105 mm rifled cannon is highly accurate, able to deliver its round on target over 3,000 m away. Additionally, the Rooikat 105 features thermal sights, which makes finding enemy tanks that are using foliage a breeze.

However, it lacks any armour, the thickest part of this fine tank is around the barrel at 40 mm. The front only offers up to, 30 mm. The side offers only up to 25 mm of thickness. This means that a .50 cal rifle will be able to penetrate the tank.

Engaging enemy tanks

Unlike other tanks in the British tree which allow for a broadside to be taken, the Rooikat cannot, as it lacks any type of protection, the only protection it allows for is over-penetration of high fuse rounds. The technical advantages of this tank must be played to the fullest extent by leveraging the advantages of the terrain on the map. This means that hills, houses, bridges, forests and ridges are used along with the appropriate camouflage selection for the map, to reduce the chances of being seen by the enemy.

When engaging enemy tanks, aim for the sides and front, ideally aim for the location of crew members and critical elements - anywhere which is flat.

  • The DM33 APFSDS shell offers up to 400 mm of penetration.

The Rooikat will allow for them to be seen, whether it be day or night, using the thermal gun sight. Make sure to use the laser rangefinder to adjust and correct the shot so it hits the enemy tank the first time. If the shot misses, move the tank to another location the reload takes up to 6.7 seconds. Most rival tanks provide an autoloader which substantially reduces their reload times, they may be able to fire two or three rounds in this time towards your location. Only one round needs to hit to knock you out.

Commander sights placed up top means you can peek from behind ridgelines and hills, easily scouting enemy units from safe cover. Using commander override will facilitate quick snapshots as well.

Night Battles

Rooikat 105, is the African rock python, just like the snake itself at night this lightly armoured vehicle becomes the master of the battle. Its fast speed, high agility and accurate cannon allows for it to be unseen, in the dead of night. It's vital to use your thermal sights as well as using the vegetation to make sure enemy tanks such as the Object 120 do not detect you. They can easily knock you out with one shot from their pin-point accurate dart like rounds, which can destroy the toughest of tanks easily.

It's extremely important that, when you have fired a shot, you move to a new location, using the darkness of battle as your cover. Do not stay in the same spot, because the enemy tanks will have seen your muzzle flash and now would be scanning the battlefield in that area with their thermal sights or radar. Instead, fire a single shot, move and repeat and keep the enemy unaware of your presence.

Capturing & Defending Zones

Use the gunner's thermal sight to check the area of the cap zone making sure no light sources can be seen. If it is clear and no enemy tanks are hiding in the distance waiting for you to cross into their sights, head towards the cap. When approaching the cap zone head towards an object in the cap zone and stay behind it while you cap the zone.

Defending the cap zone is a easy process, withdraw from the zone and use the terrain to your advantage. The enemy will try to counterattack, wait for them to counterattack, then only once they are close use the APFSDS rounds to knock them out.

Pros and cons

Pros:

  • Excellent mobility
  • Has early access to the DM33 APFSDS, which arguably makes it even more dangerous than medium tanks, especially considering its top speed
  • Decent gun handling, even on the move due to the two-plane gun stabilizer
  • Has access to thermal optics, unlike the Rooikat_Mk.1D, allowing it to see through its own ESS, among other benefits

Cons:

  • Poor survivability against autocannons, reloads slower than many light tanks
  • Susceptible to the overpressure mechanic, it is possible to deny its rush attack by simply being prepared
  • Poor turn rate

History

An upgrade and redesign program for the Rooikat was launched by Reumech OMC in 1990 for use internationally. This led to the development of the Rooikat 105 prototype with the GT-7 105 mm rifled cannon. The Rooikat 105 was made for high mobility operations taking place in both day and night. It was equipped with night vision and thermal imagery equipment for operations taking place in the dark of night. The gun used in the Rooikat 105 is the GT-7 105 mm rifled anti-tank gun. It fires a range of NATO tank shells including HEATFS, HESH and APFSDS. This gun can fire up to 6 rounds a minute (about 10 second reload). On the real version, there are two 7.62 mm machine guns for anti-infantry and anti-air, one in the turret and one in the commander's position. In-game there is only one in the turret. There are 4 smoke grenades on each side of the turret in a smoke screen configuration and the ability to use an exhaust generator. Automatic data input includes the laser rangefinder that can calculate the range of a target as well as the speed, direction of travel, wind speed, wind direction and weapon tilt. Manual data input only includes the ammunition type and the environment of its surroundings. The weapon system allows the Rooikat 105 to attack targets while on the move on rough terrain. The most complex systems of the Rooikat 105 are the gun stabiliser, the gunner's stabilised sight, the gunner's sight with night vision and the commander's individual panoramic sight.

Devblog

After the Rooikat 76 entered production in the early 1990s, South African engineers continued developing the vehicle in an effort to further expand upon its capabilities. As such, the engineers decided to, among other minor changes and improvements, fit the Rooikat with a larger 105 mm cannon, thus creating the Rooikat 105 in the process.

Development of the Rooikat 105 was completed in 1994 and a single prototype was built. However, after demonstrating the vehicle to the SANDF, the military decided not to procure the improved version of the Rooikat, given that they were already more than content with the base model of the vehicle.

As a result, the Rooikat 105 was subsequently offered on the export market in an effort to secure orders for the vehicles. However, despite its 105 mm cannon and compatibility with most NATO rounds, the Rooikat 105 failed to attract the interest of any potential foreign customers. In the end, only a single prototype of the Rooikat 105 was constructed, with the vehicle never entering production due to lacking demand.

Media

Skins
Images
Videos

See also

Other vehicles of similar configuration and role

External links


Britain light tanks
A13  A13 Mk I · A13 Mk I (3rd R.T.R.) · A13 Mk II · A13 Mk II 1939
A15  Crusader II · Crusader "The Saint" · Crusader III
A17  Tetrarch I
IFV  Warrior
Wheeled  Daimler Mk II · AEC Mk II · Fox · Vickers Mk.11
Other  VFM5
South Africa 
SARC  SARC MkIVa · SARC MkVI (2pdr) · SARC MkVI (6pdr)
Ratel  Ratel 90 · Ratel 20
Rooikat  Rooikat Mk.1D · Rooikat 105 · Rooikat MTTD
Other  Concept 3 · Eland 90 Mk.7
USA  Stuart I · Stuart III

Britain premium ground vehicles
Light tanks  A13 Mk I (3rd R.T.R.) · A13 Mk II 1939 · AEC Mk II · Crusader "The Saint" · Rooikat 105
Medium tanks  A.C.I · Grant I · Cromwell V (RP-3) · Sherman IC "Trzyniec" · A.C.IV · Comet I "Iron Duke IV"
  Centurion Mk.2 · ▄Strv 81 (RB 52) · Centurion Mk.5 AVRE · Centurion Mk.5/1 · ▄Sho't Kal Dalet · Centurion Action X
  Vijayanta · Khalid · Challenger DS · Challenger 2 OES
Heavy tanks  Independent · Matilda Hedgehog · Excelsior · TOG II · Churchill Crocodile · Black Prince
Tank destroyers  Alecto I · Achilles (65 Rg.) · QF 3.7 Ram