A13 Mk II 1939

From War Thunder Wiki
Jump to: navigation, search
This page is about the gift British light tank A13 Mk II 1939. For other versions, see A13 (Family).
A13 Mk II 1939
uk_a_13_mk2_1939.png
GarageImage A13 Mk II 1939.jpg
ArtImage A13 Mk II 1939.png
A13 Mk II 1939
AB RB SB
1.3 1.3 1.3
Show in game
MARKET

Description

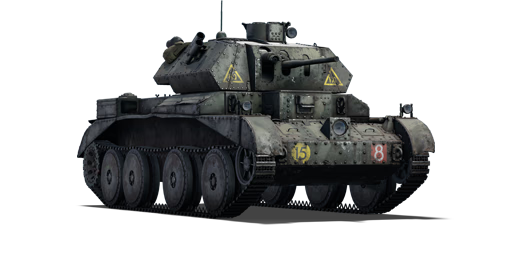
The Tank, Cruiser, Mark IV (A13 Mark II 1939) is the early-production second variant of the A13 cruiser tank family. It was the fourth cruiser tank family designed for the British Army, the direct successor of the A13 Mark I. The earliest A13 Mark IIs were A13 Mark Is with turret armour added. As a result, the hull protection of the A13 Mark II 1939 is identical to that of the A13 Mark I, with the exception of improved turret protection. Only 8 units were made in this fashion.

Introduced as a premium pack in Update 1.53 "Firestorm", the A13 Mark II 1939 provides slightly better turret protection than the A13 Mark I, adding about 0.8 tonnes of armour without sacrificing mobility. However, the A13 Mark II 1939's armour improvements are insufficient to protect the tank against most weapons, as nearly all opponents are capable of penetrating it. The 40 mm Ordnance QF 2-pounder tank gun is adequate for its rank, capable of dealing with the vast majority of opponents it will face. However, the ammunition lacks the penetrating force and accuracy needed to deal with stronger opponents at long ranges.

It was removed from the store in May 2016. It has since been available for purchase as a reward vehicle for War Thunder's 7th Anniversary Event and during the 2017 "April Fools" Sale. It was also made available as a war trophy vehicle in the Warbonds shop in April 2019. It was a reward for participating in War Thunder's 10th Anniversary Event. It is also available on the Marketplace.

General info

Survivability and armour

Smoke grenades
Creation of a smoke screen in front of the vehicle
Armourfront / side / back
Hull30 / 14 / 14
Turret14 / 14 / 14
Crew4 people
Visibility93 %

Armour type:

  • Rolled homogeneous armour
  • Cast homogeneous armour (Gun mantlet)
Armour Front Sides Rear Roof
Hull 14 mm Front plate
14 mm (0-62°) Front glacis
14 mm (64°) Lower glacis
7 mm 14 mm (0-62°) 14 mm
Turret 14 mm (0-15°) Turret front
14 mm (1-63°) Gun mantlet
14 (40°) + 14 mm (21°) 14 (21-30°) + 14 mm (2°) 14 mm

Notes:

  • Cupola is 14 mm incl. roof hatches
  • Suspension wheels and tracks are 15 mm thick.

While the A13 is in many ways very similar to the Soviet BT series in regards to armour and mobility, it is however unlike it by featuring four crew men. This difference is quite noticeable despite their cramped conditions.

Further the A13 Mk II 1939 features an improved turret armour to the standard A13 Mk II. Another 14 mm plate was added to the turret's face. It does not make a significant difference to survivability, neither does angling the hull against incoming fire. Even machine gun fire poses a significant threat, hence the preferred means of survival (alike for all Cruiser style British tanks) is to not be seen. Luckily the low profile and small size benefit this playstyle greatly.

Mobility

Speedforward / back
AB54 / 7 km/h
RB and SB48 / 6 km/h
Number of gears5 forward
1 back
Weight14.5 t
Engine power
AB649 hp
RB and SB340 hp
Power-to-weight ratio
AB44.8 hp/t
RB and SB23.4 hp/t
Game Mode Max Speed (km/h) Weight (tons) Engine power (horsepower) Power-to-weight ratio (hp/ton)
Forward Reverse Stock Upgraded Stock Upgraded
Arcade 54 7 14.5 527 649 36.34 44.76
Realistic 48 6 301 340 20.76 23.45

Even though the A13 Mk II 1939 has good mobility, it sometimes feels weird to drive. It loses speed on turns, does not accelerates quite as fast as its overpowered engine (RB stock: 20 HP/tonne) should provide it. Hill-climbing and other inclination have it struggle to pick up a proper pace. All of these flaws come from the gearbox, which has bad and uneven ratios, resulting in a kick when changing speed. Knowing that keep an eye on the "gear" counter top-left of the screen (activate it in the options menu) since it provides crucial information on how the tank will react to commands. With a bit of practice, one should swiftly masters these peculiarities.

Modifications and economy

Repair cost
AB410 Sl icon.png
RB218 Sl icon.png
SB140 Sl icon.png
Crew training450 Sl icon.png
Experts3 000 Sl icon.png
Aces45 Ge icon.png
Research Aces220 000 Rp icon.png
Reward for battleAB / RB / SB
Talisman.png 2 × 20 / 20 / 20 % Sl icon.png
Talisman.png 2 × 100 / 100 / 100 % Rp icon.png
Modifications
Mobility Protection Firepower
Mods new tank traks.png
Tracks
Mods new tank suspension.png
Suspension
Mods new tank break.png
Brake System
Mods new tank filter.png
Filters
Mods new tank transmission.png
Transmission
Mods new tank engine.png
Engine
Mods tank tool kit.png
Improved Parts
Mods extinguisher.png
Improved FPE
Mods tank reinforcement uk.png
Crew Replenishment
Mods new tank horizontal aiming.png
Horizontal Drive
Mods tank ammo.png
40mm_uk_2pdr_APHV_ammo_pack
Mods tank cannon.png
Adjustment of Fire
Mods tank ammo.png
40mm_uk_2pdr_APHE_ammo_pack
Mods new tank vertical aiming.png
Elevation Mechanism
Mods smoke screen.png
Smoke grenade
Mods art support.png
Artillery Support
Mods tank ammo.png
40mm_uk_2pdr_APCBC_ammo_pack

Armaments

Main armament

Shoulder stabilizer
Reduces the swing of the gun in one plane while moving
Ammunition87 rounds
Reloadbasic crew → aces
3.6 → 2.8 s
Vertical guidance-15° / 20°
Main article: QF 2-pounder (40 mm)

Since the QF 2-pounder is used on most British tanks of Rank I, it is important to know it well. This cannon has a major disadvantage at distances since its bullet lose around 20 mm of penetration for every 500 m it travels, which is a lot. As if this was not enough, it has poor accuracy, even with Adjustment of fire, hence, one should target large components (crewmen, engine, transmission), of the enemy or, as distance increases (500 m or more), the general centre of the foe. Firing the 2-pounder, one will easily notice its last but not least flaw: it does almost no post-penetration damage, which requires the need to snipe, crew members, one by one. Combine this difficulty with a bit of distance and this task can prove tricky pretty quick, sometimes leaving the enemy enough time to replenish its crew before being finished off.

On the other hand, this cannon has 5 major advantages: reload speed, close-quarter penetration, a primitive stabilizing system, LOTS of ammo and awesome gun depression. Its fast reloading speed allows the 2-Pounder to compensate its poor accuracy: missed a shot? why not take another even before you can reposition! Close quarter penetration, one of the best at its tier, is also a plus: enemies will only block a shot if it happen to hit a steep-angled plate of armour. With the hand stabilizer it can fire on the move too, at low speeds and on relatively flat road, though. Doing so it is much more precise than the comparable BT-7 with the 20-K. Last but not least, small shells mean more shells: the A13 can bring up to 87 bullets into the game, much more than needed to knock out 3-4 tanks, which means one can try to suppress an enemy and keep it in cover by constantly firing near it (at this rank, this tactic can prove effective against new players). Finally, the great gun depression enables it to fire over hills, peeking only it's a small turret, shooting and disappearing swiftly. Use these features cunningly.

40 mm QF 2-pounder Turret rotation speed (°/s) Reloading rate (seconds)
Mode Capacity Vertical Horizontal Stabilizer Stock Upgraded Full Expert Aced Stock Full Expert Aced
Arcade 87 -15°/+20° ±180° Vertical 15.23 21.08 25.60 28.31 30.12 3.64 3.22 2.97 2.80
Realistic 9.52 11.20 13.60 15.04 16.00

Ammunition

The QF-2 pounder is not starved for armour piercing shells. The APCBC, APHV and the APHE "Shell Mk.1" all fill different niches. The APCBC has great performance at close range and against angled slopes. It does well for sniping modules up to medium ranges, but is here quickly outshined by the APHV shot. Depending on the map size, several of these should be kept as back up for combat above 500 m. Ultimatively the Shell Mk.1 APHE is objectively the hardest hitting of the bunch with the explosive filler. However the penetration goes down to an average 60 mm @ 100 m which unlike the other shots requires aiming for weakpoint more often. The delay can be unwanted in close range combat, but so is an enemy able to shoot back. As the HE filler is underwhelming in firepower, larger vehicles such as the Pz.IV C and LVT will survive initial hits. Given the British tech tree's tendency for solid AP shot, sticking with the APCBC shot for training purposes might be for the best. The lack of a dedicated high explosive shell is negligible as the small bore diameter would have rendered it quite impotent, the coaxial LMG does the job adequately already.

Penetration statistics
Ammunition Type of
warhead
Penetration @ 0° Angle of Attack (mm)
10 m 100 m 500 m 1,000 m 1,500 m 2,000 m
Shot Mk.1 AP/T AP 72 68 52 37 27 19
Shot Mk.IXB APCBC/T APCBC 89 86 77 66 57 50
Shot Mk.1 APHV/T AP 80 75 58 41 30 21
Shell Mk.1 AP/T APHE 66 62 49 36 26 20
Shell details
Ammunition Type of
warhead
Velocity
(m/s)
Projectile
mass (kg)
Fuse delay
(m)
Fuse sensitivity
(mm)
Explosive mass
(TNT equivalent) (g)
Ricochet
0% 50% 100%
Shot Mk.1 AP/T AP 792 1.08 - - - 47° 60° 65°
Shot Mk.IXB APCBC/T APCBC 792 1.24 - - - 48° 63° 71°
Shot Mk.1 APHV/T AP 853 1.08 - - - 47° 60° 65°
Shell Mk.1 AP/T APHE 792 1.08 1.2 9 20.9 47° 60° 65°

Ammo racks

Ammo racks of the A13 Mk II 1939
Full
ammo
1st
rack empty
2nd
rack empty
3rd
rack empty
4th
rack empty
5th
rack empty
6th
rack empty
7th
rack empty
8th
rack empty
87 78 (+9) 75 (+12) 72 (+15) 69 (+18) 66 (+21) 62 (+25) 60 (+27) 56 (+31)
9th
rack empty
10th
rack empty
11th
rack empty
12th
rack empty
13th
rack empty
14th
rack empty
15th
rack empty
16th
rack empty
Visual
discrepancy
51 (+36) 47 (+40) 43 (+44) 41 (+46) 36 (+51) 31 (+56) 16 (+71) (+86) No

Note:

  • Center hull empty: 41 (+46) shells.

Optics

A13 Mk II 1939 Optics
Which ones Default magnification Maximum magnification
Main Gun optics x1.85 x3.5
Comparable optics AMR.35 ZT3

The sights are very weak in magnification. While this correlates in a wide field of view, beneficial for the close-quarters combat style of the A13, it is a major downside for medium and long range battles. Without the binoculars (or the penetration indicator in Arcade Mode) any far ranged combat becomes a sore to the eyes. Yet this is great training for spotting hostiles with the binoculars and aligning the gun to the target.

Machine guns

Ammunition3 500 rounds
Belt capacity250 rounds
Reloadbasic crew → aces
10.4 → 8.0 s
Fire rate390 shots/min
Main article: Vickers (7.7 mm)

In these low tiers, the meagre 9 mm of penetration is plenty to damage a wide range of armoured vehicles from the side and rear. Having an easy to reach key bind is recommended anyway, as it pays off quickly, from highlighting enemies on the map in Realistic Battles, clearing bushes and obstacles, to finishing off open top vehicles.

7.7 mm Vickers
Mount Capacity (Belt) Fire rate Vertical Horizontal
Coaxial 3,500 (250) 390 N/A N/A

Usage in battles

This vehicle's role is that of a light tank in the truest sense, sporting an acceptable gun, great mobility and virtually no armour to speak of. The main difference from the Mk II to the Mk I is that the former has better turret protection, adding about 0.8 tonnes of steel without hindering mobility.

The A13 has a very active playstyle and should not be used in the front lines. Instead, use the mobility to its advantage: Spot, flank and provide artillery support for the team, blind enemies with well-placed smokes screens in key avenues. Make sure to only target secluded enemies in flanking tactics to take full advantage of the element of surprise and outflank opponents. Never expose yourself for too long , as even light machine gun fire is a potential threat to survivability . The QF-2 pounder has an awful long-range accuracy, so get close to the enemy to actually land a shot. Load up this agile (but reluctant) cat with ammo and flank the enemies with a constant flow of bullets.

Since the addition of smoke in War Thunder, light tanks have it easier. Use the forward-launching smoke to create a wall of smoke in a strategic place. It can be used to cover allies, when capturing a point, flanking in a street (urban environment), or when the situation gets to hot.

Pros and cons

Pros:

  • Great mobility: fast, with good power-to-weight ratio
  • Improved turret armour over the A13 Mk II
  • Good gun for its rank
  • Shoulder stabiliser is an advantage in CQC
  • Brings lots of ammo
  • Forward-launching smoke launchers
  • Decent turret slewing rate
  • -15° gun depression

Cons:

  • Thin armour can be frontally penetrated by anything
  • Most shells have post-penetration damage
  • Loses speed when turning
  • Wiggles when trying to turn on 5th gear
  • Low reverse speed

History

Development

The British development on their cruiser tanks advanced greatly with the implementation of the Christie suspension system, which they acquired from an American firm. The tank underwent a development program under the name Cruiser Mk III (A13) and the first accepted variant for the military was the A13 Mk.I. The Mk.I featured 15 mm of armour, a 2-pounder cannon, and a Vickers machine gun as its coaxial armament. An order of 65 of these tanks were asked for in 1939 at the Nuffield Mechanization & Auto Limited, but only 30 were made before the a decision was made to upgrade the existing model with more armour and different armament.

The redesigned cruiser tank, the A13 Mk.II, Cruiser Tank Mk IV, had a new armour thickness of 30 mm and additional sloping armour was put onto the sides and rear of the turret. The Vickers machine gun used as the coaxial armament was also replaced by the BESA machine gun, a licensed Czech ZB-53 machine gun, due to issues with the Vickers gun. Around 225 to 665 A13 Mk.II tanks were produced from 1940 until late 1941.

Combat Usage

The A13 first saw combat in the Battle of France under the British Expeditionary Force in 1940. The A13 encountered many trouble during its employment, the crew have little to no training with the new tanks due to their rushed adoption into service, the tanks were in poor condition and some were even missing parts. The A13s were used in the 1st Armoured Division, but many were either destroyed by the superior German armoured forces or abandoned at Calais during the evacuation of Allied troops at Dunkirk, which forced the units to leave behind their heavier equipment.

After the disaster at France, the A13 were still used to support the war. Some were sent to Greece to support their defense against Germany in the Battle of Greece, but a majority were sent to North Africa as part of the Western Desert Campaign near Libya under the 7th Armoured Division. Compared to the time in France, the A13s in North Africa fared much better, ironing out most of its initial defects, and was even more suited to the environment than other tank designs. The A13 was popular with the crew for its high speed, reliability, and a powerful 2-pounder cannon that could engage a majority of Axis tanks in 1941. However, there was an insufficient number of A13s available for use, so tank units were mixed with the faster cruiser tanks and slower infantry tanks, which caused tactical and logistical difficulties trying to accommodate all of the tanks. Another deficiency with the tank and every other British tank with the 2-pounder was the lack of high-explosive shell issued to the tankers, which made them vulnerable to anti-tank guns, which caused a majority of British tank losses in the North African Campaign. Still, the A13 fared very well with its armour and armament until the late 1941 where better armoured Panzer IIIs and Panzer IVs began to appear on the battlefield.

Due to its growing obsolescence on the battlefield, the A13 was replaced in 1941 by the better armoured A15 Crusader tank.

Media

Skins
Videos

See also

Related British Cruiser style tanks

External links


Nuffield Mechanizations and Aero Limited
Cruiser Tanks 
Tank, Cruiser, Mk III (A13 Mk I)  A13 Mk I · A13 Mk I (3rd R.T.R.)
Tank, Cruiser, Mk IV (A13 Mk II)  A13 Mk II · A13 Mk II 1939
Tank, Cruiser, Mk VI, Crusader (A15)  Crusader II · Crusader "The Saint" · Crusader III
Tank Destroyers  Tortoise
SPAAs  Crusader AA Mk I · Crusader AA Mk II
Export  ▄Crusader Mk.II

Britain light tanks
A13  A13 Mk I · A13 Mk I (3rd R.T.R.) · A13 Mk II · A13 Mk II 1939
A15  Crusader II · Crusader "The Saint" · Crusader III
A17  Tetrarch I
IFV  Warrior
Wheeled  Daimler Mk II · AEC Mk II · Fox · Vickers Mk.11
Other  VFM5
South Africa 
SARC  SARC MkIVa · SARC MkVI (2pdr) · SARC MkVI (6pdr)
Ratel  Ratel 90 · Ratel 20
Rooikat  Rooikat Mk.1D · Rooikat 105 · Rooikat MTTD
Other  Concept 3 · Eland 90 Mk.7
USA  Stuart I · Stuart III

Britain premium ground vehicles
Light tanks  A13 Mk I (3rd R.T.R.) · A13 Mk II 1939 · AEC Mk II · Crusader "The Saint" · Rooikat 105
Medium tanks  A.C.I · Grant I · Cromwell V (RP-3) · Sherman IC "Trzyniec" · A.C.IV · Comet I "Iron Duke IV"
  Centurion Mk.2 · ▄Strv 81 (RB 52) · Centurion Mk.5 AVRE · Centurion Mk.5/1 · ▄Sho't Kal Dalet · Centurion Action X
  Vijayanta · Khalid · Challenger DS · Challenger 2 OES
Heavy tanks  Independent · Matilda Hedgehog · Excelsior · TOG II · Churchill Crocodile · Black Prince
Tank destroyers  Alecto I · Achilles (65 Rg.) · QF 3.7 Ram