
Ground Vehicles
FV4202
IV
Rank
AB
7.3
RB
7.3
SB
7.3
Battle rating

Great Britain
Research country
Medium tank
Main role
63,000

Research
200,000

Purchase
General information
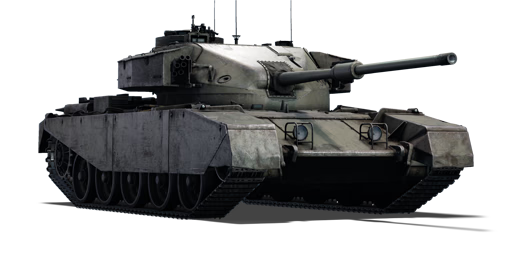
The FV4202 is a British medium tank. It was introduced in Update 1.63 "Desert Hunters". As the prototype of the Chieftain, it features the heavy sloping armour of the Chieftain on the chassis of a Centurion tank.
The FV4202 gives the player an excellent insight into what to expect from the rank IV and V medium tanks of the British ground forces. It features heavily sloped frontal armour and a powerful high penetrating cannon. The FV4202 is relatively mobile for its armour and weight, which can be used to put pressure on the enemy. When on the move, mind the turret armour and the lower frontal glacis, as these are the FV4202's greatest weak spots.
Camouflages
Survivability and armour
Armour
front / side / back
Hull
51 / 51 / 31 mm
Turret
240 / 90 / 93 mm
Visibility
100 %
Crew
4 persons
Support systems
Mobility
Max speed
Forward
3235 km/h
Backward
5 km/h
Power-to-weight ratio
13.812.226.321.4 hp/t
Engine power
510451973790 hp
Weight
37 t
Optics
Gunner
Commander
Driver
Optics zoom
5.6x–6.0x
9.9x–10.0x
—
Armaments
84 mm 20pdr OQF Mk.I cannon
Ammunition
50 rounds
First-order
8 rounds
Reload
basic crew → aces
8.1 → 6.3 s
Vertical guidance
-10 / 20°
Turret Rotation Speed
basic crew → aces
Horizontal
12.610.723.717.1 → 1815.333.924.5 °/s
Vertical
2.82.29.86.3 → 43.2149 °/s
| Ammunition | Type | Armor penetration (mm) at a distance: | |||||
|---|---|---|---|---|---|---|---|
| 10 m | 100 m | 500 m | 1000 m | 1500 m | 2000 m | ||
| APCBC | 239 | 236 | 222 | 206 | 192 | 178 | |
| HE | 19 | 19 | 19 | 19 | 19 | 19 | |
| APDS | 385 | 381 | 364 | 344 | 325 | 307 | |
| Smoke | 3 | 3 | 3 | 3 | 3 | 3 | |
7.62 mm L3A1 machine gun (coaxial)
Ammunition
7,500 rounds
Belt capacity
250 rounds
Reload
basic crew → aces
10.4 → 8 s
Fire rate
500 shots/min
| Belt | Belt filling | Armor penetration (mm) at a distance: | |||||
|---|---|---|---|---|---|---|---|
| 10 m | 100 m | 500 m | 1000 m | 1500 m | 2000 m | ||
| AP/T | 13 | 12 | 7 | 3 | 2 | 0 | |
Economy
Repair cost
Basic → Reference
AB
3,167 → 4,370
RB
3,610 → 4,982
SB
4,998 → 6,897
Crew training
57,000
Experts
200,000
Aces
800 
Research Aces
520,000
Reward multiplier
AB / RB / SB
120 / 180 / 200 %
172 %
Total cost of modifications
52,700
90,800
Talisman cost
1,700
Research order:
Mobility | |
|---|---|
Protection |
|---|
Firepower | ||
|---|---|---|
Rating by players
You must play more than 3 battles for the last week and more than 10 battles in a vehicle to rate it.
Like:
52
Armor protection:
Not enough ratings
Survivability:
Not enough ratings
Mobility:
Not enough ratings
Armament:
Not enough ratings
Balance:
Not enough ratings
Features & Facts
This space is currently empty
Do you know any interesting vehicle features?
Loading...

No articles about this vehicle yet
Become the first author and get rewards!
Write a guide, tell about interesting historical facts, make a tutorial or simply an interesting post.
No more content