Challenger 2

From War Thunder Wiki
Jump to: navigation, search
Rank IV USSR | Premium | Golden Eagles
Tu-1 Pack
This page is about the British medium tank Challenger 2. For other versions, see Challenger 2 (Family).
uk_challenger_ii.png
GarageImage Challenger 2.jpg
GarageImage Challenger 2 AddArmour.jpg
ArtImage Challenger 2.png
ArtImage2 Challenger 2.png
Challenger 2
AB RB SB
11.3 11.3 11.3
Class:
Research:350 000 Specs-Card-Exp.png
Purchase:950 000 Specs-Card-Lion.png
Show in game

Description

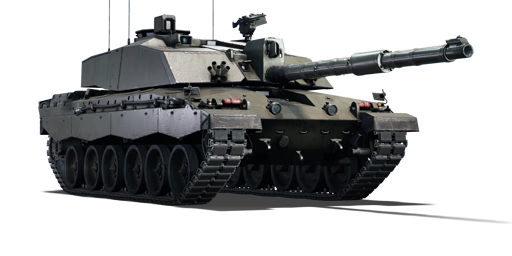
The FV4034 Challenger 2 is a third-generation British main battle tank (MBT) that has been predominantly in service with the British Army since 1994. Vickers Defence Systems (formerly BAE Systems Land & Armaments) designed it as a private venture in 1986, and it was a major redesign of the company's earlier Challenger (also referred to as Challenger 1). In December 1988, the Ministry of Defence requested a prototype. Despite superficial resemblances to the Challenger, design and advancements in technology suggest that only around 3% of the components are interchangeable. The new main combat tank outperforms its predecessor in every way. A couple of planned upgrading initiatives for the Challenger 2 tanks have recently been proposed. However, due to budget shortages, the British Army may be forced to withdraw its Challenger 2 fleet in the near future. The Challenger 2 is outfitted with second-generation Chobham composite armour. It's lighter than the original Chobham, but it's more protective. The tank's turret has been rebuilt. The Challenger 2 has NBC protection as well as autonomous fire suppression equipment. The new 120 mm Royal Ordnance L30A1 tank gun is installed on the Challenger 2. It can fire a wide range of standard NATO 120 mm tank ammunition. The loader manually loads the tank gun. The tank has a crew of four, with the driver in the centre front and three crew members in the turret, with the commander on the right, the gunner in front and below the commander, and the loader on the left side.

Introduced in Update 1.87 "Locked On", the Challenger 2 is the pinnacle of British tank design, the result of all the knowledge garnered from previous British main battle tank families such as the Chieftain and the Challenger. Given its competent qualities in firepower and armour, the Challenger 2 is a force to be reckoned with on the battlefield. Mobility, however, remains one of the key disadvantages of practically all British main battle tanks, particularly when compared to other nations. This will be a challenge during battles because players may struggle to reach strategic positions early in the game ahead of their opponents. Another notable weakness of the Challenger 2 is its driver hatch, which can still be penetrated by practically any tank at its rank. As a result, during combat, players should choose hull-down positions and avoid revealing the hull unless absolutely necessary.

General info

Survivability and armour

ERA
Effective action against the cumulative ammunition
Composite armour
Balanced protection against all types of ammunition
Smoke grenades
Creation of a smoke screen in front of the vehicle
ESS
Creation of a smoke screen in the direction of movement of the vehicle
Armourfront / side / back
Hull130 / 38 / 50
Turret270 / 80 / 58
Crew4 people
Visibility88 %

The Challenger 2 reinforces the strengths of the Challenger 1 Mk.2/Mk.3, with extremely well protected turret cheeks and better UFP protection, while suffering from similar weaknesses - a particularly weak lower front plate and negligible side protection.

The Challenger 2 has a defined gun mantlet that is far larger in area compared to previous Challenger models. This mantlet is very weak in comparison to the rest of the turret, providing roughly 300 mm of RHAe protection, making it a glaring weak spot that easily results in the destruction of the gun breech and loss of turret crew. Additionally, the taller turret design exposes a weak frontal roof slope - while this is a somewhat small vulnerability, penetration may result in the gunner or commander's incapacitation.

Similarly to the Challenger 1s, the driver's hatch on the Challenger 2 is a significant weakness that compromises the well protected UFP. The hatch has no composite behind it and provides at best 100 mm of RHA protection. As such, the Challenger 2 thrives in hull-down positions where minimal vulnerabilities are exposed and it can retreat into further cover if one of the few weak spots are penetrated. In situations where protective positioning is not an option, the Challenger 2 should be used conservatively and carefully, avoiding direct confrontation wherever possible.

If direct melee confrontation with Soviet medium tanks is impossible to avoid, operator should note, that, due to design differences, Challenger 2 towers over tanks like T-64B and at point blank (almost ramming range), LFP becomes untargetable for them, while UFP and turret take such a high angle, that even upgraded APFSDS of theirs have problems penetrating them. While it's very unlikely that rank VI or VII player will be this startled, Challenger 2 can survive about two to three panic shots like this.

If the enemy was not confused by your aggression and immediately fired at driver's hatch or gun mantlet, the outcome will then be decided by amount of ammunition still stored inside of tank turret. If it was low enough, and the enemy didn't account for it, then, depending on shell used, tank will lose either driver, loader, gunner or gun breech.

During urban combat it is also important to remember, that Challenger 2 hull is very big and long, compared to small Soviet MBT. It can block entire street with just its hull if it was immobilized, rendering your teammates unable to assist. It is also very heavy and hard to push around, so they won't be able to just move you out of the way.

Keep yourself closer to walls and avoid narrow streets, if you ever need to be helped/towed.

Armour type:

Armour Front (Slope angle) Sides Rear Roof
Hull 38 mm (79-82°), 50* mm (60°) Upper glacis
70 mm (28°) Lower glacis
60 mm (84°-0°) Driver hatch
25 mm (0°) Top
50 mm
38 mm (14°) + 4 mm Bottom
25 mm (29-30°) + 4 mm 20 mm
25 mm (71-74°) Sides
10 mm (90°) Engine grille
Turret 50* mm (50°)
30 mm (50-0°), 4 mm Gun mantlet
38 mm (0-90°) Turret cast
20 mm (6-7°) Front
25 mm (6°) Mid right
80 mm (6°) Mid
10 mm (6-7°) Rear
10 mm (17-18°)
38 mm (82°)
10 mm (80-90°) Rear
38 mm (75-78°)
20 mm (71°) Sides
38 mm (82-79°)Turret cast
Cupola 60 mm 60 mm 60 mm 44 mm
Composite armour* Front Sides
Hull 200 mm NERA + 80 mm RHA + 50 mm RHA 150 mm NERA, 70 mm screens Side skirts
Turret 400 mm NERA + 100 mm RHA + 170 mm RHA
200 mm RHA Gun mantlet
230 mm NERA + 20 mm RHA + 70 mm RHA

Notes:

  • 50-200 mm RHA armoured ammo bins inside the crew compartment.
  • 25 mm RHA armour plates next the driver position.
  • Exterior fuel tanks separate the external side armour plate and the composite side armour plate.
  • The floor armour thickness is 16 mm.

Mobility

Speedforward / back
AB66 / 42 km/h
RB and SB60 / 38 km/h
Number of gears8 forward
4 back
Weight62.5 t
Engine power
AB2 322 hp
RB and SB1 217 hp
Power-to-weight ratio
AB37.2 hp/t
RB and SB19.5 hp/t
Game Mode Max Speed (km/h) Weight (tons) Engine power (horsepower) Power-to-weight ratio (hp/ton)
Forward Reverse Stock AoA Stock Upgraded Stock Upgraded
Arcade 66 42 62.5 1.1 1,886 2,322 30.18 36.51
Realistic 60 38 1,076 1,217 17.22 19.14

The Challenger 2 is fitted with a similar twin turbo V12 diesel engine to the Challenger 1, producing a maximum of 1,200 horsepower. The Challenger 2 can reach a maximum forward speed of 66 km/h (41 mph) in AB and 59 km/h (37 mph) in RB. The vehicle's stock performance is lacklustre, with acceleration and manoeuvrability suffering due to the Challenger 2's 62.5 tonne total weight. However, once all upgrades are researched, the Challenger 2 performs acceptably, despite being generally out-classed by competitor vehicles like the M1A2 and T-80U. The Challenger 2 also utilises a fully functional neutral steering system, and even when stock the vehicle's neutral steering ability is admirable - easiest used with manual gear selection to avoid shifting during traverse. Notably, the Challenger 2's reverse speed is quite comfortable, with the vehicle capable of up to 36 km/h (RB/SB) backwards thanks to the two reverse gears.

Modifications and economy

Repair costBasic → Reference
AB3 932 → 6 845 Sl icon.png
RB3 843 → 6 690 Sl icon.png
SB4 861 → 8 463 Sl icon.png
Total cost of modifications281 900 Rp icon.png
463 000 Sl icon.png
Talisman cost3 000 Ge icon.png
Crew training270 000 Sl icon.png
Experts950 000 Sl icon.png
Aces2 200 Ge icon.png
Research Aces1 210 000 Rp icon.png
Reward for battleAB / RB / SB
150 / 190 / 210 % Sl icon.png
244 / 244 / 244 % Rp icon.png
Modifications
Mobility Protection Firepower
Mods new tank traks.png
Tracks
Research:
12 000 Rp icon.png
Cost:
19 000 Sl icon.png
320 Ge icon.png
Mods new tank suspension.png
Suspension
Research:
11 000 Rp icon.png
Cost:
17 000 Sl icon.png
290 Ge icon.png
Mods new tank break.png
Brake System
Research:
11 000 Rp icon.png
Cost:
17 000 Sl icon.png
290 Ge icon.png
Mods new tank filter.png
Filters
Research:
19 000 Rp icon.png
Cost:
29 000 Sl icon.png
500 Ge icon.png
Mods new tank transmission.png
Transmission
Research:
16 000 Rp icon.png
Cost:
25 000 Sl icon.png
420 Ge icon.png
Mods new tank engine.png
Engine
Research:
16 000 Rp icon.png
Cost:
25 000 Sl icon.png
420 Ge icon.png
Mods tank tool kit.png
Improved Parts
Research:
3 600 Rp icon.png
Cost:
19 000 Sl icon.png
320 Ge icon.png
Mods extinguisher.png
Improved FPE
Research:
3 300 Rp icon.png
Cost:
17 000 Sl icon.png
290 Ge icon.png
Mods tank reinforcement uk.png
Crew Replenishment
Research:
19 000 Rp icon.png
Cost:
29 000 Sl icon.png
500 Ge icon.png
Mods engine smoke screen system.png
ESS
Research:
16 000 Rp icon.png
Cost:
25 000 Sl icon.png
420 Ge icon.png
Mods new tank horizontal aiming.png
Horizontal Drive
Research:
12 000 Rp icon.png
Cost:
19 000 Sl icon.png
320 Ge icon.png
Mods tank ammo.png
120mm_britain_Smoke_ammo_pack
Research:
12 000 Rp icon.png
Cost:
19 000 Sl icon.png
320 Ge icon.png
Mods tank ammo.png
120mm_britain_L26_APDSFS_ammo_pack
Research:
12 000 Rp icon.png
Cost:
19 000 Sl icon.png
320 Ge icon.png
Mods tank cannon.png
Adjustment of Fire
Research:
11 000 Rp icon.png
Cost:
17 000 Sl icon.png
290 Ge icon.png
Mods smoke screen.png
Smoke grenade
Research:
11 000 Rp icon.png
Cost:
17 000 Sl icon.png
290 Ge icon.png
Mods thermal sight.png
NVD
Research:
11 000 Rp icon.png
Cost:
17 000 Sl icon.png
290 Ge icon.png
Mods new tank vertical aiming.png
Elevation Mechanism
Research:
19 000 Rp icon.png
Cost:
29 000 Sl icon.png
500 Ge icon.png
Mods tank additional armor.png
Dorchester 2E
Research:
19 000 Rp icon.png
Cost:
29 000 Sl icon.png
500 Ge icon.png
Mods tank laser rangefinder.png
Laser rangefinder
Research:
16 000 Rp icon.png
Cost:
25 000 Sl icon.png
420 Ge icon.png
Mods tank ammo.png
120mm_britain_L27_APDSFS_ammo_pack
Research:
16 000 Rp icon.png
Cost:
25 000 Sl icon.png
420 Ge icon.png
Mods art support.png
Artillery Support
Research:
16 000 Rp icon.png
Cost:
25 000 Sl icon.png
420 Ge icon.png

Armaments

Laser rangefinder
Reduces the error and increases the maximum measurable distance of the rangefinder
Night vision device
Improves visibility by enhancing natural light or active illumination.
Thermal imager
Allows to see thermal radiation in the infrared range day and night

Main armament

Two-plane stabilizer
Reduces the swing of the gun in two planes while moving
Ammunition50 rounds
First-order4 rounds
Reloadbasic crew → aces
6.5 → 5.0 s
Vertical guidance-10° / 20°
Main article: L30A1 (120 mm)

The Challenger 2's primary armament is the 120 mm L30A1 cannon. Unlike most modern MBT cannons, the L30A1 is rifled as opposed to smoothbore. This is primarily due to the British preference for HESH ammunition availability (High-Explosive Squash Head), the design of which requires a rifled cannon for accurate fire. The rifled design has some positive attributes: it's extremely accurate with both HESH and APFSDS rounds, including at long range; however the downside is a limited selection of ammunition: the CR2 only has the L23A1, L26 and L27A1 APFSDS rounds, the L31A7 HESH round and the L34 Smoke round available to it.

The L30A1 has a base reload time of 6.5 seconds, improving to 5 seconds with an aced crew. As a result, the Challenger 2 sports the fastest reloading non-autoloaded 120 mm cannon in-game. In addition, the Challenger 2 allows the L30A1 a comfortable 10° of gun depression and a reasonable turret traverse speed.

The characteristics of the CR2 in combination with the L30A1 weight the vehicle towards a long-range sniping playstyle, generally the vehicle feels very comfortable doing as it minimises the inferior mobility of the vehicle by having it stay in the back, providing long range fire support and exploiting unaware enemies.

120 mm L30A1 Turret rotation speed (°/s) Reloading rate (seconds)
Mode Capacity Vertical Horizontal Stabilizer Stock Upgraded Full Expert Aced Stock Full Expert Aced
Arcade 50 -10°/+20° ±180° Two-plane 29.5 40.8 49.6 54.8 58.4 6.50 5.75 5.30 5.00
Realistic 18.4 21.7 26.4 29.1 31.0

Ammunition

Penetration statistics
Ammunition Type of
warhead
Penetration @ 0° Angle of Attack (mm)
10 m 100 m 500 m 1,000 m 1,500 m 2,000 m
Shot L23A1 APFSDS 396 394 387 376 367 357
Shell L31A7 HESH 152 152 152 152 152 152
L26 APFSDS 493 491 487 481 474 468
L27A1 APFSDS 564 562 557 551 545 538
Shell details
Ammunition Type of
warhead
Velocity
(m/s)
Projectile
mass (kg)
Fuse delay
(m)
Fuse sensitivity
(mm)
Explosive mass
(TNT equivalent) (kg)
Ricochet
0% 50% 100%
Shot L23A1 APFSDS 1,535 3.89 - - - 78° 80° 81°
Shell L31A7 HESH 670 17.34 0.1 4 6.53 73° 77° 80°
L26 APFSDS 1,650 4.3 - - - 78° 80° 81°
L27A1 APFSDS 1,650 4.3 - - - 78° 80° 81°
Smoke shell characteristics
Ammunition Velocity
(m/s)
Projectile
mass (kg)
Screen radius
(m)
Screen deploy
time (s)
Screen hold
time (s)
Explosive mass
(TNT equivalent) (g)
L34 670 17.1 20 5 25 50

Ammo racks

Ammo racks of the Challenger 2
Full
ammo
Ammo
part
1st
rack empty
2nd
rack empty
3rd
rack empty
4th
rack empty
50 Projectiles
Propellants
48 (+2)
45 (+5)
45 (+5)
39 (+11)
43 (+7)
31 (+19)
41 (+9)
22 (+28)
5th
rack empty
6th
rack empty
7th
rack empty
8th
rack empty
9th
rack empty
Visual
discrepancy
34 (+16)
14 (+36)
29 (+21)
(+45)
(+45)
(+49)
4 (+46)
N/A
(+49)
N/A
No

Notes:

  • Projectile racks 8 and 9, and propellant rack 7, are first-stage ammo racks.
  • Hull front empty: 39 (+11) shells.

Machine guns

Ammunition1 700 rounds
Belt capacity100 rounds
Reloadbasic crew → aces
10.4 → 8.0 s
Fire rate650 shots/min
Ammunition4 000 rounds
Belt capacity2 000 rounds
Reloadbasic crew → aces
10.4 → 8.0 s
Fire rate600 shots/min

The Challenger 2 possesses one pintle-mounted 7.62 mm machine gun and one coaxial 7.62 mm machine gun. While these aren't particularly effective against tanks, they can be used as a aircraft deterrent, and lucky shots may result in critical damage or pilot snipes. Besides anti-aircraft fire, they're useful for clearing light obstacles and the crew of open-top vehicles.

7.62 mm L37A2
Mount Capacity (Belt) Fire rate Vertical Horizontal
Pintle 1,700 (100) 650 -10°/+25° ±180°
7.62 mm L94A1
Mount Capacity (Belt) Fire rate Vertical Horizontal
Coaxial 4,000 (2,000) 600 N/A N/A

Usage in battles

The Challenger 2 excels as a sniper or a support tank, and should be played as such whenever possible; the farther the better. As such, it's important to try to find reasonable cover, regardless of the situation, with the ideal position being hull-down, preferably with some degree of angling available to maximise the bouncing capability of the frontal turret roof section. The Challenger 2 is the slowest of the top rank MBTs - a fact which is extremely important to keep in mind when using it - and as such should never be expected to rush points or used for quick flanks.

Rural Combat

The CR2 is most comfortable in rural combat, where cover is generally plentiful and targets will often open themselves to fire when moving forward. This is particularly perceptible on maps such as Maginot Line, where, in most configurations, the main routes to capture points are open to snipers on hills throughout the landscape. In these situations the CR2 excels, able to hold a defensive position while protecting team members in faster MBTs and covering capture points.

Urban Combat

The Challenger 2 is less agreeable in urban situations, where proper cover is more rare and its fatal weak points are often more exposed. In some situations, such as Alaska, the opportunity may arise to flank around the side roads and pick a somewhat protected position behind the ridges lining them. However, in other maps like American Desert or Cargo Port proper hull-down cover is sparse and the vehicle can only be utilised without proper protection. In situations such as this, the Challenger 2 is best played defensively holding angles and slowly pushing forward with careful attention to the local surroundings and where opposing vehicles may appear from.

Notable enemies

  • Leopard 2A5 - The 2A5 should be engaged with care: it has better overall protection than the Challenger 2, and in many situations can appear near-impossible to destroy at range. Aim for the gun mantlet with at least the intention of disabling the weapon; some rounds may make it past and knock crew out. If the frontal hull is presented, aim for the left side of the hull as usually the driver, gunner and commander are all lined up so they can be knocked out all at the same time, resulting in the Leopard's destruction.
  • Leclerc - The Leclerc is in possession of one of the few rounds capable of penetrating the Challenger 2 UFP reliably. When in combat with the Leclerc, it's important to expose as little of the CR2 as possible - if the Leclerc is able to destroy your weapon, it will often be able to use its high speed to get close enough to finish you off.
  • C1 Ariete/Ariete PSO - The C1 Ariete and Ariete PSO with the CL1343 shell can penetrate nearly anywhere on the Challenger 2, with the exception of the outer turret cheeks (and even then, at close ranges and particular angles, it can punch through those). As such, it's a potent sniper and should be handled with care. Fortunately, the Ariete MBTs have somewhat sub-par protection characteristics, and the Challenger 2 will often prove itself capable of quickly dispatching an Ariete at any range.

Pros and cons

Pros:

  • Extremely accurate main cannon with a fast reload, particularly for a 120 mm; also good gunner optics
  • 10° of gun depression is highly useful and also increases the extremely good turret cheek protection
  • 36 km/h reverse speed, a far cry from the early poor reverse speed of other British MBTs
  • Has ESS, smoke shells and smoke grenades, a potential combat support tank
  • Excellent armour protection levels and can get upgraded chemical protection with Dorchester armour pack
  • Ammunition on the turret is inert; less vulnerable to overpenetrating shots by APFSDS. (NATO tanks with "blowout panel" as IPM1, can get sniped through the turret and explode)
  • Only strongest HE ATGM can overpressure the driver port, effectively making it immune to the "HE to the turret neck" strategy that can instantly obliterate any other MBT (protects against certain kinds of players and ATGM tanks)

Cons:

  • A CR2 with an exposed hull is extremely vulnerable because of the negligible LFP armour
  • Cannon mantlet area has unreliable armour; this is the worst weak spot as is impossible to hide while firing
  • The frontal turret roof is somewhat vulnerable to chemical rounds when the optics or the machine gun is hit
  • Ammunition propellants are strewn inside the vehicle; hull or side penetrations often result in ammo detonation (Avoidable with only 16 shells loaded)
  • Sub-par acceleration and top speed relative to many other MBTs
  • Prior to mobility upgrades being researched, manual neutral gear selection is required for reasonable hull traverse
  • Can't fight well against high ground, particularly if enemy has superior APFSDS

History

Work on developing a successor to the Challenger 1 began only a short time after the vehicle entered service with the British armed forces. Already by the mid-1980s, the Vickers company had developed a new MBT as part of a private venture. After requirements for a next-generation MBT have been issued, Vickers immediately submitted their design on the new Challenger 2 to the Ministry of Defence. Having briefly considered the adoption of the M1 Abrams, the Ministry decided to proceed with the Vickers design by ordering the construction of a prototype Challenger 2 for testing and evaluation. The Challenger 2 passed the evaluation and met expectations even when put through comparative testing against contemporary MBTs of other nations, such as the American M1 Abrams and German Leopard 2. Satisfied with the test results, the Ministry of Defence adopted the Challenger 2 and placed the first production order in 1993, with the initial batch consisting of 127 tanks in addition to 13 trainer vehicles. The first Challenger 2 tanks were delivered to the tank regiments by 1994. The Challenger 2 participated in several operations during the '90s and into the 2000s, ranging from peacekeeping missions on the Balkans to military interventions in Iraq. A number of Challenger 2 MBTs have also been exported to Oman, with this nation being the only operator of the Challenger 2, besides the UK. Production of Challenger 2 tanks seized in 2002 after all pending production orders were fulfilled, with close to 440 vehicles being produced. Since 2008, Challenger 2 tanks have constantly been undergoing modernization work, with a number of upgrade packages being developed. Thanks to these upgrades, the Challenger 2 MBT is expected to serve with the British Army well into the future.

- From Devblog

Media

Skins
Videos

See also

External links


Britain medium tanks
Valentine  Valentine I · Valentine IX · Valentine XI
Cromwell  Cromwell I · Cromwell V · Cromwell V (RP-3)
Cromwell derivatives  Challenger · Avenger · Comet I · Comet I "Iron Duke IV" · Charioteer Mk VII
Centurion  Centurion Mk 1 · Centurion Mk.2 · Centurion Mk 3 · Centurion Mk.5 AVRE · Centurion Mk 10 · Centurion Action X · FV4202
Vickers MBT  Vickers Mk.1 · Vickers Mk.3 · Vickers Mk.7
Chieftain  Chieftain Mk 3 · Chieftain Mk 5 · Chieftain Mk 10
Challenger 1  Challenger Mk.2 · Challenger Mk.3 · Challenger DS
Challenger 2  Challenger 2 · Challenger 2 (2F) · Challenger 2 TES · Challenger 2 OES · Challenger 2E · Challenger 2 Black Night
Challenger 3  Challenger 3 TD
Australia  A.C.I · A.C.IV · Centurion Mk.5/1
South Africa  Olifant Mk.1A · Olifant Mk.2 · TTD
India  Vijayanta · Bhishma TWMP
Israel  ▄Sho't Kal Dalet
Jordan  Khalid
Sweden  ▄Strv 81 (RB 52)
USA  Grant I · Sherman II · Sherman Firefly · Sherman IC "Trzyniec"