Crusader "The Saint"

From War Thunder Wiki
Jump to: navigation, search
This page is about the British light tank Crusader "The Saint". For other versions, see Crusader (Family).
Crusader "The Saint"
uk_crusader_mk_2_the_saint.png
GarageImage Crusader "The Saint".jpg
StoreImage Crusader "The Saint" 001.jpg
StoreImage Crusader "The Saint" 002.jpg
StoreImage Crusader "The Saint" 003.jpg
ArtImage Crusader "The Saint".png
Crusader "The Saint"
AB RB SB
2.3 2.7 2.7
Purchase:700 Specs-Card-Eagle.png
Show in game
STORE

Description

The Tank, Cruiser Mark VIA, Crusader II "The Saint" (A15) was a particular Crusader II assigned to the 10th Royal Hussars regiment, which was part of the 2nd Armoured Brigade, 1st Armoured Division during the North African Campaign. The 10th Royal Hussars (Prince of Wale's Own) was a British Army cavalry regiment formed in 1715. It served for three centuries, during World War I and II, before combining with the 11th Hussars (Prince Albert's Own) in October 1969 to form the Royal Hussars (Prince of Wales's Own). When World War II broke out, the 1st Armoured Division was sent to France. It fought in northern France and Belgium before returning to England in June 1940 without any vehicles. A group of personnel were transferred in December 1940 to create the cadre of the 23rd Hussars. The regiment moved to North Africa with the 2nd Armoured Brigade in November 1941, joining the 7th Armoured Division. It saw action in Operation Crusader, the Battle of Alam el Halfa in August 1942, and the Second Battle of El Alamein in October 1942, now armed with Crusader II tanks. The regiment seized General Wilhelm Ritter von Thoma, the German Deputy Commander, at El Alamein. During the Italian Campaign of 1944 and 1945, the regiment fought both as an armoured unit and as dismounted infantry.

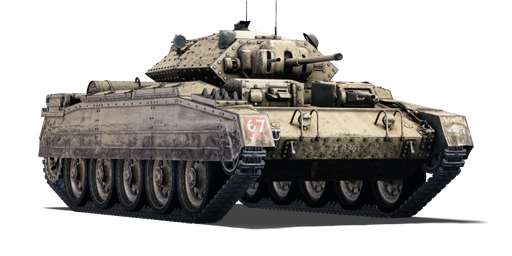
Introduced in Update "Regia Marina", the Crusader II "The Saint" is a capable short-range light tank. It is the same as the standard Crusader II used by the British Army's ground forces. It is armed with a fast-firing 40 mm Ordnance QF 2-pounder tank gun, which is suitable for destroying tanks with a crowded interior and crew close to each other. Along with its quick reload, primitive vertical gun stabilizer, and excellent handling, it is a fun light tank to play with. Handling is greatly improved over the A13 cruiser tanks due to improved cross-country performance and the vehicle not sliding during abrupt breaking. Because of its low profile and lack of armour, driving and fighting in the open field should be avoided unless there is enough cover or the terrain is shaped in such a way that the hull-down tactics, which this tank excels at, may be used. The tank also boasts good gun depression and a difficult-to-hit turret.

General info

Survivability and armour

Smoke grenades
Creation of a smoke screen in front of the vehicle
Armourfront / side / back
Hull20 / 28 / 14
Turret52 / 24 / 30
Crew5 people
Visibility76 %

Armour protection on the Crusader "The Saint" is the same as the Crusader II, and as a cruiser tank is understandably poor in most areas. The hull is generally very penetrable, only averaging 30-40 mm of equivalent protection. However, the two protrusions for the driver and machine gunner have hatches which can easily block a shot or in some cases reduce spalling, only knocking out 1-2 crew with APCBC. Side and back armour are predictably weak.

The turret armour is the thickest on the cheeks, and the angled sides can also block or bounce rounds if correctly angled and baited. The mantlet is a clear weakspot, often resulting in the turret crew being completely wiped out. The armour on the tank is supplemented by the 5 crew members, which can save players from a one-shot. In the case of the mantlet, the three turret crew may be knocked out, but the tank will survive if the driver and machine gunner remain, allowing those positioned away from the enemy a chance to get away. Additionally, the gun, coaxial machine gun, and optics in the mantlet can also block shots, though this shouldn't be relied on.

Armour type:

  • Rolled Homogeneous Armour (hull, turret)
  • Cast Homogeneous Armour (gun mantlet, MG mantlet, driver viewport)
Armour Front (Slope angle) Sides Rear Roof
Hull 9-32 mm (27-81°) Frontal plates
22.22 + 18 mm (1°) Driver's box
32 mm Driver's viewports
14 mm 7-12 mm
Turret 31.75 mm Turret front (9-73°)
30 mm Gun mantlet (7-83°)
14 mm 17 mm 12.7 mm
Machine gun turret 30 mm Turret Front
20 mm Mantlet
30 mm 9 mm

Notes:

  • Suspension wheels and tracks are 15 mm thick.
  • Mudguards, sideskirts and storage boxes are 4 mm thick.
  • Belly armour is 6.35 mm thick.

Mobility

Speedforward / back
AB47 / 8 km/h
RB and SB43 / 7 km/h
Number of gears4 forward
1 back
Weight16.3 t
Engine power
AB649 hp
RB and SB340 hp
Power-to-weight ratio
AB39.8 hp/t
RB and SB20.9 hp/t
Game Mode Max Speed (km/h) Weight (tons) Engine power (horsepower) Power-to-weight ratio (hp/ton)
Forward Reverse Stock Upgraded Stock Upgraded
Arcade 47 8 16.3 527 649 32.33 39.82
Realistic 43 7 301 340 18.47 20.86

Modifications and economy

Repair cost
AB659 Sl icon.png
RB497 Sl icon.png
SB389 Sl icon.png
Crew training2 300 Sl icon.png
Experts15 000 Sl icon.png
Aces115 Ge icon.png
Research Aces320 000 Rp icon.png
Reward for battleAB / RB / SB
Talisman.png 2 × 40 / 40 / 40 % Sl icon.png
Talisman.png 2 × 112 / 112 / 112 % Rp icon.png
Modifications
Mobility Protection Firepower
Mods new tank traks.png
Tracks
Mods new tank suspension.png
Suspension
Mods new tank break.png
Brake System
Mods new tank filter.png
Filters
Mods new tank transmission.png
Transmission
Mods new tank engine.png
Engine
Mods tank tool kit.png
Improved Parts
Mods extinguisher.png
Improved FPE
Mods tank reinforcement uk.png
Crew Replenishment
Mods new tank horizontal aiming.png
Horizontal Drive
Mods tank ammo.png
40mm_uk_2pdr_APHV_ammo_pack
Mods tank cannon.png
Adjustment of Fire
Mods airstrike.png
Airstrike
Mods tank ammo.png
40mm_uk_2pdr_APHE_ammo_pack
Mods new tank vertical aiming.png
Elevation Mechanism
Mods scouting.png
Improved optics
Mods art support.png
Artillery Support
Mods tank ammo.png
40mm_uk_2pdr_APCBC_ammo_pack
Mods smoke screen.png
Smoke grenade

Armaments

Main armament

Shoulder stabilizer
Reduces the swing of the gun in one plane while moving
Ammunition110 rounds
Reloadbasic crew → aces
3.6 → 2.8 s
Vertical guidance-15° / 20°
Main article: QF 2-pounder (40 mm)
40 mm QF 2-pounder Turret rotation speed (°/s) Reloading rate (seconds)
Mode Capacity Vertical Horizontal Stabilizer Stock Upgraded Full Expert Aced Stock Full Expert Aced
Arcade 110 -15°/+20° ±180° Vertical 34.27 47.44 57.60 63.69 67.76 3.64 3.22 2.97 2.80
Realistic 21.42 25.20 30.60 33.84 36.00

Ammunition

Penetration statistics
Ammunition Type of
warhead
Penetration @ 0° Angle of Attack (mm)
10 m 100 m 500 m 1,000 m 1,500 m 2,000 m
Shot Mk.1 AP/T AP 72 68 52 37 27 19
Shot Mk.IXB APCBC/T APCBC 89 86 77 66 57 50
Shot Mk.1 APHV/T AP 80 75 58 41 30 21
Shell Mk.1 AP/T APHE 66 62 49 36 26 20
Shell details
Ammunition Type of
warhead
Velocity
(m/s)
Projectile
mass (kg)
Fuse delay
(m)
Fuse sensitivity
(mm)
Explosive mass
(TNT equivalent) (g)
Ricochet
0% 50% 100%
Shot Mk.1 AP/T AP 792 1.08 - - - 47° 60° 65°
Shot Mk.IXB APCBC/T APCBC 792 1.24 - - - 48° 63° 71°
Shot Mk.1 APHV/T AP 853 1.08 - - - 47° 60° 65°
Shell Mk.1 AP/T APHE 792 1.08 1.2 9 20.9 47° 60° 65°

Ammo racks

Ammo racks of the Crusader "The Saint"
Full
ammo
1st
rack empty
2nd
rack empty
3rd
rack empty
4th
rack empty
5th
rack empty
Visual
discrepancy
110 89 (+21) 67 (+43) 45 (+65) 23 (+87) (+109) No

Notes:

  • Turret & center empty: 45 (+65) shells.
  • Racks disappear after all shells in the rack have been shot or loaded.

Machine guns

Ammunition3 375 rounds
Belt capacity225 rounds
Reloadbasic crew → aces
10.4 → 8.0 s
Fire rate600 shots/min
Ammunition4 950 rounds
Belt capacity225 rounds
Reloadbasic crew → aces
10.4 → 8.0 s
Fire rate600 shots/min
Main article: BESA (7.92 mm)
7.92 mm BESA
Mount Capacity (Belt) Fire rate Vertical Horizontal
Coaxial 3,375 (225) 600 N/A N/A
Turreted 4,950 (225) 600 ±10° ±50°

Usage in battles

Characteristics

Being a light tank, the Crusader features high mobility at the cost of armour.

The largest downside to the Crusader is the relatively thin armour, even on the front. Most tank guns that the Crusader will face will penetrate the frontal armour, and the side and rear armour can even be penetrated by heavy machine guns. As such the Crusader's armour can not be relied upon, which makes utilization of the gun depression - to reduce the visible and hittable profile of the tank - more important. On the other hand, shots can sometimes ricochet off the frontal armour due to the complex armour scheme with many angles.

On the bright side, the Crusader II has sufficient firepower to deal with most enemy tanks that it can face from the front, but there are tanks (especially heavy tanks) that may have too much armour on the frontal arc to penetrate. These tanks must be flanked - which is not too hard to do with the Crusader's mobility - in order to destroy them. The rapid reload of this tank's gun often allows a second shot before the enemy can even get their first shot off. The vertical stabilizer used on the gun also allows accurate firing on the move at low speeds, which can be handy in a frontal engagement.

Another strength of the Crusader is the above average 15 degrees of gun depression. This allows the Crusader to poke its turret over a hill without exposing the hull, and also allows it to fire over hills that other contemporary tanks could not dream of firing from.

The Crusader also features a smoke grenade mortar in the turret. When activated, the mortar launches one smoke grenade in the direction the turret is pointed, allowing for a smoke screen to be made very quickly. The smoke grenades allow the Crusader to hide while repairing, retreat when under heavy attack, or to capture a point without the enemy able to lay accurate fire upon it. Just remember that the smoke grenades fire in the direction the turret is facing so make sure to point the turret in the direction the smoke is needed in.

Ammunition

There are only two out of the four rounds available that are worth taking into battle - Shot Mk.IXB APCBC/T (APCBC) and Shell Mk.1 AP/T (APHE). These two shells both have their uses on the field of battle.

The APHE round is most useful against lightly armoured targets or against the sides of tanks because despite the lesser penetration it has explosive filler which gives it the highest post-penetration damage. If carrying this as the first round loaded just beware that you may have to switch to the APCBC round in order to penetrate the target.

The APCBC round has the highest penetration of all the ammo types which makes it ideal because it gives the highest chance of penetrating the target, and therefore doing damage. The downside of this round is it has no high explosive filler so if it is loaded just make sure to aim so that the shot will penetrate and take out crew members, rather than not aiming well enough and not taking out crucial crew members.

Playstyle

When using "The Saint", many players will perform to the vehicle's best by using it as a point capper and hit-n-runner. The mobility can be used to rush around the battlefield, capturing points and destroying enemy tanks as it goes. This playstyle prevents the enemy from pinpointing your location because you are always moving, but it also means that there is a chance that you overextend and cannot retreat when necessary or that you may run into too many enemies to deal with at once. Additionally, beware that despite your high mobility there are other highly mobile tanks such as the BT-7s or M3/M5 Stuarts that are just as fast or faster than you. These tanks are highly dangerous, so be careful not to rush too far forwards too early. Also make sure to use the gun depression as often as possible because it reduces the surface area of your tank that the enemy can shoot at, making it harder for the enemy to shoot your tank. Remember, in cases where the enemy assault is overwhelming or you are disabled and possibly will be fired upon, use the smoke grenade launcher in order to mask your tanks location.

Note: when facing a tank with armour too heavy to penetrate from the front, use the high mobility to outflank or outturn that tank in order to put shots into its thinner side armour.

Pros and cons

Pros:

  • Great manoeuvrability and speed, almost as fast as the M5 Stuarts
  • Good cannon with fast reload and adequate penetration
  • Amazing -15° gun depression allows hull-down over almost any hill
  • Has a low profile, harder to be seen and shot at
  • Turret rotation is quite fast

Cons:

  • Thin armour, easily penetrable by common foes like Pz.III, Chi-Ha, BT-7
  • Cannon has limited damage especially against large tanks like LVT(A)(1)
  • Poor reverse speed won't save it from danger
  • Narrow tracks worsens its agility on loose terrain like snow

History

Crusader "The Saint"

"The Saint" was a Crusader II cruiser tank of the British A squadron of the 10th regiment of Royal Hussars, 2nd Armoured Brigade of the 1st Armoured Division.

1st Division

The 1st Division, understrength at the time, was sent to France as part of the 2nd British Expeditionary Force (BEF) in 1940. It saw combat during the Battle of France, after landing on 14 May 1940, but suffered heavy losses and was forced to evacuate at Dunkirk on 16 June 16. The division then stood in England until August 1941 in anticipation of a German invasion, which never came.

The 1st Division shipped out to Egypt in November 1941. In Africa, the 1st Division saw combat against the German Deutsches Afrikakorps (DAK) in battles such as Gazala, Mersa Matruh, First El Alamein, Second El Alamein, Tebaga Gap, Mareth Line, Akarit, El Kourzia and Tunis. After the Afrikakorps surrendered in May 1943, the 1st Division remained in Africa until May 1944 when it shipped to Italy. Due to heavy losses among the 2nd Armoured Brigade during the battle of Coriano, the 1st Division ceased operations in October 1944 and was broken up and officially disbanded on 11 January 1945.

Media

Skins
Videos

See also

Links to the articles on the War Thunder Wiki that you think will be useful for the reader, for example:

  • reference to the series of the vehicles;
  • links to approximate analogues of other nations and research trees.

External links

Paste links to sources and external resources, such as:

  • topic on the official game forum;
  • other literature.


Nuffield Mechanizations and Aero Limited
Cruiser Tanks 
Tank, Cruiser, Mk III (A13 Mk I)  A13 Mk I · A13 Mk I (3rd R.T.R.)
Tank, Cruiser, Mk IV (A13 Mk II)  A13 Mk II · A13 Mk II 1939
Tank, Cruiser, Mk VI, Crusader (A15)  Crusader II · Crusader "The Saint" · Crusader III
Tank Destroyers  Tortoise
SPAAs  Crusader AA Mk I · Crusader AA Mk II
Export  ▄Crusader Mk.II

Britain light tanks
A13  A13 Mk I · A13 Mk I (3rd R.T.R.) · A13 Mk II · A13 Mk II 1939
A15  Crusader II · Crusader "The Saint" · Crusader III
A17  Tetrarch I
IFV  Warrior
Wheeled  Daimler Mk II · AEC Mk II · Fox · Vickers Mk.11
Other  VFM5
South Africa 
SARC  SARC MkIVa · SARC MkVI (2pdr) · SARC MkVI (6pdr)
Ratel  Ratel 90 · Ratel 20
Rooikat  Rooikat Mk.1D · Rooikat 105 · Rooikat MTTD
Other  Concept 3 · Eland 90 Mk.7
USA  Stuart I · Stuart III

Britain premium ground vehicles
Light tanks  A13 Mk I (3rd R.T.R.) · A13 Mk II 1939 · AEC Mk II · Crusader "The Saint" · Rooikat 105
Medium tanks  A.C.I · Grant I · Cromwell V (RP-3) · Sherman IC "Trzyniec" · A.C.IV · Comet I "Iron Duke IV"
  Centurion Mk.2 · ▄Strv 81 (RB 52) · Centurion Mk.5 AVRE · Centurion Mk.5/1 · ▄Sho't Kal Dalet · Centurion Action X
  Vijayanta · Khalid · Challenger DS · Challenger 2 OES
Heavy tanks  Independent · Matilda Hedgehog · Excelsior · TOG II · Churchill Crocodile · Black Prince
Tank destroyers  Alecto I · Achilles (65 Rg.) · QF 3.7 Ram