Difference between revisions of "Yak-9T"
Colok76286 (talk | contribs) (Undo revision 184393 by U141583682 (talk)) |
m (→Flight Performance: - Added values) (Tag: Visual edit) |
||
| (44 intermediate revisions by 19 users not shown) | |||
| Line 1: | Line 1: | ||
| + | {{Specs-Card|code=yak-9t}} | ||
{{About | {{About | ||
| − | | about = | + | | about = Russian fighter '''{{PAGENAME}}''' |
| − | + | | usage = other uses | |
| − | | usage | + | | link = Yak-9 (Family) |
| − | |||
| − | |||
| − | | link | ||
| − | |||
| − | |||
| − | |||
| − | |||
}} | }} | ||
== Description == | == Description == | ||
<!-- ''In the description, the first part should be about the history of and the creation and combat usage of the aircraft, as well as its key features. In the second part, tell the reader about the aircraft in the game. Insert a screenshot of the vehicle, so that if the novice player does not remember the vehicle by name, he will immediately understand what kind of vehicle the article is talking about.'' --> | <!-- ''In the description, the first part should be about the history of and the creation and combat usage of the aircraft, as well as its key features. In the second part, tell the reader about the aircraft in the game. Insert a screenshot of the vehicle, so that if the novice player does not remember the vehicle by name, he will immediately understand what kind of vehicle the article is talking about.'' --> | ||
| − | The ''' | + | [[File:GarageImage_{{PAGENAME}}.jpg|420px|thumb|left]] |
| − | + | {{break}} | |
| − | + | The '''{{Specs|name}}''' is a rank {{Specs|rank}} Russian fighter {{Battle-rating}}. It has been in the game since the start of the Open Beta Test prior to Update 1.27. | |
== General info == | == General info == | ||
| − | === Flight | + | === Flight Performance === |
| − | + | ''Describe how the aircraft behaves in the air. Speed, manoeuvrability, acceleration and allowable loads - these are the most important characteristics of the vehicle.'' | |
| − | |||
| − | + | {| class="wikitable" style="text-align:center" | |
| − | + | |- | |
| − | {| class="wikitable" style="text-align:center" | + | ! colspan="8" | Characteristics |
| − | ! | + | |- |
| + | ! colspan="8" | ''Stock'' | ||
| + | |- | ||
! colspan="2" | Max Speed<br>(km/h at 4,000 m) | ! colspan="2" | Max Speed<br>(km/h at 4,000 m) | ||
| − | ! rowspan="2" | Max altitude<br>( | + | ! rowspan="2" | Max altitude<br>(meters) |
! colspan="2" | Turn time<br>(seconds) | ! colspan="2" | Turn time<br>(seconds) | ||
| − | ! colspan="2" | Rate of climb<br>( | + | ! colspan="2" | Rate of climb<br>(meters/second) |
| − | ! rowspan="2" | Take-off run<br>( | + | ! rowspan="2" | Take-off run<br>(meters) |
| + | |- | ||
| + | ! AB | ||
| + | ! RB | ||
| + | ! AB | ||
| + | ! RB | ||
| + | ! AB | ||
| + | ! RB | ||
| + | |- | ||
| + | | 578 || 561 || {{Specs|ceiling}} || 18.8 || 19.5 || 13.7 || 13.6 || 366 | ||
|- | |- | ||
| − | ! | + | ! colspan="8" | ''Upgraded'' |
|- | |- | ||
| − | ! | + | ! colspan="2" | Max Speed<br>(km/h at 4,000 m) |
| − | + | ! rowspan="2" | Max altitude<br>(meters) | |
| + | ! colspan="2" | Turn time<br>(seconds) | ||
| + | ! colspan="2" | Rate of climb<br>(meters/second) | ||
| + | ! rowspan="2" | Take-off run<br>(meters) | ||
|- | |- | ||
| − | ! | + | ! AB |
| − | | 610 || 593 || 17.2 || 18.0 || 18.5 || 16.0 | + | ! RB |
| + | ! AB | ||
| + | ! RB | ||
| + | ! AB | ||
| + | ! RB | ||
| + | |- | ||
| + | | 610 || 593 || {{Specs|ceiling}} || 17.2 || 18.0 || 18.5 || 16.0 || 366 | ||
|- | |- | ||
|} | |} | ||
| − | ==== Details ==== | + | ====Details==== |
| − | {| class="wikitable" style="text-align:center | + | {| class="wikitable" style="text-align:center" |
|- | |- | ||
! colspan="5" | Features | ! colspan="5" | Features | ||
|- | |- | ||
| − | ! Combat | + | ! Combat flap |
| + | ! Take-off flap | ||
| + | ! Landing flap | ||
| + | ! Air brakes | ||
| + | ! Arrestor gear | ||
|- | |- | ||
| X || X || ✓ || X || X <!-- ✓ --> | | X || X || ✓ || X || X <!-- ✓ --> | ||
| Line 54: | Line 71: | ||
|} | |} | ||
| − | {| class="wikitable" style="text-align:center | + | {| class="wikitable" style="text-align:center" |
|- | |- | ||
| − | ! colspan=" | + | ! colspan="5" | Limits |
|- | |- | ||
| − | ! rowspan="2" | | + | ! rowspan="2" | Wing-break speed<br>(km/h) |
| − | ! rowspan="2" | Gear (km/h) | + | ! rowspan="2" | Gear limit<br>(km/h) |
| − | ! | + | ! rowspan="2" | Combat flap<br> (km/h) |
! colspan="2" | Max Static G | ! colspan="2" | Max Static G | ||
|- | |- | ||
| − | + | ! + | |
| + | ! - | ||
|- | |- | ||
| − | | | + | | {{Specs|destruction|constructions}} || {{Specs|destruction|chassis}} || 410 || ~20 || ~15 |
|- | |- | ||
|} | |} | ||
| Line 71: | Line 89: | ||
{| class="wikitable" style="text-align:center" | {| class="wikitable" style="text-align:center" | ||
|- | |- | ||
| − | ! colspan="4" | Optimal velocities | + | ! colspan="4" | Optimal velocities |
|- | |- | ||
| − | ! Ailerons | + | ! Ailerons<br>(km/h) |
| + | ! Rudder<br>(km/h) | ||
| + | ! Elevators<br>(km/h) | ||
| + | ! Radiator<br>(km/h) | ||
|- | |- | ||
| − | | < 380 || < 420 || < 490 || > | + | | < 380 || < 420 || < 490 || > 270 |
|- | |- | ||
| + | |} | ||
| + | |||
| + | {| class="wikitable" style="text-align:center" | ||
| + | |- | ||
| + | ! colspan="3" | Compressor (RB/SB) | ||
| + | |- | ||
| + | ! colspan="3" | Setting 1 | ||
| + | |- | ||
| + | ! Optimal altitude | ||
| + | ! 100% Engine power | ||
| + | ! WEP Engine power | ||
| + | |- | ||
| + | | 700 m || 1,260 hp || ?,??? hp | ||
| + | |- | ||
| + | ! colspan="3" | Setting 2 | ||
| + | |- | ||
| + | ! Optimal altitude | ||
| + | ! 100% Engine power | ||
| + | ! WEP Engine power | ||
| + | |- | ||
| + | | 2,900 m || 1,175 hp || ?,??? hp | ||
| + | |- | ||
| + | <!--! colspan="3" | Setting 3 | ||
| + | |- | ||
| + | ! Optimal altitude | ||
| + | ! 100% Engine power | ||
| + | ! WEP Engine power | ||
| + | |- | ||
| + | | ?,??? m || ?,??? hp || ?,??? hp | ||
| + | |- --> | ||
|} | |} | ||
=== Survivability and armour === | === Survivability and armour === | ||
| − | |||
<!-- ''Examine the survivability of the aircraft. Note how vulnerable the structure is and how secure the pilot is, whether the fuel tanks are armoured, etc. Describe the armour, if there is any, and also mention the vulnerability of other critical aircraft systems.'' --> | <!-- ''Examine the survivability of the aircraft. Note how vulnerable the structure is and how secure the pilot is, whether the fuel tanks are armoured, etc. Describe the armour, if there is any, and also mention the vulnerability of other critical aircraft systems.'' --> | ||
| − | |||
| − | |||
* 64 mm Bulletproof glass in cockpit front | * 64 mm Bulletproof glass in cockpit front | ||
* 64 mm Bulletproof glass pilot's headrest | * 64 mm Bulletproof glass pilot's headrest | ||
| − | * 8 mm Steel plate in the pilot's seat | + | * 8 mm Steel plate in the pilot's seat. |
| − | |||
| − | |||
| − | |||
== Armaments == | == Armaments == | ||
| − | |||
=== Offensive armament === | === Offensive armament === | ||
| − | |||
<!-- ''Describe the offensive armament of the aircraft, if any. Describe how effective the cannons and machine guns are in a battle, and also what belts or drums are better to use. If there is no offensive weaponry, delete this subsection.'' --> | <!-- ''Describe the offensive armament of the aircraft, if any. Describe how effective the cannons and machine guns are in a battle, and also what belts or drums are better to use. If there is no offensive weaponry, delete this subsection.'' --> | ||
{{main|NS-37 (37 mm)|Berezin UB (12.7 mm)}} | {{main|NS-37 (37 mm)|Berezin UB (12.7 mm)}} | ||
| Line 105: | Line 148: | ||
== Usage in battles == | == Usage in battles == | ||
| − | <!-- ''Describe the tactics of playing in | + | <!-- ''Describe the tactics of playing in an aircraft, the features of using vehicles in a team and advice on tactics. Refrain from creating a "guide" - do not impose a single point of view, but instead, give the reader food for thought. Examine the most dangerous enemies and give recommendations on fighting them. If necessary, note the specifics of the game in different modes (AB, RB, SB).'' --> |
[[File:Cockpit_Yak-9.jpg|thumbnail|right|The Yak-9T's instrument panel.]] | [[File:Cockpit_Yak-9.jpg|thumbnail|right|The Yak-9T's instrument panel.]] | ||
| − | The Yakovlev | + | The Yakovlev 9-T or Yak-9 as it is most popularly referred to in game, being the most popular of the Yak 9 variants, is best played differently depending on the situation the pilot finds themselves in. |
| − | |||
| − | |||
| − | |||
| − | |||
| − | + | To begin, make sure that you take off and '''immediately''' climb. A twenty degree angle may be too much to handle depending on the amount of upgrades purchased on the aircraft, so a fifteen degree climb is recommended. With it, the pilot keeps much needed speed and agility. altitude advantage over your opponent is '''always''' preferred, and most pilots of the tier that the Yak 9T fights, do not choose to climb over 2,000 m (6,561 ft) A good altitude to climb to is 3,000 m (9,842 ft) In this way altitude advantage is achieved. Be advised this will not '''always''' be the case and some enemies will climb above you, if this happens, try to make them bleed energy until they are slower than you and turn fight them. | |
| − | + | At high altitude, the Yak 9T is best suited to energy fighting, which means using the Yak's good energy retention to zoom at an opponent, shoot at them, and then climb up and turn back to your opponent and give chase. They Yak at mid to low altitude is best suited to turn-fighting against all nations except for the Japanese. If facing the Japanese, use the same energy fight tactics as stated above, as Japanese planes will be '''unable''' to give chase due to low energy retention of their lightweight aircraft. The Yak-9T comes equipped with '''flaps''', it is critical you use them, as performance is greatly increased in a turn-fight with them extended. | |
| − | The Yak | + | The Yak 9T and all Yak's suffer from constant engine overheat, properly watching this temperature is critical, because if let go too long, the engine will die and the Yak falls fast. Keep eyes on temp at all times. Best advice is to keep throttle at 90% or lower when not in combat. The Yak-9T is best suited to colder maps, if on a hot map, gain altitude and cruise at 85-90% throttle. |
| − | + | ===Manual Engine Control=== | |
| − | |||
| − | === Manual Engine Control === | ||
{| class="wikitable" style="text-align:center" | {| class="wikitable" style="text-align:center" | ||
|- | |- | ||
| Line 132: | Line 169: | ||
! rowspan="2" | Turbocharger | ! rowspan="2" | Turbocharger | ||
|- | |- | ||
| − | ! Oil !! | + | ! Oil |
| + | ! Water | ||
| + | ! Type | ||
| + | |- | ||
| + | | Controllable || rowspan="2" | Not controllable || rowspan="2" | Not controllable || rowspan="2" | Not controllable || rowspan="2" | Separate || rowspan="2" | Not controllable || rowspan="2" | Not controllable | ||
| + | |- | ||
| + | |} | ||
| + | |||
| + | ===Modules=== | ||
| + | {| class="wikitable" | ||
| + | ! colspan="1" | Tier | ||
| + | ! colspan="2" | Flight performance | ||
| + | ! colspan="1" | Survivability | ||
| + | ! colspan="1" | Weaponry | ||
| + | |- | ||
| + | | I | ||
| + | | Fuselage repair | ||
| + | | Radiator | ||
| + | | | ||
| + | | Offensive 12 mm | ||
| + | |- | ||
| + | | II | ||
| + | | | ||
| + | | Compressor | ||
| + | | Airframe | ||
| + | | New 12 mm MGs | ||
| + | |- | ||
| + | | III | ||
| + | | Wings repair | ||
| + | | Engine | ||
| + | | | ||
| + | | Offensive 37 mm | ||
|- | |- | ||
| − | | | + | | IV |
| + | | | ||
| + | | | ||
| + | | Cover | ||
| + | | New 37 mm cannons | ||
|- | |- | ||
|} | |} | ||
=== Pros and cons === | === Pros and cons === | ||
| − | <!-- '' | + | <!-- ''Summarize and briefly evaluate the vehicle in terms of its characteristics and combat effectiveness. Mark its pros and cons in the bulleted list. Try not to use more than 6 points for each of the characteristics. Avoid using categorical definitions such as "bad", "good" and the like - use substitutions with softer forms such as "inadequate" and "effective".'' --> |
'''Pros:''' | '''Pros:''' | ||
| − | * 37 mm has | + | * Cannon is powerful |
| − | + | * 37 mm has reasonably high rate of fire for it's caliber | |
| − | + | * Decent maneuverability | |
| − | + | * Cannon can knock out medium tanks with several hits in the side or rear. | |
| − | * Decent | ||
| − | * Cannon can knock out medium tanks with several hits in the side or rear | ||
| − | |||
| − | |||
'''Cons:''' | '''Cons:''' | ||
| − | * Once the 37 mm runs out of ammo you have a single . | + | * Once the 37 mm runs out of ammo you have a single 50. Cal MG |
* 37 mm has high recoil | * 37 mm has high recoil | ||
| − | * 37 mm is fairly inaccurate even in short bursts | + | * 37 mm is fairly inaccurate even in short bursts. |
| − | * Lousy high-altitude performance | + | * Lousy high-altitude performance. |
| − | |||
| − | |||
== History == | == History == | ||
| − | + | ''Describe the history of the creation and combat usage of the aircraft in more detail than in the introduction. If the historical reference turns out to be too big, take it to a separate article, taking a link to the article about the vehicle and adding a block "/ History" (example: <nowiki>https://wiki.warthunder.com/(Vehicle-name)/History</nowiki>) and add a link to it here using the <code>main</code> template. Be sure to reference text and sources by using <code><nowiki><ref></nowiki></code>, as well as adding them at the end of the article. This section may also include the vehicle's dev blog entry (if applicable) and the in-game encyclopedia description (under <code><nowiki>=== Encyclopedia Info ===</nowiki></code>, also if applicable).'' | |
| − | |||
| − | |||
| − | |||
| − | |||
| − | |||
| − | |||
| − | |||
| − | |||
| − | |||
| − | |||
== Media == | == Media == | ||
| − | + | ''Excellent additions to the article would be video guides, screenshots from the game, and photos.'' | |
| − | |||
| − | |||
| − | |||
| − | |||
| − | |||
| − | |||
| − | |||
== See also == | == See also == | ||
| Line 191: | Line 240: | ||
== External links == | == External links == | ||
| − | + | ''Paste links to sources and external resources, such as:'' | |
| + | |||
* ''topic on the official game forum;'' | * ''topic on the official game forum;'' | ||
| − | * ''other literature.'' | + | * ''encyclopedia page on the aircraft;'' |
| − | + | * ''other literature.'' | |
| − | |||
| − | |||
{{USSR fighters}} | {{USSR fighters}} | ||
Revision as of 16:43, 20 April 2019
Contents
| This page is about the Russian fighter Yak-9T. For other uses, see Yak-9 (Family). |
Description

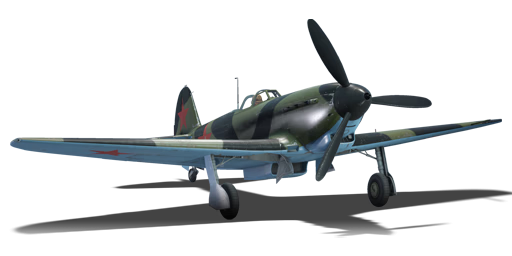
The Yak-9T is a rank III Russian fighter
with a battle rating of 3.7 (AB) and 4.0 (RB/SB). It has been in the game since the start of the Open Beta Test prior to Update 1.27.
General info
Flight Performance
Describe how the aircraft behaves in the air. Speed, manoeuvrability, acceleration and allowable loads - these are the most important characteristics of the vehicle.
| Characteristics | |||||||
|---|---|---|---|---|---|---|---|
| Stock | |||||||
| Max Speed (km/h at 4,000 m) |
Max altitude (meters) |
Turn time (seconds) |
Rate of climb (meters/second) |
Take-off run (meters) | |||
| AB | RB | AB | RB | AB | RB | ||
| 578 | 561 | 10000 | 18.8 | 19.5 | 13.7 | 13.6 | 366 |
| Upgraded | |||||||
| Max Speed (km/h at 4,000 m) |
Max altitude (meters) |
Turn time (seconds) |
Rate of climb (meters/second) |
Take-off run (meters) | |||
| AB | RB | AB | RB | AB | RB | ||
| 610 | 593 | 10000 | 17.2 | 18.0 | 18.5 | 16.0 | 366 |
Details
| Features | ||||
|---|---|---|---|---|
| Combat flap | Take-off flap | Landing flap | Air brakes | Arrestor gear |
| X | X | ✓ | X | X |
| Limits | ||||
|---|---|---|---|---|
| Wing-break speed (km/h) |
Gear limit (km/h) |
Combat flap (km/h) |
Max Static G | |
| + | - | |||
| 410 | ~20 | ~15 | ||
| Optimal velocities | |||
|---|---|---|---|
| Ailerons (km/h) |
Rudder (km/h) |
Elevators (km/h) |
Radiator (km/h) |
| < 380 | < 420 | < 490 | > 270 |
| Compressor (RB/SB) | ||
|---|---|---|
| Setting 1 | ||
| Optimal altitude | 100% Engine power | WEP Engine power |
| 700 m | 1,260 hp | ?,??? hp |
| Setting 2 | ||
| Optimal altitude | 100% Engine power | WEP Engine power |
| 2,900 m | 1,175 hp | ?,??? hp |
Survivability and armour
- 64 mm Bulletproof glass in cockpit front
- 64 mm Bulletproof glass pilot's headrest
- 8 mm Steel plate in the pilot's seat.
Armaments
Offensive armament
The Yak-9T is armed with:
- 1 x 37 mm NS-37 cannon, nose-mounted (30 rpg)
- 1 x 12.7 mm Berezin UB machine gun, nose-mounted (200 rpg)
Usage in battles

The Yakovlev 9-T or Yak-9 as it is most popularly referred to in game, being the most popular of the Yak 9 variants, is best played differently depending on the situation the pilot finds themselves in.
To begin, make sure that you take off and immediately climb. A twenty degree angle may be too much to handle depending on the amount of upgrades purchased on the aircraft, so a fifteen degree climb is recommended. With it, the pilot keeps much needed speed and agility. altitude advantage over your opponent is always preferred, and most pilots of the tier that the Yak 9T fights, do not choose to climb over 2,000 m (6,561 ft) A good altitude to climb to is 3,000 m (9,842 ft) In this way altitude advantage is achieved. Be advised this will not always be the case and some enemies will climb above you, if this happens, try to make them bleed energy until they are slower than you and turn fight them.
At high altitude, the Yak 9T is best suited to energy fighting, which means using the Yak's good energy retention to zoom at an opponent, shoot at them, and then climb up and turn back to your opponent and give chase. They Yak at mid to low altitude is best suited to turn-fighting against all nations except for the Japanese. If facing the Japanese, use the same energy fight tactics as stated above, as Japanese planes will be unable to give chase due to low energy retention of their lightweight aircraft. The Yak-9T comes equipped with flaps, it is critical you use them, as performance is greatly increased in a turn-fight with them extended.
The Yak 9T and all Yak's suffer from constant engine overheat, properly watching this temperature is critical, because if let go too long, the engine will die and the Yak falls fast. Keep eyes on temp at all times. Best advice is to keep throttle at 90% or lower when not in combat. The Yak-9T is best suited to colder maps, if on a hot map, gain altitude and cruise at 85-90% throttle.
Manual Engine Control
| MEC elements | ||||||
|---|---|---|---|---|---|---|
| Mixer | Pitch | Radiator | Supercharger | Turbocharger | ||
| Oil | Water | Type | ||||
| Controllable | Not controllable | Not controllable | Not controllable | Separate | Not controllable | Not controllable |
Modules
| Tier | Flight performance | Survivability | Weaponry | |
|---|---|---|---|---|
| I | Fuselage repair | Radiator | Offensive 12 mm | |
| II | Compressor | Airframe | New 12 mm MGs | |
| III | Wings repair | Engine | Offensive 37 mm | |
| IV | Cover | New 37 mm cannons | ||
Pros and cons
Pros:
- Cannon is powerful
- 37 mm has reasonably high rate of fire for it's caliber
- Decent maneuverability
- Cannon can knock out medium tanks with several hits in the side or rear.
Cons:
- Once the 37 mm runs out of ammo you have a single 50. Cal MG
- 37 mm has high recoil
- 37 mm is fairly inaccurate even in short bursts.
- Lousy high-altitude performance.
History
Describe the history of the creation and combat usage of the aircraft in more detail than in the introduction. If the historical reference turns out to be too big, take it to a separate article, taking a link to the article about the vehicle and adding a block "/ History" (example: https://wiki.warthunder.com/(Vehicle-name)/History) and add a link to it here using the main template. Be sure to reference text and sources by using <ref>, as well as adding them at the end of the article. This section may also include the vehicle's dev blog entry (if applicable) and the in-game encyclopedia description (under === Encyclopedia Info ===, also if applicable).
Media
Excellent additions to the article would be video guides, screenshots from the game, and photos.
See also
Links to the articles on the War Thunder Wiki that you think will be useful for the reader, for example:
- reference to the series of the aircraft;
- links to approximate analogues of other nations and research trees.
External links
Paste links to sources and external resources, such as:
- topic on the official game forum;
- encyclopedia page on the aircraft;
- other literature.
| USSR fighters | |
|---|---|
| I-15 | I-15 WR · I-15 M-22 · I-15 M-25 · I-15bis · Krasnolutsky's I-15bis |
| I-153 M-62 · Zhukovsky's I-153-M62 · I-153P | |
| I-16 | I-16 type 5 · I-16 type 10 · I-16 type 18 · I-16 type 24 · I-16 type 27 · I-16 type 28 · I-180S |
| I-29 | I-29 |
| I-185 | I-185 (M-71) · I-185 (M-82) |
| I-225 | I-225 |
| ITP | ITP (M-1) |
| MiG-3 | MiG-3-15 · MiG-3-15 (BK) · MiG-3-34 |
| LaGG | I-301 · LaGG-3-4 · LaGG-3-8 · LaGG-3-11 · LaGG-3-23 · LaGG-3-34 · LaGG-3-35 · LaGG-3-66 |
| La | La-5 · La-5F · La-5FN · La-7 · Dolgushin's La-7 · La-7B-20 · La-9 · La-11 |
| Yak-1/7 | Yak-1 · Yak-1B · Yak-7B |
| Yak-3 | Yak-3 · Yak-3(e) Eremin's · Yak-3P · Yak-3T · Yak-3U · Yak-3 (VK-107) |
| Yak-9 | Yak-9 · Yak-9B · Golovachev's Yak-9M · Yak-9T · Yak-9K · Yak-9U · Yak-9UT · Yak-9P |
| Other countries | ▂P-40E-1 · ▂P-47D-27 · ▂Hurricane Mk IIB · ▂Fw 190 D-9 · ▂Spitfire Mk IXc |
| P-39 | ▂P-39K-1 · ▂Pokryshkin's P-39N-0 · ▂P-39Q-15 |
| P-63 | ▂P-63A-5 · ▂P-63A-10 · ▂P-63C-5 |
