Difference between revisions of "Yak-9"
Inceptor57 (talk | contribs) |
|||
| Line 2: | Line 2: | ||
== Description == | == Description == | ||
| − | ''In the description, the first part needs to be about the history of and the creation and combat usage of the aircraft, as well as its key features. In the second part, tell the reader about the aircraft in the game. Insert screenshot of the vehicle. If the novice player does not remember the vehicle by name, he will immediately understand what kind of vehicle it is talking about.'' | + | <!--''In the description, the first part needs to be about the history of and the creation and combat usage of the aircraft, as well as its key features. In the second part, tell the reader about the aircraft in the game. Insert screenshot of the vehicle. If the novice player does not remember the vehicle by name, he will immediately understand what kind of vehicle it is talking about.''--> |
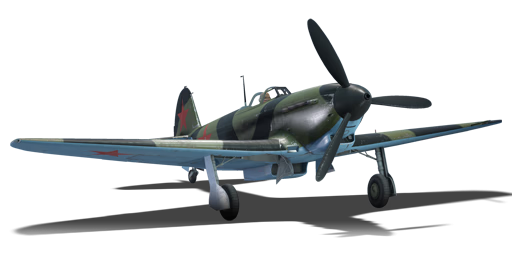
| + | [[File:GarageImage_Yak-9.jpg|420px|thumb|left]] | ||
| + | {{break}} | ||
| + | The '''Yak-9''' is a Rank II Soviet fighter with a battle rating of 3.3 (AB) and 3.0 (RB/SB). It was introduced in Update 1.43. | ||
| + | |||
| + | Since the Yak-1B, the Yak-9 is the next notable "Upgrade". While retaining the same great 20 mm cannon, as well as the 12.7 mm MG, the Yak-9 gained a number of minor upgrades such as: | ||
| + | * Rebalanced wing and cockpit placement by a slight amount. | ||
| + | * Slightly improved rearward visibility compared to previous models. | ||
| + | * New metal alloy used to construct the fuselage, meaning a lighter plane = better flight characteristics. | ||
| + | * Reworked fuel tanks, engine parts, and other internals. | ||
| + | All of this translates in-game to an even better version of the excellent Yak-1 series. The Yak-9 is the first of a number of modifications (the [[Yak-9T|T]] and [[Yak-9K|K]] variants are also in-game). While tactics and methods deviate little from the previous Yaks, this plane is like being used to flying a Bf 109 E and then suddenly being given a Bf 109 F... not much, but experienced Yak pilots can feel the difference! | ||
== General info == | == General info == | ||
=== Flight Performance === | === Flight Performance === | ||
| − | ''Describe how the aircraft behaves in the air. Maximum speed, maneuverability, speed and allowable loads - these are the most important characteristics of the vehicle.'' | + | <!--''Describe how the aircraft behaves in the air. Maximum speed, maneuverability, speed and allowable loads - these are the most important characteristics of the vehicle.''--> |
| + | ====Stat card==== | ||
| + | {| class="wikitable" style="text-align:center" | ||
| + | |- | ||
| + | ! colspan="8" | Characteristics | ||
| + | |- | ||
| + | ! colspan="8" | ''Stock'' | ||
| + | |- | ||
| + | ! colspan="2" | Max Speed<br>(km/h at 3,900 m) | ||
| + | ! rowspan="2" | Max altitude<br>(meters) | ||
| + | ! colspan="2" | Turn time<br>(seconds) | ||
| + | ! colspan="2" | Rate of climb<br>(meters/second) | ||
| + | ! rowspan="2" |Take-off run<br>(meters) | ||
| + | |- | ||
| + | ! AB | ||
| + | ! RB | ||
| + | ! AB | ||
| + | ! RB | ||
| + | ! AB | ||
| + | ! RB | ||
| + | |- | ||
| + | | 560 || 545 || 10,500 || 19.8 || 20.3 || 13.5 || 13.4 || 350 | ||
| + | |- | ||
| + | ! colspan="8" | ''Upgraded'' | ||
| + | |- | ||
| + | ! colspan="2" | Max Speed<br>(km/h at 3,900 m) | ||
| + | ! rowspan="2" |Max altitude (meters) | ||
| + | ! colspan="2" | Turn time (seconds) | ||
| + | ! colspan="2" | Rate of climb<br>(meters/second) | ||
| + | ! rowspan="2" |Take-off run (meters) | ||
| + | |- | ||
| + | ! AB | ||
| + | ! RB | ||
| + | ! AB | ||
| + | ! RB | ||
| + | ! AB | ||
| + | ! RB | ||
| + | |- | ||
| + | | 594 || 577 || 10,500 || 18.5 || 19.0 || 18.6 || 16.0 || 350 | ||
| + | |- | ||
| + | |} | ||
| + | |||
| + | ====Details==== | ||
| + | {| class="wikitable" style="text-align:center" | ||
| + | |- | ||
| + | ! colspan="5" | Features | ||
| + | |- | ||
| + | ! Combat flap | ||
| + | ! Take-off flap | ||
| + | ! Landing flap | ||
| + | ! Air brakes | ||
| + | ! Arrestor gear | ||
| + | |- | ||
| + | | X || X || ✓ || X || X | ||
| + | |- | ||
| + | |} | ||
| + | |||
| + | {| class="wikitable" style="text-align:center" | ||
| + | |- | ||
| + | ! colspan="5" | Limits | ||
| + | |- | ||
| + | ! rowspan="2" | Wing-break speed<br>(km/h) | ||
| + | ! rowspan="2" | Gear limit<br>(km/h) | ||
| + | ! rowspan="2" | Combat flap<br> (km/h) | ||
| + | ! colspan="2" | Max Static G | ||
| + | |- | ||
| + | ! + | ||
| + | ! - | ||
| + | |- | ||
| + | | 683 || 320 || N/A || ~22 || ~16 | ||
| + | |- | ||
| + | |} | ||
| + | |||
| + | {| class="wikitable" style="text-align:center" | ||
| + | |- | ||
| + | ! colspan="4" | Optimal velocities | ||
| + | |- | ||
| + | ! Ailerons<br>(km/h) | ||
| + | ! Rudder<br>(km/h) | ||
| + | ! Elevators<br>(km/h) | ||
| + | ! Radiator<br>(km/h) | ||
| + | |- | ||
| + | | < 380 || < 420 || < 490 || > 270 | ||
| + | |- | ||
| + | |} | ||
| + | |||
| + | {| class="wikitable" style="text-align:center" | ||
| + | |- | ||
| + | ! colspan="3" | Compressor (RB/SB) | ||
| + | |- | ||
| + | ! colspan="3" | Setting 1 | ||
| + | |- | ||
| + | ! Optimal altitude | ||
| + | ! colspan="2" | 100% Engine power | ||
| + | |- | ||
| + | | 700 m || colspan="2" | 1,260 hp | ||
| + | |- | ||
| + | ! colspan="3" | Setting 2 | ||
| + | |- | ||
| + | ! Optimal altitude | ||
| + | ! colspan="2" | 100% Engine power | ||
| + | |- | ||
| + | | 2,900 m || colspan="2" | 1,175 hp | ||
| + | |- | ||
| + | |} | ||
| + | |||
| + | ====Engine performance==== | ||
| + | {| class="wikitable" style="text-align:center" | ||
| + | |- | ||
| + | ! colspan="4" | Engine | ||
| + | |- | ||
| + | ! colspan="3" | Engine Name | ||
| + | ! colspan="3" | Number present | ||
| + | |- | ||
| + | | colspan="3" | Klimov VK-105PF 12-cylinder || colspan="1" | 1 | ||
| + | |- | ||
| + | ! colspan="4" | Engine characteristics | ||
| + | |- | ||
| + | ! colspan="2" | Weight (each) | ||
| + | ! colspan="1" | Type | ||
| + | ! colspan="1" | Cooling | ||
| + | |- | ||
| + | | colspan="2" | 600 kg || Inline || Water | ||
| + | |- | ||
| + | ! colspan="4" | Engine power (Stock) | ||
| + | |- | ||
| + | ! colspan="1" | Mode | ||
| + | ! colspan="4" | Take-off | ||
| + | |- | ||
| + | | ''Arcade'' || colspan="4" | 1,153 hp | ||
| + | |- | ||
| + | | ''Realistic/Simulator'' || colspan="4" | 1,142 hp | ||
| + | |- | ||
| + | ! colspan="4" | Engine power (Upgraded) | ||
| + | |- | ||
| + | ! Mode | ||
| + | ! colspan="4" | Take-off | ||
| + | |- | ||
| + | | ''Arcade'' || colspan="4" | 1,271 hp | ||
| + | |- | ||
| + | | ''Realistic/Simulator'' || colspan="4" | 1,210 hp | ||
| + | |- | ||
| + | |} | ||
| + | |||
| + | {| class="wikitable" style="text-align:center" | ||
| + | |- | ||
| + | ! colspan="4" | WEP Duration | ||
| + | |- | ||
| + | ! colspan="2" | Arcade | ||
| + | ! colspan="2" | Realistic/Simulator | ||
| + | |- | ||
| + | | colspan="2" | 25 seconds || colspan="2" | N/A | ||
| + | |- | ||
| + | |} | ||
=== Survivability and armour === | === Survivability and armour === | ||
| − | ''Examine the survivability of the aircraft. Note how vulnerable the structure is and how secure the pilot is, whether the fuel tanks are armoured. Describe the armour, if there is any, also mention the vulnerability of other critical aircraft systems.'' | + | <!--''Examine the survivability of the aircraft. Note how vulnerable the structure is and how secure the pilot is, whether the fuel tanks are armoured. Describe the armour, if there is any, also mention the vulnerability of other critical aircraft systems.''--> |
| + | * 64 mm Bulletproof glass in cockpit front and rear. | ||
| + | * 8 mm Steel plate behind the pilot. | ||
== Armaments == | == Armaments == | ||
| − | + | <!--''Describe the offensive armament of the aircraft, if any. Describe how effective the cannons and machine guns are in a battle, and also what belts or drums are better to use. If there is no offensive weaponry, delete this subsection.''--> | |
| − | ''Describe the offensive armament of the aircraft, if any. Describe how effective the cannons and machine guns are in a battle, and also what belts or drums are better to use. If there is no offensive weaponry, delete this subsection.'' | + | {{main|ShVAK (20 mm)|Berezin UB (12.7 mm)}} |
| − | + | The Yak-9 is armed with: | |
| − | |||
| − | + | * 1 x 20 mm [[ShVAK (20 mm)|ShVAK]] cannon, nose-mounted (120 rpg) | |
| − | + | * 1 x 12.7 mm [[Berezin UB (12.7 mm)|Berezin UB]] machine gun, nose-mounted (200 rpg) | |
== Usage in the battles == | == Usage in the battles == | ||
| − | ''Describe the tactics of playing in an aircraft, the features of using vehicles in a team and advice on tactics. Refrain from creating a "guide" - do not impose a single point of view but give the reader food for thought. Examine the most dangerous enemies and give recommendations on fighting them. If necessary, note the specifics of the game in different modes (AB, RB, SB).'' | + | <!--''Describe the tactics of playing in an aircraft, the features of using vehicles in a team and advice on tactics. Refrain from creating a "guide" - do not impose a single point of view but give the reader food for thought. Examine the most dangerous enemies and give recommendations on fighting them. If necessary, note the specifics of the game in different modes (AB, RB, SB).''--> |
| + | Both ''Universal'' and ''Stealth'' ammo belts for the cannon are effective against all planes, and the ''Ground Attack'' belt gives the most HE rounds for most targets. The cannon's ''Ground Attack'' belt is also capable of defeating up to light tanks if player hits them in the rear. Low gun ammo along with no other ordnance of any kind (no rockets and bombs of any kind) make this plane weak against even soft unarmored ground targets. | ||
| + | |||
| + | ===Arcade battles=== | ||
| + | In '''Arcade Battles''', the basics of Yak fighting from the previous iterations continue. Unlike Realistic or Simulator battle modes, there is no need to worry about the wooden wings ripping off, engine overheating, or being in the air without ammunition for long, which gives the Yak more liberty in its mode of attack. | ||
| + | |||
| + | Fly at full speed and pump the engine to 110% (WEP) when possible and gain altitude as soon as entering the battlefield. It is recommended to climb to 3,000 m as this will allow the Yak to have a altitude advantage over many opponents who will head towards the ground while playing into the Yak's preference for low-altitude fighting. | ||
| + | |||
| + | Though a full liberty of targets can be chosen from anything below the Yak, try to pick either large aircraft like attackers or bombers, or fighters that are unaware of the Yak's presence. Dive down and gain speed while conducting a Boom-N-Zoom attack. The center-mounted 20 mm and 12.7 mm guns acting together when fired is good enough to sufficiently damage an aircraft with a burst on a pass. The Yak is free to climb again and regain the altitude advantage, or turn and reengage the enemy with another pass as the Yak's turning ability is quite good in high energy, at the expense of the pilot's G-force resistance and stamina. | ||
| + | |||
| + | Use trigger discipline when firing the 20 mm and 12.7 mm guns as there is a relatively small ammunition load for the two. However, due to their center-alignment on the Yak's nose, there is no need to adjust for convergence, making fire adjustments much easier for the pilot. Once the crosshair is sighted right onto target, most shots on an fully upgraded gun will hit the mark. It is recommended to hit for the weaker structural parts of enemy aircraft such as the wings as the ammunition can rip them apart in a good prolonged burst. | ||
| + | |||
| + | However, all these require the Yak to have an energy advantage over an opponent. Prolonged turning engagements or other maneuvre will gradually drain the Yak of its energy and slow it to a crawl. In this state, the Yak is in its most vulnerable to enemy fighters. Once this lower speed is noticed, quickly withdraw from the combat and try to gain speed and altitude, the former especially if an enemy fighter suddenly starts to attack. All in all, energy is important in aerial combat when piloting Yak aircraft. | ||
| + | |||
| + | ===Realistic/Simulator battles=== | ||
| + | Stay low, watch your ammo, and watch your engine temp. Avoid excessive diving, since the wings are ''still'' made of wood! | ||
| + | |||
| + | Very accurate center mounted guns are easy to master for the player comparing to planes with wing mounted armament. Sadly this benefit is overshadowed with low ammo load that most of the time enforces strict trigger discipline (especially for the cannon). Long range attempts can be carry out by 12.7 HMG, but rather as a means of luring fleeing enemies into evasive maneuvers rather than taking it out. | ||
| + | |||
| + | ===Specific enemies worth noting=== | ||
| + | The Yak-9 has some vehicles it needs to consider when engaging. | ||
| + | * Japanese turning fighters - Japanese fighters like their Zeroes and Ki-43 can possess a threat as these planes can turn faster than the Yak could ever dream, so don't get suckered into turning against a Zero. Not to mention, Japanese planes are typically slower than most of its contemporaries, so a Yak trying to get a bead on one after passing through will often try to turn constantly around for another pass at these slow aircraft. Continued turns and passes will cause the Yak to lose energy and sacrifice aerial performance. This can lead other enemy aircraft or the very same Japanese aircraft the Yak was trying to strafe to coming around the slow Yak and shoot it out of the air. It is best to simply pass by a Japanese aircraft with a Boom-&-Zoom and then just climbing away to altitude away from the fighter so it couldn't try to attack. Once in a sufficient altitude, dive back down again to regain the energy during the next pass. | ||
| + | * Biplanes - Sure, if able to destroy them in the first pass, the biplane is not really the biggest threat out there. However, it is the indicator of an easy, slow target that are biplanes like the Swordfish that can cost the Yak pilot the plane. If missed, there may be an urge to quickly turn back for another quick pass against the biplane for another chance, while the biplane continues evasive manuvres. If this continues on as the Yak keeps turning for an "easy" kill, it would sacrifice much of its energy against a rather nonthreatening target. As emphasized previously, a slow Yak is an easier target to enemies and even if the biplane won't be able to dent the Yak, another enemy may swoop down an annihilate the Yak with ease. Don't waste energy trying to manuvre against a biplane, simply attack in a Boom-&-Zoom fashion. | ||
| + | |||
| + | ===Modules=== | ||
| + | Focus on cooling and engine modifications first! Once the coolant systems and engine is upgraded, flying at 90% power will never overheat the engine! Then focusing on ammo belts can benefit greatly, since the default ammo belt is rather lackluster. After that, the ''New'' modifications for the gun should also be considered for longer firing of the guns without jamming. Past that, it is pilot preference. | ||
| + | |||
| + | ===Manual Engine Control=== | ||
| + | {| class="wikitable" style="text-align:center" | ||
| + | |- | ||
| + | ! colspan="7" | MEC elements | ||
| + | |- | ||
| + | ! rowspan="2" |Mixer | ||
| + | ! rowspan="2" |Pitch | ||
| + | ! colspan="3" |Radiator | ||
| + | ! rowspan="2" |Supercharger | ||
| + | ! rowspan="2" |Turbocharger | ||
| + | |- | ||
| + | ! Oil | ||
| + | ! Water | ||
| + | ! Type | ||
| + | |- | ||
| + | | Controllable || rowspan="2" | Controllable<br>No automatic pitch || rowspan="2" | Controllable || rowspan="2" | Controllable || rowspan="2" | Separate || rowspan="2" | Controllable || rowspan="2" | Not controllable | ||
| + | |- | ||
| + | |} | ||
=== Pros and cons === | === Pros and cons === | ||
| − | ''Summarize and briefly evaluate the vehicle in terms of its characteristics and combat effectiveness. Mark its pros and cons in the bulleted list. Do not use more than 6 points for each of the characteristics. Avoid using categorical definitions such as "bad", "good" and the like - they have a substitution in the form of softer "inadequate", "effective".'' | + | <!--''Summarize and briefly evaluate the vehicle in terms of its characteristics and combat effectiveness. Mark its pros and cons in the bulleted list. Do not use more than 6 points for each of the characteristics. Avoid using categorical definitions such as "bad", "good" and the like - they have a substitution in the form of softer "inadequate", "effective".''--> |
| − | |||
'''Pros:''' | '''Pros:''' | ||
| − | * | + | * Center mounted armament that is very accurate even at longer distances. |
| − | + | * 20 mm supplemented with a 12.7 mm can do decent damage against enemy planes. | |
| + | * Relatively small aircraft profile makes it a small target. | ||
| + | * Fast and agile at altitudes up to 3 km. | ||
| + | * Great turning ability when in high energy. | ||
| + | * Experience with the Yak-1 and Yak-1B carry over to this plane. | ||
| + | * Slightly better engine than predecessors. | ||
'''Cons:''' | '''Cons:''' | ||
| − | * | + | * Armaments have limited ammunition, stresses on firing accuracy and discipline to make the most out of a belt. |
| + | * Low maximum dive speed. | ||
| + | * Very bad high alt performance. | ||
| + | * Once speed and energy is lost, the Yak-9 performance drops significantly. | ||
| + | * Engine overheats sometimes in RB/SB. | ||
| + | * No WEP in RB/SB. | ||
== History == | == History == | ||
| − | ''Describe the history of the creation and combat usage of the aircraft in more detail than in the introduction. If the historical reference turns out to be too big, take it to a separate article, taking a link to an article about the vehicle and adding a block "/ historical reference" (example: https://wiki.warthunder.com/Name-vehicles/historical reference) and add a link to it here using the <code>main</code> template. Be sure to include links to sources at the end of the article.'' | + | <!--''Describe the history of the creation and combat usage of the aircraft in more detail than in the introduction. If the historical reference turns out to be too big, take it to a separate article, taking a link to an article about the vehicle and adding a block "/ historical reference" (example: https://wiki.warthunder.com/Name-vehicles/historical reference) and add a link to it here using the <code>main</code> template. Be sure to include links to sources at the end of the article.''--> |
== Media == | == Media == | ||
| Line 50: | Line 267: | ||
* ''page on aircraft encyclopedia;'' | * ''page on aircraft encyclopedia;'' | ||
* ''other literature.'' | * ''other literature.'' | ||
| + | |||
| + | {{USSR fighters}} | ||
Revision as of 18:17, 24 October 2018
Contents
Description

The Yak-9 is a Rank II Soviet fighter with a battle rating of 3.3 (AB) and 3.0 (RB/SB). It was introduced in Update 1.43.
Since the Yak-1B, the Yak-9 is the next notable "Upgrade". While retaining the same great 20 mm cannon, as well as the 12.7 mm MG, the Yak-9 gained a number of minor upgrades such as:
- Rebalanced wing and cockpit placement by a slight amount.
- Slightly improved rearward visibility compared to previous models.
- New metal alloy used to construct the fuselage, meaning a lighter plane = better flight characteristics.
- Reworked fuel tanks, engine parts, and other internals.
All of this translates in-game to an even better version of the excellent Yak-1 series. The Yak-9 is the first of a number of modifications (the T and K variants are also in-game). While tactics and methods deviate little from the previous Yaks, this plane is like being used to flying a Bf 109 E and then suddenly being given a Bf 109 F... not much, but experienced Yak pilots can feel the difference!
General info
Flight Performance
Stat card
| Characteristics | |||||||
|---|---|---|---|---|---|---|---|
| Stock | |||||||
| Max Speed (km/h at 3,900 m) |
Max altitude (meters) |
Turn time (seconds) |
Rate of climb (meters/second) |
Take-off run (meters) | |||
| AB | RB | AB | RB | AB | RB | ||
| 560 | 545 | 10,500 | 19.8 | 20.3 | 13.5 | 13.4 | 350 |
| Upgraded | |||||||
| Max Speed (km/h at 3,900 m) |
Max altitude (meters) | Turn time (seconds) | Rate of climb (meters/second) |
Take-off run (meters) | |||
| AB | RB | AB | RB | AB | RB | ||
| 594 | 577 | 10,500 | 18.5 | 19.0 | 18.6 | 16.0 | 350 |
Details
| Features | ||||
|---|---|---|---|---|
| Combat flap | Take-off flap | Landing flap | Air brakes | Arrestor gear |
| X | X | ✓ | X | X |
| Limits | ||||
|---|---|---|---|---|
| Wing-break speed (km/h) |
Gear limit (km/h) |
Combat flap (km/h) |
Max Static G | |
| + | - | |||
| 683 | 320 | N/A | ~22 | ~16 |
| Optimal velocities | |||
|---|---|---|---|
| Ailerons (km/h) |
Rudder (km/h) |
Elevators (km/h) |
Radiator (km/h) |
| < 380 | < 420 | < 490 | > 270 |
| Compressor (RB/SB) | ||
|---|---|---|
| Setting 1 | ||
| Optimal altitude | 100% Engine power | |
| 700 m | 1,260 hp | |
| Setting 2 | ||
| Optimal altitude | 100% Engine power | |
| 2,900 m | 1,175 hp | |
Engine performance
| Engine | |||||
|---|---|---|---|---|---|
| Engine Name | Number present | ||||
| Klimov VK-105PF 12-cylinder | 1 | ||||
| Engine characteristics | |||||
| Weight (each) | Type | Cooling | |||
| 600 kg | Inline | Water | |||
| Engine power (Stock) | |||||
| Mode | Take-off | ||||
| Arcade | 1,153 hp | ||||
| Realistic/Simulator | 1,142 hp | ||||
| Engine power (Upgraded) | |||||
| Mode | Take-off | ||||
| Arcade | 1,271 hp | ||||
| Realistic/Simulator | 1,210 hp | ||||
| WEP Duration | |||
|---|---|---|---|
| Arcade | Realistic/Simulator | ||
| 25 seconds | N/A | ||
Survivability and armour
- 64 mm Bulletproof glass in cockpit front and rear.
- 8 mm Steel plate behind the pilot.
Armaments
The Yak-9 is armed with:
- 1 x 20 mm ShVAK cannon, nose-mounted (120 rpg)
- 1 x 12.7 mm Berezin UB machine gun, nose-mounted (200 rpg)
Usage in the battles
Both Universal and Stealth ammo belts for the cannon are effective against all planes, and the Ground Attack belt gives the most HE rounds for most targets. The cannon's Ground Attack belt is also capable of defeating up to light tanks if player hits them in the rear. Low gun ammo along with no other ordnance of any kind (no rockets and bombs of any kind) make this plane weak against even soft unarmored ground targets.
Arcade battles
In Arcade Battles, the basics of Yak fighting from the previous iterations continue. Unlike Realistic or Simulator battle modes, there is no need to worry about the wooden wings ripping off, engine overheating, or being in the air without ammunition for long, which gives the Yak more liberty in its mode of attack.
Fly at full speed and pump the engine to 110% (WEP) when possible and gain altitude as soon as entering the battlefield. It is recommended to climb to 3,000 m as this will allow the Yak to have a altitude advantage over many opponents who will head towards the ground while playing into the Yak's preference for low-altitude fighting.
Though a full liberty of targets can be chosen from anything below the Yak, try to pick either large aircraft like attackers or bombers, or fighters that are unaware of the Yak's presence. Dive down and gain speed while conducting a Boom-N-Zoom attack. The center-mounted 20 mm and 12.7 mm guns acting together when fired is good enough to sufficiently damage an aircraft with a burst on a pass. The Yak is free to climb again and regain the altitude advantage, or turn and reengage the enemy with another pass as the Yak's turning ability is quite good in high energy, at the expense of the pilot's G-force resistance and stamina.
Use trigger discipline when firing the 20 mm and 12.7 mm guns as there is a relatively small ammunition load for the two. However, due to their center-alignment on the Yak's nose, there is no need to adjust for convergence, making fire adjustments much easier for the pilot. Once the crosshair is sighted right onto target, most shots on an fully upgraded gun will hit the mark. It is recommended to hit for the weaker structural parts of enemy aircraft such as the wings as the ammunition can rip them apart in a good prolonged burst.
However, all these require the Yak to have an energy advantage over an opponent. Prolonged turning engagements or other maneuvre will gradually drain the Yak of its energy and slow it to a crawl. In this state, the Yak is in its most vulnerable to enemy fighters. Once this lower speed is noticed, quickly withdraw from the combat and try to gain speed and altitude, the former especially if an enemy fighter suddenly starts to attack. All in all, energy is important in aerial combat when piloting Yak aircraft.
Realistic/Simulator battles
Stay low, watch your ammo, and watch your engine temp. Avoid excessive diving, since the wings are still made of wood!
Very accurate center mounted guns are easy to master for the player comparing to planes with wing mounted armament. Sadly this benefit is overshadowed with low ammo load that most of the time enforces strict trigger discipline (especially for the cannon). Long range attempts can be carry out by 12.7 HMG, but rather as a means of luring fleeing enemies into evasive maneuvers rather than taking it out.
Specific enemies worth noting
The Yak-9 has some vehicles it needs to consider when engaging.
- Japanese turning fighters - Japanese fighters like their Zeroes and Ki-43 can possess a threat as these planes can turn faster than the Yak could ever dream, so don't get suckered into turning against a Zero. Not to mention, Japanese planes are typically slower than most of its contemporaries, so a Yak trying to get a bead on one after passing through will often try to turn constantly around for another pass at these slow aircraft. Continued turns and passes will cause the Yak to lose energy and sacrifice aerial performance. This can lead other enemy aircraft or the very same Japanese aircraft the Yak was trying to strafe to coming around the slow Yak and shoot it out of the air. It is best to simply pass by a Japanese aircraft with a Boom-&-Zoom and then just climbing away to altitude away from the fighter so it couldn't try to attack. Once in a sufficient altitude, dive back down again to regain the energy during the next pass.
- Biplanes - Sure, if able to destroy them in the first pass, the biplane is not really the biggest threat out there. However, it is the indicator of an easy, slow target that are biplanes like the Swordfish that can cost the Yak pilot the plane. If missed, there may be an urge to quickly turn back for another quick pass against the biplane for another chance, while the biplane continues evasive manuvres. If this continues on as the Yak keeps turning for an "easy" kill, it would sacrifice much of its energy against a rather nonthreatening target. As emphasized previously, a slow Yak is an easier target to enemies and even if the biplane won't be able to dent the Yak, another enemy may swoop down an annihilate the Yak with ease. Don't waste energy trying to manuvre against a biplane, simply attack in a Boom-&-Zoom fashion.
Modules
Focus on cooling and engine modifications first! Once the coolant systems and engine is upgraded, flying at 90% power will never overheat the engine! Then focusing on ammo belts can benefit greatly, since the default ammo belt is rather lackluster. After that, the New modifications for the gun should also be considered for longer firing of the guns without jamming. Past that, it is pilot preference.
Manual Engine Control
| MEC elements | ||||||
|---|---|---|---|---|---|---|
| Mixer | Pitch | Radiator | Supercharger | Turbocharger | ||
| Oil | Water | Type | ||||
| Controllable | Controllable No automatic pitch |
Controllable | Controllable | Separate | Controllable | Not controllable |
Pros and cons
Pros:
- Center mounted armament that is very accurate even at longer distances.
- 20 mm supplemented with a 12.7 mm can do decent damage against enemy planes.
- Relatively small aircraft profile makes it a small target.
- Fast and agile at altitudes up to 3 km.
- Great turning ability when in high energy.
- Experience with the Yak-1 and Yak-1B carry over to this plane.
- Slightly better engine than predecessors.
Cons:
- Armaments have limited ammunition, stresses on firing accuracy and discipline to make the most out of a belt.
- Low maximum dive speed.
- Very bad high alt performance.
- Once speed and energy is lost, the Yak-9 performance drops significantly.
- Engine overheats sometimes in RB/SB.
- No WEP in RB/SB.
History
Media
An excellent addition to the article will be video guides, as well as screenshots from the game and photos.
Read also
Links to the articles on the War Thunder Wiki that you think will be useful for the reader, for example,
- reference to the series of the aircraft;
- links to approximate analogues of other nations and research trees.
ETC.
Sources
Paste links to sources and external resources, such as:
- topic on the official game forum;
- page on aircraft encyclopedia;
- other literature.
| USSR fighters | |
|---|---|
| I-15 | I-15 WR · I-15 M-22 · I-15 M-25 · I-15bis · Krasnolutsky's I-15bis |
| I-153 M-62 · Zhukovsky's I-153-M62 · I-153P | |
| I-16 | I-16 type 5 · I-16 type 10 · I-16 type 18 · I-16 type 24 · I-16 type 27 · I-16 type 28 · I-180S |
| I-29 | I-29 |
| I-185 | I-185 (M-71) · I-185 (M-82) |
| I-225 | I-225 |
| ITP | ITP (M-1) |
| MiG-3 | MiG-3-15 · MiG-3-15 (BK) · MiG-3-34 |
| LaGG | I-301 · LaGG-3-4 · LaGG-3-8 · LaGG-3-11 · LaGG-3-23 · LaGG-3-34 · LaGG-3-35 · LaGG-3-66 |
| La | La-5 · La-5F · La-5FN · La-7 · Dolgushin's La-7 · La-7B-20 · La-9 · La-11 |
| Yak-1/7 | Yak-1 · Yak-1B · Yak-7B |
| Yak-3 | Yak-3 · Yak-3P · Yak-3T · Yak-3U · Yak-3 (VK-107) |
| Yak-9 | Yak-9 · Yak-9B · Golovachev's Yak-9M · Yak-9T · Yak-9K · Yak-9U · Yak-9UT · Yak-9P |
| Other countries | ▂P-40E-1 · ▂P-47D-27 · ▂Hurricane Mk IIB · ▂Fw 190 D-9 · ▂Spitfire Mk IXc |
| P-39 | ▂P-39K-1 · ▂Pokryshkin's P-39N-0 · ▂P-39Q-15 |
| P-63 | ▂P-63A-5 · ▂P-63A-10 · ▂P-63C-5 |
