Bangerland
| This member plays War Thunder on Windows |
 |
This member has been playing War Thunder since 2018 |
 |
ATGM main Who likes his indirect strikes. Incoming artillery fire! |
 |
This member considers FV102 Striker the best tank in game. |
 |
This member considers IS-7 the best tank in rank VI. |
Contents
- 1 Who am I?
- 2 Relative camera controls for ATGM
- 3 Ground forces missile power comparison checklist
- 4 links to remember
- 5 Paranoia and conspiracy check corner
- 6 Talk/comment section
- 7 Header to separate custom articles from the rest of the page.
- 8 How to Sneak Up on Enemy Tanks in Arcade (Edited by AN_TRN_26)
- 9 Tank vision in Arcade mode (know thy enemy's location)
- 10 What does it mean for the flanker?
- 11 Indirect fire related items
- 12 Hull down and other cover related items
- 13 Angling and related things
Who am I?
I'm a British ground forces main, registered my account at 2016, but really started playing in 2018. Mostly playing in AB, since I feel like vehicles there have most balanced stats game-wise there, if you forget about wallhack and aim assist. 8.3-9 are probably mine favourite BRs.
If to not consider factions, i mostly use SPG and light tanks (including combat SPAA) and specialize in ATGM vehicles in particular. I dislike using medium tanks, due to them being flawed cannon fodder for no benefit, with very few exceptions. I like the idea of heavy tanks, but factions i play only have ridicilously flawed ones (to a point even 0.3 uptier means certain death even at 45 degree angle frontally), so i do not use them very often.
I do have some planes, but i practically do not play air mode. I did reach top tier, but it feels boring to me, as attacker playstyle is not relevant there past 4.0, as games end before you can do any significant team score damage (yes, i actually prefer to attack tanks rather than bases). The planes randomly being completely changed also didn't help my opinion much. The recent release of brimstone without fire-and-forget feature even for air mode in top tier just says it all, really.
If you have issues with what i write, i mostly operate from game perspective and what i actually saw or did in it. I also accepted that i have to plaster a lot of pictures around, due to my texts often sounding like crazy talk. History does not interest me and might as well not exist, unless i am forced to write in certain style.
I do not mind if someone overrides and even deletes mine walls of text either, as long as new informations is not false, so don't worry about that. It is inevitable due to amount of stealth patches going on.
Some people thought that i'm a part of WSP or something, i am not and i never was.
Favorite ground vehicles so far
British?
A30 SP Avenger - It really lives up to it's name, whether you snipe with it, or drive it GTA style. Never fails to deliver your salt, even in uptier. Extremely sturdy and can survive shots that would end literally any other tank. Also has opened roof, which often lets APHE to fly out of it, to frustration of its opponents.
A39 Tortoise - It is fun to play as breakthrough tank, or just to be a giant "boss" tank for players to shoot at, preventing spawn camping. You really will love those instant karma moments, even if you get nothing out of it. Though Germans love to destroy it, and some players outright punch through the middle of it, sadly.
Falcon - It's more effective tank than most rank 5-6 tanks, especially if you know how to fire at tracks with auto cannons, forcing enemy to turn and get destroyed... And it's a good AA, lol. But with every patch Gaijin increases repair price for it in AB by 6k. Lately finally nerfed it from 22k to 14k. Why is it so expensive? I dunno, beats me. Be careful with trigger discipline, single belt rearms for a minute and then reloads for as long. You will be destroyed :D . French AMX-30 DCA is basically same thing, but hull has 230 mm armour which often deflects APHE point blank, but if it pens, the tank is toast.
Centurion Mk 1 - After playing with other nation, I can see how it's alright. It can bounce enemy shot when cutting a corner, then fire back at them and go on with it's business. And it's not terribly overtiered, like the rest of its tech line, so it can actually survive.
Radar SPAA in general - Since the lock-on update playing such SPAA became a bliss. As British player I mostly use Marksman , which can incinerate every light vehicle in 2km range on top of shredding anything that flies. It also generates hatemails like crazy, since people underestimate it due to it's snail speed and ridiculous size. In 10.0 there is Stormer HVM, which is very whimsical, but removes anything that flies next to instantly.
All British ATGMs - That feeling when people just despair and give up in their own cover under ATGM rain is priceless. They launch up to 10 artys at once on you and entire sniper gangs try to get you the entire match. It makes you feel special, even if you do die from it.

Japan?
Chi-Ha Kai - the first tank in jap line that doesn't need HEAT to defeat something. It also has decent control. Can be used to steadily break enemy, at least in successive 1v1 duels. Massive rush will obliterate it. Actually, every tank after this one is mostly alright, though mostly its like this: glass cannon->tank that can actually bounce-> glass cannon -> tank that can actually bounce. Chi-to and Chi-to late are the most obvious successors of chi-ha kai and example of this rotation.
Chi-Ri II - Giant landship, easy to destroy, autoloader reload speed is not much better than godawful indestructible Cobra King, but if you'll manage to get it into proper spot near to capture point, so that nobody can get past friendly snipers without going straight into your APHE kill-zone, your enemies will regret everything. Actually, even better, work with M4A3E2 or similar tank and fire at enemy from behind it, once they fired their guns. That will work great on cluttered street, as nothing can destroy jumbo anyway, and you will punish them for not leaving earlier. Can destroy rank 1 HE heroes, Italian automobiles and bait opponents with secondary APHE gun. In AB, spaded chi-ri can even flank (what???) and destroy enemy's initial push on some maps before they realize where they're being shot from.
Honestly, all 7.0 japanese SPG are broken overpowered, but if you don't believe:
Ho-Ri Production - Probably even more awful tank than M4A3E2, balanced only by the fact, that rank 4 and 5 have enough counters to it. Can bounce anything at range, can tank APHE from most tanks, can ram you and make your tank useless, is literally unstoppable when used properly, can survive being shot at by 6 vehicles at once multiple times and destroy some of them back. Explodes to pure AP shot to transmission (French), ammo rack flanks (GE) and heavy SPG in general (jagdtiger, etc), can be slowly deconstructed by HEAT tank, occasionally destroys itself, trying to blow up T-54.
Type 60 ATM - Extremely flawed tank, which slowly grows onto you, if you actually take time to use it, instead of going straight into 7.7+. Has missiles that can aim on their own in AB. Due to how it's launcher works even when damaged in AB, it also confuses people to a point of stupid death. It's so ridiculous, that it actually works even against 9.3 tanks. Enemy is too smart to open himself towards you? Scout them out and laugh, as a squad of Leopards on other end of the map deletes them from the face of the earth for you.
Type 75 SPH - while the gun depression and suspension on this is worth a potato, it can just fire over hills and special proximity fuse shell will get you even behind a wall, even if you are an indirect ATGM god and never show yourself. Might as well J-out, because if you didn't explode on first hit, it will fire again in 10 seconds due to fully automatic autoloader and incinirate your tank for good.
Italy?
To be honest, all of the italian tanks are quite good despite their shortcomings, but they all require you to be in a very specific state of mind and demand loyalty, or you will just get curbstomped by US tanks. For example, playing FIAT 6614 ( which is downright overpowered tbh ) after a month of not playing it is just not working.
From medium tanks, OF-40 is insane for what is supposed to be "just another leopard". From light tanks, aside from FIAT and VBC which are funny (and powerful), VCC-80/60 is a peak light tank. It literally can do anything if you are good enough. KF41 is also a tank i play a lot since it reminds me of a Warrior, but in a higher tier.
Hated ground vehicles so far
Conqueror MK2 - God, this thing gets lit on fire even by random vehicles blowing up near to it's side, and explodes from random shots to the track. I even got destroyed by Centurion AVRE, that MISSED me. YEAH. I realize that this vehicle is great in RB and all, but why it is so flammable in AB is beyond me.
Caernarvon - People often say it is good. I honestly don't understand what's good in this tank. Even FV4202 was better for me. I guess i have to fight Germans way too often to see it's good side in action. What i see is it being unable to survive anything that would be a threat to your average tank and being unable to penetrate most of tanks that others easily destroy.
Warrior - I love it, but I also hate it. Why BMP-1 cannon shell can hull break warrior even when it hits add-on armor, and cannot hull break striker? Why BMP-2 bullets can instantly destroy armour plates from over 1.5KM and instakill it? I got hit by ATGM from IT-1 and lived somehow, losing all armour on my left side, but cannot survive BMP? How is that??? Also, Soviet light tanks now can survive hull break by being hit into engine or even radiator, but Warrior seems to not be able to do that. Common sence is overrated, I guess.
Na-To - I feel like this tank is a failure on it's BR. Not only it's open topped again (after Ho-Ni III), but it reminds people of flakbus, and so it will trigger every person in 2km range to attack you until this truck is annihilated, which happens a lot faster, because it doesn't have flakbus armour or spacious crew placement. One can even one-shot it with APHE, if they know how. You may also expect to use it in up-tier with APCR, but it's penetration is just not good enough for frontal shot. If to compare it to other vehicles at rank, 90/53 M41M creates such a horror effect to anyone who ever was shot by it, it doesn't even need any protection, not to mention it's much more resistant to damage.
AUBL/74 - While i don't despise this tank, the fact that its gun can miss a target 200 m away if you aren't driving 50 km/h is really something i can't get behind.
Archnemesis
IS-4M - whenever I meet it, I don't live long enough to understand where to shoot it, lol. Appearantly, you just shoot it below turret into that giant triangle, and it either explodes, or you are just screwed.
Merkava Mk.1 (USA) - If you want to drive chemical ammo\light tank user mad - that's your vehicle of choice, as it's packed with fuel tanks and RHA screens. Turret is almost invulnerable to kinetic damage as well. Can be obliterated by APDSFS from the front, APHE to turret neck, or by shots from the side (rear is pretty much invulnerable to chem ammo too).
Relative camera controls for ATGM
Okay, this is very seriously important for any british ATGM main, if you really want to destroy the opposition. If may work for others as well, to some extent. It fixes camera issues in melee range and when camping on steep hills.
You need to set "relative camera angle" for your aiming, by going to control-tank-camera control - "view in battle - ground (Y axis)".
In new menu you need to activate "relative controls" and "keep value for disabled axis", then set buttons for "Increase value", "decrease value", "enable axis" and "reset axis value". For example i set them to NUM 7,9,8,4 respectively. The sensitivity is up to taste, but i took it to the extreme, as it's faster to do.
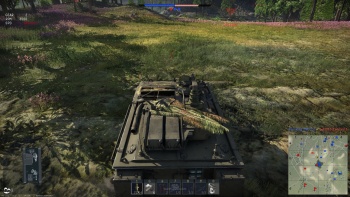
What it does: you use "decrease" and "increase" value to set a direction for camera (down or up basically), and on press of "activate axis" it detaches your camera from your reticle by a certain angle. You can make your camera look sky-high up, so when you actually aim in front of you, you can now truly aim for enemy, not just randomly fire missiles everywhere, enabling you full melee combat capabilities, allowing you to look behind ridges, while aiming, and fixing the problem on pictures below. Or you can fire upwards without looking at the back of your vehicle (though that's usually fixable by just pressing Z, but something like Type 60 ATM needs this feature.)
When you are done, you use "reset axis value" and "activate axis" to return to normal aiming mode.
It's also possible to do to horizontal axis, allowing to see people behind rocks as you turn missiles there, though it's only good for you in towns and mountains at specific spots.
Now only thing left is finding out if it's possible to ruin semi-auto aiming by triggering manual control by a button somehow. Though i doubt i'ts possible.


Ground forces missile power comparison checklist
A list of stats to pay attention to/ to make educated guesses from. Mostly ground forces perspective. The rules apply to manually guided SAM and ATGM.
Guidance type:
- Hand aiming (manual) - in RB, forces tank to stop and is guided with WASD (tank controls). in AB it is replaced with semi-auto (no ECCM) by default.
- Context: To see if it's bad or not, check when the missile starts to actually respond to commands (after how many meters), and how responsive they are.
- Difference between the RB and AB for tanks with manual aim is that in AB the tank might be restricted to only aim with sniper crosshairs (like type 60 ATM or RakJPz 2 after recent nerf), which is very bad as usually in AB ATGM tanks are allowed to aim anywhere (like the Zachlam Tager currently), as to avoid being killed by tanks with Aim Assist. Otherwise it is clunky.
- Hand aimed ATGM can be controlled outside of LOS in RB, which makes them decent for artillery strikes (see "launch type").
- Semi-Automatic (SACLOS, 2nd gen, etc.) - The tank guides the missile with IR light and it is controlled by mouse. If it does not have ECCM it can be jammed (check right under "guidance system type" in stat-card). It will never trigger LWS. If the tank cannot see the missile, the control is lost. Only one can be guided at once.
- Context: Some tanks, even in RB, can guide missiles past sniper crosshairs, but you can't guide missile after it left your LOS. Therefore, in ATGM battle the best missile tank has the ability to guide with it's launcher located as high as possible, or the scope on the very roof, and the missile controls for it are very lenient. For comparison, BMP-2 theoretically can fire ATGM over a wall, as it pokes out, but it cannot aim it, and, most likely its safety catch will prevent it from firing in the first place. Shturm-S can (whether it's a bug or not), swap controls to launcher itself and fire directly over a wall and it will be able to guide (in rb only at melee range). IT-1 does this by default in AB/RB.
- Some SACLOS missiles immediately drop to the ground if you cut them off by launching next missile. This is very important as it would be very convenient to just spray a fan of missiles and retreat to cover without actually guiding them. This also affects "manually guided" missiles in AB.
- Jamming actually does not occur to direct attack missiles if your missile is out of your LOS. Tanks with optics on top and super agile missiles like the Shturm-S can launch the missile and just back off immediately to ignore the jamming altogether.
- Generally, if the tank has "commander aim" functionality, he also can guide missiles, thus increasing tank's LOS capability by moving the guidance device from gunner scope to the tank roof, so ATGM tanks with that function should turn it on by default before engaging. Simply having Commander optics does not imply that he can aim ATGM.
- Beam riding (laser guided) - The tank guides missiles with laser beam. It is allowed to launch and guide all of them together. It cannot be jammed or interfered with in any way as of now. However, if after a launch you will aim directly at enemy tank or helicopter that has LWS, it will receive attack alert.
- Context: Semi-automatic Striker and MEPHISTO may have a lot of missile pods, but they are constantly exposed and can't really utilise missiles that are still mounted. ZT3A2 with laser guidance does not have this problem - theoretically you just launch all 3 missiles and then even if people hit the missile rack, it is already empty, so it's irrelevant unless HE was used (currently, the ammo rack of that tank almost constantly counts as an active ammo rack, even when empty for some reason, so pay attention to stealth-nerfs).
- There isn't that many LWS armed tanks besides the majority of italian and japanese tanks of 9.0+, but it's better to not aim directly at the enemy until the missiles are close to them. Since helicopters can spam multiple "Hellfires" or "vikhrs" and rely on laser lock to attack the tanks while manoeuvering, these tankers will immediately drop smokes (to break the lock-on) and move, or even try to shoot back.
Launch type:
- Vertical (fixed) - Missile is launched upwards, then comes back on course after certain distance (usually 150m or 240 m). The key is to find out where enemy tank really is, then aim sniper scope exactly there, then launch, the missile does the rest by itself. If it doesn't, you can pull out of cover and aim at the enemy tank to finish the job (or just steer them around if they are hand aimed).
- SACLOS missiles have a tendency to fail at doing full hulldown strategy, as missiles tend to deviate by 5 degrees eventually, but the tanks that have them usually have raised optics, thus should be difficult to destroy with HEAT while they correct the shot. This can be a problem in AB, where manual aim is replaced with SACLOS on tanks that aren't built do to this.
- To fire straight, such tank must angle itself down about 30 degrees, or at least until aiming applications for the launchers become visible. (then the missile simply flies into crosshairs)
- Roof mounted horizontal - Missile is generally mounted on a roof and launched forward by "fire special weapon" button. Problems come from the launcher being a liability (very easy to hit with HE or spot in general before you can even use them, very poor launcher depression, etc). These launchers also have a safety catch installed in them which prevents tanks from firing at point blank range to various degree. In AB, Light tanks are usually allowed to resupply this launcher without coming to the capture point.
- Horizontally launched missiles have different starting speeds. Generally its 80% of maximum speed, or just maximum speed (like with BMP-2), but it might also be 50% (like with the Warrior firing downwards), obviously, the faster is the missile from the get-go, the more useful it is in general melee and in a hill battles, but also less useful when fighting over a flat plain (as it will just leave your LOS before you can correct it).
- Horizontal launcher - Can launch missile up or forward from a specialized launcher or cannon. They are launched by "fire primary weapon" button. Generally, even more of a liability than the roof strapped ATGM, because in the case of these tanks sometimes the launcher ammo rack counts as an instant-kill hazard. But they also have benefits, for example they can be fired at any range, even if it kills the ATGM carrier by exploding enemy tank in its face.
- Missile are immediately controllable after launch, so no waiting to get missile controls back. But this also means you can't just launch the missile behind a hill and expect it to hit tanks without an effort, you have to do all of it yourself.
- These launchers have even more variety of launch missile speed. It may vary from 100% (like with the BMD-4 and Khrizantema-S) to 0% (like with the M551) speed. Slow launch missiles cannot be used as an opener, but are easier to launch behind a building.
- Some tanks fire ATGM with their cannon. All of them can fire on the move by default. Usually they receive an insane ATGM reload penalties compared to the tank shells (generally almost threefold) and are uncompetetive at close range with other ATGM carriers. These tanks can be successfully used even if the gun barrel got broken (the ATGM does not receive damage penalty and does not get randomly launched wherever even if you don't fully repair the barrel), and ATGM are often used as an opener (especially tandem charge missiles).
- Tanks that fire ATGM from the gun are usually not allowed to resupply ATGM outside of a capture point in AB unlike other missile carriers.
Attack type:
- Direct hit - Aim ATGM at the tank, it flies into it and explodes, simple enough. Cover can block them, but user can launch them from above or just guide them into cover at the last moment.
- Top-down - When you aim crosshairs at something, it flies approximately 10 degrees above that and tries to spot tanks. If there is anything "tank-like" below them, they explode downwards. They react to dead tanks and may detonate too early if enemy tank has the turret on the very back. If it does not have ECCM, it can be jammed even if enemy tank can't see you. Can be used to directly hit tanks, but generally can't do much if used that way due to a reduced penetration power.
Payload type:
- HEAT - Much like HEAT shells, it does punctual damage in direction of a hit. ATGM is stronger than shells, because you can control the damage cone direction, and it in general has enough penetration to ignore internal defences. The more explosive mass the ATGM has, the more likely it is to one shot tanks by destroying fuel tanks and the more AOE it has after penetration.
- Usually does 15 mm RHA of overpressure damage, but there are exceptions, particularly if missiles have more than 3 kg explosive mass (in TNT eq). Explosive mass does not always equal to more damage, but always equal to more overpressure range.
- HEAT (tandem) - Ignores ERA of a tank (the hit is calculated as if it was not present).
- It appears that they do around 30 mm RHA of overpressure damage on initial hit by default, but it might not be the case with ZBD86 (i have no way to test this).
- HE - Basically an HE shell strapped to a missile. The same overpressure rules apply to the ATGM and it might also come with proximity fuse that only reacts to aircraft (HE-VT, like Shturm-S or BMP-2M) or have top-down attack ability (like with type 89)
links to remember
Some random images left by wiki moderator to help me remember how to upload pictures:

http://wiki.warthunder.com/index.php?title=Hunter_F_1


Category tags for images: [[Category:In-game screenshots]] [[Category:Garage images]] [[Category:Animated files]] [[Category:Ammo racks]] [[Category:Document images]] [[Category:Historical photos]] [[Category:Map layouts]]
Link to upload stuff : http://wiki.warthunder.com/index.php?title=Special:Upload .
Link to optics gallery: https://wiki.warthunder.com/Optics
Link to autoflaps page: https://wiki.warthunder.com/Automatic_flaps
Link to nvd page: https://wiki.warthunder.com/Night_Vision_Devices
Link directly to parsed zooms list: https://wiki.warthunder.com/index.php?title=User:U13682523&oldid=34725#List_of_all_tank_sight_magnifications
Link directly to parsed NVD list: https://wiki.warthunder.com/Night_Vision_Devices#List_of_vehicles_with_Night_Vision_Devices
Link to some data on NVD resolutions: https://wiki.warthunder.com/User_talk:U38088265#nvd_list
Paranoia and conspiracy check corner
Space for special MG penetration tables/graphs (discontinued)
Yes i am aware that different rank MG's and minor caliber changes of certain factions should and might be different on different ranks, but i digress for now, since difference seems insignificant to me ingame, as seen in 7.92.
Anyone is welcome to add info on different calibers, or add specific faction calibre (like french 15.00 or whatever)
HT: heavy tanks, HTD: heavy TD, as in Foch, ISU, and so on.
By heavy damage is implied, that it can destroy some module, but doesn't pen entire vehicle. (if ammo doesnt explode in 1 hit, specify that)
By destruction implied, that if it hits you, with it's ROF you are probably screwed.
low caliber SPAA and autocannons included to compare with french coax autocannon and check other abnormal dps stuff (pen*rof), do not add more of those
In case if you don't know if your LVEH can be penned by MG or not, just use armour protection analysis on your vehicle against BMP-2 AP-T belt or M2A2 default belt and then compare it to numbers in table. That will give you the jist of it.
| Caliber | Presumable pen point-blank (against RHA, or whatever number bmp2 "protection analysis" check says) | presumable pen at 100m (against RHA or whatever number bmp2 "protection analysis" check says) | ROF | Who uses: | Tree removal (y/n) | Stone wall removal (y/n) | Damage to external armour | ATGM intercept
time (lol, yes) |
DPS to flat rear of TD (45 mm homogenous armor) (tested mostly on IT1) | DPS/TTK to sloped LVeh (50-65 mm aluminium AA7017) | Dps/TTK to angled sides of Lveh/armored turret (20-30mm~~ aluminium 7039) | TTK to unangled/ unarmored LVeh (15mm in general, aluminium 7017) |
|---|---|---|---|---|---|---|---|---|---|---|---|---|
| 30mm warrior gun, APDS loadout | 110 | 101 | Very low | Warrior | Yes | Yes | ERA, doesn't seem to do much else | Damages engine | Heavy damage, 6 hits to destroy ammo | Heavy damage, ~2 hits to destroy ammo | Heavy damage | |
| ~23cal AA only SPAA gun combo | ~46 | ~45 | Insane | Non combat SPAA like ZSU-23-4, wirbelwind with no ap ammo and such | yes | Yes | Significant | Damages engine. | appearantly deteriorates even permament armor to 0 in 3 seconds or so, resulting in destruction. RNG/bug/feature? | Destruction | RUN | |
| 20cal vulcan gun | 58 | 55 (it got buffed i think, because how The 23 mm does less damage??) | ~infinity | M163 | yes | Yes | It seems to not care. | It shredded Vickers MBT from the front eventually, and it has 60 mm RHA, sooo, yeah. | Instant death due to millions of ricochets all over the smallest weakspots. Hilarious. | RUN | RUN | |
| 20mm Crusader AA cannons and such | 41 | ~39 | Heavy since twin guns.. | Most early autocannon tanks and such | yes | Yes | Seems to not damage 5mm plates | Penetrated, despite it being statistically impossible, or Bypasses external armor (5mm) | Unknown | Destruction | Destruction | |
| BMP2 30mm autocannon, AP-T load | 64 | 61 | medium or insane | Bmp2 | Y | Y | instant destruction | Unknown, probably destruction | AP-T seems to not penetrate ~60, for no reason. It seems having high ground may help. | Destruction | Destruction | |
| 20cal coax cannon | 47 | supposedly 34 (unverified source)
44 , 31 up to 500m by ingame stats (nerfed lately) |
Heavy | French rank 6, amx-30 (r5) and some top german MBTs | yes | yes | Unknown | Unknown | Can cause Destruction for unknown reason.
No damage to ~55mm of alloy7039, or just doesn't damage heavily sloped armor. (unlikely) |
Destruction, but no AOE damage, so it damages weakspot of LV with 30mm but nothing more so far. At least from french gun. | Destruction, 1 sec max | |
| 15.0 mm MG | 36 | 34 (ultra nerf down from 45 lol) | unknown | French HT and HTD | unknown | unknown | unknown | unknown | unknown | unknown | unknown | |
| 14.5 mm KPVT | 45 | seems to be around ~26mm, but sometimes pen more.
42 by ingame stats, but seems doubtful. (how da hell it's still so op when french one is nerfed??) |
low to Medium | is7, is10m, soviet HTD rank 5 | yes | unknown | Unknown | Unknown | Does nothing to 60+mm, but either 38 or 44mm on warrior's alloy 7039 rear achieved destruction. assumed 50mm of AA7039 seems to hold off. | Heavy damage, sets off ammo in 1 hit, can AOE from turret shots. | Destruction | |
| 12.7 mm DShK and such | 29 | seems to be around ~26mm, but sometimes pen more.
27 by ingame stats |
low to Medium | HT and HTD , some MBTs of rank4+, | unknown | unknown | Unknown | None | None | Heavy damage, sets off ammo in 1 hit, can AOE from turret shots. | Destruction in 1 sec max | |
| 12.7 mm M2HB USA edition | 26 | 25 by ingame stats, but seems to be around 26. | low to Medium | USA on rank2+, half of JPN vehicles on any BR | yes? At least on direct hit on a small tree. | unknown | unknown | None | somehow did damage after 5 sec or fire from M103.
perhaps hit weakspot with ~30mm. |
unknown | Destruction in 1 sec max | |
| 8.00 | 10 | 9 by ingame stats (how even if 7.92 is better?) | ??? | Italy up to rank 2 | unknown | unknown | unknown | unknown | unknown | unknown | unknown | |
| 7.92 | 13 | less than 13?
12 by ingame stats |
Medium | German tanks before rank 4, their HT and HTD past rank 4 | unknown | unknown | ERA only | Unknown | seems to do no damage | Unknown, since nobody tries to use it on selected vehicles | Resistable, can technically penetrate 10mm vents | |
| 7.7 | 10 | 9 by ingame stats | Low | Japanese rank 1-3 | No | No | unknown | unknown | unknown | unknown | useless | |
| 7.62 | 10 | less than 13?
9 by ingame stats |
Low to medium, heavy on rank 6 | German medium vehicles rank4+, french before rank 6 and most british tanks use something similiar, most USSR mbts | No | No | ERA only | No damage | No damage | Nonexistant/ignorable | seems to be useless even point-blank vs ~13mm aluminium alloy | |
| 7,50 | 10 | 9 by ingame stats | unknown | French at various ranks | unknown | unknown | unknown | unknown | unknown | unknown | unknown |
I gather that SPAA guns penetrate at least 7mm more than ingame tip says, at least for aluminium. And with highter ROF it may cause instakill even on vehicles, that are supposed to be permamently resistant to it, so probably MG does that as well. As long as cursor is yellow in protection analysis or AB, this means high ROF guns can penetrate it with some luck/determination.
Conclusion for armor protection for general mg bullets so far:
AP-T (or incindenary armor piercing) ammo in cases of many tanks negates inclination armor modifiers, just like APHE of soviets, which makes it as good as APDS against angled armor, which is extremely unfair (lol). The ones that do not possess this feature act like HVAP - lose penetration power very fast with each degree of angle, despite being initially strong.
However, IAP seems to have much worse ricochets angle than APDS and such shells, so high ground negates it entirely as long as you have 65mm total. APDS cannot pen much more at this angle either, because it has no angle modifiers, just huge raw numbers.
This kind of explains how the soviets HMG destroy sloped turret of warrior in 1 hit, but sometimes soviet autocannons cannot destroy Striker's hull - even with BMP2 guns for example.
The weirdness is further increased by fact that aluminium alloy has huge penalty to armor (which is not properly displayed in statistics, and goes all ways from 20% to 50%) and "yellow" penetration is actually Random (RNG), which means insane ROF of auto cannons and such can roll "penetration" chance a hundred times per second, which convert 5% chance of pen into guaranteed kill.
External plating often seems to be completely ignored whenever penetration of enemy ammo > armor of plate, or just gets destroyed in 5 hits at it is. Doesn't even have to be angled for this at certain points. Seems to be proved by panther D side (40+5) being penned by Crusader AAmk2. Also most light vehicles have glaring weakspots with 10mm less armor (like this isn't enough already) and even some equivalents of 7.64 can penetrate external shield, if you aim exactly where it hurts.
As in, the protection analysis feature seems to like to ignore external plates for life, so it's safe to assume, that on random occasion bullets can just go through them anyway. They still protect from HESH and single cannon shots though.
High ground seems to help against MG and Autocannon in case of solid permament armor, however if in case of modules, like Striker transmission blocking any MG bullets coming through LFP, the fury of certain guns like "vulcan" will shred it apart just due to sheer ricochet randomness over hundreds hits.
Perceived subclasses of tanks
| These aren't in any way official, but rather a headcanon. SPAA can generally be put into light tank category, so i did. |
Light and SPAA:
Scout tank: Somewhat weak light tanks/early spg that can barely damage even medium tanks and have to flank to defeat something. Generally very short.
Autocannon armed tanks - light tank/Combat SPAA: Early german tanks, british Falcon, that soviet SPAA that many hate so much and their variations. Have poor armour, but may be able to survive fire of the same type of weapon. At rank VI and onward almost all of them carry ATGM as well, which makes them very dangerous.
Chemical gun light SPG/tank: Lookup all those light tanks and SPG at 6.3+, which only carry chemical recoilless rifles. There are also unique premium tanks falling into same category at various ranks. They are usually small and can barely survive MG fire, so they rely on stealth, but they can penetrate almost anything too. They often have Scouting, even if they are marked as an SPG. Due to their generally low profile, they may be hard to target.
Heavily armed scout tank: Basically a light tank with medium tank weapon, start appearing with rank 5. Different from chemical light tanks, since it can use kinetic weapons, usually have smokes, much taller and generally rely on speed over stealth. Superior to medium tanks in AB due to Scouting and smokes used in parralel.
Medium: Brawler - Tank, which can deflect popular non-sniper shell of a rank at a moderate range, and probably can ignore light tanks unless they are in their face or did 90 degree flank, like t54 and some american tanks, etc.
Hulldown medium sniper - Medium tank with high amount of armour on a turret, but bad hull armour or is very slow. Usually, even though it has high armour, it's not enough to deflect shots of it's own BR so it has to be really, really far away, hence medium and not heavy tank. Centurions, Chieftains, Etc.
Sniper - Barely has armour to protect itself from frontal attack of a light tank, negligible armour on a side. May have sloped turret cheeks to protect it from inaccurate shots, but that's it. If you saw leopard 1 or chi-ha, then you know what i mean.
SPG: Breakthrough/heavy SPG - No nonesence heavy armour on the front, which is near impossible to penetrate without HEAT or superior ammo, but is generally very slow or have weaknesses. May be specialized to camp on a distant hill or to push directly.
Hill based camp SPG - SPG with high depression but long gun reload. Usually has ammo which can delete any tank. Usually has weak armour and early on can be bullied by any aircraft.
Ambush/snipe SPG: SPG with mediocre armour which rely on stealth, great scope, very long range ammo (often weaker than normal) and low profile to spike someone in their side and retreat. Often have great reverse speed. Many of them are useless in AB for obvious reasons. Eventually adopts ATGM and moves way too far for any tank to be a threat.
Shoot&Scoot SPG - Negligible or weak armour, but has great forward speed for its rank and exceedingly dangerous gun. I'd call it a better medium tank, since WT sometimes has funny perception of module-based armour, making them far superior in all ways.
Demolition tank/artillery - SPG with giant HE/HESH gun mounted on it. Usually have ridicilously long reload, but a single hit from that will send even heavy tank back to spawn. Often can fire over obstacles due to shell velocity.
Heavy:
Hulldown - Heavy turret armour, generally can only be defeated by a direct hit of sniper ammo or SPG grade HE/HESH to the roof, but is very slow or very vulnerable to flanking. Lots of american tanks excel at this.
Assault - Heavy tank with really high frontal armour of both hull and turret, may rely on angling for side armour or have enough to ignore small guns. Soviet tanks are very canonic here.
Support - Heavy tank which is supposed to assist tanks around it. Generally has heavy armour all around and lots of smokes or other tools, but weak to SPG and snipers in general. Early British heavy tanks are like this.
Fake heavy tank - Pretty much entirety of the french tree and some japanese tanks. Fake as in it is just a giant medium tank with even bigger gun and it's armour is nothing generally accepted for a heavy, thus it can be deleted by a single shot of an autocannon tank. But, it's usually the early autoloader tanks, so good luck if they fire first...
ETC.
Hullbreak checks
Wanted to create this subsection to check if anything changes with new patch/sub patch, as every time light tanks begin to refuse to explode to a single ATGM for weirdest of reasons, then next patch gaijin adds tank which doesn't explode while sporting 15mm aluminium armour, then it again explodes to hull hit, but not engine hit, even to 150+ mm cannon, ETC.
Wouldn't need it, if Update 1.89 "Imperial Navy" didn't drop yet another uneven nerf. IDK, maybe they were just too bored to list every light tank at 8.0 BR, but it doesn't make me feel any better, that OBJ 906 and BMP 2 weren't mentioned.
I highly suggest that moral questions like "is this fair that BMP-2 does not have same hull break as BMP-1 while being literally the same tank" not being summoned here. But mentions of Hullbreaks on certain tanks with patch number next to it would be nice.
- Types of hull break
Ammunition type hull break: Basically, vehicle can be rigged to explode if hit by certain ammunition, usually chemicals. Sturmpanzer II instantly explodes if HE hits it, even on non-pen. You may argue if it's also tied to caliber, but it's irrelevant, really - APDSFS also causes it to happen more often than other KIN shells, though that would be strange.
Calibre based hull break: Basically, vehicle is rigged to explode if certain caliber shell hits it. Rule is often matched with certain hit region (IE, hull, engine, ETC) and ammunition type (may need lesser caliber for CHEM or KIN). Example: M10 often explode if hit by high enough caliber KIN shell into engine. Or Striker is now mentioned to have hull break of 105 mm CHEM or 120 mm KIN, without any specifications of "Where to".
- Regions affecting hull break
The hull itself - it either can or cannot be ruined. I didn't find evidence of different sides of armour having different hull break property/ caliber requirement, the only exception was warrior and it's ERA shield somehow magically stopping even ATGM (though it's so powerful it was usually meaningless.)
Engine - Usually acts as a stopping power for shells, as of late 7.3+ light tanks are not hull broken if HEAT/ATGM hits them straight after hull penetration, but sometimes it is a weakspot (mostly for WW2 tanks with KIN shells).
Cannon - Normally, it's a deterrent for any types of shells, but in case of flakbus if big enough shell hits the gun directly, whole truck just explodes to pieces, while even penning entire truck all the way with through with KE does no real damage.
Radiator - Lately stops light tank hull break if chemical warhead hits it after pen (mostly tested on HEAT-ATGM)
Transmission - Can stop hull break, but you will still likely get obliterated by raw damage
Track/suspension wheel - Strange hullbreak spot added by 1.89. Basically if enemy HE of 75+mm hits track front or certain suspension wheels (usually the first and last two), you just die
- Tanks, which are immune to hull break for some reason
Tank - invulnerability properties - patch
Type 60 SPRG (C) - immune to KE hull break unlike type 60 ATM - 1.89 . Not anymore - 1.99
- Vulnerable tanks


| Name | Hull break | Engine break/protection | Cannon/launcher break/protection | Radiator break/protection | Exceptions? | patch? |
|---|---|---|---|---|---|---|
| Warrior | 75 mm HE, 105 mm HESH, 120 mm Any chem, NO KIN | Protection HEAT/HESH | No protection | N/A | ERA shields (if explosion hits in between them, you are dead regardless) | 1.89 |
| BMP 2 | 105 mm CHE | Protection | No protection | Protection | None? | 1.87 |
| Striker | 105 mm any CHE on track, 120 mm KE, Artillery | Transmission protection, but mostly only HEAT | Protection | N/A | No | 1.89 |
| Name | Calibre and type | Protection/Break | Protection/Break | Protection/Break | yes/no (specify) | patch Number |
Talk/comment section
In case if you want to write exactly here:
@Bangerland, here are a couple of options for formatting images here on the wiki. You can check out options on Google for GIFs (although, I don't think the formatting is much different for them). You want to make sure when uploading images, that you don't upload copyrighted images (without permission). Feel free to load images you take from the game, public domain images or copyrighted images which you have received permission and annotate in the information section of the image posted.
Here is the link to upload images and GIFs: http://wiki.warthunder.com/index.php?title=Special:Upload
Also, this is your page, you can add, edit or remove data here as you would like. Good luck! - AN TRN 26 (talk) 16:16, 21 December 2018 (UTC)
Does someone maybe know a way to use the marketplace thing without double authentication? Wanted to exchange some junk to get decals for fun, but this thing just wont let go... IDK why every company just assumes i have 2k$ phone, or have time to set up emulator, or even care about mine account's safety. It's really frustrating to me, because decal even costs like 0.13 points of whatever the currency is, and i could get 4 easily by dumping SU-85a, which i wasn't going to ever use anyway. If that's oficially and even unoficially not possible, at the very least some recommendation of easy to setup emulator would be nice. (bluestacks gave me headache previous time i tried to use it.) --U42773747 (talk) 21:51, 24 April 2019 (UTC)
- Sorry, I don't have a recommendation. I was able to set up double authentication, but the market still would not let me purchase anything so I didn't pursue it any further. I have used Bluestacks and it seemed to be a resource hog and worked most of the time, but recently I have switched to MEmu (https://www.memuplay.com/) and that one seems to run a bit better and is fairly easy to get going, maybe that will help with the emulator portion. -- AN_TRN_26 (talk) 01:30, 25 April 2019 (UTC)
- You don't need a phone to enable 2 factor. You can turn on 2 factor by email.--blastedryan (talk) 03:56, 25 April 2019 (UTC)
Another question - is there any way to learn exact magnification value on tank/gun? X-ray and stat-cards seem to not tell optics zoom on tanks. Would never tell ST-A1 is a decent tank, but OH GOD THIS OPTIC HAS AT LEAST X12 MAGNIFICATION. I mean... Many rank 6-7 tanks wish they had optics this good, you can even see tanks from over 1km in detail with this. If not , maybe we should include optics as a detail on tank pages if possible? --U42773747 (talk) 17:16, 27 April 2019 (UTC)
- I don't play tanks very often, so I don't know, Inceptor57 or one of the other mods may have more info on that. If there is enough information to write up on the optics (if there are really that many different ones/zoom levels) then it's possible a small section may be worth is. You can always work on mocking one up on your page and we can see where it goes. AN_TRN_26 (talk) 18:03, 27 April 2019 (UTC)
- Problem is, only few tanks display optics info. Like... uh. I only found it on newer tanks of rank 6 and leopard line, as example, you hover over one of 89-s numerous optics, on one of them you see "optics X2-X8 zoom". The warrior just says "Optics X8", challenger "optics X4-10". But even in rank 6 i look at many tanks and see nothing (like KPz-70 data is omitted), and i have failed to find ones at rank 5 and below, except for Leopard I. I suspect those had to be filled by developers, but weren't in case of at least 90% of vehicles. And so, i don't have any solid information, only the subjective zoom impact info from comparing one to another. Well, because even default (minimal) gunner zoom is always different too, i have no clue what X1 even looks like. And some scopes seem to diffirentiate even by X0.3s, as Leopard A1A1 suggests, which is mind boggling.
- The difference is about like this (actual magnification extremely subjective, but the proportion i judged by "compass" on top of screen, which changes the distance between degrees with zoom magnification, so its still sort of true): Rank 1 tank has only X2 zoom as default (i suppose as things look closer than from 3PV) and X4 as second one (on press of Z), then you have rank 4 tanks with mostly X2-4 as default and about X4-5 as secondary, but you do get expections on tanks like M26 "D.C.Ariete" with X5 and X6. And so is with the many of the medium tanks, with X4 you barely see tanks at 1km range. Then you have sth like Object 120, which has X4 as default and about X8 as secondary , or Ru 251 with ~X7 and ~X8 , then you have something like German SPG Panzer IV/70(A) or rank 7 Challenger 2 which is supposed to be "the ultimate hulldown tank", and these ones have ~X4-6 by default and about X10 as secondary zoom. There is also Leopard A1A1 (L/44) which has like X10.3 as default and X12 as secondary zoom. And finally you have something really rare like Leopard 2K(and few other from those lineup), or rank 4 ST-A1 with about X8 as default and X16+ on secondary zoom (and probably the entire japanese tank line after that one too, as their rank 6 premium has similiar scope). The damn default zoom is as good as than the last one of top tier "sniper tanks". And what is worse , only few tanks have this insane optic. And the difficulty of aiming is different too, as the marks on scope (which say the shell drop distance) also become bigger and have quite the distance from eachother on that scope, even with APDSFS, so you don't have to stare at your screen so hard. You know, i often questioned Leopard 1 driver's sanity, as they constantly go for cross-map snipes and hit me in SPG from 2km away on the move, when i barely even see them in sniper scope, but when you know their optics are like 4-8 times better than yours, it makes at least some sense.
- I doubt a whole subsection would be needed to be created, because as much as i look, commander's binoculars seem to have same ~X6 increment on every vehicle, and cannot be zoomed, so you can't even make a big meaningfull table called "optics" to be filled like "gunners optics, Default, zoomed", "Commander optics, default, zoom". But i feel like adding lil table with optics of gunner to "main armament' subsection would be great. Here is an example: ("which ones" is there just in case Multi-turreted tanks have different zoom levels on different guns, though i failed to find one such example yet.)
| Optics (Xmagnification) | ||
|---|---|---|
| Which ones | Default | Maximum (zoomed in) |
| Main Gun optics | X4.3 | X12 |
- Even if that is too much, we have this default table explaining the guidance and stabilizer on the gun, and its fire rate (though without mentioning of autoloader, which also impacts things sometimes, like sudden knockout of loader not stopping/resetting the reload). And there are 2 empty slots after reload speed, which i always use in SPAA pages to say "rearm time", as those take forever and are on separate timers. We could appropriate those 2 slots to be like optics-> minimal zoom, maximal zoom instead? But problem is, table looks like it's supposed to be linked to gun page, not vehicle itself, or something. --U42773747 (talk) 20:03, 27 April 2019 (UTC)
- I like the looks of that table, something like that could be doable. Might be something to find a static marker/target in the trial yard and snap a screenshot of the target through the scope at each of its different settings and have those on the page for people to visually compare to, they don't have to be huge images, people can click on them (or it can be a composite of the images so one image has all magnifications side by side, that might be useful too. Might be good to have Inceptor57 weigh in on this, he is more of a tank guy than I am. AN_TRN_26 (talk) 20:50, 27 April 2019 (UTC)
- So, you want to add like a line into instructions, for people to compare or something like that? In a way of "If you can, check magnification of gunner's scope at This page and apply screenshots that match minimal and maximum zoom of this vehicle's optics here."? I feel like composite image might be hard to use, especially with wiki engine here. It will probably be better to have a lot of images you can scroll with those arrows. Like, make a page called "optics magnifications" and make a gallery of them, being commented like "X2" or "X4" "X8", "X8.8" (damn french RC car!), "X10", "X10,3" (damn leopard!) and such. For those vehicles, that have specified zoom, I could use enemy tank from test drive in AB mode, to use as a mark. Problem is, though, the vehicles may be different all the time for different factions/ranks. With AB rangefinder i always can make sure enemy stands at exactly 1km range, but ofcourse having only one same target for this would be better, to not get confused with different target sizes, but mine resources are kind of limited to what brits (and maybe japs) have, and the premium german test drives. Having a tree or building as a mark instead might be kind of... Counterintuitive? I have one ruined tank hull in mind (even with a tree in a way to have some comparsion) and can make sure it's 1km away via AB rangefinder, but for other people to drive that far and double check it, that would take forever. Anyhow, should i write to Inceptor57 about it directly or they might notice our discussion at their own time? --U42773747 (talk) 21:33, 27 April 2019 (UTC)
- I think it is possible to data-mine the tank optics zoom. In a tank BLK file if you divide 74 by the "zoomOutFov" or "zoomInFov" field that gives you the default and zoomed in magnification (it has a load of decimal points after it but when you round it to 1 d.p it is nearly always accurate, sometimes you will be out by 0.1 x though). Not sure the significance of 74, presumably it is the FoV of a 1x zoom or something. I worked this out by taking the standard zoom of the Challenger 2 (stated as x 4 in game), then multiplying it by the "zoomOutFov" field in the challenger 2 blk file to get 74. If I then pick other tanks in game which have a zoom specified and divide 74 by the "zoomOutFov" & "zoomInFoV" fields in their files the number you get nearly always rounds to what the zoom level was stated at in game. --Flame2512 (talk) 12:32, 28 April 2019 (UTC)
- That's very useful. You mean the .BLK similiar to those that appear, when you access "skin customization"? I'm afraid i'd have to own the vehicle to get these still. Or am i mistaken and i can make them out of other files? Kind of curious what kind of optics Type 90 has. --U42773747 (talk) 12:51, 28 April 2019 (UTC)
- The type of BLK you get by data-mining (extracting the game files). Its the way flaps limits, optimal velocities, compressor settings and stuff like that are found out for aircraft pages.
Header to separate custom articles from the rest of the page.
How to Sneak Up on Enemy Tanks in Arcade (Edited by AN_TRN_26)
Arcade Battle (AB) has game mechanics which provide a huge benefit to casual players - most notable, an ability to see enemy tanks through vegetation by seeing their "marks" or nameplate and vehicle type. "Aim-assist" is another huge help, which shows where the shells land up to 1 km away and instant rangefinder hints if the vehicle is even further away.
Due to this, many budding (and even more experienced) tankers may deem it impossible to initiate a surprise flank attack while playing Arcade mode. While this mindset is mostly true for the open plain maps (limited cover options), there are still several ways to sneak up on enemy tanks or appear to hit them seemingly out of nowhere. The key is in understanding the game mechanics and using them to your advantage.
Tank vision in Arcade mode (know thy enemy's location)
General vision rules
The ability of your or the enemy tank to spot each other has to do with the crew skill "keen vision." The higher amount of keen vision a crew has, the further away they are able to initially spot an enemy vehicle by the eye. While this ability is critical in realistic battles (where some of AB's abilities are not available), it almost becomes irrelevant in arcade battle, unless you are using very specific tanks due to the more relaxed spotting mechanics.

What one really needs to know, is how far away from and through what enemy tank cam make you visibly "marked", as it makes your presence obvious to everyone on their screen or minimap, once spotted. Another important ability needed for crews to effectively receive enemy position from teammates is the radio communication.
How you spot others (or are spotted yourself)
Firstly, your tank is marked when the enemy vehicle's commander (cupola) or gunner have a direct vision on your tank and you are within their "keen vision" skill range. When using binoculars or sniper aim, the vision power is tripled, however, this comes at a cost because their viewable area is now extremely narrow which will make it difficult to see an enemy flanking them. While light tanks may tend to be weaker in armour amount, they get an impressive 30% bonus vision from a modification exclusive to them.

The default keen vision ranges start at about 563 m (615 yds) stock and end around about 1,200 m (1,330 yds) for a spaded normal tank, however, bumped up to 1,600 m (1,749 yds) for vehicles classified as scouts. It is important to note that only a limited amount of players have "ace" crews in their tanks, so their keen vision abilities will be less than maximal most of the times. In the skill stats, it's called "line of sight detection". Do note, that if your tank is reasonably far away, the enemy will only be able to see your tank's class (although, if needed, they can just look up your tank's name on the scoreboard by pressing the default TAB key).
If the enemy's tank crew's keen vision is maxed out, they can mark you even through a wall or a building, but only when at a very close range of about 20-40 m. In skill stats, this benefit is called "absolute identification".
While this may sound difficult, if not impossible, to sneak up on the enemy vehicle, you will only get marked if player actually looks at your tank. As counter-intuitive as it may sound, the closer you are to them, the harder it is for them to notice you accidentally as typically they will be focused on what is in front of them, trying to either get to a vantage point or "scoping" out enemy vehicles to prey upon.
| PRO TIP: It isn't necessary to turn the turret to look for enemies. By holding the "look around" key (by default, "c") you can check your surroundings without exposing your vehicle's weak spots. |
If one enemy vehicle happens to spot your vehicle, other enemy vehicles will not necessarily have your vehicle show up on their minimap (same thing when team-mates spot an enemy vehicle.) The ability of vehicles to communicate to their team-mates the location of an enemy vehicle comes with the crew skill of "radio communication". The higher the crew skill in radio communication the earlier they will get a warning about incoming enemy vehicle, if anyone saw it.
It is important to note that trees and other frangible vegetation do not prevent a vehicle from being spotted, however, buildings, tall stone walls, rocks and terrain will inhibit line-of-sight and prevent a vehicle from being spotted.
Do note, when looking for cover to hide behind, it is advisable to avoid sitting at corners of buildings or on hill-tops, it is best to find obstacles which will completely cover your vehicle for line-of-sight from others. How far away is optimal? At the very least, your tank shouldn't be visible by eye (even through trees), so that people with no keen vision do not see you like in this example:

Ace crew skill Keen Vision notes
- If an enemy has maximum keen vision, ace, and maybe even scout lenses, there are two things to note:
- They can see an enemy even behind a corner of a cover, with leverage of about 5-10 meters. This means they can mark you even through a building block at times. They also can actually see above walls they are hiding behind. While this requires insanely high keen vision, this is still possible. In the case of certain missile tanks, they can even attack, while being completely invisible.


- While maxed crew keen vision seems god-like, objects can still serve as visual protection. When counter-flanking, you should try to stick to your original plan and preserve as much of your cover as possible while moving around:


Within keen vision range - avoiding getting marked
Sometimes it is unavoidable to be found within the keen vision range of an enemy vehicle or for someone to have snuck up on you. To prevent being marked on the enemy maps, vehicles equipped with smoke screens can "pop" smoke and disappear or obscure the enemy vehicles view.
There are two "stages" in which the smokescreen works, "deploy" and "set in". Deployed smoke prevents the enemy from targeting you directly with aim assist, but doesn't hide your vehicle's movements. After a certain time, "set in" will obscure sight completely within a certain range for a certain amount of time, usually about 20 seconds. Smokes do not prevent your vehicle from being marked if the enemy tank is next to yours, just like buildings, so avoid driving close to the enemy.
Generally, in AB it will take about 5 seconds for smokes to set in after landing and start the marking prevention. Once deployed, wait a short bit before driving in or out to avoid being an easy target. At rank VI hull mounted default smoke screens are replaced with aerosol canisters which set in two seconds, but unless you are retreating you still have to wait. If you want to know how long it will take for the smoke will set in, look for "smoke screening" stat in module or ammunition characteristics for your vehicle's details.
| Group launched smokes set in different time span, due to the time when they hit the ground. Sometimes, they malfunction and do not fire, but you generally can try to use them again later. |


| Enemy can still see you normally. Even if your hull pokes out of the smoke only for a bit and you still don't get marked, they can still manually target it. Avoid driving near to the edge of the smoke area. |
- Other important factors:
- Secondly, if keen vision is high enough with an enemy vehicle and if you are in front of their driver (front of the hull), your tank might get highlighted on the minimap. It also makes tanks visible by eye as in "realistic battle" line-of-movement detection rules at great range.
- Lastly, a light tank can "scout" your position, making you indefinitely visible across entire map even through smoke screens and walls, as you could see on the previous example. The smoke and objects will still prevent the aim assist from working.
What does it mean for the flanker?
What to consider as a flanker
- If you are playing at a low battle rating or against people with very little keen vision (crews skills) in general, you only have to be about 700-800 m away from an enemy to still be unnoticed, unless they specifically look in your direction with binoculars or the sniper scope. If you are standing about 1.5 km away (edges of the map), you will be invisible to most of the enemy players and even if not, they still have to look directly at you with binoculars or sniper scope.
- At this point, you will want to attack when nobody is looking at you, meaning you need to attack not the vehicles at a capture point itself, but rather the enemy around that capture point. The logic behind this is those enemy vehicles tend to expect an enemy attack here from the front and not from a flank. Plan your routine with that in mind to include your travel route, ambush site and retreat route. Even at rank V it's possible to get behind people without them noticing, as long as you don't get in their way - they most likely will focus on their tunnel-vision.

- Early on, you need to avoid overly open spots and utilise terrain which has solid obstacles obscuring line-of-sight. At rank V many people start levelling keen vision and there are a lot of dedicated snipers who will attempt to pick off unwitting targets from across the map. On open maps like "single cap Mozdok," you can forget about relying on conventional stealth. On cluttered maps, you want to avoid long "corridors" and to block enemy vision utilising buildings, while moving as close to cover and away from corners, as possible.
- If you have maxed out keen vision while flanking the enemy, you can attack or scout enemy through walls and over obstacles on some maps. This way you can either observe the enemy movements to better plan an ambush or interception or try to use special weapons or tactics to attack them from where you are.
- Sitting and waiting in a covered spot is sometimes the better option, let the enemy come to you instead of running into them.
- Light tanks are the bane of those making a stealthy approach. Ironically, because of that they also give you the greatest offensive "stealth" option of all by seeing enemy vehicles early on and the ability to plan routes around them.
Radio communication and why it matters
One of the most overlooked crew skills for AB tankers is the "Radio Communication" skill. Why is this a must-have skill for flanker in arcade battles? As teammates come into contact with enemy vehicles and mark them, you get an opportunity to see them on minimap as well. The higher is your radio communication skill, the further away you can see the enemy, which your teammates spotted, on your minimap. The higher the radio communication skill a crew has, the earlier you can know about enemy approaching you, improving your advantage to either avoid, flank or capture unmanned capture points. So, even though your vehicle may be unable to see anything around you, due to rough terrain or other circumstances, having a high radio communication skill will allow you to get heads up from teammates in the 250-500 m radius, by receiving your target's location.
As such, there is a two-fold benefit to radio communications, the first is that this skill directly affects flanking and stealth attacks, because when an enemy is spotted then they can be easily avoided by you, as your teammates are warning you of their presence via minimap. Secondly, it also works the other way around supporting your "main push" with helping them to know what is going on, as you attack their opponents from the side.
What is less known, however, is that whenever your team has aircraft in the sky, you can see everything. Which means, if you drive in between capture points or in the middle of the map while having maxed out radio communication, you basically have satellite support on the battlefield.

Having this advanced knowledge will allow you to judge and predict enemy movements, judge where they are looking to (generally in the direction they are moving to) and what they are doing (attempted flank, waypoint capture, sniping...etc...), eventually stalking them down and eliminating them. All of this helps you and your teammates to survive longer while being deep within the enemy territory.
Flanking tactics for different types of tanks
General combat tactics
Choosing a flanking tank
The most common tanks which players will be up against on the battlefield will be medium tanks.

While the medium tank is a very broad term, generally this defines that they have an average speed (around 40 km/h), average cannon (which is moderately effective), average armour and potentially a special quirk (modification or benefit limited to this vehicle) or two. All too often, many of the medium tanks feel more like a light tank with a big gun. Typically during a match, you will face at least three such tanks during your flank attempts before enemy heavy tanks or tank destroyers arrive and it is your job to eliminate this resistance before the big guns arrive.
As such, when picking out your flanker, you need to find a tank which is particularly good at destroying medium tanks. The properties such a perfect tank might include:
- Autoloader or multiple combat-capable weapons (heavy machine guns included, perfect against dangerous light SPG, which often accompany them)
- APHE ammunition or reliable HEAT counterpart as comparable preferred ammunition round
- Above an average speed of 50+ km/h. (Should be faster than most Soviet medium tanks of the rank, at the very least)
- Frontal armour can survive Anti-air tank or light tank fire just in case you get intercepted
- If you prefer move-and-shoot tactics, look for a tank with cannon stabiliser
- Remember the non-ammunition options, as certain tanks ram enemy tanks better - it can be useful to pull their tank (and guns) up onto you, rendering them unable to fight and repair, or to forcefully push them onto something to make them look down, so their hull is less angled and becomes vulnerable. (That may backfire, though, as they still can fire at you)
Keep in mind, that even using spaded fast-autoloader APHE tank with a maxed out crew, or even using contraption with 5-6 HEAT guns at once is not going to automatically provide a victory to you. Some enemies will actually drive tanks which counter yours, and with poor aim will survive even seemingly fatal shot. Pay attention to what you are using and against whom. Most importantly, practice your fast aim, instead of just relying on aim assist for everything.
Early game flank
After choosing your flanking tank of choice, start a battle.

Your first priority will be at the start of the battle to get behind the capture point, specifically at a point where enemy tanks would position to start fighting your troops (generally around cap point). Remember, that while manoeuvring into position make sure to avoid alerting their team of your presence too early. Here it is key to use less obvious approaches such as a road which nobody uses, concealed river grounds, or a path which is concealed by building or mountain. Use structures and terrain to your advantage.
It is fine to drive out in the open as long as you are not visible to the enemy team. Use radio communication to see where enemy snipers are entrenched, learn typical enemy behaviour on certain maps and plan your pathing and flanking strike with all of that in mind.
Secondly, look at your map to guess where the enemy team is at. You can see which direction your team is pushing, therefore roughly guess where enemy team push will take place. If your team is near to the cap point, surely their team is as well setting up to prevent the capture. You do not really care about what their flankers and fast tanks are doing at this point, only concentrate on and fight those if they are in your way to the position you are headed to.
| British medium and heavy tanks are generally extremely slow at most ranks, so you can't make a suggestion by looking at them. They are also often capable snipers, so if an enemy chieftain is late to a battle, it may actually be there just in time to shoot at your tank and remove you as a threat. Mind your positioning and try to remain concealed towards tanks which can snipe from long distances. |
As soon as tanks converge on capture point or when they start the actual battle for capture point, make your flanking move.
The usual infiltration plan
| In this example we will look at a spacious map with high altitude ranges, so Type 60 ATM was chosen as a flawed, but a fitting vehicle for the job. It is slow, so the player decides to flank B, as medium tanks cannot intercept flank on that road in time, most of the times. |

1) The first priority is to get behind the enemy tanks en route to point B while trying to not to be exposed to other enemy tanks which are not otherwise engaged with something else (such as those moving to/from a spawn point or pursuing your teammates).
In the current example, Type 60 ATM is manoeuvring towards a heavily protected high ground position next to the enemy flanking line, which has high defence potential. This position is generally useless for the team approaching from the south because it is too out in the open to sniper fire from the blue side, however, this is a perfect position for a north team flanker. One of the benefits is that this is a place which few people ever look at and is especially hard to notice and attack this spot from below (from the south base). The only disadvantage to this position for the flanker is that he has to keep an eye on the minimap and destroy every light tank they notice which is in range as it is very easy to get sniped from enemy tanks which may be situated at the capture point C.
To get to such an advantageous spot as this, one has to temporarily put themselves in danger for a moment while manoeuvring into position. Luckly here we did not meet any enemy flankers en route, however, if we did, the Type 60 ATM would easily dispatch them because it is not limited by terrain elevations.
2) Attack the enemy. Here you will want to annihilate the most observant enemy players first - you do not want anyone to ask questions of sort "why is that guy firing to the left and not to the front?", especially if they have scouting capability. If you have the scouting ability on your vehicle, start marking enemy vehicles which are panicking and trying to retreat. Once marked, your teammates will most likely start destroying them the very moment they show up on their screen.


3) After taking down several tanks at this flanking position, look around you and decide your next move:
A) Disengage by returning to the capture point through any enemy vehicles in order to reunite with your team. If needed ram and push the last opponent out of cover to secure the site.
OR
B) Go berserk and try to either escape towards next capture point or cut off and attack enemy reinforcements. Sometimes bold and bizarre tactics which do not make any sense can confuse the enemy and allow you to take advantage of a situation where you had none before.


Late game
While later on, it becomes hard to flank enemy as a medium tank or tank destroyer, however, you still can do some mind games in urban and mountain environments, using corridors, unpopular streets and openings to suddenly attack enemy:
-
 In this case, the friendly team lost A point completely, but we still have radio reports on enemy positioning. Tank destroyer sees, that enemy sniper is not present on a hill now, while the enemy medium tank is trying to spawn camp, and so it takes the opportunity to destroy it, to reduce enemy numbers around B.


Ultimately, the most devious of players can get behind enemy lines at a spot nobody ever looks at, sniping anyone who tries to go towards capture points, although that is often called out as borderline spawn camping. Often enough, it's right next to the enemy team spawn, because it is unthinkable for people to get sniped from their own base.

Scouting based flank attacks
Light tanks are generally considered weaker than medium tanks until around battle rating 7.3 and thus are a rare sight, Scouting allows these tanks to perform some extremely mean "Stealthy" moves.
Wall sniping
| This tactic requires buildings to be penetrable. Not every map allows this, and certain buildings will be impenetrable anyway. Only armour piercing ammunition can do this, as chemical ammunition explodes on impact with anything. You can do this even without scouting, but it's generally very hard to pull off. |
The tactic is about the same as an early rush of medium tank or default tank destroyer, but with a twist - while approaching frontline, do not hide and instead scout 3 enemy tanks, which are going towards penetrable buildings, then, when they least expect it, snipe the sides of the tank through a wall. Doing so they will not be able to see you even if you are near to them and while you are attacking them.
Only scouts can allow you to fire precisely at enemy tanks through any amount of walls and buildings, but you can use very high keen vision to look around corners to spot enemy this way, then try to aim at them.
In some cases, you can punish the enemy, who only has strong frontal armour and is trying to run away from you behind a building. In this case, they eventually have to turn their weak side armour towards the wall of a building, allowing you to just fire at it through their "cover".

As an example of fighting through the wall with and without a scout, we will use south-east flank on B point of Alaska. Our tank destroyer got stuck near to B point because the enemy team had way too many flankers to get through them and to do regular flank:

Since our goal is to flank the enemy and to destroy as many tanks as we can, not to stall enemy flankers, we need to either find a way of destroying our obstacle fast or simply go around it. While tanks were exchanging meaningless shots, friendly scout tank marks enemy OBJ-120 near to B point. Of course, this Ho-RI, as a flanker, should not pass such an opportunity! It fires APHE at T54 track, instantly breaking it to buy some time and gets into position next to skyscrapers:

Eventually, the enemy destroyed our friendly scout tank and started moving into B. Since every single tank on the left side got sniped through the wall, we only have to pay attention to what happens on the right side.
To check on our situation, and to reduce the number of enemy tanks, we call in a bomber. Apparently, a heavy tank is pushing our line and got into hull-down position next to us. This would be a very problematic encounter, but we can use our relatively high keen vision to aim at them through the wall around the corner:

Since we do not have scout friend anymore, we cannot fire at an enemy through walls precisely anymore, but we still have to do something with the rest of enemy tanks. The enemy team is heavily cut down now, and we see on our minimap, that there are only a few opponents left, and they are all around right side, so we take a risk and flank them from the left:
At this point, tank destroyer starts running out of ammunition, and ultimately gets destroyed by enemy team reinforcement, as even enemy SPAA is interested in "destroying it immediately". A single tank destroyer with minor help of a scout took out 8 enemy strongest tanks and assisted at destroying one more, which is a success.

A list of some maps, which may allow such a tactical move:
| Not all maps may be mentioned, as game patches may change destructibility of buildings. Also, for some reason, bridges are impenetrable on any maps. |
| Map | Can penetrate buildings? (yes, no, only some) | Exceptions |
|---|---|---|
| American Desert | Yes | Main building on C cap. With certain buildings, foundations are impenetrable. |
| Alaska | Yes | Some buildings are unpenetrable, mostly red brick houses to the west of the map. Some of them can still be destroyed. Destructible skyscrapers cannot be shot through. |
| Volokolamsk | Yes | Church, which is present on some map variants, is impenetrable. |
| Korea (38th parallel) | Yes | The radio towers may stop shells. |
| Japan | Some | Only wooden buildings and constructions are penetrable (and destructible). |
| Berlin | Some | Certain damaged buildings around C collapse when shot, and so, they do not shield tanks from AP. Rest of them are very likely impenetrable. |
| Second Battle of El Alamein | Some | It seems, that all buildings on B point, except for the main (central) one are penetrable. |
| Wallonia | No | There is a multitude of openings in between buildings everywhere, which you can use to a similar effect. |
| Hurtgen forest | No | A lot of buildings have holes in the roof, so some ATGM carriers technically can fire through them. |
Smoke attack
| This tactic may or may not work in presence of enemy scout tanks. (Depends if they are foolish enough to not scout you) |
Ultimate "stealth" attack - Scout 2 enemy tanks and deploy smoke right on top or in front of them. After five (two with rank VI hull mounted smoke) seconds pass, they will not be able to see you, while you see them clearly. Generally, this move spooks anyone but boldest soviet players and they will just look at the smokescreen, confused. Because of this, you don't even have to worry about instant retaliation.
Select target (with middle mouse button) to see their tank's profile. Find out their side, and snipe it. Move around after each shot to avoid retaliatory fire. If enemy tank rushes into the smoke to find and destroy you, sidestep it and fire at it's back, but never drive closer than 50 meters to it.
After 2 kills or about 16 seconds (Generally, 2 light tank ATGM reloads at rank V are about as long, so after firing second ATGM you should run away, as you won't be able to reload again.) get away from the fight before smoke has dissipated - do not become greedy unless there is only one enemy left and you are committed to destroying them at any cost.
| Light tank in this example has a powerful weapon and so it will be given a task worthy of it. Do not feel discouraged if you can't do the same in a battle rating 3.3 light tank, as they can only attack heavier tanks from the side. Look for easier targets at lower battle ratings, fight one on one, or work with your allies to dismantle your opponents.) |
As an example, a desperate situation on the Berlin map will be used. C point is completely overtaken by enemy heavy tank push, and our Warrior is the last thing standing in between them and spawn. Every single one of these tanks has machine guns capable of instantly destroying it on proper hit, and cannon shots will likely cause a hull break:

The situation looks hopeless, and it seems that light tank can't even take someone down with itself. Unfortunately for the enemy, heavy tanks have very long reload time, so they can't just shoot at the smokescreen randomly. Warrior drops smoke screen, drives out of cover and launches ATGM at the scouted enemy heavy tank, while simultaneously dropping artillery strike on enemy scout tank:

This way of attacking is extremely powerful, not even because your targets are unable to protect themselves, no matter what they are using, but because you can destroy anyone while being looked at by their entire team, just like on the screenshot. Be aware, that this tactic is very "stealthy" and "subtle", and very experienced players will definitely try to shoot back at you if you fail to destroy them.
Sniper based tactics
While maxed out keen vision allows seeing anyone across half of the map in Arcade battle (or even entire map for ace scouts), it is still possible to exploit special sniper positions to out-snipe those, who do have it. Those, who don't have it, and pay little attention, have an even lesser chance of avoiding such moves in time.
| Most tanks before rank III can't snipe from afar due to lack of accuracy or low velocity of their shells, so use specialized tanks early on (usually tank destroyers) or the ones with sniper ammunition. Usually shells with muzzle velocity around 856 m/s or above can be used for sniping (Early on it is mostly Pure AP or APCR). Some tanks require upgrades "Fire adjustment" and "Elevation gear" to hit anything past 500 m even at rank V. Shells with muzzle velocity of ~502 do not land where the scope and rangefinder MG shows past 1 km range and should only be aimed from experience past that range. |
Special sniper positions
While sniping itself is not really a "stealth flank", snipers live in their own dimension, where they can still flank other snipers and battlefield as a whole. Use special sniper spots which are not as obvious on the map at a first glance - some of them are even located in the middle of a battlefield.
These spots are:
- Away from the main battle line, which means enemy snipers will not see you on accident via binoculars or sniper scope
- Far enough or have enough cover for the enemy not to see you accidentally with 3rd person view (3PV)
- Probably require the use of ATGM, APDS or another high velocity round, as basic chemical warheads have a tendency to not fly where you want
Examples:
1) Standing on the edge of the map is not enough - find a spot, which is away from the frontline horizontally, to greatly reduce the number of people spotting you accidentally and then wanting to shoot at you.
One would argue, that this isn't going to help, but remember, that radio communication only marks you if you are near to enemy tanks. This is basically the only way you can do "stealth" on this Mozdok single cap variant without using smoke screens.


Some maps do not have a solid frontline like this. In which case, you can go for another option:
2) Use high ground to snipe or hide, if necessary.

Sniper scope vision is three times greater than the third-person view, so, at low ranks, you can snipe medium tanks like this while they are moving towards the middle of the map. They simply cannot see you until it's too late and snipers rarely ever look in that direction.
ATGM allows for safer firing over covers and use of super-high ground, but demasks such cover instantly, making your presence obvious. Use Kinetic ammunition if you want to remain unnoticed for a longer period of time. But remember, even this method won't help if a high-level scout tank will look your way and mark you with "scouting".
If this is not acceptable, there is an even better option:
3) Hide in plain sight using caves instead of overused "out of bounds" spot:
While not every map has covers like this, you should definitely look for one. Not only the enemy team cannot see you if you are careful, but it is also generally possible to cover all three capture points at once from such a spot!

Vertical ATGM
ATGM can often serve as a flanker weapon of choice, but there are differences between horizontal launchers and vertical ones. While vertical ATGM is harder to master, than the normal one, and may require camera manipulation to use effectively, it allows for some absurd flanking and surprise attacks.
Stand behind houses, rocks and mountain ranges and fire at an enemy, who cannot even see you, using normal vision mechanics from Realistic battles, or extremely high keen vision, to attack the enemy while avoiding getting spotted. Retreat to even less likely hiding spot to confuse the enemy even more.
| ATGM always makes a lot of noise, and these are not an exception, so you are only really concealed until you fire the first shot. However, it may take forever for the enemy to figure out where exactly you are if you are careful. |
Some ambush options made easier by added verticality:
1) Hide even further behind hills to become invisible and try to snipe the enemy. Alternatively, hide behind objects nearby to enemy and curve missiles into them, as they leave their cover.
-
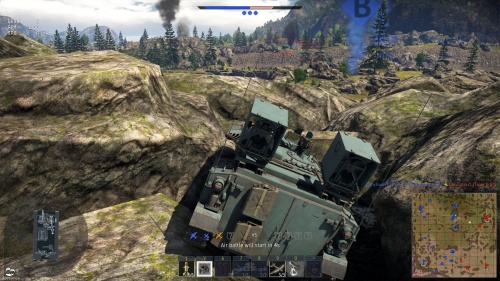 While it's easy to notice someone camping right next to B point, however, it is much more difficult to see someone perched behind rocks on top of the mountain who is using cover to their advantage. From here it is very much possible to fire and scout towards A point, increasing your usefulness and providing critical information to your teammates.


In case if your team got severely crippled, or you just cannot fight the enemy team directly, you can always visibly pretend to retreat, but in reality go towards low ground or another hideout just outside of capture points, to make enemy feel better about themselves, so they drop their guard and move in to capture it. That's when you get them:

2) If simply staying in some sneaky place is not good enough for you or you are quickly bored of conventional sniping, consider instead ruining the enemy's day as a counter-sniper, counter-flanker and counter-camper by being super aggressive. A lot of it involves being stealthy until the very last moment until you let it all loose.
Your main focus is to sneak into a good firing position, smoke up your sides or retreat path to prevent a counterattack and then unleash on an unsuspecting enemy. While this tactic is very risky, it works wonders against enemy campers and heavy tanks. High risk can equal high reward:

It is clear that ATGM can make enemy question their safety and sanity just by firing out of unexpected places, but with the aggressive approach, you can do much more. Instead of attacking enemy main push directly, you can demolish enemy sniper team the same way, by using their normally superior sniper position against themselves. Quite often, this is only possible for vertical ATGM vehicles.

After destroying enemy resistance, you can take over their sniping spot, to snipe yourself or to do even more damage to those, who will try to take it back:

If you don't want to just take over usual enemy sniper spot, you can go even deeper inside of the enemy territory and exploit even more bizarre firing positions. The most obvious example of using enemy team territory is firing over the high ground on maps with narrow passages. Firing over mountains is not easy, but on most maps, the deeper you are in the enemy territory, the easier it is to fire onto the enemy party. It is almost impossible to predict this kind of attack before it is already too late.

Cannon (shells)
In order to hit a target while being , tankers often use a trick called "binocular sniping"
There is a big good text for this at sturer emil page, i did not copy-paste it entirely, as these instructions aren't necessarily fitting for all tanks.
To indirectly attack with a cannon shell, player have to:
Hide entirety of their tank behind terrain or cover; Go to binocular sight (as it is often placed higher than the entirety of the tank); Aim at enemy tank and hold "fire" button to turn the gun towards them (gun will not fire in binocular sight); After that, guess or rangefind distance between the tank and the target; Enter sniper mode, correct aim for range and fire.
Players also heavily utilize gun scope controls to trivialize artillery-style sniping across entire map.
One of the greatest capabilities of large calibre guns, particularly ones using Chemical ammunition, is that they allow you to take advantage of their high angle of projectile drop. Efficiency of this method grealy depends on velocity of the shell used, so if it is slow, it will work best at up to 900 m range, while faster shells work great beyond 1,000 metres, but also depends on the type of terrain and hull-down positions available on the map.
| Shells with muzzle velocity of ~502 do not land where the scope and rangefinder MG shows past 1 km range and should only be aimed from experience past that range. |
Example gif by Inceptor57:

AB notes:
Everyone knows that AB provides player with aim assist at up to 1000m (1km) and instant rangefinding at any range for manual aim. What is less noticed, is that even when you cannot directly aim at enemy tanks within 1km range and try to pull the gun around, enemy tank still gets outlined with red when aimed at with "white crosshair", and since the gun can be moved while using binoculars, it is possible to aim without moving into visible area even by tanks, which have terrible shell velocity and inaccurate gun.
The price is that you do not get predictions on whether the shell will penetrate or not.
<insert screenshot here>
This allows sneaky SPGs to launch shells over the hill without being detected by AB sight system and can be heavily abused by mortar tanks like Centurion Mk.5 AVRE to fire even over buildings, due to very low shell velocity, and they do not really care about where it hits their target due to heavy damage their huge explosive shells imply.

AB Players are also often extremely uncomfortable with firing without aim assist confirmation, which is easily prevented by obstacles such as a weak metal fence built around a capture point, while you can learn the gun ballistics and train yourself to fire by using distance indicators from spotting (via high "keen vision" skill or scouting) and tank profile (use "select" hotkey, which is by default set to mouse wheel, to see hostile tank overall size and position) instead, to surprise them and thus avoid return fire.
RB notes:
To reduce a likelyhood of missing in absence of "rangefinder" modification, rangefinding MG can be used (if tank has one), which generally works at up to 800m range for early tanks and may work at longer range for special rangefinding MGs. For example, Type 60 SPRG (C) has rangefinder MGs mounted on its guns, specifically for this purpose.
Principle is the same as with firing through binoculars by guessing, but before firing a gun, you fire machineguns first and use binoculars to see, if they hit the target, or not. Then follow it up with main weapon shot.
<screenshots of type 60 doing that could be placed here>
ATGM
Particularly important stats of ammo
To attack indirectly with ATGMs, it is important to understand how they work in the first place and which parameters help them to hit the target and which method should be used.
Control type:
Manually controled atgm (first gen/wire control/WASD/ETC):
Guidance mode, which exists only in RB and SB for early ATGM tanks. In AB, it is replaced by semi-auto control. Tank can only fire when standing still and can't move, since tank controls now operate the missile instead (with up and down also being reversed).
This is fine on paper, however most gen-1 missiles also have input lag and take time reacting to commands, which means that you have to practice using them for a really long time to be able to pull off the attack.
Semi-auto control (second gen/laser guided/mouse):
Guidance mode, mostly available from BR of 7.7 and upwards. Relies on your sniper crosshair - missile tries to follow it to hit the target. If it can't go where you point at, it will try to mimic pointer movements. It also somewhat relies on your "aiming reticle", particularly when you aim at things the missile already passed. This allows you to "manually" control missile and steer it around, just like with first gen missiles.
However, if space between sniper scope and the missile is obscured by a solid obstacle, the control is cut and missile just flies forward until hit something or expire, which poses numerous challenges to user's skill.
Missile maneuverability
A parameter never listed really in TTX - missiles have a certain degree of vertical and horizontal mobility. They vary between AB and RB, and the only real way to improve it is to upgrade "targeting" skill on the crew, as it improves "turret tracking", which often subsequently increases missile maneuverability.
Missiles, which can't change vertical angle fast will never accidentally fall to the ground and explode, but will also refuse to drop down into enemy cover at the last second, like Khrizantema-S's missiles, rendering you unable to circumvent enemy tank turret armour or cover. Same goes for horizontal turning speed and turning missiles around tall cover.
initial missile velocity
It needs to be pointed out, that while tankers often like to call ATGM's "slow", most of them can't be bothered to notice, that anything flying at 200m/s will easily destroy any target 1000m away with minimal chances of retreat, but not all missiles start at a speed listed in TTX, as the speed listed in TTX is merely their maximum speed. Do not take any opinion about ATGM speed as granted.
Each game mode has different start speed for missiles and it must be kept in mind (RB missiles generally being far slower).
Attack types
Depending on their initial speed, missiles can then be put into different niches for indirect attack:
Initially slow missiles (0 to 89 m/s) can be used to attack tanks behind any cover, particularly at close range, since user have several seconds before missile accelerates up to its maximum speed. ATGM tanks with vertical launch fall into this category, and lots of hybrid tanks like M551 use slow starting missiles;

First generation missiles can only be used as rockets at close range due to input lag, but their low speed can be abused noneless to fire missiles over small cover without leaving it, like in the case of AMX-13 (SS.11). As the missle flies further, it can be deliberately guided to fall into enemy cover.
Second generation missiles can be forced to make a sharp turn into enemy cover by pointing at it in specific way (different for every tank), or by trying to use "manual aim" mode to steer missile as hard as possible into enemy cover, particularly at close range. At long range, these missiles generally can be dropped or turned onto enemy simply by pointing the crosshair at an enemy behind cover at a specific moment.
Moderately fast missiles (200 to 300 m/s) can be used to attack tanks over a flat hill as long as the targets are 800m away, most of early hulldown ATGM tanks and IFVs use these;
Firing ATGM over a hill is similar to a cannon indirect attack, but there is a catch - most fast ATGMs are second generation, which means, that missile control cuts off when the sight of the missile is lost.
Sniper mode is often used to aim over objects or terrain by sending missile into the sky and then very quickly aiming at the enemy tank behind a hill with your crosshairs. Success relies purely on user's ability to aim at targets they can barely see.
To circumvent control loss, missile can be initially launched much higher into the sky, then guided down towards the target. The further away is the target and the less steep is the hill, the easier it is to blindly guide missile into enemy tank. This does not work well for sensitive missiles, since they like to crash into the ground due to initial over-correction.
Actually fast missiles (600+ m/s) can be used to attack tanks behind cover only if their maneuverability is also incredibly high, or if a vehicle-specific gimmick is used, otherwise they can only really be reliably used directly. Mostly used by rank VII tanks and SAM.
Specific Examples:
Firing over a hill:
Firing over a generic obstacle:
Firing around an object:
Notable issues:
AB:
Since certain patch, ATGMs in AB are marked with giant red rectangle which immediately demasks your tank, even if enemy somehow managed to not notice the incredibly loud noise.
RB:
Most atgm tanks in RB cannot guide missiles with their "aiming reticle", rendering third person guidance prone to failure and incompatility with terrain.
Clearly unintended techniques
They will grant you an edge against unaware people, but it can be patched out or nerfed in some way for obvious reasons.
Changing camera angle
Insert edited text from here, i guess.
.gif)
Guidance swap
| Note: this worked as of update "hot tracks", but it's so clearly unintended, that there is no guarantee that it will do so forever. It was tested in AB. |
Sometimes, you want to fire ATGM, but imagine, that you are driving a hybrid tank, which can only guide missiles with it's cannon sight (located far too low for comfort), and were locked down inside of a building by an army of angry medium tankers, ready to destroy anything with their top-tier APFSDS the very moment you expose the turret out of cover. This is often a grim situation.
<a pic or a drawing>
But there still is a way out of this. For some reason, it is possible to guide launched ATGM with a coaxial autocannon (and, maybe, even machine gun). To do so, you need to launch ATGM out of the cover and swap control from main weapon to coaxial weapon (a specific hotkey must be set in "tank controls" to be able to do that). After that, you have to go into the sniper seat for that weapon, often conveniently located on turret's roof and guide missiles from there, which is usually absolutely safe.
Needless to say, this allows many hybrid tanks to be equivalent to a specialized hulldown atgm tank, for example, KPz-70 can act like RakJPz 2, which is very funny. It also does not stop you from attempting to further curve missile outside of your control zone and over obstacles, meaning that it is even harder to counter or expect.
| Biased opinions of AB player. Probably wont work for RB, incomplete for most tanks. Concepts which may need testing are locked into << >> |
Cover levels and height of tanks necessary to use them
Use of objects
<Here would be measurements of tallness of tanks and various decorations and objects.>
- Short road fence (destructible)
- Generic dead tank decoration (indestructible)
- Generic short stone (indestructible)
- Building wall and windows (usually indestructible)
- Tall rocks (indestructible)
- Tall solid wall (destructible)
- Very tall rocks\mountain edge (indestructible)
- Tall weak building (destructible)
<Tons of pics would allow for measurements of hull-down straight from hangar. would be useful, but who knows if it's any of use. Mention particular trash examples like ST-A2 being too tall for 1 cover and too short for next one, maybe.>
Use of player tank remains
<Use of dead tanks, particularly note that on death many tanks do not lose turrets, so they are a taller than normal cover>
<Specify which tanks can benefit and how>
- Tanks with hard turret -
- Tanks with weapons on top -
- Tanks with hydropneumatic suspension -
- ambush tanks -
- Super heavy tanks - <<While super heavys generally can't hide themselves behind destroyed opponents, they often weight so much, that they can sacrifice themselves to block the road entirely for good, simply due to how massive they are. Ongoing hostile assault will generally require a tank as heavy to pull the husk out of the way, forcing enemy team to fight hull-down allies head-on or giving up altogether>>
Use of terrain
<Here would be in detail explanation of how to use hills and how inclination of a hill changes how much depression tank needs to fire at an enemy, probably.>
<Here would also be a good place to tell that depression numbers between different tanks are often incompatible, due to their differences in tallness and turret form/construction>
What armour levels and weakspots need to be noted for hulldown and why
<Speculations on various armour properties relevant for HD - turret, hull front, hull side, roof>
<Speculations on various stupid weakspots relevant specifically for HD - top mounted MG, cupola, frontal ammo rack, stupid pointy sections of frontal armour, etc.>
<Prime comparisons - M103 and Conqueror, ST-A! and ST-A2, Chieftain tanks, Challengers 1 and 2 (might as well try to explain why CHL1 is arguably trash compared even to chieftain 10)>
<Show that it's possible to die to HE, which HE tanks are actually dangerous, at which levels of armour is tank vulnerable to that. While at it, mention that HESH can be a threat to some tanks too, maybe (not really).>
<Proceed to explain why keeping your distance and keeping flanks secure is as important as not leaving cover, feat. swingfires and/or light tanks vs m113 while mentioning that most pure HD tanks have trash side armour, explain that past nerfs autocannons have trash angle performance and how to abuse that, etc.>
Specific extreme examples for RB and AB
<Explain why hulldown behind destructible obstacle is not a sin sometimes, mention HEAT and RB specifics>
<Shturm-s and all those tanks that put their weapon down to hide in RB>
<Maybe also Type 60 SPRG and it's stupid ability to hide behind 0.3m tall destructible things, RB perspective>
<Explain why it is sometimes possible to use destructible obstacles in AB, maybe use FV4005 as a role model>
base information
What's that?
<throw epic pictures of heavy tanks not giving a damn>
Why angle anyway and how much to angle?
<Throw in some pictures with tiger H and tiger E>
Which tanks should never angle and why
<Throw in some pics with IS-7 and similar tanks>
Why some tanks should always angle
<Throw in some disgusting frontal pen bug pictures with churchill VII, also throw t-34-100 picture withstanding falcon fire>
How to find out if there is a point in angling your tank
Let's suggest, that your tank has sloped frontal armour and mediocre side armour.
How to understand, should you even bother with angling, and when? That depends a lot on a rank you play at, and nation you play against.
<Put milestones for ammo penetration, IE adoption of AP(HE)CBC, heavy APCBC, APDS, HEAT, ATGM, APFSDS into ranks>
There are general milestones for ammunition, which really change the way you look at hostile tanks:
AP(HE)CBC:
APCBC:
APDS:
HEAT:
ATGM:
APFSDS:
<Explain how differences of side armour or tools at certain ranks change player's attitude towards certain tank classes. Leotard VS ZSU, generic french tank VS autocannons , etc>
If to look at the situation from rank perspective, things to keep in mind are:
Rank I:
Rank II:
Rank III:
Rank IV:
Rank V:
Rank VI:
Rank VII:
Ammo penetration at 30 and 60 degrees, normalization
<Explain that all nations generally use different ammo>
<Explain that pen at 0 degrees is useless at long range at low rank and is especially useless at mid to high rank since all tanks have slopes there>
<Double down explaining that some kinetic ammo have bonuses against slopes(cursed AP(HE)CBC, APDSFS) and some have serious penalties (HVAP, APCR), and some really don't (APDS)>
<Explain why angling is not going to help if your armour is paper to begin with, or why french tanks are such easy targets as a consequence of that.>
Particular add-on armour
<Throw pics of warrior surviving a scrape shot with addon shield, show it also pathetically explode from direct hit.>
<Throw in M10 pics surviving a shot just because it came at a high angle.>

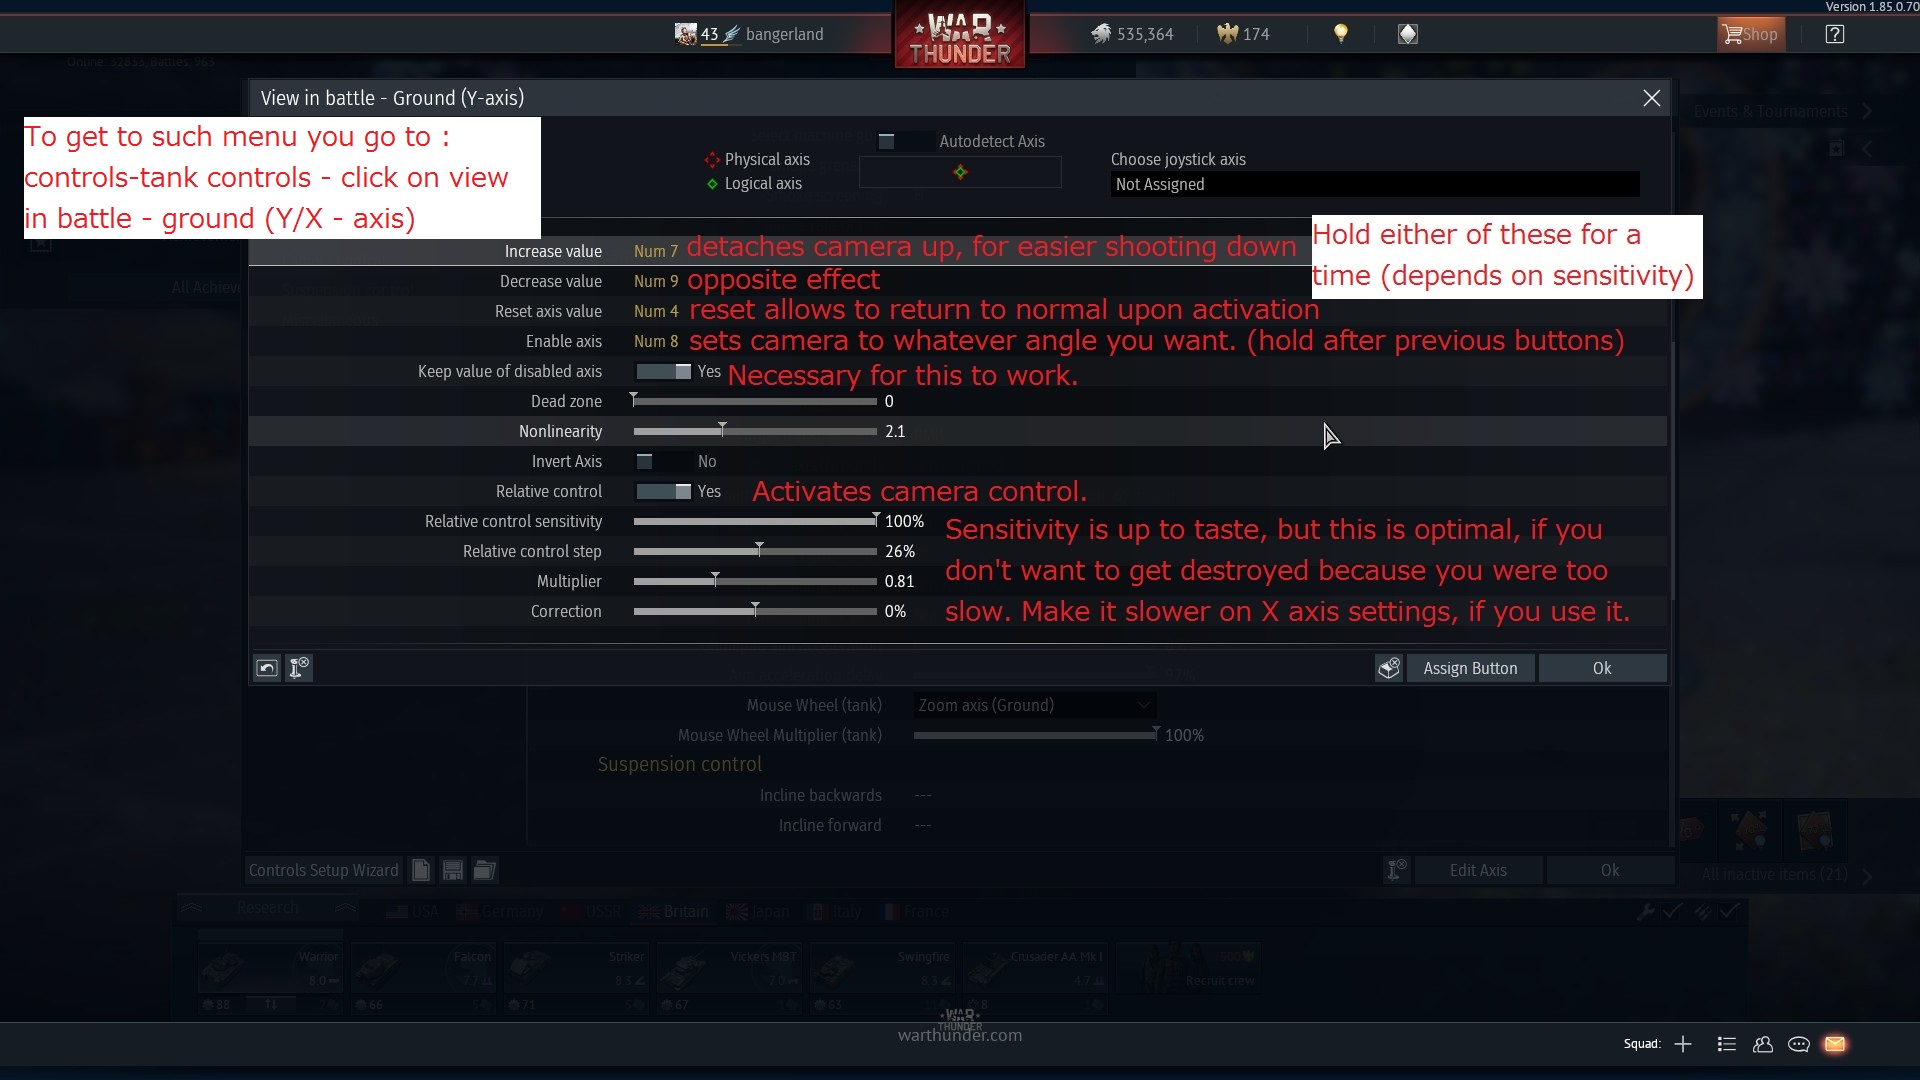