Leopard I

From War Thunder Wiki
Jump to: navigation, search
Rank VI USA | Premium | Golden Eagles
A-10A Thunderbolt (Early)
This page is about the German medium tank Leopard I. For other versions, see Leopard 1 (Family).
germ_leopard_i.png
GarageImage Leopard I.jpg
ArtImage Leopard I.png
Leopard I
AB RB SB
8.0 8.0 8.0
Class:
Research:120 000 Specs-Card-Exp.png
Purchase:340 000 Specs-Card-Lion.png
Show in game

Description

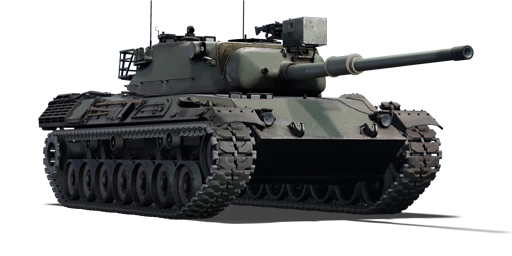
The Leopard 1 is the first variant of the Leopard 1 main battle tank family. The Leopard 1, which entered service in 1965, is one of the most iconic Cold War main battle tanks. The tank was exceedingly successful, being thinly armoured but highly manoeuvrable and mounted with the powerful 105 mm Royal Ordnance L7A1 tank gun. It was used in several countries around the world, including Canada, Australia, Belgium, and Turkey. Turkey is one of the countries that continue to use the Leopard 1. The vehicle has also generated several variants, such as anti-air and recovery vehicles. The Leopard's early development may be traced back to the mid-1950s when Western Germany's rapid industrial recovery allowed it to establish a robust, locally built defence force. The "Europanzer" project would have armed most Western European countries to supplement or replace US-supplied tanks like the M47 and M48 Patton tank families. The Standard-Panzer project, as it was known in Germany, began in November 1956 and ended in July 1957. These required 30 metric tons of weight, a power-weight ratio of 30 hp/ton, armour capable of withstanding rapid-fire 20 mm autocannon hits, to be treated NBC and amphibious, and to be armed with the recently selected 105 mm Royal Ordnance L7A1 tank gun. Since new hollow charges were now accessible, mobility and firepower were prioritized over protection. Germany, which had been at the forefront of tank design since World War II, nicknamed the new family of main battle tanks "Leopard" to continue the tradition begun with feline species during World War II, and it fits well with the emphasis placed on mobility. The moniker conveyed agility, speed, and ferocity, and it was also a marketing triumph. It was tested and acquired in large numbers by practically all European nations previously equipped with American tanks, as well as former British-supplied countries such as Canada and Australia. The Leopard was armed with the standard (Rheinmetall-licensed) 105 mm Royal Ordnance L7A1 tank gun and had great mobility thanks to an improved suspension system. In the 1970s and 1980s, protection was steadily enhanced until the production of the Leopard 1A5, the last iteration of the Leopard 1 family and one of NATO's most prolific main battle tank families.

Introduced in Update 1.51 "Cold Steel", the Leopard 1 is a revolutionary design that departs from Germany's heavily armoured tank design pioneered during World War II. The Leopard 1 is a core of a mobility-focused tank design philosophy that emerged during the Cold War Era, based on the idea that increased armour thickness did not necessarily help with crew survivability due to the ever-increasingly powerful tank ammunitions and anti-tank weapons. Instead of adding bulky heavy-weight steel armour to the tank, which would restrict mobility and increase the probability of enemy hits, the Leopard 1 relied on great mobility and serious firepower to ambush enemies and quickly escape before the adversary could react. The Leopard 1 has the same degree of firepower as the renowned British Centurion Mk 10. It does not, however, have a two-plane fully automatic stabilization system, making accurate firing on the move difficult.

General info

Survivability and armour

Smoke grenades
Creation of a smoke screen in front of the vehicle
Armourfront / side / back
Hull70 / 35 / 25
Turret65 / 45 / 52
Crew4 people
Visibility96 %

The Leopard's armour is not thick enough in the game to defend itself from most incoming fire, as many shell types at its battle rating are able to easily penetrate and destroy the tank. The Leopard 1 was originally built with a "perfect standard tank" idea, similar to the Main Battle Tank concept, as during its development, the armour has been considered an expendable quality and that superior speed and firepower is most important. Therefore the Leopard's armour design was only meant to withstand 20 mm calibres from the front. A big threat is the ZSU-57-2, which gives any Leopard 1 a hard time with its high rate of fire of effective 57 mm AP rounds.

It is recommended to carry as little ammo as possible, about 20 rounds, as the majority will be stored in the rack at the front left of the vehicle, being an extreme vulnerability if overloaded when in a head-on engagement.

Armour type:

  • Rolled homogeneous armour (Hull, Turret roof)
  • Cast homogeneous armour (Turret)
Armour Front (Slope angle) Sides (Slope angle) Rear Roof
Hull 70 mm (60°) Front glacis
50 mm (51°) Bottom glacis
35 (40-42°) mm Top hull side
30 mm Bottom hull side
25 mm (12-47°) 30 mm Front area
15 mm Rear area
Turret 65 mm Turret front
45 - 200 mm Gun mantlet
37-45 mm (28-31°) 25-52 mm (26-72°) 25-35 mm Turret roof
20 mm Cupola area

Notes:

  • Suspension wheels and tracks are 20 mm thick.
  • The turret mantlet has varying thicknesses ranging from 45 - 200 mm. It is thickest near the centre in contrast to the borders where it is the thinnest.

Mobility

Speedforward / back
AB73 / 28 km/h
RB and SB66 / 26 km/h
Number of gears8 forward
4 back
Weight40.0 t
Engine power
AB1 584 hp
RB and SB830 hp
Power-to-weight ratio
AB39.6 hp/t
RB and SB20.8 hp/t
Game Mode Max Speed (km/h) Weight (tons) Engine power (horsepower) Power-to-weight ratio (hp/ton)
Forward Reverse Stock Upgraded Stock Upgraded
Arcade 73 28 40 1,286 1,584 32.15 39.6
Realistic 66 26 734 830 18.35 20.75

The Leopard I is powered by a MTU MB 838 CaM-500 engine, which produces a total of 830 hp (610 kW) at around 2,200-2,300 RPM. The mobility is between the XM-1 (GM) and the T-55AM-1. Expect a speed of 40-50 km/h off-road. The reverse is about -15 km/h off-road. The neutral steering is amazing, you are able to swivel your tank easily, and can be used to boost turret rotation speeds. The suspensions are also great, very soft with great dampening effects, and give the tank a smooth drive. Overall, mobility is excellent and should be used to your advantage since the tank has limited armour.

Modifications and economy

Repair costBasic → Reference
AB3 836 → 5 707 Sl icon.png
RB4 350 → 6 472 Sl icon.png
SB6 138 → 9 133 Sl icon.png
Total cost of modifications98 600 Rp icon.png
164 800 Sl icon.png
Talisman cost2 200 Ge icon.png
Crew training98 000 Sl icon.png
Experts340 000 Sl icon.png
Aces1 300 Ge icon.png
Research Aces780 000 Rp icon.png
Reward for battleAB / RB / SB
140 / 210 / 230 % Sl icon.png
202 / 202 / 202 % Rp icon.png
Modifications
Mobility Protection Firepower
Mods new tank traks.png
Tracks
Research:
5 100 Rp icon.png
Cost:
8 200 Sl icon.png
220 Ge icon.png
Mods new tank suspension.png
Suspension
Research:
4 600 Rp icon.png
Cost:
7 400 Sl icon.png
195 Ge icon.png
Mods new tank break.png
Brake System
Research:
4 600 Rp icon.png
Cost:
7 400 Sl icon.png
195 Ge icon.png
Mods new tank filter.png
Filters
Research:
6 400 Rp icon.png
Cost:
10 000 Sl icon.png
270 Ge icon.png
Mods new tank transmission.png
Transmission
Research:
6 600 Rp icon.png
Cost:
11 000 Sl icon.png
280 Ge icon.png
Mods new tank engine.png
Engine
Research:
6 600 Rp icon.png
Cost:
11 000 Sl icon.png
280 Ge icon.png
Mods tank tool kit.png
Improved Parts
Research:
3 300 Rp icon.png
Cost:
8 200 Sl icon.png
220 Ge icon.png
Mods extinguisher.png
Improved FPE
Research:
3 000 Rp icon.png
Cost:
7 400 Sl icon.png
195 Ge icon.png
Mods tank reinforcement ger.png
Crew Replenishment
Research:
6 400 Rp icon.png
Cost:
10 000 Sl icon.png
270 Ge icon.png
Mods new tank horizontal aiming.png
Horizontal Drive
Research:
5 100 Rp icon.png
Cost:
8 200 Sl icon.png
220 Ge icon.png
Mods smoke screen.png
Smoke grenade
Research:
5 100 Rp icon.png
Cost:
8 200 Sl icon.png
220 Ge icon.png
Mods tank cannon.png
Adjustment of Fire
Research:
4 600 Rp icon.png
Cost:
7 400 Sl icon.png
195 Ge icon.png
Mods tank ammo.png
105mm_usa_HESH_ammo_pack
Research:
4 600 Rp icon.png
Cost:
7 400 Sl icon.png
195 Ge icon.png
Mods new tank vertical aiming.png
Elevation Mechanism
Research:
6 400 Rp icon.png
Cost:
10 000 Sl icon.png
270 Ge icon.png
Mods night vision device.png
NVD
Research:
6 400 Rp icon.png
Cost:
10 000 Sl icon.png
270 Ge icon.png
Mods art support.png
Artillery Support
Research:
6 600 Rp icon.png
Cost:
11 000 Sl icon.png
280 Ge icon.png
Mods tank ammo.png
105mm_usa_HEAT_FS_ammo_pack
Research:
6 600 Rp icon.png
Cost:
11 000 Sl icon.png
280 Ge icon.png
Mods tank rangefinder.png
Rangefinder
Research:
6 600 Rp icon.png
Cost:
11 000 Sl icon.png
280 Ge icon.png

Armaments

Rangefinder
Reduces the error and increases the maximum measurable distance of the rangefinder
Night vision device
Improves visibility by enhancing natural light or active illumination.

Main armament

Ammunition60 rounds
First-order14 rounds
Reloadbasic crew → aces
8.7 → 6.7 s
Vertical guidance-9° / 20°
Main article: L7A3 (105 mm)
105 mm L7A3 Turret rotation speed (°/s) Reloading rate (seconds)
Mode Capacity Vertical Horizontal Stabilizer Stock Upgraded Full Expert Aced Stock Full Expert Aced
Arcade 60 -9°/+20° ±180° N/A 22.8 31.6 38.4 42.5 45.2 8.71 7.70 7.10 6.70
Realistic 14.3 16.8 20.4 22.6 24.0

Ammunition

DM13; APDS (Armour-Piercing Discarding Sabot) will comfortably penetrate the armour of most foes; be aware however that some vehicles such as the IS-4 or M103 are only vulnerable in specific weak spots. APDS rounds do require some finesse with their placement, and because of the lack of explosive filler, unless you're confident you can destroy the enemy before they can respond, you should attempt to disable their weaponry first to ensure your own safety. Against targets with known ammunition storage, it's possible to try to detonate it with a well-placed shot; keep in mind, however, that ammo detonations always occur with a random chance, taking out crew members is more reliable to destroy your enemies. This, of course, requires knowledge about the vehicles you may face - so be sure to use the game's X-Ray view in the hangar and analyse your potential foes for their weak spots! Also, keep in mind that with increased armour thickness the amount of shrapnel shrinks.

DM512; HESH (High-Explosive Squash-Head) works very differently than other shell types. It ignores any angle, except for ricochet and deals damage by metal-flakes which are blown off inside the armour by the exterior explosion. To create this deadly shrapnel inside the tank, make sure to only hit armour plates which are directly adjacent to the interior crew compartment of the tank. Hitting exterior parts of a tank like spaced armour, the suspension, tracks etc. will not harm crew members/modules at all. Unfortunately, HESH is particularly ineffective against particularly high true armour values (as opposed to high 'effective' armour values sourced from highly angled but thin armour - HESH loves angles!). Like all high-explosive shells, the fuse is very sensitive and can be set-off by most objects e.g. fences, trees, shrubbery. The low muzzle velocity of this shell can make it quite hard to hit targets at larger distances, although an experienced tanker may be able to use this to their advantage by lobbing a round over a small defilade or hill. It's also worth noting that HESH can be rather unreliable at times; it's best used as a fall-back ammo, or saved for particularly lightly armoured targets.

DM12; HEATFS (High-Explosive Anti Tank Fin-Stabilised): Knowledge of potential opponents vehicle layouts can be very handy - as you now have a round at your disposal that can penetrate essentially any vehicle's armour frontally. Like the APDS shot, increased armour thickness results in a reduced amount of shrapnel after penetration. You are able to take out enemies on any distance since the HEAT round does not lose penetration effectiveness with distance - very handy on big scaled maps like Kursk. There is, however, a significant downside to HEATFS: Given that it is a chemical energy round, its fuse is highly sensitive in regards to its practical application in battle. As a result, virtually anything, such as trees or even a fence, will set it off prematurely, so you cannot fire through obstructions with this kind of round. It's often a good idea to clear bushes and fences with your machine guns quickly before taking a shot. HEATFS also possesses sub-par post-penetration effect compared to other readily available ammunition. Finally, the HEATFS round is relatively expensive in terms of SL, so keep that in mind when loading up.

Penetration statistics
Ammunition Type of
warhead
Penetration @ 0° Angle of Attack (mm)
10 m 100 m 500 m 1,000 m 1,500 m 2,000 m
DM13 APDS 350 347 333 317 302 287
DM512 HESH 127 127 127 127 127 127
DM12 HEATFS 400 400 400 400 400 400
Shell details
Ammunition Type of
warhead
Velocity
(m/s)
Projectile
mass (kg)
Fuse delay
(m)
Fuse sensitivity
(mm)
Explosive mass
(TNT equivalent) (kg)
Ricochet
0% 50% 100%
DM13 APDS 1,478 4 - - - 75° 78° 80°
DM512 HESH 732 11.2 0.1 4 4.31 73° 77° 80°
DM12 HEATFS 1,174 10.5 0.05 0.1 1.27 65° 72° 77°

Ammo racks

Ammo racks of the Leopard I
Full
ammo
1st
rack empty
2nd
rack empty
3rd
rack empty
4th
rack empty
5th
rack empty
Visual
discrepancy
60 57 (+3) 54 (+6) 15 (+45) 12 (+48) (+59) No

Machine guns

Ammunition5 400 rounds
Belt capacity200 rounds
Reloadbasic crew → aces
10.4 → 8.0 s
Fire rate1 200 shots/min
Ammunition2 000 rounds
Belt capacity200 rounds
Reloadbasic crew → aces
10.4 → 8.0 s
Fire rate1 200 shots/min
Main article: MG3A1 (7.62 mm)

The Leopard I mounts one coaxial 7.62 mm machine gun and one pintle-mounted 7.62 mm machine gun. These both have particularly high rates of fire, and can be used as a deterrent for close air support as well as clearing light obstacles and crew in open-top vehicles.

7.62 mm MG3A1
Mount Capacity (Belt) Fire rate Vertical Horizontal
Coaxial 5,400 (200) 1,200 N/A N/A
Pintle 2,000 (200) 1,200 -8°/+20° ±120°

Usage in battles

Scan and use the terrain to your advantage. Take into consideration the moderate vehicle height, which allows you to go turret down in certain locations, allowing you to safely use your commander's binoculars to locate targets. Then, after you have located the enemy, fire a few rounds in quick succession and relocate when spotted, especially when the enemy shots come dangerously close. The Leopard is quite fast, so taking hits from a distance while on the move is a risk that you may consider worth taking.

The Leopard is not designed to take hits from any guns, nor fight in stand-off situations against heavier enemy vehicles. Frontally, the angle of the hull can bounce shots once in a while, but you're better off not to rely on this. The turret front is also the same, it's best to attempt to only fire when you can avoid receiving a shot or relocating to a position if possible. The main goal is to make the opponent incapable of returning fire. The majority of Soviet rank V tanks (IS-3, IS-4M, T-10M, T-54s, SU-122-54, T-62 or ZSU-57-2) gunners are disabled by penetrating the right side of the turret or hull, if they are faced towards you. If you have the possibility to hit a Soviet tank's hull, which is again faced towards you, prioritize it, because it is likely to take it out with one shot to the right side of the hull (3 out of 4 crew member are sitting in a row). American top rank tanks like the M103, M47 or M60 are harder to take out. It is advised to take out the gunner first, which is located in the left side of the turret and then take out the rest of the remaining crew members. Hitting the ammo rack of your opponent is often the fastest way to take out an enemy vehicle, keep in mind though there is a small chance the ammo will not blow up (Best ammo types to ammo rack: HEATFS > HESH > APDS).

Remember you have a gun manoeuvrability advantage over most of your enemies: your gun depression will allow you to play hull-down, protecting the large portion of ammo in your hull (especially if fully loaded), and you can turn faster than many opponents due to the neutral steering and powerful engine of this vehicle. However, bear in mind that American tanks in particular, as well as some British tanks, will be able to match, and even outperform, your gun depression angle, so it may be better to flank these enemies using your speed.

Leopard I engaging a T-55AM on Cargo Port

Sometimes moving is not an option, but remember, directly behind your hull front sits a large portion of your ammunition, at least if you're fully loaded. Always have that in mind when positioning yourself against the enemy - and don't forget that you don't have to stack all of your ammunition racks to their maximum capacity! Sometimes it can be wise to take less ammunition with you, as it will increase your survivability when taking hits - especially with the Leopard. The Leopard's worst nemesis are the ZSU-57-2, the PT-76-57 and the IT-1. The ZSU-57-2 can be easily destroyed by hitting one of the many ammo racks in the big turret, which often leads to an explosion of the whole tank. The PT-76-57 is armed with a stabilizer, an autoloader and a laser rangefinder. Don't aim at the turret since there's no guarantee it will take out the cannon breech or the gunner, aim anywhere at the hull. The IT-1 can be quite hard to deal with, since they are able to operate perfectly hull down only exposing the roof mounted ATGM. Destroying (only black damage status counts, red damage does not prevent from firing ATGM) the rocket mount/cannon barrel forces the IT-1 to repair for a whole 27 seconds (maxed out + expert crew).

The Leopard 1 holds a distinct advantage over almost every other tank it will face - it's almost always faster. While in a direct shoot-out, most other vehicles can take out the Leopard, using the mobility advantage of the Leopard will allow a good tanker to get into an advantageous position and take out targets before they get the opportunity to respond. However, ensure you are aware of your surroundings and have a fall-back option: getting caught off guard on the back of a hill with nowhere to back off to and with no real support is a death sentence.

Depending on the map and opponents, ammunition choices may vary however usually it's ideal to have APDS as primary ammunition (extremely easy to use at range, decent damage, extremely cheap), HEATFS as a backup (reasonably easy to use at range, high penetration value) and a couple of HESH rounds to deal with any light targets you might encounter. Try to keep round storage to a minimum but keep in mind that with these ammunition choices often it will take a number of rounds to guarantee a destroyed target.

The Leopard 1 is also very effective at sniping, due to its relatively small profile and speed, and high-magnification optics and HEATFS being unaffected by range (in terms of penetration), allowing it to get to a comfortable sniping position and relocate quickly. An effective use of this is to combine all strengths of this tank by flanking the enemies holding a specific chokepoint, sniping their vulnerable sides (whilst they are under pressure from your heavier allies at the front), before advancing rapidly after the enemies are neutralised to capture a point or finish off remaining enemies which may be crippled but hiding. However, remember to be flexible and relegate this strategy to teammates using vehicles dedicated to this role (such as the JPz 4-5), as you are still a main battle tank and have other strengths, that they may not be suited to perform.

In a nutshell, use the superb mobility with the cannon's perfection to flank and spank enemies, wait and hunt for the perfect positions and pick off the enemy tanks one by one, while always maintaining a good situational awareness. Patience is the key to success.

Pros and cons

Pros:

  • Fast and very agile when fully upgraded
  • High-penetration APDS and HEAT rounds
  • HESH rounds extremely effective against light targets
  • Reasonably fast reload time, can be reduced to 6.7 seconds
  • Good gun elevation and depression
  • Reasonably good turret traverse rate
  • Access to smoke grenades
  • Relatively small, moderately low profile
  • Excellent reverse speed
  • A well coordinated squad of Leopards can effectively take over a match
  • Potential to be an extremely efficient vehicle in the right hands
  • Some parts of the turret (mainly the mantlet) can bounce rounds from the right angles

Cons:

  • Essentially non-existent armour that can't stop any more than 20 mm rounds reliably
  • No main gun stabiliser, takes a while for the gun to steady after moving for accurate shots.
  • Tankers unaccustomed to APDS may struggle with the stock vehicle
  • Stock accuracy is sub-par
  • Does not have the HESH round when stock
  • Like all MBTs, there is ammunition stored adjacent to the driver
  • 4-man crew complement, reasonably close-packed
  • Easy prey for high-calibre autocannons such as those found on the ZSU-57-2
  • HEATFS and APDS rounds have sub-par post-penetration effectiveness, often taking multiple rounds to destroy vehicles
  • HEATFS detonates when it hits a fence or bush
  • The optic has very high zoom levels, makes it difficult for use in CQC environments

History

Development

The project for the Leopard started as far back as 1956 as an attempt to replace the American M47 and M48 Patton tanks in service at the time as they were becoming outdated to newer anti-tank technology. These American tanks did not fit the tactical concepts Germany had developed at great expense during the Second World War, so a new design was sought which would integrate this knowledge and also rebuild the German armaments industry.

Specifications for the new tank came in July 1957 asking for a design weighing no more than 30 tons, with a power-to-weight ratio of 30 horsepower per ton and could withstand 20 mm gunfire alongside protection against chemical weapons and radiation fallout, which was becoming extremely common protection system for the modern tank designs. The design stressed mobility as the main focus, while firepower comes next and armour was relegated to minimum priority. The lack of focus on the armour was because of the belief that no matter how much armour a tank can have, it will eventually fall obsolete to the advent of newer anti-tank weapons such as the HEAT rounds, which was becoming stronger and stronger by the years.

In the initial stages of development, France and West Germany, interested in this tank design, worked on it from 1957 to build a common tank and the project was designated the Europa-Panzer. France had AMX, SLD Lorraine, and SOMUA with FCM Renault working on the project, while Germany had Porsche, Rheinmetall with Henschel, and Borgward working on the project. In 1958, Italy entered into the development as well, though it's not sure if they provided much to the program. By 1960, Porsche and Rheinmetall had prototypes submitted, as well as AMX from France, all the others failed to provide a prototype in time. In 1963, the Porsche prototype was selected as the winner in 1963, though even before this decision the vehicle already has priority in being built in greater number than the others. Though a tank is set, France and Germany split in the joint tank project in 1963 after France opted out of standardization with the NATO forces. This left Germany alone with their Leopard tank development, which they continued.

The Porsche Prototype II was well received, though changes were made to the design such as a new cast turret, hull design change, and relocating the radiators. The tank now mounted the 105 mm L7 gun over the Rheinmetall design, as well as adding an optical range-finding system for increased gunnery. The design finished trials by the end of 1963 and production started in Munich in February of 1964. The first batches began arriving at the Bundeswehr (German Army) in September of 1965 and were put into units by November of that same year. The tank was finally designated the Leopard 1, with the prototype stage labelled as the Leopard 1A0.

Usage

After the first delivery, many upgrades were made on the tank throughout its production and service life. The first few Leopards were designated Leopard 1A1 and continued all the way to Leopard 1A6 as it incorporates new technology such as sights, gun, radios, armour, or even small upgrades or redesigns on some parts. Some of these Leopards are even upgraded further in each variant form, for example, the Leopard 1A1A1 which had it fitted with new turret armour and night sights. Other than the different variants, the Leopard 1 was also extensively modified or made into derivatives in roles such as anti-aircraft guns, armour recovery vehicles, bridge layers, and such.

The versatility of the Leopard 1 design and its rather cheap cost in comparison to other tanks at the time made it a useful tank and it was sought out by many different countries in and out of the NATO force group. These countries put them into service in the conflict, such as Denmark, which is believed to be the first country to use the Leopard 1 in hostile engagement, when going against Bosnian Serb forces. Canada also used the Leopard 1C2 in the War in Afghanistan from 2006-2011. Greece also had Leopard 1s and is the largest user of it, with over 500 units of Leopard 1A5s still in service.

The Leopard 1 versatility and widespread use compared to other tanks in the NATO service made it a very useful weapon system for armies that couldn't afford the new American Pattons or Abrams tanks or the British Challengers and Chieftains. The Leopard 1 in German service was eventually replaced by the Leopard 2 design, which entered into service in 1979 as the main battle tank with better armour and better gun compared to the Leopard 1, fully replacing it in 2003. Other countries followed suit by upgrading their tanks to either the Leopard 2, the American M1 Abrams, or their own domestic tank designs. The vehicle in its various modernized forms is still operated by third parties such as , Brazil, Turkey, and Greece. Some are kept in reserve in Chile and Ecuador due to their light frames and ease of use in soft soils like in the jungles in their countries.

In 1974, the Australian government purchased 101 Leopard 1 tanks (90 MBTs, 5 bridge-laying variants, and 6 recovery vehicles). the first leopard 1s arrived in Australia in 1976 and served with the 1st Armoured Regiment. The Leopard 1 was retired from service in July 2007.

The Belgian army received 334 Leopard 1s, equipping 8 tank regiments with 40 Leopard 1s each. The Belgian Leopards were retired from service in 2014.

Canada received 127 Leopard 1 C1 tanks in 1978-1979 to replace the Centurion tank. starting in 2000, the Canadian government upgraded the Leopard 1 C1 to Leopard 1 C2. the Leopard C2 is now obsolete and the Canadian government has opted to use the Leopard 2.

In 1976, Denmark acquired 120 Leopard 1A3 tanks. Denmark acquired another 110 Leopard 1A3 tanks in 1992, and upgraded all for a total of 230 Leopard 1A5-DKs tanks. Denmark no longer uses Leopard 1 tanks as an MBT (replaced by leopard 2), but still uses an armoured recovery vehicle variant.

Germany used a total of 2,437 Leopard 1 tanks, of various variants. The remaining Leopard 1s are in storage, replaced by the Leopard 2.

From 1971-1985, Italy obtained (Purchased from other countries or Built under license) 920 Leopard 1 tanks and 250 Special Variants. Italian Leopard 1 MBTs were retired from service by 2008, and are replaced with the native Italian C1-Ariete tank. Armoured recovery vehicles and bridge-laying variants remain in service.

The Netherlands operated 468 Leopard 1 tanks, and are replaced with Leopard 2 tanks. Armoured recovery vehicles and bridge-laying variants remain in service.

Norway operated 172 Leopard 1 tanks, the last Leopard 1 decommissioned in 2011, and are replaced with Leopard 2 tanks. Armoured recovery vehicles and bridge-laying variants remain in service.

Brazil currently operates 128 Leopard 1BE and 250 Leopard 1A5.

Chile used to operate 202 Leopard 1V, but sold some and currently have 120 in service.

Ecuador purchased all 60 of their Leopard tanks from Chile.

Greece bought 104 Leopard 1A3s in 1983. during 1992, Greece received a further 75 Leopard 1A5. Greece purchased another 192 used Leopard 1A5s. Greece is now the current operator of the most Leopard 1 tank.

Lebanon purchased 43 Belgian Leopard 1A5.

Turkey bought and upgraded 170 Leopard 1A1 tanks and upgraded all to Leopard 1T 'Volkan'. Turkey also purchased 227 A3 variants.


Archive of the in-game description

Development of the tank began in 1957 in cooperation with France. However, this attempt to create a unified European tank was unsuccessful. The projects in both countries were conducted virtually in parallel, but in 1963, before the end of comparative testing of the French and German tanks, Germany declined to cooperate further with France. Each country began to build its own national tank — the Leopard in Germany, the AMX-30 in France.

During the development of the Leopard 1 among all combat characteristics preference was given to firepower and mobility. Later, due to the German engineers' changing perspective on the significance of tank defenses in modern combat, a number of steps were taken to increase it.

The first production order of 1,500 tanks was placed in 1963, and in September, 1965 the first serial Leopard 1 was delivered to the Bundeswehr.


Media

Skins
Videos

See also

Vehicles equipped with the same chassis
Other vehicles of similar configuration and role

External links


Krauss-Maffei Wegmann (KMW)
MBTs 
Leopard 1  Leopard I · Leopard A1A1 · Leopard A1A1 (L/44) · Leopard 1A5 · C2A1
Leopard 2  PT-16/T14 mod. · Leopard 2K · Leopard 2A4 · Leopard 2 (PzBtl 123) · Leopard 2 PL · Leopard 2A5 · Leopard 2A6
KPz-70  KPz-70*
  *By the Deutsche Entwicklungsgesellschaft consortium, in collaboration with the General Motors Company.
IFVs  PUMA
SPAAs  Gepard · Gepard 1A2
Export 
Leopard 1  ▄Leopard 1A5 · Leopard 1A5NO2
Leopard 2  Strv 121
See Also  BAE Systems AB

Germany medium tanks
Pz.III  Pz.III B · Pz.III E · Pz.III F · Pz.III J · Pz.III J1 · Pz.III J1 TD · Pz.III L · Pz.III M · Pz.III N
Pz.IV  Pz.IV C · Pz.IV E · Pz.IV F1 · Pz.IV F2 · Pz.IV G · Pz.IV H · Pz.IV J · Pz.Bef.Wg.IV J
Pz.V  VK 3002 (M) · Panther A · Panther D · Panther F · Panther G · Ersatz M10 · Panther II
M48 upgrades  M48A2 G A2 · M48 Super
Leopard 1  Leopard I · Leopard A1A1 · Leopard A1A1 (L/44) · Leopard 1A5 · C2A1 · Turm III
Leopard 2  PT-16/T14 mod. · Leopard 2K · Leopard 2AV
  Leopard 2A4 · Leopard 2 (PzBtl 123) · Leopard 2 PL · Leopard 2A5 · Leopard 2 PSO · Leopard 2A6 · Leopard 2A7V
Trophies  ▀M4 748 (a) · ▀T 34 747 (r)
Other  Nb.Fz. · KPz-70
USA  mKPz M47 G · M48A2 C
USSR  ◊T-72M1