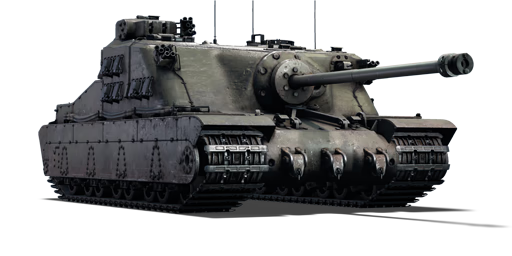
Tortoise
Contents
Description
The A39 Tortoise is a rank IV British tank destroyer with a battle rating of 6.7 (AB/RB) and 6.3 (SB). It was introduced in Update 1.55 "Royal Armour" along with the initial British ground tree. A huge casemate structure made as an assault vehicle akin to the American's T95, the Tortoise presents thick raw sloped armour with a unique heavy punching 94 mm cannon.
General info
Survivability and armour
As its name suggest, the Tortoise is not very fast. While its mobility leaves much to be desired, the tank's survivability is the complete opposite. The tank sacrifices its speed for very thick armour, both on the front and sides. The frontal protection varies from 170 mm at the lower plate to 215 mm of cast steel around the mantlet, with additional protection being provided by spaced armour, covering the gun breech. This, combined with the mostly well-angled front of the tank, makes the armour reach an effective thickness of around 250 mm. This makes the Tortoise borderline immune to most attacks from the guns found at its BR, even the mighty Russian 122 mm D-25T cannon. The Tortoise's hull sides and rear are also very tough to pierce, making any SPAA vehicle, and even some light tanks, more of a nuisance than a real threat to the tank. If the armour is not enough the Tortoise has a huge 7 man crew, which does contribute a lot to its survivability. As the crew is spread out in the hull, knocking out the Tortoise with just one-shot is quite rare.
The tank does have some glaring weak spots in its frontal armour. First weak spot of note is the cupola. Considering that the cupola is only 101.6 mm thick and flat, it is very easy for the Tortoise's opponents to penetrate it, usually resulting in a loss of a crew member. Another weak spot is actually one of the thickest part of the tank, the gun mantlet area. While the plate itself is very thick, the fact that it is flat makes it very vulnerable, if not angled. A shot from a Tiger II can pierce it, resulting in the Tortoise's destruction or at the very least incapacitation. In order to avoid this, it is advised to angle the armour to make it more effective.
There is one more weak spot which more advanced players will use to their advantage when facing a Tortoise, another flat area of the superstructure located next to the machine gun port, which is only 152 mm thick. This flat area is quite large, making it an even easier target, and unfortunately for the Tortoise, even proper armour angling will not make it sturdy enough to withstand the long 88 mm KwK 43, let alone something like the Russian D-25T or D-10T.
Tortoise also has access to smoke grenade launchers, which are very useful and should be utilised often, especially if there is a need for a hasty retreat, which is made possible by the Tortoise's good reverse speed. The smoke grenades are released in 4 charges through 3 mortars, one of which is placed on the rotating turret. Important thing to note is that if the turret's operator is knocked out, it won't be able to move, resulting in smoke grenades being launched in the direction the turret's MGs are facing.
Usually when faced against vehicles which use APCBC rounds and are of equal BR, the Tortoise's armour holds very well. The issue however appears when the tank faces enemies, who have access to more advanced munitions like APDS, HEAT-FS or any early ATGMs. The armour performs really badly against these and will frequently be pierced. There are also some large calibre guns capable knocking out the Tortoise by shooting HE shells into its roof and through overpressure, which is made easier by the large cupola.
Armour type:
- Cast homogeneous armour
- Rolled homogeneous armour (Side hull, Rear hull, Hull roof, Superstructure roof)
Armour | Front | Sides | Rear | Roof |
---|---|---|---|---|
Hull | 55 mm (75°) Front glacis 170 mm (3-71°) Lower glacis |
110 + 50.8 mm | 100 mm (10-45°) | 25 mm |
Superstructure | 215 mm (0-59°), 152 mm (0-45°) Front armour 96 + 80 + 152 mm Gun mantlet |
152 mm | 110 mm (0-7°) | 50.8 mm |
Cupola | 101.6 mm | 101.6 mm | 101.6 mm | 25 mm |
Notes:
- Suspension wheels and bogies are 20 mm thick while tracks are 30 mm thick.
- Tracks on the side of the Tortoise give an additional 30 mm of armour.
- The steel boxes on the side of the rear of the Tortoise grant only an extra 5 mm of armour.
Mobility
Game Mode | Max Speed (km/h) | Weight (tons) | Engine power (horsepower) | Power-to-weight ratio (hp/ton) | |||
---|---|---|---|---|---|---|---|
Forward | Reverse | Stock | Upgraded | Stock | Upgraded | ||
Arcade | 21 | 21 | 81.3 | 923 | 1,240 | 11.35 | 15.25 |
Realistic | 20 | 20 | 575 | 650 | 7.07 | 8 |
Such a great armour plays heavily on mobility. With a max speed of 20 km/h in both directions, neutral steering and wide tracks, this tank has good enough mobility to get into position and fire on the enemy. It is not advised to travel up to the frontlines since it will only expose weak spots, make flanking easier, and take a really long time due to poor max speed.
Modifications and economy
Armaments
Main armament
Unlike other British Rank IV tanks, the Tortoise does not have access to APDS or HESH ammunition, it relies on pure AP solid shots. Fortunately, these large calibre rounds are roughly similar to the 20-pounder cannon's APDS rounds, meaning the learning curve from the Charioteer Mk VII is not too steep. Plus, these 94 mm shells are stock rounds in the Tortoise.
The main APCBC round for the Tortoise features superb penetration with 250+ mm at close range. While some other opponents might sport a better penetration, the ~10 seconds reload and incredible accuracy means you will usually be able to get a shot off before the enemy at this BR since a lot of tanks make use of large calibre guns with long reload times (Tiger II, IS-2, FV4005, etc.). The Shot Mk.1 also features excellent post-penetration damage thanks to its large calibre.
Due to the stable gun platform provided by an incredibly heavy chassis, as well as the decent gun traverse, the Tortoise is able to halt, stabilize and fire its gun before enemies are able to.
94 mm 32pdr OQF | Turret rotation speed (°/s) | Reloading rate (seconds) | |||||||||||
---|---|---|---|---|---|---|---|---|---|---|---|---|---|
Mode | Capacity | Vertical | Horizontal | Stabilizer | Stock | Upgraded | Full | Expert | Aced | Stock | Full | Expert | Aced |
Arcade | 60 | -10°/+18° | ±20° | N/A | 8.81 | 12.19 | 14.80 | 16.37 | 17.41 | 11.18 | 9.89 | 9.12 | 8.60 |
Realistic | 5.95 | 7.00 | 8.50 | 9.40 | 10.00 |
Ammunition
Penetration statistics | |||||||
---|---|---|---|---|---|---|---|
Ammunition | Type of warhead |
Penetration @ 0° Angle of Attack (mm) | |||||
10 m | 100 m | 500 m | 1,000 m | 1,500 m | 2,000 m | ||
Shot Mk.1 | APCBC | 256 | 253 | 241 | 226 | 212 | 199 |
Shell Mk.1 | HE | 13 | 13 | 13 | 13 | 13 | 13 |
Shell details | ||||||||||||
---|---|---|---|---|---|---|---|---|---|---|---|---|
Ammunition | Type of warhead |
Velocity (m/s) |
Projectile mass (kg) |
Fuse delay (m) |
Fuse sensitivity (mm) |
Explosive mass (TNT equivalent) (g) |
Ricochet | |||||
0% | 50% | 100% | ||||||||||
Shot Mk.1 | APCBC | 929 | 14.5 | - | - | - | 48° | 63° | 71° | |||
Shell Mk.1 | HE | 1,043 | 12.7 | 0.4 | 0.5 | 920 | 79° | 80° | 81° |
Ammo racks
Full ammo |
Ammo part |
1st rack empty |
2nd rack empty |
3rd rack empty |
4th rack empty |
5th rack empty |
Visual discrepancy |
---|---|---|---|---|---|---|---|
60 | Projectiles Propellants |
41 (+19) 59 (+1) |
31 (+29) 35 (+25) |
21 (+39) 31 (+29) |
11 (+49) 1 (+59) |
1 (+59) N/A |
No |
Note:
- As they are modeled by sets of 2, shells disappear from the rack only after you fire both shells in the set.
Machine guns
The secondary armament on this tank is a MG turret with twin-mounted BESA machine guns, good for dealing with low-flying planes and even some bombers, although these MGs lack the power of cannons for aircraft encountered in mixed battles at this BR. Since this turret is the main weak spot on this tank's frontal armour, it is often disabled in the first few shots.
Six of the vehicle's smoke grenades are located on the machine gun turret, and even if it's disabled (locking it in the direction it was facing) the grenades will still fire like normal.
7.92 mm BESA | ||||
---|---|---|---|---|
Mount | Capacity (Belt) | Fire rate | Vertical | Horizontal |
Cupola | 3,375 (225) | 600 | -6°/+20° | ±180° |
Usage in battles
The A39 Tortoise was created with the intention of serving as a "heavy assault tank" to break through the Siegfried Line. It plays more as a tank destroyer that's best used at long range. Therefore, to maximize the potential of the Tortoise, one must stay at long distances and snipe enemies with the very accurate 32 pdr OQF cannon, while making sure to choose good cover, so as to not allow the enemy to target the Tortoise's weak spots: the MG turret and gunner's cupola, the flat areas of the mantlet armour, and the lower front plate (LFP) if it is left exposed. With its slow speed and reload rate, this is not a frontline tank; it will easily be outflanked if used in shorter range engagements. In summary, the Tortoise is best used in a defensive capacity - either to defend capture points, or important strategic areas on the map (i.e. areas where enemies love to camp).
The Tortoise is a true sniper tank destroyer: the farther, the better. Its biggest vulnerability is that it moves extremely slowly, so it's not recommended for frontline combat. It plays much better as an entrenched shooter that can change a game by picking cover with a good field of fire, and then denying enemy entry or egress of an area. The cannon lacks an AP shell with HE filler, making general knowledge of tank internals a must. With good gun depression, it can be near-invincible when taking a good hull-down position, and can retreat back into cover easily enough due to its good reverse speed.
Some tips for specific combat environments:
- Plains
This type of terrain is mostly devoid of any structures that could possibly provide cover. The terrain itself will provide the main form of cover. Maps such as Kursk, Mozdok and Jungle can be described as such. Find decent cover that provides a good view of the battlefield and field of fire, then set up a kill zone to deny entry into an area. Scout with binoculars so as to not needlessly expose yourself, then pop out at the right time to fire at any worthwhile targets of opportunity. Overextend tactics work well with this tank: line up a shot, take it, and fall back behind cover. Do not bother to move from a good position if possible: the Tortoise can take many shots before going down, and its dreadful top speed make it counterintuitive to play in an offensive capacity. Reposition the tank only if the enemy line gets too close or if there is a flanker in the vicinity.
- Urban
These kind of grounds are all about buildings, terrain variation is almost nonexistent. Maps such as Abandoned Factory, Port Novorossiysk and Advance to the Rhine are urban battlefields. This is the most tricky scenario to face with the Tortoise. Pick an alley and cover it from one end or ambush near a capture point, if feeling lucky. Always try to stay near allied cover.
- Rural
Rural maps are a mix of the two former: a small urban map surrounded by plains. Maps such as Fields of Poland, Eastern Europe and Normandy are rural environments. Stay around the town and never get in, cover alleys from afar, make the enemy fear to turn any corner. Try to get as far as possible to the town and keep an eye for flankers.
- Hilly terrain
These maps feature high terrain deformation with steep hills and even walls. Maps such as Ash River, Karelia and Frozen Pass falls under this designation. Use the same tactics as with plains while being extra careful since flanking is easier on these kind of maps. Stick to the rear of allied armour or play as a bullet magnet, leaving light tanks a way to flank the enemy without getting too much attention. Make sure to hide weak spots behind props such as rocks or walls, leaving only the gun mantlet exposed.
Pros and cons
Pros:
- Good frontal armour and adequately thick side armour
- Angling the tank at near-45 degrees increases protection
- 94 mm 32-pdr OQF cannon offers both high penetration power and post-penetration spalling damage
- Highest penetrating round (Shot Mk. 1 APCBC) has a forgiving and predictable trajectory
- 7-man crew means that it will usually take several HEAT or APDS rounds to knock out the Tortoise (even penetrating APHE shells likely will not destroy the tank in a single hit)
- Goes as fast in reverse as it does when travelling forward
Cons:
- Given its enormous size, the tank is nearly impossible to fully conceal.
- Lack of speed and manoeuvrability: it is extremely slow given its enormous weight. You will not be able to run away from threats.
- The Tortoise lacks AP shells with any explosive filler. However, unlike most other British tanks at this battle rating, no APDS shells are available for the 32-pounder.
- Obvious weak spot: The MG turret on top of the tank is massive and is weakly armoured, which players will readily take advantage of: if an APHE round were to penetrate, it would likely kill the loader (and possibly the driver).
- The top left corner of the tank is big and flat; APHE rounds with high penetration can punch right through, killing the commander and gunner.
- Due to the casemate design, cover and fields of fire must be chosen carefully to minimize exposition of the Tortoise's weaknesses.
- The lower front plate (LFP) is somewhat flat and presents a possible weak spot for enemies to shoot at if exposed.
History
Development
Years before the invasion of Normandy, there were men among the Allied planners worrying about the heavily-defended fortification lines such as the Siegfried Line blocking the path from France to Germany. One of the proposed methods was to develop extremely heavily armoured vehicles capable of destroying any fortification it comes across and any resistance the German had. Britain and America both worked on this project in order to develop these super-heavy tanks.
The British began to develop a new type of vehicle to counter this threat, the Assault Tanks that focuses all effort on armour. The first development for such a tank began in 1943 as the A33 Excelsior tank, though this was cancelled with better reliability of the Churchill infantry tank. The Secretary of State for War and the Minister of Supply sent out specifications for the Assault Tanks in April 1943, to which the Nuffield Organisation react with 18 designs for the specifications between May 1943 to February 1944, named AT1 to AT18. Each design was more armoured than its predecessor, but design AT16 was approved by the Tank Board in February 1944. It was proposed that 25 vehicles would be produced and thus work began throughout the rest of the war. Six units were produced before production came to an end.
Design
The AT16 was renamed the A39 Tortoise Heavy Assault Tank during its production life. The Tortoise is a fixed casemate design. Though classified as an Assault Tank, it was in reality a self-propelled/assault gun. The fixed casemate superstructure limited the gun traverse, but the front armour is very thick at 225 mm. This large amount of armour came at the increased weight of 80 tons and a height of 10 feet. The gun is the 96 mm 32-pounder gun that provided effective explosive and armour-piercing capabilities, good enough to destroy a Panther tank at 1,000 yards away. The Tortoise is powered by a Meteor engine with an all-speed transmission system for equal speed forward and reverse. The suspension is a bogie system, with each bogie having a pair of wheels that are linked to a transverse torsion bar. The vehicle holds a crew of six people, two of which are loaders for the 32-pounder gun.
Cancellation
By the time the few prototypes of the vehicles were made, World War II in Europe ended in May 1945. The rapid demilitarization and lack of need for such a vehicle reduced the original order amount to just 6 vehicles, which were built. One was sent to Germany for evaluation trials, where the Tortoise proved itself as being mechanically reliable and its 32-pounder a great asset on the battlefield. Its undoing was its 80 ton weight, which gave it a low speed and a logistical nightmare to transport around the region.
In the end, the super heavy tanks designs made by the Americans (T28) and the British (Tortoise) only proved that such needs for tanks were unnecessary. The Siegfried Line and other such fortifications were taken out by use of the standard issued medium tanks such as the M4 Shermans, proving that affordable, mass-produced vehicles could dominate the modern battlefield. The only positive note that these heavy tanks provided was that it showed the true extent of American and British industrial capabilities, being able to produce these massive monsters.
Media
- Skins
- Videos
See also
External links
Paste links to sources and external resources, such as:
- topic on the official game forum;
- other literature.
Nuffield Mechanizations and Aero Limited | |
---|---|
Cruiser Tanks | |
Tank, Cruiser, Mk III (A13 Mk I) | A13 Mk I · A13 Mk I (3rd R.T.R.) |
Tank, Cruiser, Mk IV (A13 Mk II) | A13 Mk II · A13 Mk II 1939 |
Tank, Cruiser, Mk VI, Crusader (A15) | Crusader II · Crusader "The Saint" · Crusader III |
Tank Destroyers | Tortoise |
SPAAs | Crusader AA Mk I · Crusader AA Mk II |
Export | ▄Crusader Mk.II |
Britain tank destroyers | |
---|---|
Infantry tank derivatives | Archer · Gun Carrier (3-in) |
Light tank derivatives | Alecto I |
M10 Achilles | Achilles · Achilles (65 Rg.) |
Centurion derivatives | FV4005 · Conway |
ATGM | Swingfire · Striker |
Other | Tortoise · ▄M109A1 |
Canada | QF 3.7 Ram · ADATS (M113) |
South Africa | G6 · ZT3A2 |