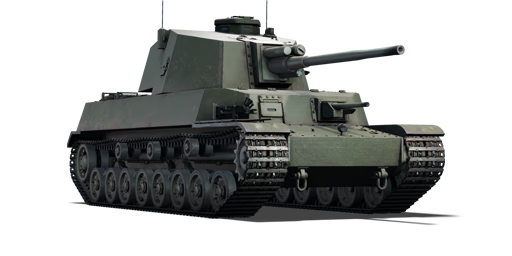
Chi-Ri II

From War Thunder Wiki
Jump to: navigation, search
Rank VI Israel | Premium | Golden Eagles
Merkava Mk.2D Pack
Chi-Ri II
jp_type_5_chi_ri.png
GarageImage Chi-Ri II.jpg
ArtImage Chi-Ri II.png
Chi-Ri II
AB RB SB
5.0 5.0 5.0
Class:
Research:40 000 Specs-Card-Exp.png
Purchase:135 000 Specs-Card-Lion.png
Show in game

Description

The Type 5 Chi-Ri II (五式中戦車II 「チリII」) was designed as a result of Japanese field reports on the Eastern front war between Germany and the Soviet Union which evolved tank combat as a separate branch. Roughly offering the hull protection of a KV-1 and the firepower of German long 75 mm's, the Chi-Ri was to be a heavy medium tank offering quality over quantity in tank design. However, with the scale the Chi-Ri was supposed to be designed and the draining of resources the Japanese military experienced through China and mainly the Pacific, resources were diverted to the more practical Chi-To instead.

The Chi-Ri II was introduced along with the initial Japanese Ground Forces tree in Update 1.65 "Way of the Samurai". It's armed with a Type II Model I 75 mm cannon and is one of the earliest tanks in the game to feature a fully functional auto-loader for full-size tank guns, with a two-round capacity. The "auto-loader" is simply a tray-assisted ready rack for 2 shells that can be laid ready in front of the gun to simply push in, without the need of pulling ammo directly from the storage racks into the breech. Once the trays have been emptied, the reload will be like any usual tank with a slight penalty. The big drawback of the Chi-Ri II is its size and traverse speeds - while it offers a stronger engine once spaded, the massive turret will crank slowly making response time slow if the hull isn't utilized and the sheer size of the tank makes for a massive target.

General info

Survivability and armour

Armourfront / side / back
Hull75 / 35 / 35
Turret75 / 50 / 50
Crew5 people
Visibility130 %

Armour type:

  • Rolled homogeneous armour
  • Cast homogeneous armour (Recoil tube, Gun mantlet)
Armour Front Sides Rear Roof
Hull 75 mm (15°) Front plate
20 mm (81°) Front glacis
75 mm (9°) Joint plate
35 mm (59°) Lower glacis
35 mm (18°) Top
35 mm Bottom
35 mm Top
20 mm (38°) Bottom
20 mm
Turret 75 mm (15°) Turret front
50 mm (10°) Inner gun mantlet
20-75 mm (10-15°) Outer gun mantlet
50 mm (15°) 50 mm 20 mm
Cupola 75 mm 75 mm 75 mm 20 mm

Notes:

  • Suspension wheels and bogies are 15 mm thick while tracks are 20 mm thick.
  • Small parts of the suspension on the hull sides give 10 mm thick protection at their area.

Mobility

Speedforward / back
AB51 / 10 km/h
RB and SB46 / 9 km/h
Number of gears8 forward
2 back
Weight41.0 t
Engine power
AB1 049 hp
RB and SB550 hp
Power-to-weight ratio
AB25.6 hp/t
RB and SB13.4 hp/t
Game Mode Max Speed (km/h) Weight (tons) Engine power (horsepower) Power-to-weight ratio (hp/ton)
Forward Reverse Stock Upgraded Stock Upgraded
Arcade 51 10 41 852 1,049 20.78 25.59
Realistic 46 9 486 550 11.85 13.41

Modifications and economy

Repair costBasic → Reference
AB1 584 → 2 038 Sl icon.png
RB1 873 → 2 410 Sl icon.png
SB2 339 → 3 010 Sl icon.png
Total cost of modifications35 000 Rp icon.png
68 000 Sl icon.png
Talisman cost1 300 Ge icon.png
Crew training39 000 Sl icon.png
Experts135 000 Sl icon.png
Aces550 Ge icon.png
Research Aces390 000 Rp icon.png
Reward for battleAB / RB / SB
80 / 130 / 150 % Sl icon.png
154 / 154 / 154 % Rp icon.png
Modifications
Mobility Protection Firepower
Mods new tank traks.png
Tracks
Research:
2 300 Rp icon.png
Cost:
4 500 Sl icon.png
145 Ge icon.png
Mods new tank suspension.png
Suspension
Research:
1 600 Rp icon.png
Cost:
3 100 Sl icon.png
100 Ge icon.png
Mods new tank break.png
Brake System
Research:
1 600 Rp icon.png
Cost:
3 100 Sl icon.png
100 Ge icon.png
Mods new tank filter.png
Filters
Research:
2 900 Rp icon.png
Cost:
5 600 Sl icon.png
180 Ge icon.png
Mods new tank transmission.png
Transmission
Research:
3 800 Rp icon.png
Cost:
7 400 Sl icon.png
240 Ge icon.png
Mods new tank engine.png
Engine
Research:
3 800 Rp icon.png
Cost:
7 400 Sl icon.png
240 Ge icon.png
Mods tank tool kit.png
Improved Parts
Research:
2 300 Rp icon.png
Cost:
4 500 Sl icon.png
145 Ge icon.png
Mods extinguisher.png
Improved FPE
Research:
1 600 Rp icon.png
Cost:
3 100 Sl icon.png
100 Ge icon.png
Mods tank reinforcement jp.png
Crew Replenishment
Research:
2 900 Rp icon.png
Cost:
5 600 Sl icon.png
180 Ge icon.png
Mods new tank horizontal aiming.png
Horizontal Drive
Research:
2 300 Rp icon.png
Cost:
4 500 Sl icon.png
145 Ge icon.png
Mods tank cannon.png
Adjustment of Fire
Research:
1 600 Rp icon.png
Cost:
3 100 Sl icon.png
100 Ge icon.png
Mods tank ammo.png
75mm_type4_APHE_ammo_pack
Research:
1 600 Rp icon.png
Cost:
3 100 Sl icon.png
100 Ge icon.png
Mods new tank vertical aiming.png
Elevation Mechanism
Research:
2 900 Rp icon.png
Cost:
5 600 Sl icon.png
180 Ge icon.png
Mods art support.png
Artillery Support
Research:
3 800 Rp icon.png
Cost:
7 400 Sl icon.png
240 Ge icon.png

Armaments

Main armament

75 mm Type II Model I cannon
Ammunition100 rounds
First-order2 rounds
Reloadbasic crew → aces
4.3 → 3.3 s
Vertical guidance-10° / 20°
75 mm Type II Model I Turret rotation speed (°/s) Reloading rate (seconds)
Mode Capacity Vertical Horizontal Stabilizer Stock Upgraded Full Expert Aced Stock Full Expert Aced
Arcade 100 -10°/+20° ±180° N/A 11.4 15.8 19.2 21.2 22.6 4.29 3.80 3.50 3.30
Realistic 7.1 8.4 10.2 11.3 12.0

Ammunition

Penetration statistics
Ammunition Type of
warhead
Penetration @ 0° Angle of Attack (mm)
10 m 100 m 500 m 1,000 m 1,500 m 2,000 m
Type 1 APHE APHE 149 146 133 118 105 93
Type 4 Kou APHE 151 148 137 124 112 101
Type 90 HE HE 17 17 15 14 12 11
Shell details
Ammunition Type of
warhead
Velocity
(m/s)
Projectile
mass (kg)
Fuse delay
(m)
Fuse sensitivity
(mm)
Explosive mass
(TNT equivalent) (g)
Ricochet
0% 50% 100%
Type 1 APHE APHE 865 6.56 1.3 15 84.8 47° 60° 65°
Type 4 Kou APHE 865 6.75 1.2 14 80.64 47° 60° 65°
Type 90 HE HE 830 6.17 0.2 0.1 490 79° 80° 81°

Ammo racks

Ammo racks of the Chi-Ri II
Full
ammo
1st
rack empty
2nd
rack empty
3rd
rack empty
4th
rack empty
5th
rack empty
6th
rack empty
100 93 (+7) 85 (+15) 77 (+23) 66 (+34) 55 (+45) 45 (+55)
7th
rack empty
8th
rack empty
9th
rack empty
10th
rack empty
11th
rack empty
12th
rack empty
Visual
discrepancy
35 (+65) 27 (+73) 19 (+81) 11 (+89) (+97) (+99) No

Notes

  • Rack 12 is a 2-shell ready-rack, which will replenish when not reloading.
  • Hull empty: 35 (+65) shells.

Additional armament

37 mm Type 1 cannon
Ammunition120 rounds
Reloadbasic crew → aces
5.2 → 4.0 s
Vertical guidance-8° / 17°
Horizontal guidance-10° / 10°
Main article: Type 1 (37 mm)
37 mm Type 1 (Hull mount) Reloading rate (seconds)
Capacity Vertical Horizontal Stabilizer Stock Full Expert Aced
120 -8°/+17° ±10° N/A 5.2 4.6 4.2 4.0

Ammunition

Penetration statistics
Ammunition Type of
warhead
Penetration @ 0° Angle of Attack (mm)
10 m 100 m 500 m 1,000 m 1,500 m 2,000 m
Type 94 APHE APHE 46 44 36 29 23 18
Shell details
Ammunition Type of
warhead
Velocity
(m/s)
Projectile
mass (kg)
Fuse delay
(m)
Fuse sensitivity
(mm)
Explosive mass
(TNT equivalent) (g)
Ricochet
0% 50% 100%
Type 94 APHE APHE 700 0.7 1.2 9 11 47° 60° 65°

Ammo racks

Full
ammo
1st
rack empty
2nd
rack empty
3rd
rack empty
4th
rack empty
5th
rack empty
6th
rack empty
7th
rack empty
Visual
discrepancy
120 101 (+19) 81 (+39) 61 (+59) 41 (+79) 21 (+99) 11 (+109) (+119) No
Ammo racks of the Chi-Ri II

Notes:

  • Left side only: 21 (+99) shells.

Machine guns

Ammunition3 000 rounds
Belt capacity20 rounds
Reloadbasic crew → aces
3.9 → 3.0 s
Fire rate499 shots/min
Main article: Type 97 (7.7 mm)
7.7 mm Type 97
Mount Capacity (Belt) Fire rate Vertical Horizontal
Hull (coaxial with Hull cannon) 3,000 (20) 499 N/A N/A

Usage in battles

The best play style with the Chi-Ri II is a conservative one, a strategy equally applicable to its predecessor the Chi-To. One should lay a far distance from the enemy, using the high-velocity 75 mm gun in a sniping role than a close support. When an enemy appears, fire upon them, and the auto-loader allows for some mistakes as the next burst round is available in about a second for a follow-up shot. Once the three shots are expended, one has the option of either retreating back into cover to allow the autoloader to refill back with its three shells, or simply wait for the gun to reload one shell and fire. The latter option is viable due to the Chi-Ri's good reload speed even without the autoloader. The decent gun depression of -10° allows the Chi-Ri to exploit hull-down positions to maximize cover, so use that to gain a battlefield advantage.

Another play style is a close-quarter ones, going against everything the paragraph above suggests. The three-round capacity of the auto-loader means the Chi-Ri has some decent close-range firepower to use if it can catch a group of enemies unawares from the sides or rear. The Chi-Ri's decent mobility, especially for its huge size, helps with that. Being able to fire two rapid shots of high-damaging 75 mm shell can allow the Chi-Ri to effectively neutralize in a record time before they have time to react. After those shots, the Chi-Ri can either wait in cover and reload the shells, or just fire each shell as its reloaded. However, the tank is always vulnerable to being spotted and surprised due to its massive profile, very weak armour and slow turret traverse. Furthermore, actually reloading the autoloader takes far longer than firing them off. As such, it's easily gunned down then if not supported by friendly tanks.

One last thing to note is the secondary 37 mm hull gun. This often doesn't get much use, as it only has 46mm of penetration point-blank, making it useless against the majority of the Chi-Ri's opponents. The gun also can't be used to range the 75mm main cannon due to having a very different trajectory. Furthermore, the crew member in charge of the gun is the first to be relocated in case another crew member is knocked out, rendering it unusable unless one gets the chance to get more crew at an objective. However, the 37mm still has its uses against very thinly-armoured opponents such as Hellcats, the turrets of AA vehicles, and the sides of mediums at close enough range. In addition, it can also be used to trick opponents into thinking that the Chi-Ri has already fired all of its shells, causing them to expose themselves and be vulnerable to return fire.

At this stage, most medium, heavy tanks, and tank destroyer can penetrate the Chi-Ri's armour with ease. Take caution on the battlefield.

At BR 5.0, the Chi-Ri starts to face some tanks that are quite resistant to its 75 mm cannon, namely the Tiger H1 and IS-1 heavy tanks. While the Type 4 Kou shell has fantastic post-penetration damage thanks to its high explosive filler, it only has 157mm of penetration. While this is enough to go through these tanks' weak spots, taking the time to aim for them is disadvantageous in a "shoot first, aim later" type of engagement. Meanwhile, Tigers, IS-1s, and Panthers can take out the Chi-Ri out with ease due to the Chi-Ri's thin armour and massive profile. Thus, it is best to pounce on and surprise enemy tanks rather than face them in a frontal duel, catch them by their sides and blow up their interior. The same strategies in place for using the Chi-To Late to deal with the horrors of 5.0 should be implemented with the Chi-Ri.

Pros and cons

Pros:

  • 3.3 second reload between each shell in the autoloader with a fully trained crew
  • First Stage Ammo Storage enables the tank to reload in less then 6 seconds even when the auto-loader is empty
  • With the First Stage Ammo Storage mechanic, the auto-loader is reloaded when not firing the gun
  • Exceptional burst damage potential
  • Shell performance similar to the T-34-85's 85 mm
  • Very competitive gun depression (-10°)
  • Secondary 37 mm armament allows for engaging weaker enemy without wasting 75 mm shells, and can be used to trick inattentive enemy players into thinking the main gun has fired
  • Decent mobility, even with stock engine

Cons:

  • With the First Stage Ammo Storage mechanic, the 4 ammo racks in the back of the turret will be the last to be depleted, increasing the chance of ammo racking
  • Actually reloading the autoloader takes a very long time
  • Learning curve to use tank properly is worse than the M3 Mediums
  • Massive profile
  • Abysmal hull turn time
  • Unimpressive turret traverse speed
  • Thin, poorly sloped armour all around
  • Angled hull front cheek sections make armour angling useless
  • 37 mm can only aim forwards and is very weak for Rank 3
  • Average accuracy
  • Maximum of 157 mm of penetration with the best shell, can have trouble penetrating same and higher-rank heavy tanks

History

Chi-Ri

Under the pretext of their lacklustre tank designs, the Japanese worked on creating a tank that could surpass the Allies' main tank, the M4 Sherman. Upgraded designs made to deal with the Sherman led to the Type 3 Chi-Nu and the Type 4 Chi-To. While these two were quite capable against the Sherman, they did not represent the best that the Japanese had to offer.

Sometime during the development period of the Chi-Nu and the Chi-To, the Japanese designed a medium tank far more sophisticated than anything they had done previously. The tank was to be equipped with the same 75 mm gun as the Chi-To, except it had an auto-loading system on it. There was to be a hull-mounted 37 mm with a machine gun as well. The chassis was similar to the Chi-To's, but lengthened to eight road wheels per side. It was also powered by a 550 hp gasoline aircraft engine designed by BMW from Germany. The tank was classified as the Type 5 Chi-Ri and a single prototype without the main gun was produced in May 1945, but efforts were diverted to the more practical Type 4 Chi-To. Due to that, the war ended with only a single Type 5 Chi-Ri prototype produced.[1]

Chi-Ri II

Though Chi-Ri showed the development process for the new tank design, improvements often come to during prototype stages for a more manageable tank design. The improvements on the Chi-Ri, which would be called the Chi-Ri II, were mainly the removal or addition of certain features, with the added ones namely from the Chi-To. Notable differences would be the use of a supercharged Mitsubishi diesel engine instead of a German gasoline engine, the change in suspension and turret design to resemble the Chi-To's, and the removal of the 37 mm secondary armament. It is uncertain how useful these simplifications are since these are all plans never put into practice.[2]

Production plans

If the Chi-Ri ever entered production, the Japanese had plans for a bit of an upgrade in its firepower. It would be armed with a gun based on the Type 99 88 mm anti-aircraft gun, giving it a much higher velocity cannon that makes the vehicle more than capable of taking out Allied tanks. With the Chi-Ri in production and in numbers, it would be used in Japan's final stand against the Allies should they invade the home islands.

However, like many late-war tanks of Japan, they would never see any battle service due to their surrender in September 1945. The single Chi-Ri prototype was captured by the ensuing American occupation force, which they transported to the Aberdeen Proving Grounds for tests. Records show that the Chi-Ri prototype was scrapped along with other foreign tanks on October 1952.[3]

Media

Skins
Videos

See also

Links to the articles on the War Thunder Wiki that you think will be useful for the reader, for example:

  • reference to the series of the vehicles;
  • links to approximate analogues of other nations and research trees.

External links

  • Zaloga Steven. Japanese Tanks 1939-1945 Great Britain: Osprey Publishing Ltd., 2007
  • Davis, Frank. "Chi Ri II - Japanese Tier 6/7 Medium." For the Record. Blogger.com, 05 June 2013. Web. 12 Jan. 2017. [1]
  • Sun, Eun Ae. Chi-Ri & Chi-To: Aberdeen Tank Scrapping. YouTube, YouTube, 7 Aug. 2017, [2]

References

  1. Zaloga 2007
  2. Davis 2013
  3. Sun 2017


Mitsubishi Heavy Industries (三菱重工業株式会社)
Light Tanks 
Type 95  Ha-Go · Ha-Go Commander
Medium Tanks 
Type 89  I-Go Ko
Type 97  Chi-Ha · Chi-Ha Kai
Type 1  Chi-He · Chi-He (5th Regiment)
Type 3  Chi-Nu · Chi-Nu II
Type 4  Chi-To · Chi-To Late
Type 5  Chi-Ri II
SPGs 
Chi-Ha Derived  Ho-Ro
Chi-He Derived  Ho-I
Chi-Ri Derived  Ho-Ri Prototype · Ho-Ri Production
Other  Na-To · Ro-Go Exp.
Captured  ␗Chi-Ha · ␗Chi-Ha Kai
Note  Most tank designs would be contracted by the Army Technical Bureau to Mitsubishi
See also  Mitsubishi Heavy Industries Ltd. (Post-War)

Japan medium tanks
Type 97  Chi-Ha · Chi-Ha Kai · Chi-Ha Kai TD · Chi-Ha Short Gun
Type 1  Chi-He · Chi-He (5th Regiment) · Ho-I
Type 3  Chi-Nu · Chi-Nu II
Type 4  Chi-To · Chi-To Late
Type 5  Chi-Ri II
Type 61 MBT  ST-A1* · ST-A2* · ST-A3* · Type 61
Type 74 MBT  ST-B2* · Type 74 (C) · Type 74 (E) · Type 74 (F) · Type 74 (G)
Type 90 MBT  Type 90 · Type 90 (B) · Type 90B "Fuji"
Type 10 MBT  TKX (P)* · TKX* · Type 10
Other  Ka-Chi
USA  ▅M4A3 (76) W · ▅M47
  *Prototype