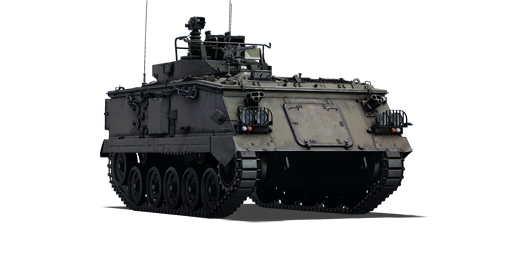
Swingfire

From War Thunder Wiki
Jump to: navigation, search
Rank IV USSR | Premium | Golden Eagles
Tu-1 Pack
Swingfire
uk_fv438_swingfire.png
GarageImage Swingfire.jpg
Swingfire
Research:105 000 Specs-Card-Exp.png
Purchase:300 000 Specs-Card-Lion.png
Show in game

Description

The FV438 Swingfire is a rank V British tank destroyer with a battle rating of 8.0 (AB/RB/SB). It was introduced in Update 1.63 "Desert Hunters".

The Swingfire is the first dedicated ATGM of the British nation tree. It doesn't have any cannons, just a light machine gun. Instead, it has two ATGM launchers that are reloaded separately and fire upwards with missiles that are guided by mouse. Missiles are slow and relatively easy to control, as long as they are visible by the ATGM camera. You can only directly control the missile last fired.

The main point is the player can fire while being completely concealed and fire on people that try to hide from the Swingfire, whether they are hiding behind rocks (vertically) or houses (horizontally). You just need to "swing" the missile into their cover, which surprises people who expect long-range ATGM sniping from 2 km range like other ATGMs. But another side of that is, it's very easy to see the missiles coming and hide from them, making it twice as hard to hit enemies unless the player can judge the distance well and drop missiles right on them.

Because of that, the main purpose of the Swingfire is either control of hills, castles, streets and so on to block enemy offensive pushes or assist in team assaults by hiding behind teammates, walls or rocks and blasting enemies out of cover.

General info

Survivability and armour

Smoke grenades
Creation of a smoke screen in front of the vehicle
Armourfront / side / back
Hull12 / 12 / 10
Turret10 / 10 / 10
Crew3 people
Visibility100 %

The Swingfire's hull can be easily damaged by anything, as it has almost no armour. This leads people to think that it is useless in close combat, and ignore it. Despite that, most of the hull can sustain 7.62 mm MG fire. However, avoid exposing the right side of the tank's hull, as the crew sits on that side and a short spray of 12.7 mm MG there will destroy the tank immediately.

The area around launchers have the least armour on the tank, so even shrapnel of MG rounds hitting the launcher can accidentally injure the commander and the loader. If the tank got set on fire, it will likely take long time until fire reaches ammunition rack, in the best case scenario allowing to fire back 6 times until the engine melts completely and sets the ammo rack off. With some luck, low calibre sabot shells can be blocked by the engine, but that probability isn't that high.

The Swingfire can be easily overpressurized with explosives, but HEAT hitting missile launcher sometimes fails to destroy it. HE can obliterate it even with a close miss, which can be exploited to defeat the Swingfire when it stands too close to the edges of its cover.

When fighting on hilly maps, be exceptionally vigilant about hiding the camera podium, as it is much higher than the rest of the hull. In Arcade, some people may drop HESH or HEAT projectiles over hill right into it, resulting in crew knock-out. The use of solid cover for the launchers and the hull at close ranges or longer than 1 km range is often required, particularly on hilly maps.

Armour type:

  • Rolled homogeneous armour
Armour Front Sides Rear Roof
Hull 12 mm (42°) Front glacis
10 mm (38°) Lower glacis
12 mm Top
12 mm (13°) Bottom
10 mm (2°) 10 mm
Turret 10 mm 10 mm 10 mm 12 mm

Notes:

  • Suspension wheels and tracks are 15 mm thick, though the torsion bars are 10 mm thick.

Mobility

Speedforward / back
AB57 / 10 km/h
RB and SB53 / 9 km/h
Number of gears6 forward
1 back
Weight15.9 t
Engine power
AB458 hp
RB and SB240 hp
Power-to-weight ratio
AB28.8 hp/t
RB and SB15.1 hp/t
Game Mode Max Speed (km/h) Weight (tons) Engine power (horsepower) Power-to-weight ratio (hp/ton)
Forward Reverse Stock Upgraded Stock Upgraded
Arcade 57 10 15.9 341 458 21.45 28.81
Realistic 53 9 212 240 13.33 15.09

The mobility of the Swingfire is average. It can't retreat fast backwards and it has very poor turn rate when stock. If someone flanks at close range, the Swingfire won't be able to turn the launcher in time. It can keep up with some heavy and medium tanks, when going forward.

Modifications and economy

Repair costBasic → Reference
AB5 120 → 6 681 Sl icon.png
RB5 163 → 6 737 Sl icon.png
SB8 549 → 11 156 Sl icon.png
Total cost of modifications85 900 Rp icon.png
146 400 Sl icon.png
Talisman cost2 100 Ge icon.png
Crew training86 000 Sl icon.png
Experts300 000 Sl icon.png
Aces1 200 Ge icon.png
Research Aces720 000 Rp icon.png
Reward for battleAB / RB / SB
150 / 210 / 250 % Sl icon.png
196 / 196 / 196 % Rp icon.png
Modifications
Mobility Protection Firepower
Mods new tank traks.png
Tracks
Research:
6 100 Rp icon.png
Cost:
9 800 Sl icon.png
170 Ge icon.png
Mods new tank suspension.png
Suspension
Research:
6 800 Rp icon.png
Cost:
11 000 Sl icon.png
190 Ge icon.png
Mods new tank break.png
Brake System
Research:
6 800 Rp icon.png
Cost:
11 000 Sl icon.png
190 Ge icon.png
Mods new tank filter.png
Filters
Research:
11 000 Rp icon.png
Cost:
18 000 Sl icon.png
310 Ge icon.png
Mods new tank transmission.png
Transmission
Research:
9 900 Rp icon.png
Cost:
16 000 Sl icon.png
280 Ge icon.png
Mods new tank engine.png
Engine
Research:
9 900 Rp icon.png
Cost:
16 000 Sl icon.png
280 Ge icon.png
Mods tank tool kit.png
Improved Parts
Research:
4 000 Rp icon.png
Cost:
9 800 Sl icon.png
170 Ge icon.png
Mods extinguisher.png
Improved FPE
Research:
4 400 Rp icon.png
Cost:
11 000 Sl icon.png
190 Ge icon.png
Mods tank reinforcement uk.png
Crew Replenishment
Research:
11 000 Rp icon.png
Cost:
18 000 Sl icon.png
310 Ge icon.png
Mods smoke screen.png
Smoke grenade
Research:
9 900 Rp icon.png
Cost:
16 000 Sl icon.png
280 Ge icon.png
Mods night vision device.png
NVD
Research:
6 100 Rp icon.png
Cost:
9 800 Sl icon.png
170 Ge icon.png

Armaments

Night vision device
Improves visibility by enhancing natural light or active illumination.

Main armament

Ammunition14 rounds
Reloadbasic crew → aces
0.6 → 0.5 s
Fire on the moveup to 5 km/h
Main article: BAe Swingfire
170 mm BAe Swingfire ATGM (x2) Turret rotation speed (°/s) Reloading rate (seconds)
Mode Capacity Vertical Horizontal Stabilizer Stock Upgraded Full Expert Aced Stock Full Expert Aced
Arcade 14 N/A N/A N/A 15.5 15.5 18.9 20.9 22.2 13.00 11.50 10.60 10.00
Realistic 10.5 10.5 12.8 14.1 15.0
  • The turret is represented by a camera to the right of missile launchers. Improving its rotation speed affects the responsiveness of missile, whether you see or don't see the target directly.
  • The camera can only turn 90 degrees in each direction, so it cannot automatically control missiles behind the Swingfire. It still can send commands to the missiles, allowing to hit targets manually, though it is challenging.
  • The inability to see the target and missile at same time disables automatic guidance system, forcing you into manual mode.

The Swingfire is a giant box, which has two enormous launcher tubes on its left, that face upwards and a big control camera near to them, which is also your gunner's camera. Whenever needed to fire, you want that camera to see as much as possible, as losing the sight of the target will make you lose easy control over missiles. Without direct sight on target, you will only be able to control them with mouse movements, but not with the targeting reticle point. If sight of the missile is lost, control is lost entirely. You also can only initially launch missiles forward.

People may think, that your missiles inside launchers explode violently when shot by MG, but it won't destroy you even if that happens. Still, the launchers are very fragile and they are a large target, that can be easily shot by HE, instantly destroying the tank in the process. For that reason alone, an enemy might stop and stare at your cover, waiting for your move, like with most ATGM tanks. What they generally don't realize, is that you don't even have to drive out of your cover or into their territory to attack them.

Since your launcher faces upwards, to attack an enemy you just have to expose your camera or even nothing at all, and send missile over cover straight at them. If they are at least 150 m away and the camera has a direct sight on the enemy, the missile will correct itself back on target without hitting the ground, otherwise, you might need to aim in specific ways, or manually correct it, by pulling mouse to steer it away from obstacles or ground, depending on the missile flight path. If a target is too close (closer than 100 m away), simply aim into the ground in between of the Swingfire and them, then correct missile manually after launch to achieve a hit. If an enemy is attempting to ram the Swingfire directly, simply aim below missile carrier itself to land a fatal turret shot.
The custom-made sights provides great aid when mastering the Swingfire; notably with the characteristic initial drop of the missile!
To download it, proceed to the Media section.

Because of how the launcher and the camera work, missiles cannot be fired precisely backwards or close to your sides, even though missiles can turn that hard. If your target is far enough, you can try and use Third Person view to force missile into sharp turn behind you. If you can't allow yourself to miss - make sure your opponent is at least 100 m away from you, turn your hull until you can aim the camera directly at your enemy in sniper mode, then launch a missile in opposite direction and only then turn the camera towards the enemy and aim straight at them in sniper mode. Firing such shot without sniper aim is only as precise as calling artillery strike, which makes hitting people behind you more of a miracle than skill since you cannot control missile after it went behind you, and it's not guaranteed, that it will be aimed straight at them, or just fly into space by that point.

Each launcher has 7 missiles, that reload separately. In AB, if you spent entire magazine for one launcher, the game will rearm exactly that magazine completely. In RB (Realistic Battles) you can only rearm at capture points. Rearms can happen for both launchers at the same time, but you only see one timer at once.

Use of custom made sight

The Swingfire can be a complicated vehicle to master due to the very different playstyle from what is presented in the early British ground forces tree. One of the most complicated issues to master for some British tank commanders are the aiming and effective use of the Swingfire ATGM at close distances. Fortunately, things like the custom made sights can drastically improve the player's performance in combat.

Ammunition

Penetration statistics
Ammunition Type of
warhead
Penetration @ 0° Angle of Attack (mm)
10 m 100 m 500 m 1,000 m 1,500 m 2,000 m
BAe Swingfire ATGM 535 535 535 535 535 535
Missile details
Ammunition Type of
warhead
Velocity
(m/s)
Range
(m)
Projectile
mass (kg)
Fuse delay
(m)
Fuse sensitivity
(mm)
Explosive mass
(TNT equivalent) (kg)
Ricochet
0% 50% 100%
BAe Swingfire ATGM 185 4,000 25 0.05 0.1 4.55 80° 82° 90°
  • BAe Swingfire missiles are specifically designed for cover-busting and attacking out of unexpected places, so it's initially slower than most ATGMs out there, and its max speed isn't very impressive.
  • Missile tends to fall down after flying about 150 m forward, so if you aren't attacking someone in their cover, but need to fire relatively close (about 250 m) you might need to aim higher, to avoid dropping it on the ground.
  • In case you are firing at range <150 m, missile will fly roughly double the distance you aimed for. (so if you fire at target that stands in 50 m range, you should aim at ground before it in 25 m .)
  • Dead zone of launcher is ~5 m, but even if someone got that close to you, it's still possible to aim reticle right below the tank, to force missile to drop straight down, resulting in generally fatal turret roof shot, assuming you hit the target and it doesn't ricochet.
  • Despite its low speed, this model of BAe Swingfire is one of few ATGMs that can fly for 4 km. This means, that the Swingfire can snipe across the map and even attack ATGM helicopters in hover mode, even if they are out of map bounds, because it has 4 km range and they like to sit at about 3 km. Beware of instant retaliation, since maximum speed of this missile is also below average, and helicopter pilot must be very busy to not notice your attack, dodge it and attempt to fire back at you.

Ammo racks

Ammo racks of the Swingfire
Full
ammo
Visual
discrepancy
14 No

Note:

  • It is not possible to select how many missiles to bring into battle.

Machine guns

Ammunition2 500 rounds
Belt capacity250 rounds
Reloadbasic crew → aces
10.4 → 8.0 s
Fire rate500 shots/min
Main article: L3A1 (7.62 mm)
7.62 mm L3A1
Mount Capacity (Belt) Fire rate Vertical Horizontal
Pintle 2,500 (250) 500 -5°/+25° ±45°

The small calibre of the L3A1 machine gun makes it largely ineffective against all armoured vehicles but the ones with an open compartment exposing any crew members. It still can be used to ping targets as a rangefinding help or to mow down minor obstacles blocking the line of sight. This cleaning with the light machine gun is important part of the gameplay on ATGM carriers, as bushes and small fences are likely to trigger the ATGM upon contact. Wasting the missile and probably exposing the position of the Swingfire to the enemy team- Another use is against low-level flying aircraft.

Usage in battles

Combat tactics

Whatever the tankers do, always try to hide behind something, whether it is the terrain, allies, or indestructible obstacles.

The most important quirk of the missiles is that when the player targets someone on the same ground levelling and they are too close, the missile initially drops really hard to ground and may detonate.

To avoid this, aim the reticle a bit higher than the target, at least initially. Alternatively - have the high ground, which will solve this problem, but adds the problem of firing precisely. In need to duel someone at 100 m or closer, the players can overwork the characteristic of the missile's initial drop and aim the reticle into the ground in third person view. This will force the missile to land in front of the Swingfire; any more precise firing will require practice.
The only thing limiting the Swingfire to fire above cover is the camera elevation angles, is possible to fire without even exposing the camera!
To fire at the enemy in cover or above hills, simply fire above it, when the missile is actually near to them or above cover, aim straight at the enemy or below them, depending on how close missile is to them. It is possible to do so from long range. In case the aim calculations are not precise, just expose the camera and aim straight at them in sniper mode; the constant back-up missile will provide a second chance against any enemy thinking it was just one ATGM then the reload.

After a bit of practice of this technique, the player is likely to hit the target. The further away is the cover, the sharper the turn the missile can make. For point-blank fights in urban areas, it is usually better to face the passageway or the corner with the camera before firing, an praise to the namesake, the Swingfire.

  • If the Swingfire must fire from behind a building or a high rock, that makes it unable to fire at them directly or from above, first take around 100 m of distance from the corner of their cover, then fire a bit away from it and force the missile to take a sharp horizontal turn towards the enemy. If done right, the enemy will get hit by a missile in their side.
  • Alternatively, thanks to the low acceleration of the missiles, is possible to wiggle the missile in between houses or walls; even if the launcher faces an obstacle and as long as you have control of the camera at least 40 m away from the target.

The Advance to the Rhine location presents an adequate example for both of these attacks.

An example of why should never fire secondary launcher immediately: another enemy nearby the first target.
Consider curving missiles horizontally, that way hitting enemies behind buildings and in uncomfortable situations like this.

It's very tempting to fire the second launcher immediately in case of a miss, but if alone the player should let the first launcher to reload at least half-way before firing again, so the Swingfire won't get overrun if missing again. If they are already rushing towards the Swingfire - fire at will. This is very important against fast targets like the commonly found German tanks Leopards and Ru 251 or the Soviet T-54/55 (Family).

In RB, it's possible to destroy planes with missiles, achieving "unguided" reward. It's not recommended to do in AB, since planes there can do unrealistic manoeuvres without damaging themselves into the ground or ripping their wings off. Helicopters can be shot down with 4 km range ATGM, but remember that Swingfire missile is the rather slow and cautious pilot will just dodge the shot. Soviet helicopters like the Mi-4AV provide a rather easy frag thanks to their huge size; their Falanga ATGM is also ranged up to 4 km therefore the possibility of sniping it with the Swingfire is possible.

Even if an enemy tank is lightly-armoured and can be overpressurized, try to treat them as normal targets, as a HEAT warhead can only instantly destroy such tanks if it hit them in a weak spot. Be also aware, that all vulnerable SPGs, most light tanks and SPAAs can instantly destroy the Swingfire with basic suppressive fire. Do not leave cover.

If an enemy is behind smokes:

  • In AB try to fire closer to ground, that way at least de-track it, which is crucial in case of fast tanks. Try to disable the gun for slower tanks, but be aware that 12.7 mm MG like the Soviet DShK (12.7 mm) can still destroy the Swingfire.
  • In RB fire at turret or centre of the hull first regardless, because even if missile takes out their gun barrel and the crew remains alive within the vehicle, the enemy becomes very uncomfortable with chances of jamming their gun completely, along with long repair times.
Specific enemies worth noting

Soviet tanks ▂ - Aim for hull centre or right side at their ammo rank inside fuel tanks, as hits there are usually deadly and their round turrets have way too high ricochet chance. If you can't angle the missile right, at least hit their tracks when they try to escape, so they turn over and expose their side to your fast follow-up shot, or become unable to chase you, while your second launcher reloads. If firing at the turret - aim for the gun mantled sides, thus trying to destroy MG operator, as their 12.7 is lethal for the Swingfire. If it's too late and they are already reaching point-blank range - attempt to fire at the rooftop with a curved missile; if they carry enough ammunition, they will blow up.

German MBTs ▀ - They rely less on machine guns and more on moving fast. Spook them away with single missile shot, remember how the rocket was aimed. After that, if you missed, keep the second one just in case if they try to rush. At the worse case, you will disable just the driver but thanks to the great damage of the Swingfire ATGM, a hit in the upper hull or the turret is often enough to finish the entire crew.

Heavy tanks - They will usually be afraid of the Swingfire, but if they manage to call-in medium tank friends, and your crew is not skilled enough, it is better to retreat, as it's not easy to fight both heavy and medium at same time on the Swingfire, because heavy tanks can just penetrate your armour easily or even suppress your crew with machine gun only, and most medium and light tanks can flank the missile launcher easily. You just cannot reload fast enough. As a last resort, high ground can be used combined with attempts to break their tracks or transmission and to set their engines on fire to delay and slowly destroy them.

Fences and trees - If a street is full of high fences, it's not worth defending that street. Destroy them all with your machine gun. If they are solid - the Swingfire can't do anything about it so better reposition. Trees also obscure the vision and are almost impossible to clear in the Swingfire. If you use them as cover, do not fire your launchers in front of them as it will detonate and waste ammo.

ATGM carriers - Avoid attacking other ATGM carriers directly to the line-of-sight; use the fact, that you can fire over tall obstacles in front of your carrier and they usually cannot because of their extremely fast missiles. Be wary of certain ATGM carriers like the Japanese type 60 ATM, as they can do the same to you. Destroy them before they can reach you or try to curve missiles into your cover, as your hull is very long and tall, which makes it vulnerable to top-down attacks of other vertical ATGM.

Planes - Drive backwards or frontally into the Swingfire's smoke screen and with some luck they won't hit the ammo or the tank commander in the back. The best defence is to reposition situationally based on the enemy air superiority. If gaining notoriety in a area of the map, proceed to retreat and avoid sticking around too much. If needed, attempt to use the Machine gun and score some hits in the plane. Call the treat to any allied aircraft or nearby anti-air tank!

Counter-tactics

The Swingfire cannot really damage vehicles that are directly behind it or directly on its sides. The closer you are to it, while being behind it, the harder it is for the gunner to pull off a miracle shot. Explosives and SPAA guns destroy it easily. Same with artillery, if the Swingfire is stuck facing its cover.

Being in front of the Swingfire in 200 m range is a very bad idea, regardless of your cover, as if its launchers will reload in time, you can suddenly be destroyed. If you have to do that, at least face it with frontal armour and never show the sides, so missiles have a harder time destroying the tank. Having tall cover further improves your chances of survival. Forcing it to move around by dropping artillery on it or its retreat route before pushing is also a good idea. In the worst-case scenario - try to shoot down its ATGM with your MG. Don't think, that it cannot fire forward in 30 m range, it actually can. It's just very hard to do accurately. Any solid obstacle can stop missiles, and trees make it hard to see you, so the more things there are between you and the Swingfire, the better.

If you want to destroy it with machine guns from the front - fire straight in middle around the place where the camera is, then spray the bottom of it. It's more likely to break something important or disable the gunner (commander) that way.

If the Swingfire is driving around and going on a destruction spree, it means the team underestimated its operator. Don't repeat someone's mistake and attack with everything you've got before is too late - the Swingfire can destroy quite a few tanks, until it depletes all the ATGMs, don't dismiss it for that reason alone.

Pros and cons

Pros:

  • Missiles are very agile in both vertical and horizontal plane, they can even do 180 degree turns
  • Can blast enemy out of their own cover by firing over or around it, without having to deal with them frontally; even without direct sight at close ranges
  • Sniper setup and missile effective range allows the Swingfire to attack from almost anywhere on the map, while staying relatively hidden
  • Together the launchers can reload faster than medium tanks; one of them can be kept to deter heavily armoured opponents - Something some other ATGM tanks like the IT-1 can't do
  • Has significantly more ammo than Type 60 ATM, which allows it to hold off sieges in a less risky and more confident manner
  • Provides a different playstyle from the regular MBT configuration
  • Missiles are easier to control and deliver than the latter Striker, camera placing grants more flexibility
  • The sight is above the tank and the ATGM launchers are angled upwards meaning that you can fire while entirely behind cover with only your sight visible

Cons:

  • Complicated to know how long a reload will be, players have to guess by looking at launcher's animation
  • Missiles are rather slow on launch and accelerate slowly, which can be a problem at long range
  • Missiles launchers are static upwards with limited horizontal camera guidance, difficult to aim at close ranges; fast opponents can get close or behind the Swingfire
  • Sluggish and unarmoured, possible to get outflanked and shot down by medium or light tanks, or to get suppressed by artillery strike or aerial attacks
  • Tall vehicle, vulnerable to overhead shots in the launchers, even more so in Arcade Battles, it is generally easier to destroy than the low-height RakJPz 2 when using just the terrain as a cover
  • Does not have Night Vision for sniper scope, during the night it will be at a severe disadvantage at long range against most rank VI tanks

History

Developed in the early 1960s, the "Swingfire" was a relatively slow missile that would allow directional changes of 45 degrees on the horizontal and 20 degrees of elevation which created the apt name. It was a 27 kg (60 pounds), 1 m (3.5 ft) long rocket with range of 4 km (2.5 miles), capable of penetrating up to 500 mm of enemy armour. The FV 438 was a British light anti-tank vehicle, equipped with the wired-guided "Swingfire" missile. The 438's primary weapon was launched through two Swingfire ATGM launchers, or bins, which could be reloaded from inside the vehicle. Apart from the 2 missiles stored in launchers, it could carry up to 12 additional reloads. Its only secondary armament was a 7.62 mm M1919 General Purpose Machine-Gun.

The FV 438 Swingfire was based on the FV432 armoured personnel carrier, a vehicle that was very lightly armoured - it was meant to deliver its crew to combat, while keeping it protected from machine-gun fire. This platform was used for several other modifications amongst which is its sister vehicle already in game: the Falcon. The FV 438 "Swingfire" was powered by a Rolls-Royce K60 multifuel engine with maximum of 240 horsepower. It was a quick and nimble vehicle with weight slightly exceeding 16 tons, which could reach up to 52 km/h (32 mph).

Although the Swingfire missile was used during various engagements on other platforms, the 438 carrier was never used in combat and was decommissioned in the 90s. The vehicle was built in rather smaller numbers.

Media

Sights
Skins

See also

Other vehicles of similar configuration and role

External links


Britain tank destroyers
Infantry tank derivatives  Archer · Gun Carrier (3-in)
Light tank derivatives  Alecto I
M10 Achilles  Achilles · Achilles (65 Rg.)
Centurion derivatives  FV4005 · Conway
ATGM  Swingfire · Striker
Other  Tortoise · ▄M109A1
Canada  QF 3.7 Ram · ADATS (M113)
South Africa  G6 · ZT3A2