Type 89

From War Thunder Wiki
Jump to: navigation, search
Rank VI USA | Premium | Golden Eagles
A-10A Thunderbolt (Early)
This page is about the Japanese light tank Type 89. For equipment of the same adoption year, see Type 89 (Disambiguation).
jp_type_89.png
GarageImage Type 89.jpg
ArtImage Type 89.png
Type 89
AB RB SB
9.0 9.0 9.0
Class:
Research:94 000 Specs-Card-Exp.png
Purchase:520 000 Specs-Card-Lion.png
Show in game

Description

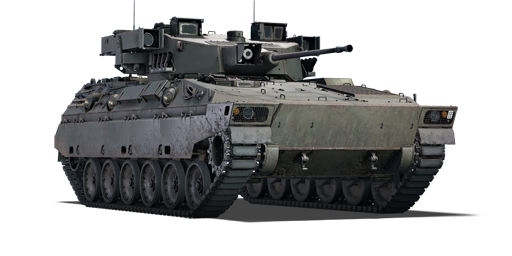
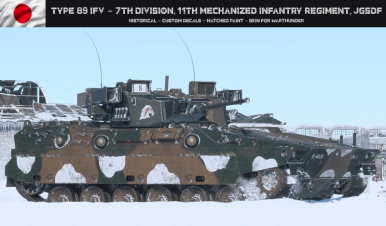
The Type 89 IFV (89式装甲戦闘車) entered service with the JSDF in 1989. It supplements the APCs that preceded it, such as the Type 60 APC, Type 73 APC and other wheeled APCs, which were vulnerable without tank support. The Type 89 IFV was developed from 1980 to 1989, when it was officially adopted. It was meant to work with the Type 90 tank in different regions, but due to budget constraints and high cost of the Type 89 IFV, only about 120 vehicles were produced by 2014 out of an order for 300, mainly deployed in Hokkaido.

The Type 89 IFV was introduced in Update 1.85 "Supersonic". It can engage various targets with its Oerlikon KDE (35 mm) and its heavy Type 79 Jyu-MAT missiles. It is best suited for hit-and-run tactics, using its speed and smoke grenades to avoid direct fire and attack the weaker sides of enemy armour with APDS rounds. The Type 89 IFV also has a laser warning system that warns the player of incoming laser-guided missiles.

General info

Survivability and armour

Smoke grenades
Creation of a smoke screen in front of the vehicle
LWS
Notifies about the vehicle's exposure to laser emissions
Armourfront / side / back
Hull35 / 15 / 15
Turret35 / 20 / 15
Crew3 people
Visibility88 %

While the Type 89's armour consists of rolled homogeneous armour, it is not any better than modern light tanks of other factions, which use double or even triple the amount of aluminium to give roughly the same amount of protection. This means that its sides and even angled turret will still be vulnerable to all autocannons and will trigger overpressure damage easily if hit in a weak spot, such as the back half of the tank.

The armour profile can be closely compared to Merkava Mk.1, it has a long hull with turret on the back, and the entirety of it is sloped as much as possible. This means that inaccurate frontal hull shots will likely bounce and this tank should always face the opponent. Unfortunately, due to how big the turret is, the bounced shell might actually fly straight into it, and there aren't any special shields or additional armour for the turret crew on this tank.

Internal module placement is rather smart on paper, with the driver and MG operator hiding on the right side of the tank, and main weapon crew hiding at the back along with ammunition, while the rest of the tank is one giant engine compartment, sealed off with a 5 mm RHA screen, meaning that most hull shots should not be able to deal overpressure damage. In reality, the means of protecting the crew and critical weak points are insufficient. Most notably, the driver isn't completely sealed away from tank's front and the turret, meaning that any chemical shot coming to suspension from the right can overpressure the entire tank. Direct artillery hits will usually destroy the tank instantly. Frontal shots also tend to destroy the gun breech, rendering the main gun useless.

Due to overall low thickness of armour Type 89 can get overmatched. Whenever the tank hull side is even slightly opened, it will get easily penetrated by big guns, the armour is thick enough to trigger APHE fuses and even if it's a slow 19 mm fuse it will trigger off hitting the engine and RHA screen, then cause violent explosions next to ammo rack. Pure AP shells even of a small calibre autocannon will fly straight through the entire engine compartment, likely hitting the turret crew or ammo rack in the very back of the tank. It is also possible to lose the entire tank crew to a single coaxial autocannon spray from the right side, as nothing is protecting the driver there.

The one scenario in which the sealed compartment can truly work against kinetic shells is when the Type 89 is driving around the town, or hiding from snipers behind buildings, and someone suddenly shoots engine compartment into direction opposite from the crew, then enemy APHE may simply get stuck there, doing reduced damage to the turret crew. This does not make the situation any better though, as without team help or a very unlikely ATGM counterattack, Type 89 will still get repeatedly set on fire until it explodes.

Recommendations: Keep your opponents in front of you, if you can't - at least keep them on your left to reduce chances of an overpressure damage. Avoid being shot directly by 120+ mm shells. Do not needlessly taunt enemy SPAA. In close quarters you can be extremely aggressive and destroy enemy weapon or gunner as soon as possible. Otherwise try to scout enemies and hope to fire first or that there is a sniper to cover your back.

Armour Front (Slope angle) Sides Rear Roof
Hull 15 mm - 20 mm (81°) Upper Glacis
5 mm (81°) Ventilation
35 mm (26°-57°) Lower Glacis
20 mm (0°-50°) Sponson Front
20 mm Upper
15 mm (Base) +10 mm (Sideskirts) Lower
15 mm 5 mm - 20 mm
Turret 35 mm (11°-12°) Turret Front Sides
25 mm + 25 mm Gun mantlet
20 mm 15 mm (Base) + 5 mm (Storage Rack) 10 mm
Cupola 10 mm

Notes:

  • Fenders, Storage - 5 mm
  • Turret Ring - 25 mm
  • Tracks - 15 mm
  • Suspension - 10 mm
  • There are 10 mm or armour protection between the engine compartment and the crew compartment inside the vehicle

Mobility

Speedforward / back
AB78 / 48 km/h
RB and SB71 / 43 km/h
Number of gears9 forward
4 back
Weight26.5 t
Engine power
AB1 145 hp
RB and SB600 hp
Power-to-weight ratio
AB43.2 hp/t
RB and SB22.6 hp/t
Game Mode Max Speed (km/h) Weight (tons) Engine power (horsepower) Power-to-weight ratio (hp/ton)
Forward Reverse Stock Upgraded Stock Upgraded
Arcade 78 48 26.5 930 1,145 35.09 43.21
Realistic 71 43 531 600 20.04 22.64

On hard, flat terrain, the Type 89 will easily keep pace or out-speed many other vehicles due to its reasonable power-to-weight ratio of 23 hp/t.

On soft, uneven or hilly terrain the Type 89 loses a lot of its speed advantage. This is due to the fact that the gearbox only provides 4 separate forward speeds. Due to the long gearing the Type 89 will often find itself unable to climb hills in gear 2 and will have to change to gear 1, which provides a top speed of just 9 km/h for hill-climbing. This means the Type 89 is often less mobile on hilly terrain than medium tanks. This problem can be mitigated to some extent by maintaining a good amount of speed (30+ km/h) and not stopping when travelling up hills.

As with Type 60 SPRG (C), reverse gear is much more responsive and will allow you to manoeuvre and retreat back around the corner during combat - use it if tank was forcibly stopped.

Modifications and economy

Repair costBasic → Reference
AB3 215 → 5 381 Sl icon.png
RB3 439 → 5 756 Sl icon.png
SB4 117 → 6 891 Sl icon.png
Total cost of modifications155 300 Rp icon.png
259 400 Sl icon.png
Talisman cost2 600 Ge icon.png
Crew training150 000 Sl icon.png
Experts520 000 Sl icon.png
Aces2 100 Ge icon.png
Research Aces950 000 Rp icon.png
Reward for battleAB / RB / SB
130 / 170 / 210 % Sl icon.png
220 / 220 / 220 % Rp icon.png
Modifications
Mobility Protection Firepower
Mods new tank traks.png
Tracks
Research:
11 000 Rp icon.png
Cost:
17 000 Sl icon.png
490 Ge icon.png
Mods new tank suspension.png
Suspension
Research:
6 300 Rp icon.png
Cost:
9 900 Sl icon.png
280 Ge icon.png
Mods new tank break.png
Brake System
Research:
6 300 Rp icon.png
Cost:
9 900 Sl icon.png
280 Ge icon.png
Mods new tank filter.png
Filters
Research:
8 400 Rp icon.png
Cost:
13 000 Sl icon.png
370 Ge icon.png
Mods new tank transmission.png
Transmission
Research:
9 100 Rp icon.png
Cost:
14 000 Sl icon.png
400 Ge icon.png
Mods new tank engine.png
Engine
Research:
9 100 Rp icon.png
Cost:
14 000 Sl icon.png
400 Ge icon.png
Mods tank tool kit.png
Improved Parts
Research:
3 300 Rp icon.png
Cost:
17 000 Sl icon.png
490 Ge icon.png
Mods extinguisher.png
Improved FPE
Research:
1 900 Rp icon.png
Cost:
9 900 Sl icon.png
280 Ge icon.png
Mods tank reinforcement jp.png
Crew Replenishment
Research:
8 400 Rp icon.png
Cost:
13 000 Sl icon.png
370 Ge icon.png
Mods smoke screen.png
Smoke grenade
Research:
9 100 Rp icon.png
Cost:
14 000 Sl icon.png
400 Ge icon.png
Mods new tank horizontal aiming.png
Horizontal Drive
Research:
11 000 Rp icon.png
Cost:
17 000 Sl icon.png
490 Ge icon.png
Mods tank cannon.png
Adjustment of Fire
Research:
6 300 Rp icon.png
Cost:
9 900 Sl icon.png
280 Ge icon.png
Mods counterMeasures.png
LWS/LR
Research:
6 300 Rp icon.png
Cost:
9 900 Sl icon.png
280 Ge icon.png
Mods airstrike.png
Airstrike
Research:
6 300 Rp icon.png
Cost:
9 900 Sl icon.png
280 Ge icon.png
Mods new tank vertical aiming.png
Elevation Mechanism
Research:
8 400 Rp icon.png
Cost:
13 000 Sl icon.png
370 Ge icon.png
Mods thermal sight.png
NVD
Research:
8 400 Rp icon.png
Cost:
13 000 Sl icon.png
370 Ge icon.png
Mods scout streak.png
Scout UAV
Research:
8 400 Rp icon.png
Cost:
13 000 Sl icon.png
370 Ge icon.png
Mods art support.png
Artillery Support
Research:
9 100 Rp icon.png
Cost:
14 000 Sl icon.png
400 Ge icon.png
Mods scouting.png
Improved optics
Research:
9 100 Rp icon.png
Cost:
14 000 Sl icon.png
400 Ge icon.png
Mods tank ammo.png
152mm_jp_type_79_ASM_ammo_pack
Research:
9 100 Rp icon.png
Cost:
14 000 Sl icon.png
400 Ge icon.png

Armaments

Laser rangefinder
Reduces the error and increases the maximum measurable distance of the rangefinder
Night vision device
Improves visibility by enhancing natural light or active illumination.
Thermal imager
Allows to see thermal radiation in the infrared range day and night

Main armament

35 mm Oerlikon KDE cannon
Two-plane stabilizer
Reduces the swing of the gun in two planes while moving
Autoloader
Automatically feeds projectiles into the breech. The speed does not depend on the skills of the loader
Ammunition251 rounds
First-order34 rounds
Reload0.3 s
Vertical guidance-10° / 35°
Main article: Oerlikon KDE (35 mm)

The Type 89 is equipped with a 35 mm Oerlikon KDE autocannon, which is similar to the KDA variant used by the Gepard, the Type 87, and the Chieftain Marksman, and is widely considered to be one of the most effective guns in regards to damage output and reliability. This is due to their moderate calibre and rate of fire: 35 mm is the largest of the small autocannons which allows it to have a much higher rate of fire than any 40 mm or 57 mm system.

The difference between them is that KDE cannon fires slower than KDA, but it uses tank-specific ammunition instead. This particular tank also has an autoloader magazine of 34 shells. Each shell is reloaded for about 5 seconds when not firing, unless you rearm on the capture point, which injects shells directly into the magazine every ~0.1 sec regardless of firing, which allows the gun to fire forever.

It is very important to remember that even 3-5 direct APDS hits to a cannon barrel can neutralize almost any medium tank Type 89 can face, and should anything impenetrable suddenly attack, one can just destroy their gun to avoid being shot at. The APDS can also easily hit tanks from further than 1.2 km away, so it's worth looking around for unaware opponents with their sides exposed.

Overall, the autocannon allows the Type 89 to deal with most lightly armoured vehicles in the game. The APDS ammunition allows it to deal with Main Battle Tanks from the side, sometimes even from the front, though this should be carefully planned, as running out of autoloader ammo will almost definitely result in Type 89's demise.

The tank can use conventional HE to attack helicopters, if it must. Remember to use the laser rangefinder to target them quicker when it's researched. HE can also be used to demolish buildings, but every building piece will take at least 3 shots, which severely undercuts already limited autoloader ammo pool, therefore it should only be done when rearming from a capture point and only if you want to see and fire over cover (for example, to use the Type 79 ASM efficiently).

Whenever you see that the main gun can't deal with an enemy target, or someone caught you off guard, consider using the ATGMs instead.

35 mm Oerlikon KDE Turret rotation speed (°/s) Reloading rate (seconds)
Mode Capacity Fire rate Vertical Horizontal Stabilizer Stock Upgraded Full Expert Aced Stock Full Expert Aced
Arcade 251 200 -10°/+35° ±180° Two-plane 28.6 39.5 48.0 53.1 56.5 0.30 0.30 0.30 0.30
Realistic 17.9 21.0 25.5 28.2 30.0

Ammunition

Penetration statistics
Ammunition Type of
warhead
Penetration @ 0° Angle of Attack (mm)
10 m 100 m 500 m 1,000 m 1,500 m 2,000 m
DM23 APDS 127 125 118 110 102 95
DM11A1 HE* 11 11 9 8 6 5
Shell details
Ammunition Type of
warhead
Velocity
(m/s)
Projectile
mass (kg)
Fuse delay
(m)
Fuse sensitivity
(mm)
Explosive mass
(TNT equivalent) (g)
Ricochet
0% 50% 100%
DM23 APDS 1,400 0.38 - - - 75° 78° 80°
DM11A1 HE* 1,175 0.55 0.1 0.1 204 79° 80° 81°

Ammo racks

Ammo racks of the Type 89
Full
ammo
1st
rack empty
2nd
rack empty
3rd
rack empty
4th
rack empty
5th
rack empty
Visual
discrepancy
251 163 (+88) 103 (+148) 69 (+182) 35 (+216) (+250) No

Notes:

  • Racks 1 and 2 are modeled as sets of 2 rounds. The rounds disappear from the rack only after you've fired both rounds in the set.
  • Racks 3 and 4 are modeled as sets of 4 rounds; they disappear from the rack only after you've fired all rounds in the set.
  • Rack 5 is modeled as individual rounds which disappear after having been shot or loaded.
  • Rack 5 (autoloader magazine) is a first stage ammo rack. It totals 34 rounds.
    • This rack gets filled first when loading up the tank and is also emptied first.
    • As the Type 89 is equipped with an autoloader, manual reloading of the gun is not possible.
    • Once the autoloader magazine has been depleted, you can't shoot until the loader has restocked the autoloader with at least one round. The restocking time is longer than the normal reload time of the gun, so take this into account when playing.
    • Simply not firing when the gun is loaded will move ammo from racks 1 to 4 into rack 5. Firing will interrupt the restocking of the ready rack.

Additional armament

Type 79 ATGM
Ammunition4 rounds
Belt capacity2 rounds
Fire rate120 shots/min
Vertical guidance0° / 20°
Fire on the moveup to 5 km/h
Main article: Type 79

The Type 79 default ATGM has around 700 mm flat penetration at any range and has start velocity of 200 m/s, while retaining the high explosive mass of the Type 64 MAT, making it one of the better ATGMs of the rank. This ATGM can deal with most tanks from the front, but be sure to avoid hitting modern NATO NERA composite armour, as these composite armours will minimise the damage done or even negate it entirely. When facing tanks with active ERA screens like M60A1 RISE (P), attack the screen with the cannon first if possible, as such ERA plating may reduce the damage taken by the hostile tank and force you to use both missiles to take them down.

Two missile launchers are located on the sides of the turret, with two reserve missiles being stored in the back of the hull (four total). Due to their placement, they only really arrive at crosshair location if the target is over 500 m away, so use them on targets which are away from the tank and practice aim in test drive to be able to use them at melee ranges, instead of relying on the targeting reticle. The second missile can be immediately fired after the first one, but firing it will cut off guidance for the first one, so only do this if you are sure it's on the correct course. Missile reload is only possible after both missiles are fired.

Type 79 ASM is a proximity HE modification of the Type 79 ATGM. You can only have 10 magazines of ASM modification per battle (20 shots). When you aim at an enemy tank, it will automatically fly above the designated target to explode at about 3 m range from the tank roof. You can't directly control how far it will go, but aiming lower will usually increase the damage output, until the missile starts hitting the target directly. It is generally recommended to aim around the enemy turret base for maximum damage, as missile then tends to explode right above the target's roof.

This missile can be used to obliterate hostile ATGM tanks or to counter superior proximity ATGM carriers, but it is not very effective against medium and heavy tanks. While it technically can breach the roof even of the most feared tanks (like IS-6) and can be spammed offensively until spent completely off the capture point, if aimed incorrectly the missile tends to detonate too early and hit plates with 35+ mm thickness, doing superficial or no damage. It can also be very difficult to use in the heat of battle, where even a fraction of a second spent aiming may be the difference between victory and defeat. The missile is also too weak to breach roof ERA or NERA, so tanks with the full 360° roof protection (like rank VII Soviet tanks) will not take any damage from it, easily enduring even double direct hits.

Type 79 missile Reloading rate (seconds)
Capacity (Belt) Vertical Horizontal Stabilizer Stock Full Expert Aced
4 (2) 0°/+20° N/A N/A 13.00 11.50 10.60 10.00

Ammunition

Penetration statistics
Ammunition Type of
warhead
Penetration @ 0° Angle of Attack (mm)
10 m 100 m 500 m 1,000 m 1,500 m 2,000 m
Type 79 ATGM 700 700 700 700 700 700
Type 79 ASM ATGM-HE 35 35 35 35 35 35
Missile details
Ammunition Type of
warhead
Velocity
(m/s)
Range
(m)
Projectile
mass (kg)
Fuse delay
(m)
Fuse sensitivity
(mm)
Arming
distance (m)
Trigger
radius (m)
Explosive mass
(TNT equivalent) (kg)
Ricochet
0% 50% 100%
Type 79 ATGM 200 4,000 19.9 0.05 0.1 - - 5.5 80° 82° 90°
Type 79 ASM ATGM-HE 200 4,000 19.9 0.05 0.1 30 3 3.01 79° 80° 81°

Ammo racks

Ammo racks of the Type 89
Full
ammo
1st
rack empty
2nd
rack empty
Visual
discrepancy
2 (+1) (+2) No

Notes:

  • ATGMs are modeled by sets of 2. You can carry either 2 or 4 missiles.
  • The left ATGM is fired first.
  • The reload process will only begin when both ATGM have been fired off the Type 89's side launchers

Optics and night vision

The Type 89 receives night vision imagers once the tier 3 modification 'NVD' is researched. This unlocks standard 500 x 300 resolution thermal sights for the gunner, as well as standard image intensifiers for all crew (available in third person view in AB/RB additionally).

Type 89 Optics
Type of optic Magnification Night Vision Devices
Image Intensifier Thermal Imager
Resolution
Notes
Resolution Light Mult Noise Level
Gunner's Sight 2.0x - 8.0x -- -- -- 500 x 300 Intensifier & thermal sights unlocked by 'NVD' modification (tier 3)
Commander's View 6.0x 1600 x 1200 9.0 High N/A Intensifier unlocked by 'NVD' modification (tier 3)
Driver's View 1.0x 800 x 600 5.0 High N/A Intensifier unlocked by 'NVD' modification (tier 3)

Machine guns

Ammunition2 000 rounds
Belt capacity250 rounds
Reload8.0 s
Fire rate701 shots/min
Main article: Type 74 (7.62 mm)

Type 74 machine gun isn't doing anything special on this tank, as Type 89 can "scout" tanks directly without making any noise, but it can be sometimes used together with main gun when fighting other ATGM tanks or helicopters, as to add a chance of survival against ATGM by shooting them down mid-flight.

7.62 mm Type 74
Mount Capacity (Belt) Fire rate Vertical Horizontal
Coaxial 2,000 (250) 701 N/A N/A

Usage in battles

While the tank has a lot of weapons, it is a bit on a slower side. Since it is not able to fire ATGMs on the move and its autoloader has a very limited ammo pool, the Type 89 has to rely on cover and area denial to move around and fight.

One way to avoid ammo starvation is to stand on a capture point, which will reload the weapons for you, but capture points often provide really poor cover and must be captured first to provide ammo, which may not even happen.

Even if you managed to get to a really good capture point, which does not allow enemies to suddenly attack you and you carry type 79 ASM to destroy them before they can even get into a line of sight, enemies will very soon grow tired of the endless 35 mm KDE noises and the ATGMs hitting them, then call their entire artillery supply in your general direction. An artillery strike can destroy the Type 89 in one hit and must be avoided.

If you clearly can't capture a point (there is a lot of tanks or snipers have it on lockdown), work as a support or a flanker to avoid situations in which you are overwhelmed and can't retreat to reload. Getting into enemy squad side can be difficult, but generally provides an opportunity to take out two tanks with a gun before ATGMs have be used.

Despite having low ammo count, the main gun itself can deal a lot of damage to the crew or weapons if aimed properly, working as a decent deterrent for many tanks. It won't be able to beat Begleitpanzer 57 or IT-1 because it does not have APHE option and only does marginal damage to such tanks if they are careful, so use ATGM to destroy them if you can.

Pros and cons

Pros:

  • Has 2 ATGM loaded at the same time and can fire them in quick succession
  • The Type 79 ATGM is hard to dodge, have high penetration power of 700 mm and higher explosive mass than average ATGM
  • The Type 79 ASM can be used to defeat proximity ATGM carriers of higher rank, although it's not nearly as effective against regular targets
  • The Type 89's hull technically can survive some HEAT, HESH or even ATGM if they hit its engine compartment (left side), but it's not very reliable
  • Highly accurate stabilized main weapon
  • Can very efficiently exchange speed to manoeuvrability at gears 2 and 3
  • Neutral steering
  • Good reverse speed, turns better in reverse than forward
  • Has thermal sight

Cons:

  • Weak armour - It has worse protection from overpressure damage than TAM or Warrior with add-on composite shields and also can lose an entire crew to a single 23 mm API-T or even APDS shot from the right side
  • Low ammo count for the main gun autoloader and only 4 ATGM - will often get stuck for a long time hiding behind cover to reload
  • Due to placement of ATGM launchers on turret, firing them in close combat is awkward and may result in a non-fatal hit
  • Unlike Type 60 ATM, ATGM only reloads after you fired both of loaded missiles
  • ATGM launchers have zero gun depression, which can make close range encounters even more difficult
  • Very poor turn rate at gear 1

History

At the beginning of the 1980s, the JSDF wanted to replace its outdated Type 60 and Type 73 APCs with more modern IFVs, similar to the American Bradley and the German Marder. The JSDF drew up a set of requirements and tasked the Mitsubishi company with developing a suitable replacement.

In 1984, funding was approved to build four different prototypes, all of which underwent testing until 1986. By 1989, one prototype design was selected and was adopted within the armed forces under the designation of Type 89.

Initially, the JSDF estimated the need for about 300 Type 89s to be built. However, the end of the Cold War in the 1990s combined with a limited budget prevented a rapid mass-production of Type 89 to take place. In fact, production was proceeding at a very low rate, with just over 50 vehicles entering service with the JSDF by 1999.

Although production of Type 89 was discontinued in 2004, the vehicle is still in service with the JSDF today. As of 2016, a total of 68 vehicles were present in the JSDF's inventory from the initially planned 300.

- From Devblog

Media

Skins
Videos

See also

External links


Mitsubishi Heavy Industries Ltd. (三菱重工業株式会社)
Ground Vehicles 
APC  Type 60 · SUB-I-II
IFV  Type 89
MCV  Type 16 (P) · Type 16 (FPS) · Type 16
SPH  Type 75 · Type 99
SPAAG  Type 87
Main Battle Tanks 
Type 61  ST-A1 · ST-A2 · ST-A3 · Type 61
Type 74  ST-B2 · Type 74 (C) · Type 74 (E) · Type 74 (F) · Type 74 (G)
Type 90  Type 90 · Type 90 (B)
Type 10  TKX (P) · TKX · Type 10
Air Vehicles 
Jet Fighters 
F-86  F-86F-30 ▅* · F-86F-40 ▅* · F-86F-40 JASDF▅*
F-104  F-104J*
F-1  T-2 Early · T-2 · F-1
F-4  F-4EJ Phantom II* · F-4EJ ADTW* · F-4EJ Kai Phantom II*
F-15  F-15J*
Naval Vehicles 
Patrol Boats (PT) 
No. 7 class  PT-8 (PT-808)
No. 11 class  PT-15 (PT-815)
Destroyers (DD) 
Harukaze-class  JDS Harukaze (DD-101)
Ayanami-class  JDS Ayanami (DD-103)
  MHI's shipyards are positioned in Kobe, Nagasaki, and Shimonoseki
  * Licensed Production / Variants
See also  Mitsubishi Aircraft Company (1928-1945) · Mitsubishi Heavy Industries Ltd. (1938-1945) · Mitsubishi Shipbuilding Company (1884-1945)
  North American Aviation · Lockheed · McDonnell Aircraft Corporation

Japan light tanks
Type 89  I-Go Ko
Type 95  Ha-Go · Ha-Go Commander
Type 98  Ke-Ni
Other  Ka-Mi
IFV  Type 89
Wheeled  Type 87 RCV (P) · Type 87 RCV · Type 16 (P) · Type 16 (FPS) · Type 16
USA  ▅M24 · ▅M41A1