BMP-1

From War Thunder Wiki
Jump to: navigation, search
VTOL | Rank 5 USA
AV-8A Harrier Pack
This page is about the Soviet light tank BMP-1. For other versions, see BMP-1 (Family). For other uses, see BMP (Disambiguation).
ussr_bmp_1.png
GarageImage BMP-1.jpg
GarageImage BMP-1P.jpg
BMP-1
AB RB SB
7.7 7.7 7.7
Class:
Research:105 000 Specs-Card-Exp.png
Purchase:300 000 Specs-Card-Lion.png
Show in game

Description

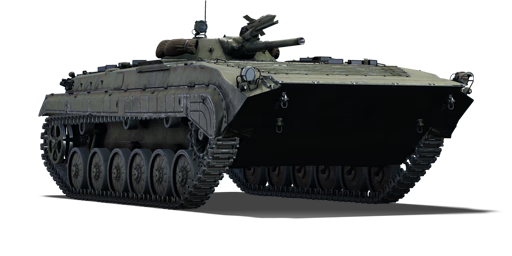
The BMP-1 (Object 764) and its upgraded variant, the BMP-1P (Object 765Sp4), were the first IFV to be mass-produced and the first major modernization of this type of vehicle respectively. They were designed by the Soviet Union in the 1960s and 1970s to give mechanized infantry better mobility, firepower, and protection on the battlefield. The BMP-1 was widely exported and participated in various conflicts around the world, such as the Arab-Israeli wars, the Iran-Iraq war, the Afghan war, and the Chechen wars. The BMP-1P was introduced in the late 1970s and featured enhanced anti-tank capabilities, smoke grenade launchers and additional armour. The BMP-1P was also extensively used by Soviet and Warsaw Pact forces, as well as by some of their allies and adversaries.

It was introduced in Update 1.71 "New E.R.A.". The BMP-1 is more of a shoot-and-scoot type of vehicle as an exposed BMP is a dead BMP, so it avoids being a target at all costs. It can also use its mobility to find reasonable sniping spots (for ATGM) and generally only use the cannon if an enemy is close and unaware of its presence unless it's in arcade mode, where it can land artillery-like shots easily. With the BMP-1 being one of the more affected vehicles after getting a vehicle modification (BMP-1P) it comes with a trade-off: While the BMP-1 has a manual guided missile using WASD, it does come with a 6-second autoloader for its cannon which isn't affected by crew skill/damage/losses, while the BMP-1P comes with a far more sophisticated mouse-guided missile and smoke grenades, but loses its autoloading capability, leading to a potentially slower reload of the cannon, next to reload speed loss on crew skill/damage/losses.

General info

Survivability and armour

Smoke grenades
Creation of a smoke screen in front of the vehicle
ESS
Creation of a smoke screen in the direction of movement of the vehicle
Armourfront / side / back
Hull19 / 18 / 16
Turret23 / 19 / 13
Crew3 people
Visibility70 %

The BMP-1 has very little to speak of in the conventional armour department. Minimal frontal and nearly non-existent side armour results in the vehicle being vulnerable to almost any incoming fire under many angles. Sides, particularly the left one, are poorly defended and can be penetrated by 12.7 mm or bigger MG, the flatter the angle of attack, the faster will the BMP-1 give in and explode. Front is also weak enough to be penetrated by HMG, but it is very angled and can only be shot through by a tall tank from the top. 14.5 mm will occasionally bounce off, but if its user will actually go to MG sniper mode and fire straight at the tanks weakspots, it will not sustain.

As such, the vehicle's survivability stems from its internal modules, mobility and short profile. Despite the lack of armour, the engine compartment on the right side might block a lot of shots (even ATGM might not break through it sometimes) and it is reasonably difficult to hit closer to the turret, where the shot usually proves fatal.

Where possible, BMP should utilise hills or other cover, only exposing as much of the vehicle as is necessary to engage an unaware target. Ideally, only the small turret must be exposed, which makes attacking BMP back even more difficult or at least user should only demonstrate its right side.

Armour Front (Slope angle) Sides Rear Roof
Hull 7-12 mm (80°) Front glacis
19 mm (56°) Lower glacis
16 mm (3-18°) Top
18 + 4 mm Bottom
16 mm (12°) Top
12 mm (48°) Bottom
12 mm (8-51°) Doors
6 mm
5 mm Engine exhausts
Turret 23 mm (0-53°) Turret front
33 + 26 mm Gun mantlet
13-23 mm (24-37°) 13 mm (23-26°) 6 mm
Cupola 7 mm 7 mm 7 mm 7 mm

Notes:

  • Suspension wheels and tracks are 10 mm thick.
  • Belly armour is 6 mm thick.

Mobility

Amphibious
The design allows you to swim and control movement in the water
Speedforward / back
AB73 / 13 km/h
RB and SB66 / 12 km/h
Number of gears5 forward
1 back
Weight13.0 t
Engine power
AB572 hp
RB and SB300 hp
Power-to-weight ratio
AB44.0 hp/t
RB and SB23.1 hp/t
Game Mode Max Speed (km/h) Weight (tons) Engine power (horsepower) Power-to-weight ratio (hp/ton)
Forward Reverse Stock Upgraded Stock Upgraded
Arcade 73 13 13 465 572 35.77 44
Realistic 66 12 265 300 20.38 23.08

The BMP-1's mobility in RB is reasonably good, although somewhat lacking relative to other IFVs. Despite that, once it gets moving it can travel at a decent pace.

In AB, BMP-1 are very fast, if not the fastest, due to being able to accelerate to average speed of 55-60 km/h offroad very quickly and reaching maximum speed if they do not have to climb, so a determined BMP user can drive straight to a point and expect to meet nobody else, but other fast tanks, like wheeled light tanks or some medium tanks of rank VI (which also have poor armour and generally will not dare to do that).

In RB, be aware when attempting flanking manoeuvres and early pushes, as there are vehicles with better mobility characteristics, and in many cases you'll encounter a vehicle before reaching a desirable position.

Modifications and economy

Repair costBasic → Reference
AB2 549 → 4 488 Sl icon.png
RB3 053 → 5 376 Sl icon.png
SB4 152 → 7 311 Sl icon.png
Total cost of modifications87 500 Rp icon.png
146 600 Sl icon.png
Talisman cost2 100 Ge icon.png
Crew training86 000 Sl icon.png
Experts300 000 Sl icon.png
Aces1 200 Ge icon.png
Research Aces720 000 Rp icon.png
Reward for battleAB / RB / SB
110 / 160 / 210 % Sl icon.png
196 / 196 / 196 % Rp icon.png
Modifications
Mobility Protection Firepower
Mods new tank traks.png
Tracks
Research:
6 100 Rp icon.png
Cost:
9 800 Sl icon.png
280 Ge icon.png
Mods new tank suspension.png
Suspension
Research:
4 100 Rp icon.png
Cost:
6 600 Sl icon.png
185 Ge icon.png
Mods new tank break.png
Brake System
Research:
4 100 Rp icon.png
Cost:
6 600 Sl icon.png
185 Ge icon.png
Mods new tank filter.png
Filters
Research:
5 700 Rp icon.png
Cost:
9 200 Sl icon.png
260 Ge icon.png
Mods new tank transmission.png
Transmission
Research:
4 900 Rp icon.png
Cost:
7 900 Sl icon.png
220 Ge icon.png
Mods new tank engine.png
Engine
Research:
4 900 Rp icon.png
Cost:
7 900 Sl icon.png
220 Ge icon.png
Mods tank tool kit.png
Improved Parts
Research:
4 000 Rp icon.png
Cost:
9 800 Sl icon.png
280 Ge icon.png
Mods extinguisher.png
Improved FPE
Research:
2 700 Rp icon.png
Cost:
6 600 Sl icon.png
185 Ge icon.png
Mods tank reinforcement ussr.png
Crew Replenishment
Research:
5 700 Rp icon.png
Cost:
9 200 Sl icon.png
260 Ge icon.png
Mods engine smoke screen system.png
ESS
Research:
4 900 Rp icon.png
Cost:
7 900 Sl icon.png
220 Ge icon.png
Mods new tank horizontal aiming.png
Horizontal Drive
Research:
6 100 Rp icon.png
Cost:
9 800 Sl icon.png
280 Ge icon.png
Mods tank cannon.png
Adjustment of Fire
Research:
4 100 Rp icon.png
Cost:
6 600 Sl icon.png
185 Ge icon.png
Mods airstrike.png
Airstrike
Research:
4 100 Rp icon.png
Cost:
6 600 Sl icon.png
185 Ge icon.png
Mods new tank vertical aiming.png
Elevation Mechanism
Research:
5 700 Rp icon.png
Cost:
9 200 Sl icon.png
260 Ge icon.png
Mods tank ammo.png
BMP-1P
Research:
5 700 Rp icon.png
Cost:
9 200 Sl icon.png
260 Ge icon.png
Mods art support.png
Artillery Support
Research:
4 900 Rp icon.png
Cost:
7 900 Sl icon.png
220 Ge icon.png
Mods scouting.png
Improved optics
Research:
4 900 Rp icon.png
Cost:
7 900 Sl icon.png
220 Ge icon.png
Mods night vision device.png
NVD
Research:
4 900 Rp icon.png
Cost:
7 900 Sl icon.png
220 Ge icon.png

Armaments

Night vision device
Improves visibility by enhancing natural light or active illumination.
Setup 1:73 mm 2A28 cannon
7.62 mm PKT machine gun
9M14 ATGM
Setup 2:73 mm 2A28 cannon
7.62 mm PKT machine gun
9M113 "Konkurs" ATGM

Main armament

Autoloader
Automatically feeds projectiles into the breech. The speed does not depend on the skills of the loader
Ammunition40 rounds
Reload6.0 s
Vertical guidance-4° / 30°
Main article: 2A28 (73 mm)

The 2A28 main cannon, despite being the 'main' armament will more often than not act more as secondary armament, at least once the BMP-1P upgrade is researched, due to the 9M113 ATGM proving significantly more controllable and effective at all engagement ranges.

Despite this, the PG-9 HEAT round proves valuable in a pinch, with well-placed shots able to disable critical components on most vehicles the BMP-1 will face. Keep in mind that the BMP-1 does not feature any sort of stabilisation at all, and due to its chassis the gun is near impossible to get on target when braking or going cross-country at full speed.

The main cannon's primary drawback is its mediocre ballistic performance, with the HEAT round travelling at only 665 m/s and the HE round travelling at a 290 m/s. The projectiles, however, do not have shell falloff until 3km away and can be aimed using gun scope adjustment. BMP-1 does not have a rangefinder, so it is only reasonable to use HE shell in AB, and the HEAT will be difficult to aim past 900 m in RB. As such, the projectile drop is not the worst in-game.

HE shell is near useless at the BR range, and is extremely difficult to aim in RB. It still does have one very specific use - to attack open topped ATGM tanks without going at them, so at least two can be taken in AB just in case.

At least some care should be taken when firing the HEAT round as it has relatively poor slope characteristics, with the penetration dropping to just 150 mm if it hits an armour plate with more than 60 degrees of slope, which is not a problem at long range, but can become an issue when facing top superheavy tanks head-on, and you happened to run out of ATGM.

73 mm 2A28 Turret rotation speed (°/s) Reloading rate (seconds)
Mode Capacity Vertical Horizontal Stabilizer Stock Upgraded Full Expert Aced Stock Full Expert Aced
Arcade 40 -4°/+30° ±180° N/A 19.04 26.35 32.00 35.39 37.65 6.00 6.00 6.00 6.00
Realistic 11.90 14.00 17.00 18.80 20.00

Ammunition

Penetration statistics
Ammunition Type of
warhead
Penetration @ 0° Angle of Attack (mm)
10 m 100 m 500 m 1,000 m 1,500 m 2,000 m
PG-9 HEAT 300 300 300 300 300 300
OG-9 HE 11 11 11 11 11 11
Shell details
Ammunition Type of
warhead
Velocity
(m/s)
Projectile
mass (kg)
Fuse delay
(m)
Fuse sensitivity
(mm)
Explosive mass
(TNT equivalent) (g)
Ricochet
0% 50% 100%
PG-9 HEAT 665 2.6 0 0.01 918.75 65° 72° 77°
OG-9 HE 290 3.7 0.05 0.1 735 79° 80° 81°

Ammo racks

Ammo racks of the BMP-1
Full
ammo
1st
rack empty
Visual
discrepancy
40 1 (+39) No

The single ammunition rack consists of a shell barillet located around the turret basket.

Additional armament

Ammunition4 rounds
Flight speed140 m/s
Range3 500 m
Method of aiming
ABSemi-auto
RB and SBManual
Fire on the moveup to 5 km/h
Ammunition4 rounds
Vertical guidance-5° / 10°
Horizontal guidance-15° / 37°
Flight speed248 m/s
Range4 000 m
Fire on the moveup to 5 km/h
Main articles: 9M14, 9M113 Konkurs

The BMP-1 can use two different ATGMs which are mounted differently and have entirely different playstyles tied to them. Either missile reloads 8 seconds which is one of the fastest (beats most ATGM tanks by at least 2 seconds, other IFV by at least 4), if not the fastest, ATGM reload. Both missiles have poor turn rate at close range.

9M14

An extreme example of 9M14 use in AB against technically superior ATGM tank. May or may not work in RB.

The BMP-1 comes with a rail-mounted manually-guided ATGM as stock. This must be guided using the keyboard, disabling tank movement, and has somewhat mediocre penetration and explosive mass values. While occasionally useful, generally the main gun is easier and more reliable to use. It also has very low starting speed of about 70 m/s.

The 9M14 Malyutka ATGM steers very controllably. When fired, the 9M14 drops just slightly above your aim reticle and is not usable in the first 5 metres. After surpassing 5 metres, the ATGM will fly in a straight line without any oscillation or deviation. When using the hand aiming guidance of the ATGM, it is very accurate and flies with minimal error compared to the SACLOS (aim reticle guided) 9M113 Konkurs, that tends to be unpredictable and quite unstable in-flight. You can easily swap from target-to-target with the hand aiming guidance, as it remains steady and doesn't oscillate. If a target is too close to you, aim slightly below the point you wish to hit. The ATGM will align itself slightly above the aim reticle almost right away, allowing you to hit or eliminate the target at closer range.

In AB, the missile can be directed with the mouse and will not disable the tank's movement. It also can be semi-reliably launched over cover, since it is launched upwards. By pointing a targeting reticle at a tank 200 m away behind a wall or a hill before launch, you are likely to hit them directly, however, sometimes it flinches.

4 x 9M14 ATGM

  • Guidance type: MCLOS
  • Firing range: 3 km

9M113

Once the BMP-1P upgrade is researched, the rail-mounted 9M14 ATGM is replaced with a spindle-mounted 9M113 ATGM. This ATGM is significantly more powerful and can be easier to use due to its semi-automatic guiding system.

The 9M113 Konkurs ATGM steers rather unpredictably. When fired, the 9M113 drops below your aim reticle in the first 15 metres (due to being at low speed right after launch). After surpassing 15 metres, the ATGM will have accelerated enough to fly up and stabilize itself with your aim reticle. Due to this launch drop, it is suggested to aim slightly up when firing the ATGM: this will avoid having your ATGM hit the ground or any fences as sometimes that tends to happen. When the ATGM is flying, steer it gently and carefully. Instantly snapping to another target can cause it to oscillate from side-to-side and hit something on the way or miss the target entirely.

Improved penetration values and significantly increased explosive mass will also result in far more reliable destructive power. Keep in mind that the ATGM still can only be fired when stopped or at extremely low speeds. Be aware that the new missile launcher is put above the top of a turret and can be a liability, since it is very visible even when the tank hides behind a wall and is a valid target for hostiles. A single ATGM hit to the launcher will obliterate the BMP, and so will HE.

4 x 9M113 ATGM (BMP-1P)

  • Guidance type: SACLOS
  • Firing range: 3 km
9M14 ATGM / 9M113 ATGM Turret rotation speed (°/s) Reloading rate (seconds)
Mode Capacity Vertical Horizontal Stabilizer Stock Upgraded Full Expert Aced Stock Full Expert Aced
Arcade 4 -5°/+10° -15°/+37° N/A 19.04 26.35 32.00 35.39 37.65 8 8 8 8
Realistic 11.90 14.00 17.00 18.80 20.00

Note: The vertical and horizontal traverse depend on the turret position and are only relevant to the 9M113 ATGM.

Ammunition

Penetration statistics
Ammunition Type of
warhead
Penetration @ 0° Angle of Attack (mm)
10 m 100 m 500 m 1,000 m 1,500 m 2,000 m
9M14 ATGM 400 400 400 400 400 400
Missile details
Ammunition Type of
warhead
Velocity
(m/s)
Range
(m)
Projectile
mass (kg)
Fuse delay
(m)
Fuse sensitivity
(mm)
Explosive mass
(TNT equivalent) (kg)
Ricochet
0% 50% 100%
9M14 ATGM 140 3,000 10.9 0.05 0.1 3.25 80° 82° 90°

Penetration statistics
Ammunition Type of
warhead
Penetration @ 0° Angle of Attack (mm)
10 m 100 m 500 m 1,000 m 1,500 m 2,000 m
9M113 ATGM 500 500 500 500 500 500
Missile details
Ammunition Type of
warhead
Velocity
(m/s)
Range
(m)
Projectile
mass (kg)
Fuse delay
(m)
Fuse sensitivity
(mm)
Explosive mass
(TNT equivalent) (kg)
Ricochet
0% 50% 100%
9M113 ATGM 248 3,000 14.5 0.05 0.1 4.37 80° 82° 90°

Ammo racks

Full
ammo
Visual
discrepancy
4 No

Notes:

  • The missiles are listed from M1 to M4 (see the picture above).
  • Missiles are modeled individually and disappear after having been launched.
  • It is not possible to select how many missiles to bring into battle.

Machine guns

Ammunition2 000 rounds
Belt capacity1 000 rounds
Reload8.0 s
Fire rate700 shots/min
Main article: PKT (7.62 mm)

The BMP-1 comes equipped with a coaxial 7.62 mm PKT machine gun. This is only useful for clearing small obstacles or exposed crew in open-top vehicles.

7.62 mm PKT
Mount Capacity (Belt) Fire rate Vertical Horizontal
Coaxial 2,000 (1,000) 700 N/A N/A

Usage in battles

The BMP-1's limitations as a light tank hinders its ability to directly fight enemy vehicles, it will not survive any punishment sent its way. It needs to play with cover and concealment frequently, as any vehicle with a heavy machine gun, be it ground or air, can quite easily shred the BMP-1 apart if a round hits the left side or roof armour. Considering one of the common enemy nation of the BMP-1 in RB is the USA, which has a habit of putting a heavy machine gun on any tank, means that the BMP-1 needs to be extremely careful and aware of their surroundings before moving up, lest it gets torn apart by a barrage of bullets. In AB, the biggest threat to it is its own brethren, as fighting other BMPs is very difficult and relies on difference in your skills a lot (or, at least, on ability to press "aim assist" and "fire" faster).

However, the BMP-1's traits in mobility and firepower makes the vehicle a good scout and ambush vehicle.

Scouting

The BMP-1 in War Thunder can't serve as an IFV as it is in real life due to the lack of infantry, but it does have the ability to active scout. This role makes the BMP-1's mobility an important factor of the vehicle's success, as getting to places that the enemy is not aware of to scout out can mean a lot to the team's successes. Even in the active scouting's cooldown period, do not be afraid to communicate to the team where the enemy is with the map and chat function.

In this role, the BMP-1 should avoid contact with the enemy. Utilise useful camouflage and whatever cover is available to make sure the enemy cannot see the BMP-1 at a first glance (or without switching to any available special optics like thermals). One can also use the amphibious nature of the BMP-1 to get into areas through paths that the enemy would not expect. Although this role may mean the BMP-1 is not as active in destroying the enemy, it is an important role for the team overall that the scout continues to observe the enemy so that battlefield information is kept up to date.

The BMP-1 of course may be spotted during this endeavour, and so an exit strategy should be maintained. Should an enemy round start flying around the BMP-1's direction, or an enemy was observed trying to move onto the BMP-1's position, begin exfiltrating. Utilise smoke for concealment (default with the ESS, but smoke grenades are available with the BMP-1P modification upgrade) if needed.

Ambushing

Though the BMP-1 is not good standing up against enemy tanks, the BMP-1 still has the necessary firepower to deal with most. The 73 mm has decent amount of penetration for a hit, but the low muzzle velocity is detrimental for long-range targets (although, it can be utilised for a parabolic firing arc against enemies beyond hills). The key weapon on the BMP-1 is the four ATGM mounted on the turret, with either the manual 9M14 or the semi-active 9M113 missile (the latter with the BMP-1P upgrade) as options. Although both have better penetration values than the 73 mm cannon, the 9M113 missile with the BMP-1P upgrade is a much better candidate for this role due to the increased missile velocity and lethality.

Moving around the flanks, the BMP-1 should try to find a nice, open field of fire against common enemy paths. Try to establish the BMP-1 around objectives so as teammates fire upon the enemy and force them to take cover, the BMP-1 can manoeuvre to an ideal angle and hit the enemy thinking they are in cover. The ideal manner of firing on the enemy is, if the target is less than 500 m, to engage first with the 73 mm cannon. If this does not destroy nor critically damage the enemy to disable their movement or firepower, then follow up with a missile into the hull. If the target is at farther ranges, engage first with the missile to ensure the first shot hits the target. Be wary of longer engagements as there are only 4 missiles onboard the BMP-1, and more shots will mean the enemy have a better idea of the BMP-1's position.

If ambushing from the sides of an enemy's attack direction is not ideal to the map, a "shoot-and-scoot" tactic of hiding behind cover and exposing the BMP-1 only long enough to fire a missile or shot can be sufficient too in dealing with the enemy. However, beware of exposing the BMP-1 by manner of going over hills, as the turret's gun depression is only -4 degrees (-5 degree for the 9M113 missile launcher) and doing so will expose a large portion of the BMP-1's hull to the enemy.

Should the BMP-1's position become compromised, dump smoke and exfiltrate the area.

Night-fighting
The BMP-1's with the fixed hull-mounted IR spotlight on in NVD mode. One can observe that the spotlight does not follow the turret.

Either of the role above can still be performed at night, but one must utilise the tools available in the BMP-1 to make the most of the environment.

The BMP-1 can research the Night Vision Device (NVD) modification, which can help during night battles to help with visibility. NVD is available in commander, gunner, driver and outside view ports. Utilising the NVD can brighten up a hazy horizon due to the night.

Another tool with the NVD modification is an infrared spotlight, which can help illuminate targets if they are hard to see even with the NVD. However, the spotlight is fixed to the hull and does not move with the gun, requiring alignment of the hull towards the target requiring illumination. The infrared spotlight, when on, also marks the BMP-1 with a giant light that any enemy with the same NVD can spot easily. As such, usage of the infrared spotlight should be minimised, with total reliance on the base NVD by itself or only periodically switching on the spotlight and quickly turning it off once a picture of the battlefield is obtained.

Fighting people which are aware of BMP-1 position

There are two ways in which you can defeat opponents straight up charging at your position: by corner camping and by abusing scouting.

Corner camping is simple as long as you have both weapons loaded - you take such a position, that does not allow an enemy to fire at BMP-1 until you shot their front with a gun (which almost guarantees that their driver is gone and causes the tank to continue moving forward and also eventually stop) and "double tap" them for a good measure with an ATGM to the exposed side, destroying the rest of the crew. Usually, even if an enemy tank somehow survives, you can reload faster than their crew replaces the gunner or the driver. Do note, that camping behind destructible cover is a bad idea, since kinetic shells can penetrate them, and your chemical shells cannot.

Against other missile tanks this tactic is a double edged sword. Make sure to hide ATGM launcher from missile tanks, as otherwise they might just fire at it and destroy you. If you see a vertical ATGM tank charging directly at you, that generally means its user knows how to fire over obstacles and the tactic will not work if you don't have a tall wall. Even if you do have a tall wall, some double launcher ATGMs can go as far as straight up demolishing the building you are hiding behind just to get to you.

Using scouting is more difficult and is more fit for the arcade mode - use scouting on enemy tank and fire smoke screens to break direct vision, aim assist and marking, then roll out and fire ATGM in direction the enemy tank is supposed to be in. This is unlikely to work against other light tanks, because they might just spam scouting at everything they see, including you, naturally countering the tactic.

Pros and cons

Pros:

  • Fairly mobile and thus very good at flanking
  • Both weapon systems are particularly effective against lightly armoured vehicles, like the Leopard I, OF-40, etc.
  • Has a below 4-second reload if it chain fires both weapons
  • One of the earliest ATGM vehicles available and the earliest to receive mouse-guided (SACLOS) ATGMs (with the BMP-1P modification)
  • Decent 73 mm HEAT penetrating up to 300 mm of armour, effective against last-gen heavy tanks like the Conqueror, M103, etc.
  • Amphibious ability allows it to reach positions that other vehicles struggle to
  • Functional even in uptiers, due to its piercing ATGM and HEAT
  • Night Vision allows effectiveness in night battles
  • Unless it is hit straight in the turret compartment there is always a chance that it somehow survives

Cons:

  • Mediocre reverse speed for a light tank, limiting its tactical agility
  • Default missiles are manually guided in RB, can be challenging to use
  • Poor survivability due to thin armour, minimal crew number and large size
  • You can't use the smoke grenades together with the original missiles
  • Only has chemical ammunition, struggles to damage vehicles with ERA like M60A1 RISE (P) or Centurion Mk.5 AVRE, can't fire through light obstacles like fences or bushes, buildings
  • Minimal -4° gun depression makes it struggle in hills
  • Has no stabiliser, a disadvantage against stabilised/stationary tanks like FV4202
  • Infrared Spotlight mounted to hull, won't rotate with turret when NVD is on
  • Can carry only 4 ATGMs

History

Development

In the 1950s, Soviet armoured personnel carrier (APC) tactics consisted of lightly armoured vehicles that would transport soldiers to combat zones, and then head back behind the lines to safety. During this time, the West German Bundeswehr was using the Schützenpanzer Lang and infantry fighting vehicle (IFV) tactics, where the vehicles would work with the infantry and tanks in order to support them, especially against lightly armoured targets. The BMP was a Soviet IFV design created in the late 1950's. Some of the requirements were the ability for all of the infantry carried to be able to fire from within the vehicle, which was unseen before in IFV designs. It was intended to support the infantry and combat enemy light vehicles. The design placed emphasis on speed and manoeuvrability, potent armament, and sufficient armament to protect against 23 mm autocannons over the frontal arc. There was a debate over how the vehicle should be wheeled or tracked, and a number of options were explored including hybrid designs with both. The design that was chosen was a tracked vehicle with the engine in the front and the crew compartment in the rear; it was designated the Object 764. A prototype was created in 1964, and the final design was chosen in 1965 - an improved model called the Object 765. In service the production model was called the BMP-1.

Design

The BMP-1 features a fully tracked hull, with a sharply angled glacis at the front, a centrally mounted turret, and a crew compartment in the rear of the hull, with doors for the infantry to mount and dismount the vehicle. The hull layout is as follows: the engine was in the front right section of the hull. The driver sat to the front left of the vehicle, the commander sat right behind the driver, and the gunner sat in the right side of the turret. The troop compartment located at the rear of the vehicle could seat 8 infantry soldiers. The ability to fire from inside the vehicle was provided by four firing ports on each side of the hull and one in the left door. There are also four hatches in the roof. The infantry sit on two benches with padding, back to back, facing the outer sides of the vehicle. The armour of the frontal arc is enough to generally protect against 20 mm autocannon fire, the side armour generally protects against 12.7 mm machine gun fire, and the roof and rear armour protects against small arms fire and shell fragments. In addition, the sloped glacis on the front of the hull also increased the chances of shells bouncing, because of the extreme angles. The protection level depended somewhat on the version of the BMP-1 in question, as different nations had differing levels of armour quality. The main armament consisted of a 73 mm 2A28 Grom smoothbore semi-automatic cannon, along with a 9M14 Malyutka anti-tank guided missile (ATGM). Secondary armament consisted of a 7.62 mm PKT machine gun. The engine provides 300 hp, and is a six-cylinder four-stroke diesel engine. The suspension system used was a torsion bar suspension system. The BMP-1 is fully amphibious with little preparation. Before entering the water a trim vane has to be raised, which provides additional frontal armour when in the lowered position. It can achieve 65 km/h (40 mph) on road and 8 km/h (5 mph) in water.

Production and Service

Over 20,000 BMP-1's were produced in the Soviet Union alone, with many more produced in China and Czechoslovakia. The BMP-1 was widely exported and saw significant combat worldwide. BMP-1's participated in the Yom Kippur War, the Angolan Civil War, the Iran-Iraq War, the Gulf War, and many other conflicts. It was well liked for its manoeuvrability, but it was found that the cannon lacked effective range and the 9M14 ATGMs were hard to control. During the Gulf War it was found that the 25 mm Bushmaster cannon found on the M2/M3 Bradley could consistently penetrate the frontal armour of the BMP-1, even at range.

BMP-1P Upgrade

The BMP-1P was an upgrade to the ATGM systems of the BMP-1. It replaced the 9M14 Malyutka missiles with 9M113 Konkurs or 9M111 missile. This increased the weight of the vehicle, leading to a slight decrease in manoeuvrability.

Media

Skins
Videos

See also

Similar Soviet vehicle

External links


Chelyabinsk Tractor Plant (Челябинский тракторный завод)
IFVs 
BMP-1  BMP-1
Heavy Tanks 
KV  KV-85 · KV-122
IS-1/2  IS-1 · IS-2 · IS-2 (1944) · IS-2 "Revenge" · IS-2 No.321
T-10  T-10A · T-10M
Other IS Tanks  IS-3 · IS-4M
Tank Destroyers 
KV Derivatives  SU-152
IS Derivatives  ISU-152 · ISU-122 · ISU-122S · Object 268
Export 
IS-2  ␗IS-2 · IS-2 No.402 · ␗IS-2 (1944)
ISU  ␗ISU-152 · ␗ISU-122
IFVs  SPz BMP-1
See Also  Leningrad Kirov Plant

USSR light tanks
T-26  T-26 · T-26 (1st Gv.T.Br.) · T-26-4 · T-26E
BT  BT-5 · RBT-5 · BT-7 · BT-7 TD · BT-7M · BT-7A (F-32)
T-50  T-126 · T-50
T-70  T-70 · T-80
PT-76  PT-76B · PT-76-57 · Object 906
BMP  BMP-1 · BMP-2 · BMP-2M · BMP-3
BMD  BMD-4
2S25  2S25 · 2S25M
Wheeled  BA-11 · BTR-80A
Other  T-60 · Object 685 · 2S38
China  ▂Type 62