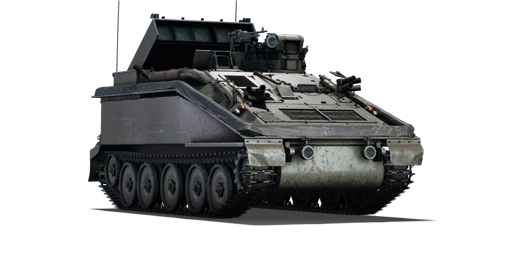
Striker

From War Thunder Wiki
Jump to: navigation, search
Rank 6 USA
F-5C Pack
Striker
uk_fv102_striker.png
GarageImage Striker.jpg
Striker
Research:160 000 Specs-Card-Exp.png
Purchase:450 000 Specs-Card-Lion.png
Show in game

Description

The FV102 Striker is a rank VI British tank destroyer with a battle rating of 8.3 (AB/RB/SB). It was introduced in Update 1.71 "New E.R.A.".

The Striker is basically a direct upgrade to the Swingfire and is better than its predecessor in some ways, even though it has its own problems. Just like the Swingfire, the Striker's purpose is to blast the enemy out of cover by firing at them indirectly whenever possible, but it has some trouble at attacking long-range, as BAe Swingfire missiles are slower than the rest.

Striker has a much better fire rate and a bigger room for error compared to its predecessor, due to having five launchers at once, thermal imaging and great mobility, so its push-preventing powers can be godlike in skilled hands.

Nevertheless, its guidance camera placement is far from ideal - it creates aiming problems when firing and controlling the ATGMs over uneven ground or from behind cover, requiring user to directly aim with the scope to make corrections, which involves also exposing the vehicle to the enemy kinetic shells - unlike with the Swingfire's raised camera podium.

Due to this main disadvantage, it takes a lot more dedication and patience from its users to command the vehicle expertly.

General info

Survivability and armour

Smoke grenades
Creation of a smoke screen in front of the vehicle
Armourfront / side / back
Hull25 / 13 / 13
Turret0 / 0 / 0
Crew3 people
Visibility100 %

Armour

Much like the Swingfire, Striker is a box with sloped front, however, it has a smaller profile than the Swingfire and has more armour on the front. It has a little amount of armour on other sides and there are fewer points where the Striker can get shot without consequences. Still, the sloped frontal armour makes it difficult to be destroyed with heavy machine guns and may protect from stock 20 mm autocannons, so the Striker should face the enemy's push direction, not just to fire, but to reduce the chances of being instantly destroyed, especially by light tanks flanking. Having high ground or a reliable sloped position might help to repel autocannons due to ricochets, but such situations should be avoided at all cost, as many SPAA tanks can randomly penetrate the transmission anyway.

There is also a commander cupola which supports slightly stronger optics and supports a machine gun on it. The cupola has less armour than the hull and it's possible to lose both gunner and commander by being hit there, easily destroying the vehicle in RB.

Ammo rack and Launcher

Striker always burns in extreme over the top ways, which fills the enemy with joy. In reality, is not as bad as it looks and in some cases fire may go on for about half a minute.

The first thing to notice about the Striker is a giant missile panel on its back. It has 5 slots, which have missiles loaded in them. If the launcher got penetrated and damaged, it will likely explode the entire rack and torch the vehicle, like a firework; also losing any ATGMs in the rack. It's also possible to fire autocannons or even heavy machine guns at the tubes and damage the missiles stored inside of them to set the Striker on fire.

The Striker's racks are a tall target and its guiding devices are located way below its weapon system and on level with its hull. While the hull itself is mostly hidden from enemy fire, it is practically impossible to fire at long range without exposing the weapon and commander cupola or using third-person view, making it an easy target for HE and patient APFSDS users. In some cases, HEAT can also ricochet off the launcher and damage the hull, resulting in crew knockout.

Hence, players must try not to get hit in the missile launch area. In case the Striker gets shot at an empty tube, there is a chance the entire rack won't break in one hit and the vehicle will still be able to fire while having the option to repair it back to 100%. The rack can be fixed much quicker than generally expected, only taking about 3-5 seconds for minor repairs, so it is possible to do even during intense close range combat. In case all of the ATGMs are spent, the launcher and the rear are actually the safest places to be hit as fuel is stored there and will now be empty space.

The missile launcher itself can sometimes absorb artillery shots, helicopter ATGM or fire from the BMP-1 cannon, protecting the Striker hull, but only if shell did not have opportunity to hit the hull. The missile rack also covers the reserve ammo rack from planes strafing from the sky, so as long as they can't fire inside of the vehicle, the Striker should be fine.

General survivability

For increased survivability, it is recommended to use a proper camouflage painting scheme for the environment of the battle. Having bushes and leaves also helps greatly when disguising the Striker.

For dire situations, the Striker is also equipped with two groups of smoke launchers. The smoke launchers are aerosol-type as with all rank VI tanks and cover a 270-degree zone in front of the Striker within 2 seconds. It is recommended to use the second group of launchers only after gaining some distance from the first smoke and pursuers. Secondary smoke can also be used to extend the smoke wall and puzzle opponents trying to find the Striker amidst it, while it has rapidly left the scene, or to protect allies.

Avoid letting enemy vehicles to get into ramming range, even more so in Arcade battles, as it can quickly render the Striker completely useless due to its inability to retaliate while moving. If close range combat is inevitable, use the tank's good reverse speed and smoke screens to retreat or prepare for combat before this happens.

Overpressure mechanics

The Striker is susceptible to the overpressure mechanics - if shockwaves made by a chemical shell of calibre 105 mm (Almost any NATO medium tank armed with HEATFS qualifies) hit the roof, cameras, or the side of this tank, the entirety of the crew is likely to be instantly knocked out. Since the commander optics count as a weak spot for HEAT overpressure damage, it is possible to destroy Striker in ATGM duel by hitting it anywhere.

It is possible to take HEAT shots frontally with the launcher, but it can quickly backfire, should enemy shot land at a bad angle. HE shells in general instantly obliterate Striker, unless hit the launcher from the back. HESH is less dangerous than HE, but it will likely destroy the crew even without overpressure damage, if explosion reaches the roof. Artillery strike may fail to destroy the tank if it landed somewhere in front of it, but any close side shot has a chance of instantly decimating the crew.

Missile launcher is also often rendered completely broken if hit by such shells. It is worth noting that in Arcade Battles the launcher does not "auto-repair" after such hits and, even if it does, it still malfunctions, so it must be manually repaired. The issue is worsened by the fact that malfunctioning launcher does not stop reload sequence and the tank can get set on fire on a follow-up shot, preventing repairs and requiring the operator to make a full retreat.

Armour type:

  • Aluminium Alloy AA7017
Armour Front (Slope angle) Sides Rear Roof
Hull 25 mm (69°) 12.7 mm 12.7 mm 12.7 mm
Missile launcher 50 mm (55°) 50 mm 50 mm (55°) 0-10 mm
Cupola 25 mm 25 mm 25 mm 12.7 mm

Notes:

  • Suspension wheels and tracks are 15 mm thick
  • Belly and hull undersides over the tracks are 12.7 mm thick
  • Outdoor ammo rack is 50 mm thick everywhere, except hinges that are 10 mm thick
  • It possible to fire HE inside of the launcher tubes, setting missile inside of it and Striker on fire, but the missile rack will not break
  • A strafing plane can fire inside of the launcher or just fire at the ammo racks and crew inside of Striker instead

Mobility

Reverse gearbox
Forward and backward movement is possible at the same maximum speed
Speedforward / back
AB88 / 88 km/h
RB and SB81 / 81 km/h
Number of gears7 forward
7 back
Weight8.3 t
Engine power
AB363 hp
RB and SB190 hp
Power-to-weight ratio
AB43.7 hp/t
RB and SB22.9 hp/t
Game Mode Max Speed (km/h) Weight (tons) Engine power (horsepower) Power-to-weight ratio (hp/ton)
Forward Reverse Stock Upgraded Stock Upgraded
Arcade 88 88 8.3 270 363 32.53 43.73
Realistic 81 81 168 190 20.24 22.89

The mobility of the Striker is much better than that of the Swingfire, so it can actually get to capture points along with the team's push, or it can assist in guarding the point and destroying the enemy team while rearming at a capture point.

If fully upgraded and travelling on pavement roads, the Striker can reach a peak speed of 87/80 km/h (AB/RB). It can drive as fast in any direction, so the only issue is properly turning around in the spot. This is possible because the Striker is much lighter than the Swingfire, unfortunately, the lighter hull makes it even easier for the enemy to ram it, temporarily disabling the weapon and potentially throwing it over to a side, effectively making it as good as dead.

Since drive direction is irrelevant for Striker, it's possible to always turn the chassis in a way that allows the tank to guide missiles (to keep enemies on its right) without hampering the mobility.

One of weaknesses of Striker is its suspension, because the tank will often not just fail to side climb road borders, but actually break tracks over them. Even upgraded tank is weak to this and should be driven carefully in towns. It is also very difficult, if not impossible, to climb objects in order to compensate other the Striker's flaws.

It is important to have a high level of "driving" in crew skills. The non-aced driver will get confused if you try to drive forward or backwards and turn at the same time, especially at gear 1. Until your crew is fully trained, use neutral steering first, only then start moving, or get to gear 4-5 and then turn around. It's also worth noting that even if your driver is maxed out, at ~50 km/h you can only turn a little bit before you start losing your speed, so try to keep moving in a certain direction if trying to reach maximum speed.

Even under ideal circumstances the Striker is slower than most light tanks (speeds above 100 km per hour), so unless a group of fast allies are rushing a point with the Striker, there's no expectation to capture points solo, or to get there first. On certain maps with lots of turning involved, Striker can outpace wheeled tanks and arrive on a capture point at the same time or slightly before them. It also moves faster than some of them in river banks, with 20 km/h being its limit.

Improving acceleration with modifications and maintaining map awareness do play a part despite the inability to fire on move. Besides, the Striker can still desperately fire a missile and begin moving again while guiding the missile towards an enemy. Using this last resort method allows missiles to be fired while maintaining the best possible 'combat mobility'.

Modifications and economy

Repair costBasic → Reference
AB4 702 → 6 136 Sl icon.png
RB5 152 → 6 723 Sl icon.png
SB6 436 → 8 398 Sl icon.png
Total cost of modifications125 600 Rp icon.png
225 000 Sl icon.png
Talisman cost2 400 Ge icon.png
Crew training130 000 Sl icon.png
Experts450 000 Sl icon.png
Aces2 000 Ge icon.png
Research Aces890 000 Rp icon.png
Reward for battleAB / RB / SB
160 / 210 / 250 % Sl icon.png
214 / 214 / 214 % Rp icon.png
Modifications
Mobility Protection Firepower
Mods new tank traks.png
Tracks
Research:
14 000 Rp icon.png
Cost:
22 000 Sl icon.png
440 Ge icon.png
Mods new tank suspension.png
Suspension
Research:
8 000 Rp icon.png
Cost:
13 000 Sl icon.png
250 Ge icon.png
Mods new tank break.png
Brake System
Research:
8 000 Rp icon.png
Cost:
13 000 Sl icon.png
250 Ge icon.png
Mods new tank filter.png
Filters
Research:
12 000 Rp icon.png
Cost:
19 000 Sl icon.png
380 Ge icon.png
Mods new tank transmission.png
Transmission
Research:
15 000 Rp icon.png
Cost:
24 000 Sl icon.png
470 Ge icon.png
Mods new tank engine.png
Engine
Research:
15 000 Rp icon.png
Cost:
24 000 Sl icon.png
470 Ge icon.png
Mods tank tool kit.png
Improved Parts
Research:
4 200 Rp icon.png
Cost:
22 000 Sl icon.png
440 Ge icon.png
Mods extinguisher.png
Improved FPE
Research:
2 400 Rp icon.png
Cost:
13 000 Sl icon.png
250 Ge icon.png
Mods tank reinforcement uk.png
Crew Replenishment
Research:
12 000 Rp icon.png
Cost:
19 000 Sl icon.png
380 Ge icon.png
Mods tank ammo.png
170mm_uk_swingfire_mk_2_ammo_pack
Research:
8 000 Rp icon.png
Cost:
13 000 Sl icon.png
250 Ge icon.png
Mods smoke screen.png
Smoke grenade
Research:
12 000 Rp icon.png
Cost:
19 000 Sl icon.png
380 Ge icon.png
Mods thermal sight.png
NVD
Research:
15 000 Rp icon.png
Cost:
24 000 Sl icon.png
470 Ge icon.png

It is important for the Striker to take mobility upgrades as soon as possible, because:

Brakes are very important in towns, as stopping one moment too late can push the Striker out of cover and exposed at the mercy of medium tanks. Better brakes also help in hilly maps, especially when the Striker gets flanked and needs to retaliate. The Striker cannot fire on the move, so better brakes means less time taken before the Striker can fire.

Maximum inclination and suspension upgrades allow the Striker to climb hills and mountain rocks better, and stay on them without slipping too much. The Striker will likely have issues with controlling missiles when not staying on flat terrain, but spots with a good sight on chokepoints allow to plan ahead of the enemy and will save the tank before close range combat even begins.

Thermal imaging devices also help with target acquisition on large maps, but their resolution is not excellent; it limits the ability to distinguish tanks at long distances (2.5+ km).

Armaments

Night vision device
Improves visibility by enhancing natural light or active illumination.
Thermal imager
Allows to see thermal radiation in the infrared range day and night

Main armament

Two-plane stabilizer
Reduces the swing of the gun in two planes while moving
Ammunition10 rounds
First-order5 rounds
Reloadbasic crew → aces
0.6 → 0.5 s
Fire on the moveup to 5 km/h
Main article: BAe Swingfire

Slightly to the right of commander cupola, there is the main ATGM camera optic. The missiles will never ever go beyond angles at which this camera can look. Because of how the camera is placed, the Striker cannot fire to the left past the cupola or depress the camera to fire downwards as easily as the Swingfire, which may at times result in the Striker being unable to find suitable hull-down positions; even suitable positions will often partially reveal the vehicle or result in 'blind spots' where the optics simply do not have the ability to aim.

The missiles are controlled by the cable and the camera cannot guide multiple missiles even though the launcher has 5 missiles readily available without any internal reload. Rapid fire without waiting for the missile to at least get on target is not recommended.

When firing the missiles at medium ranges, it's important to keep in mind the same 'swing' in the missile as the Swingfire - since when they're fired at an upwards angle, the missile will later correct its trajectory downwards and fly wherever the sniper scope was pointed, regardless of Line Of Sight. Due to this, some of the depression and camera placing issues can be compensated by artillery style indirect fire and by manually picked launch angles at close to medium ranges.

By simply pointing the circle directly on enemy tank in third person view, firing, and patiently waiting until missile leaves LOS of the carrier, Striker operator can launch missile effectively anywhere within 45 degrees in front of the hull, even if the target is behind a wall and is not visible, as long as the missile does not hit the ground during the launch itself and sniper scope can be pointed there (through the obstacle). This means, that the Striker does not have to even reveal itself at all as long as the cover allows for this method of attack. As a side effect, until LOS to the missile is restored it will remain uncontrollable and will just fly where it was told to, so enemy should not be able to find good cover, and preferrably should not be able to leave, or attack will become pointless. Additionally, dead tanks produce perfect cover against "blind" Swingfire, so even a good trap spot can become unusable after a certain amount of people fall for it, especially if enemy is capable of pushing dead tanks and understands what is going on.

Sometimes the missiles glitch and instead of going towards the target they suddenly spike upwards at about 95 m mark upon losing control. The reason for this is not known, but it is more likely to happen if carrier's current cover is extremely tall, or the ingame ping is unstable.

If direct combat is unavoidable, reverse gearbox and stabiliser allows the Striker to respond to enemy waves coming from one side by presenting it's right side and attacking while driving along the cover to avoid enemy shots at the same time, but it will only work at medium to long ranges as the missiles start to fly in less than optimal ways when their carrier is not stationary (despite having a stabilizer) and may hit the ground.

In one on one combat at close range the launcher can overwhelm most tanks by firing at them every few seconds. The advantage decreases with more and more tanks entering the fight. The launcher has a hard dead zone of 50 m over even terrain and soft dead zone of around 70 m, therefore it is necessary to pay attention not only to hills themselves, but rocks and backward inclines next to them. if the enemy is closer than 70 m, it's suggested to aim not at the tanks themselves, but rather at the ground between Striker and them, or to angle the hull downwards on a slope beforehand (so that target is "above" the carrier), as otherwise the missiles will be unable to correct themselves in time. 40 m shot on even elevation is only possible if the missile is fired sideways and even then the hit is not guaranteed.

Detailed examples of Striker attacking what is generally considered a difficult target and still doing well:

The missiles will generally turn well on launch within the default 45 degree launch zone. Outside that zone, they will require about 150 m or more before they can get on target. The more the missile speeds up, the higher is the likelihood of overshooting in a sharp turn. Where necessary, turn the carrier around to ensure that the Swingfire doesn't hit any obstacles on the way to its target.

Reloading the Swingfires

While it might appear that the Striker will reload all five missiles simultaneously after the rack is emptied, it actually reloads one at a time.

Do note, that the reload process is split into 2 parts: "autoloader" loading a missile, which takes about 4.5 seconds and can be prevented by launching a missile, and missile activation which takes 0.65 to 0.5 seconds. The autoloader reload cannot be sped up, so try to remember about it and let autoloader load the next missile before firing again.

This can lead to an advantage in Arcade battles, as the ammo can be portrayed as limitless since tubes generally reload while guiding the missiles to the target. However, full ammo rearm outside of capture point after spending all missiles in AB takes about 50 seconds, and the missiles cannot be used too recklessly as it still takes at least 5 seconds to reload one launcher.

While rearming, launchers also instantly reload, which means you can fire at will after rearm sequence is finished. If you are rearming inside of a capture point and have less than 5 missiles, then they get "reloaded" immediately, however, though rearm itself is not interrupted by the Striker firing, it is longer than reload and takes about 8 seconds.

Rearming inside of capture points in AB can also grant more than 1 missile if you start to rearm before using the last missile. This rearms entire ammo pool immediately, but having a steady aim is still required, as it is also generally unsafe to do, as capture points rarely provide any cover by themselves. It's technically possible to endlessly rearm the entire magazine and fire endless hurricanes of ATGMs if only 5 missiles were taken in the ammo distribution UI, but the Striker is then confined to guarding the capture point it arrives to, and it will only work if the point was captured by allies, which is not guaranteed.

In Realistic Battles, this advantage is less important since the Striker only has 10 shots, and if a missile in the rack is hit, it will explode all of the ammo in the launcher, leaving the Striker with even less. It also rearms only one missile per cycle on capture points in RB.

When unlocking Mk.2 missiles, keep in mind that while they give you a penetration edge over heavy tanks, you can only have 30 of them per battle. Should you waste all of them, the Striker becomes almost completely useless. This is more relevant in AB, because Strikers can get used to a literally unlimited ammo pool and suddenly find themselves unable to fire and rearm - if you plan to live forever or going to menace and halt the enemy team rather than go tank hunting, then you might resort to just using Mk.1 instead.

In short: Learn to be careful with your missiles and be mindful of your surroundings; if you're not confident, practice the Striker's aim in AB and abstain from RB or don't use Mk.2 missiles until able to control the missiles properly - having a wasteful attitude to missiles or missing shots will force a constant rearming period at a capture zone.

BAe Swingfire ATGM Turret rotation speed (°/s) Reloading rate (seconds)
Mode Capacity Vertical Horizontal Stabilizer Stock Upgraded Full Expert Aced Stock Full Expert Aced
Arcade 10 N/A N/A Two-plane 18.65 18.65 22.64 25.04 26.64 0.65 0.57 0.53 0.50
Realistic 12.60 12.60 15.30 16.92 18.00

Notes:

  • Turret, in the case of Striker, is represented by cameras (optics). The faster they move, the more responsive missiles become.
  • Launcher has a dead zone of about 50 m in front of the vehicle. If Striker is angled upwards, then the dead-zone is extended further below vehicle due to the camera depression angles.
  • Automatic guidance system has a soft dead-zone of about 70 m and missile tends to initially go above designated target, which results in an inability to hit the enemy if the reticle is simply pointed at them. Point reticle into the ground close to an enemy to hit or use indirect attack technique.
  • Reloading only happens for one tube at a time. If the weapon is broken, then reloading is stopped to prevent potential ignition on follow-up shots. If out of ammo, when fully rearmed all racks are also reloaded and ready to fire again.

Ammunition

Penetration statistics
Ammunition Type of
warhead
Penetration @ 0° Angle of Attack (mm)
10 m 100 m 500 m 1,000 m 1,500 m 2,000 m
BAe Swingfire ATGM 535 535 535 535 535 535
BAe Swingfire Mk.2 ATGM 700 700 700 700 700 700
Missile details
Ammunition Type of
warhead
Velocity
(m/s)
Range
(m)
Projectile
mass (kg)
Fuse delay
(m)
Fuse sensitivity
(mm)
Explosive mass
(TNT equivalent) (kg)
Ricochet
0% 50% 100%
BAe Swingfire ATGM 185 4,000 25 0.05 0.1 4.55 80° 82° 90°
BAe Swingfire Mk.2 ATGM 185 4,000 25 0.05 0.1 4.55 80° 82° 90°
  • Missiles are launched upwards with initial velocity of about 89 m/s
  • The Mk.1 and Mk.2 BAe Swingfire missiles are not different from each other in any way but penetration, which allows Mk.2 to penetrate heavy tanks at extreme angles and destroy ERA shields more efficiently. The price is, however, is that you can only have 30 of Mk.2 missiles per battle (though it's difficult to spend them all in RB).
  • ATGM can overpenetrate fuel tanks, which are often used to protect ammo racks. However it can also overpenetrate certain parts of tanks and leave them without doing any damage - be cautious and try to do direct hits exactly where it hurts
  • The missiles can cause overpressure damage, but only if hit enemy tank in a weak spot with less than 15 mm RHA

Ammo racks

Ammo racks of the Striker
Full
ammo
1st
rack empty
2nd
rack empty
3rd
rack empty
Visual
discrepancy
10 (+5) (+3) (+10) No

Notes:

  • Missiles are modeled individually and disappear after having been shot or loaded.
  • Rack 3 is a first stage ammo rack. It totals 5 shells and gets filled first when loading up the tank.
  • This rack is also emptied early: the rack depletion order at full capacity is: 3 - 1 - 2.
  • Simply not firing will move missiles from racks 1 and 2 into rack 3. Firing will interrupt the restocking of the ready racks.
  • Missiles are fired from right to left when looking from behind

Machine guns

Ammunition2 500 rounds
Belt capacity100 rounds
Reloadbasic crew → aces
10.4 → 8.0 s
Fire rate650 shots/min
Main article: L37A1 (7.62 mm)

Not much to be said about the machine gun as it barely does anything against highly armoured targets. So use the machine gun to remove fences since hitting anything with the Striker slows it down considerably. Fighting planes with this machine gun is not suggested, it's easier to just fire ATGM at them and hope they care enough to disengage, but it can be optionally done in RB in an attempt to damage some critical component on the aircraft or rotatory wing. - With a hint of luck, is possible to hit the pilot or damage the vehicle enough to make it crash.

Msg-info.png Light helicopters like the Alouette (Family) are really vulnerable to the high rate of fire of the L37A1, wait for them!
7.62 mm L37A1
Mount Capacity (Belt) Fire rate Vertical Horizontal
Pintle 2,500 (100) 650 -10°/+50° ±180°

Usage in battles

The Striker should be seen as an extremely mobile support platform. It can pose serious intimidation to any enemy thanks to the powerful Swingfire missiles, however, is equally vulnerable against most enemy tanks or planes. It can be very effective when used as a siege tank, up close and personal, rather than a sniper, but not every map allows such a playstyle, especially in RB.

While "black hot" thermal mode is painful for eyes, it makes tanks stand out even more. It also makes ATGM block out less vision, which is important, as it is already hard to hit tanks hiding in bushes.

Moving around

Find buildings, teammates, hills, or rocks that are as tall as the hull of Striker, then proceed to snipe with the ATGMs - Use the machine gun only for destroying fences and against planes. In other words "Be sneaky and shoot at the range".

In realistic battles, if you have the Thermal vision modification installed, you can use your thermal scope to "scan" the surroundings for hostile snipers and "bush campers", the advantage of this system is that it is possible to even use it during the day. Driving out in the open will not end well for the Striker unless the enemy has someone else to shoot. Use the smokescreen to cover the Striker (or allies) from enemy snipers while they opening fire on someone else.

In extreme situations, the Striker can be put into risk in a flanking tactic by driving straight to cover inside of enemy territory (preferably at the start of the match in RB), hoping that nobody expects missiles suddenly launching within "their" part of the map and ruining their plans.

It is possible to make fast emergency stop by crashing into obstacles or other tanks when necessary. Make sure to not crash with just one track, since it will break it, especially if driving above 40 km/h.

Combat tactics

There are several examples of this Flanking/Ambushing tactic, for example:

Trade one for eight.

As the right-side team on the "Vietnam" map, the Striker cannot hope to take hold of the C capture point, as the left-side team has an indefensible advantage over that capture point. Even the idea of it is so unthinkable, that almost nobody checks the river near to town (and even if they do, using both smoke launchers can give enough breathing space to get past them), so the Striker can dash to the river entrance of C capture point, which is exactly the size of the Striker and is also heavily fortified from every direction, to destroy the entire enemy team right there, as it tries to leave C.

Not only the chances of success are quite high, but the heavily aggravated enemy team will probably come straight at the Striker's position leaving them prey of Striker's teammates sniping in the back.

Striker fires from above

Note that rush and flank tactics are not feasible without a spaded vehicle, as it's significantly harder to hit a Striker when it is driving at 50-87 km/h, compared to 30-60. A weaker suspension may stop the Striker from moving altogether after hitting any bumps on a road, weaker tracks tend to break easier, and so on.

Remember, it is not needed to go that far into enemy lines to ambush the enemy team; use your imagination and teamwork to do more damage. Retreating away or imposing a "threatening presence" next to capture point is generally a much more viable tactic, unless trying to take a last stand against the entire enemy squad. Where any regular player sees a wall, and might only think of getting around it or trying to blindly fire over it, an expert seeks opportunity in everything around them.


Teamwork

Striker excels at holding chokepoints, so just give the enemy something to think about by firing 1-2 missiles at the corner of their cover, then use their confusion or doubt to get closer and think of a way to launch missiles straight into them, as they are now potentially defenceless, then blow them up.

If they try something as rushing without a smokescreen, show no mercy and fire all launchers at will, until they are disabled or destroyed.

Having a scouting light tank working with the team to actually mark the enemy through walls and smokes is great, as you don't need to guess where your opponents are and can just fire at them by using sniper mode. Having someone to draw attention from the Striker, like a Chieftain tank, is even better, as nobody normally prioritizes the bland Striker, especially if next to a bunch of scarier, fearsome teammates. Avoid using them as a shield at 9.3+, as APFSDS which can go through multiple tanks is used there very often; if not always.

In case the situation is such that the Striker must protect itself or allies against a tank rush, the carrier can be crashed into something with its back to negate the dead zone almost entirely. If there are no suitable objects, use a hill or retreat far enough for missiles to hit before targets can get into ramming range.

When choosing a sniping point, aim for certain criteria to be flexible if trying to make a difference:

  • Can this help at holding control point from here? Can the Striker destroy the enemy before they can run away?
  • Is it fortified to a point it's impossible to take out the Striker without heavy enemy losses or air support? Can it fire without exposing itself to avoid being hit by normal explosives?
  • Can the Striker control more than one direction from here? If not, is this the only really important capture point on the map?
  • (In RB) Can the Striker rearm fast there?
  • (In AB) Is retreat possible, or enemy snipers will lock down the position completely soon after your arrival?


Positioning

Sometimes, a well-chosen cover can be a difference between complete defeat and victory. A direct attack on B capture point on American Desert sounds completely desperate for a normal ATGM carrier. However, one can use ATGM to damage buildings to create a perfect firing position for themselves. Remember, buildings that didn't collapse entirely after being hit by ATGM generally cannot be shot through by AP shells anymore.

In the case of American Desert, the ruins are often high enough to protect even the missile launcher entirely.

The Striker can often aim through ruins and any tank behind them can be aimed at directly, including tanks behind other houses, as almost every cover around you is often completely destructible or does not protect well against repeated ATGM attacks from the top. Even to reach the Striker at some positions, the enemy has to go through 1 to 3 alleyways while being under heavy missile barrage. If necessary, in Arcade Battles an entire city block can be levelled down over time to increase Striker's control zone, as ammunition limit is not a pressing issue there.

However, do not get too impudent, as it is still possible to snipe the Striker through street openings, and it is very difficult to fight once enemy tanks get into 50 m zone around it, so the positioning and map awareness is the key.

Surviving counterattacks

Typical day of Striker driver in Arcade battles.
The Striker's noisy actions will draw attention, so expect to be bombarded by artillery almost constantly. Standing under artillery fire is a bad idea, but at some point it will be required to tough it out, hoping the blasts or shrapnel won't end the Striker and then focus at stopping whatever called the artillery, as enemy tanks probably will come after the bombarded area. Keep in mind that it has fewer chances of hitting the Striker on mountain rocks and other unorthodox types of cover, especially if close to several covers at once.

If someone is rushing towards the Striker's position, keep calm and turn as much attention as possible to the direction of assault. Remember about the launcher dead zone and retreat to position that allows to fire back at the incoming tanks. Machine guns have problems disabling the Striker's weapon system from the front, so you should first aim at the tanks which are likely to have APHE or carry ATGM.

In case the enemy breaks the Striker's weapon, remember that neutral steering turn on flat terrain does not prevent field repair of weapons, so simply keep turning towards enemy and hope for the best when under suppressing fire.

Even when an enemy destroyed Striker, you still have indirect control over the missile for a few seconds. Ignore the "you were destroyed" screen and keep guiding it into them, or don't move the mouse, if you are sure it's onto them, or it will flinch.

Overcoming dead zones and other weaknesses of a vehicle:

Since Striker is unable to fight at long range without exposing itself, most enemies will have to be attacked indirectly regardless of range. Mostly this kind of attack is done in third-person view, as using sniper mode is way too dangerous. Sniper mode still can be used to aim over objects or terrain by sending missile into the sky and then very quickly aiming at the enemy tank behind a hill with your crosshairs when missile gets close to them (as to minimize exposure to enemy fire), or by just pointing it at the enemy location if you are sure of it (for example, when enemy is scouted below the carrier at about 100 m range).

.Gif picture with exxagarated examples - click on it to see more. Note how reticle is initially aimed in most of these fights - normally operator would be unable to see anything. This kind of performance is rarely ever expected, and is absolutely impossible otherwise. It will still take a lot of work or ammunition to land these kinds of shots if you want to avoid exposing the carrier at all costs.

By memorizing launch angles and setups the Striker can attack the enemy from extremely advantageous angles, while use of third person view pointer will ensure that missile goes exactly at the enemy and not somewhere else. However, there is a limit to what one can do. For example, indirect fire allows Striker to attack enemy behind steep hills, but adds another problem - there are still dead zones, because missiles can crash during launch and gunner camera is unable to look down. When trying to push third person aim to its limits to compensate for this, you will also find out that it becomes difficult to see due to sight obstructions. To overcome this and become even stronger, activate "relative camera control" in the "control-tank-view in battle - Ground (y/x axis)".

For specific settings and control explanations relate to the screenshot in media section below.

Basically, this will temporarily detach the camera from the centre reticle by a certain degree as mouse viewing does. Be extremely careful when using this option because it makes the Striker specifically designed for close or ultra-long-range combat or battles at certain heights, and the camera must have a quick reset button in case anything unexpected happens. In case everything goes wrong, the Striker still can swap to use sniper mode, as it's unaffected by camera modifiers and will still guide missiles straight into the crosshairs.


Specific enemies worth noting
  • Other ATGM launchers: Don't fight them directly at close range, it will be foolish. Instead, bait enemy closer to your cover, then just destroy them by firing over it. Another way is to set them on fire by any means necessary at a distance and let them burn just to be safe. Be triple careful with IT-1, as even a close miss of their missile can obliterate Striker. Avoid being spotted by ATGM tanks with vertical attack missiles like the CM-25 - you may parry their missile with yours, but its unlikely and they don't need to go through any special procedures to fire into your cover.
  • Light tanks and SPAA: As fun as it may be to trigger them by firing all over their cover, they still can destroy the Striker easily and have enough speed and mobility to actually do that. Let them ignore the Striker and do their business, though keep an eye on them. If they try something sneaky - destroy them. If it's possible to hit them in a weak spot within the first two shots to trigger overpressure damage - do it.
  • Soviet tanks: Aim for the hull, as it usually destroys or immobilizes them. Aiming for right (their left) side is taking out the gunner and is generally better for self-defense, however a direct hit on left side (their right) will likely overpenetrate fuel tanks and ignite their ammo rack. They are also more dangerous than German ones, so prioritize them over others.
  • MBTs with autocannon coaxial (mainly French): They can penetrate your commander cupola and sides with their coaxial weapon from any angle at 100 m, so letting them close means certain death. While retreating, try to not expose cupola or sides without also exposing the front of the hull, so they have something to fire at and don't get any better ideas. Spending your ammo fast makes side shots less lethal since coaxial autocannons seem to not have explosive filler, and if they don't hit your crew or ammo directly, the damage is minimal.
  • Helicopters: In case the Striker provokes half of the enemy team and didn't succumb to artillery, they will probably send one of these flying birds directly at the Striker's location. If they have ATGM, immediately hide behind some tall cover and fire back with a missile. If they are too far away, there is not much the Striker can do and if actually targeted should try to empty their launcher and turtle up using launcher as a shield to protect the fragile hull from ATGM. Rockets can destroy the Striker as well if the pilot manages to carpet-bomb the position, so helicopters should be prioritized as a target and a threat.
  • Strike aircraft: While bombers generally approach their targets directly, can be shot down with ATGM, and their bombs generally make enough noise to notice them and dodge, attackers at 8.3+ are extremely fast, manoeuvrable and can suddenly carpet-bomb your vehicle with rockets more than once. Do not show them the sides of the Striker, and try to not let them fire rockets precisely from the top, by hiding in smokes.
  • Top-tier tanks: While the Swingfire Mk.2 can damage top-tier tanks, it is unwise to fight ERA-covered tanks with the Striker if you do not have a plan. Always treat them as if they only take real damage on second hit. Avoid being hit by them, as they generally can knock out the Striker with a single shot.
Counter-tactics

The Striker can be extremely dangerous if it is entrenched in a suitable firing position. If you know for sure that it is ready to unload onto you the moment you leave the cover (or even already thinks of firing into your cover), use artillery strike on it and deploy smokes before going in, otherwise you will just be annihilated by a missile salvo. One of the signs that it is ready to desperately fight back is that the carrier is being angled down and launchers are pointed at you, rather than upwards.

It has problems firing at the opposite side of the same hill if it's too steep. This will not help destroy a Striker, but at least the location is somewhat safe until they found a proper firing angle. It can fire over cover in 45 degree sector in front of it. It is incapable of fast-firing to the left at all and has issues with firing behind itself. It is preferable to stay closer than 500 m in case if Striker decides to turn and counterattack with the right side, as otherwise the Swingfires definitely will have no issue with turning around and hitting you.

The Striker must stop before firing and has a dead zone, so if surprising one while it fights someone else - destroy it before it hit the brakes, or at least make them panic and try to push the vehicle around, ultimately dragging them into a wall. One can even use disabled Striker as a shield against their own teammates, as it can't really do anything about it.

Enemy used buildings to sneak behind Striker, who couldn't see him, broke its track and weapon, and pushes it around as a shield, denying repairs.

In case if you absolutely have to attack it directly, you can at least try to destroy its ATGM with MG suppressive fire, because it can't really control missiles without the line of sight. If it has the LOS on you, a good enough bullet screen will take at least 4 x 7.62 mm MG at once, there are no guarantees it will work, and, if it has high ground, it still can launch them at such angle, that you will be unable to do anything.

It's best to attack from many directions at the same time, preferably from behind or the left. Even better if the operator didn't see it coming. Sniping and terrain-based flank are working better in arcade battle, since there they only have vision in front of their driver and in direction they point camera at, but at great range, while sneak attacks from any direction are more reliable in realistic battle, though they themselves are much harder to notice in time. Use of thermal scope is recommended in order to find it or its missiles. If you just have numbers on your side, and your team is more or less cooperative, even the Striker can be overwhelmed. A coordinated simultaneous push of 6 tanks can destroy even the best Striker users, albeit at a high cost. If you must attack entrenched invisible Striker, do not scoff away from idea of using dead tanks as a portable shield. Do not attack it one by one - that is exactly what they want, as it gives them time to reload in between shots.

If it only exposes its missile racks, fire at it, preferably with explosives (HE or ATGM might destroy it outright, HESH and HEAT might hit a weak spot and cause overpressure damage), APFSDS, or 30 mm autocannons with at least 80 mm of penetration. It's also possible to fire into the tubes with all kinds of weapons to damage the missiles directly. Usually, the tubes on your left (their right) fire first and are already empty, so initially aim for the right (their left) to set them on fire. After setting the weapons on fire, destroy the hull. Keep attacking missile launcher if unable to hit the hull or commander cupola to prevent it from properly reloading and to force it to retreat.

The front of Striker may be surprisingly resistant to machine gun fire, however, if in possession of high calibre machine guns, move around Striker and penetrate its back or sides with them. If you have autocannons as a coaxial weapon (which are ~23 mm and insufficient to damage launchers), attempt to damage commander's cupola, which has much worse protection. 7.62 mm machine gun does nothing to it even point-blank, so do not use those on it. Fire it at its missiles instead.

If attacks didn't set Striker on fire, but broke it's weapons, it will be at least 4 seconds of manual "full repair" before the Striker repaired the launcher properly. Firing at launchers again will reset the "field repair" timer, which takes about 9 seconds and is generally used when Striker is forced to spin around by machine gun fire, so sometimes time can be taken after a successive hit. However, remember, that Striker normally doesn't suffer critical damage when hit in a missile launcher and it may still be able to fire if hit wasn't strong enough. Regardless, its crew will be able to complete repairs extremely fast if not prevented by fires, allowing the launcher to fire even under seemingly impossible conditions. Always fire at different tubes, as it may set the vehicle on fire if actual ammo is hit and prevent it from retaliating at all.

This is why striker must always fire at Soviet tank's hulls: T-54 used terrain to get into melee range with the Striker. Despite being hit several times in turret, it managed to push striker into a wall, then smoked the entire area to make teammates unable to save him. The Striker cannot save itself anymore.

The SPAAs with absurdly high fire rate, like Vulcan and Shilka can fire at Striker and destroy vehicle without even aiming. Problem is, it's unlikely that Striker will just let them drive up to itself, and these SPAA cannot defend themselves against other tanks at all, so chances of them ever fighting are very low.

Pros and cons

Pros:

  • Reasonable mobility in all directions once fully upgraded, thanks to the reverse gearbox
  • 5 powerful ATGMs ready for quick succession firing when necessary
  • When defending a capture zone, ammunition is constantly reloaded; allowing to fire ATGMs almost indefinitely, unlike ATGM carriers which require manual reload or have longer rearms, like Shturm-S or ZT3A2
  • Double hull mounted smokescreens provide adequate visual protection; specially during retreats
  • Can be used as artillery, but such playstyle requires a lot of practice and not every map allows it
  • Often underestimated, unseen or left unattended, giving the Striker a chance to repair and strike back; all because of the small and vulnerable size
  • Availability of thermal imaging; packed with the great optics allows for a proper target acquisition
  • Frontal armour can actually withstand HMG and even some 20 mm cannons; modules placing also improve frontal protection
  • Technically fastest ATGM reload, tied with the BMD-4, but can't reload while attacking, unless on a friendly capture point


Cons:

  • Highly vulnerable to autocannons, ATGM, air attacks, artillery, ramming, and HE/HESH shells
  • Optics location is a worse aiming set up when compared to Swingfire ; the top and ammo racks of the Striker must be exposed to correct the ATGMs trajectory; Optics can be targeted with any explosives to instantly destroy the Striker
  • Has a hard dead zone of 50 m in AB and further in RB, can be difficult to guide missiles at ranges below 70 m due to a guidance dead zone
  • ATGM rack is impossible to lower; an impact to the ATGM rack can leave the Striker with no active ammo left
  • Modest ATGMs count can be quickly depleted without trigger discipline; in Arcade battles automatic rearm is available anywhere, but more ATGMs per tank are also often required
  • Although Swingfire can be launched over full cover without any further input, it often crashes on launch if cover is too tall or wide.
  • Despite a quick reload, the ATGMs are loaded into the rack one by one; making the Striker vulnerable to multiple enemies after depletion of the rack
  • Swingfire ATGMs are noisy and will give away the Striker's position in close quarters even when it is perfectly hidden

History

The FV102 Striker was an anti-tank wire-guided missile carrier which belonged to the CVR(T) family, developed for the British Army during the Cold War. The Striker had five missile launcher boxes and carried a total of 10 Swingfire missiles (5 in the launchers and 5 reloads). It weighed around 8.3t and was powered by the Cummings BTA 5.9-litre diesel engine which could output 190 hp. Its top speed was 81 km/h (50 mph) forwards and backwards.

Development

The Striker was first developed in 1975 for the British Army. The chassis was produced in the West Midlands, England. Other components were sourced from other suppliers, Fairey Engineering manufactured the missiles and so did the British Aircraft Corporation. The missiles were released by the launcher at the back on the Striker and had a range of 4,000 m, the commander could correct the trajectory if it was necessary. However, it had to be reloaded manually from the outside. It was also equipped with a 7.62 mm L37A1 machine gun (2,500 rounds).

It was first powered by the Jaguar 4.2-litre petrol engine (standard car engine) and later replaced by the Cummings BTA 5.9-litre diesel engine. It consisted of 3 crew, the gunner who sat on the right side, commander and driver who sat on the left side (the driver sat next to the engine). The front armour was 25 mm thick while the side and back were 12 mm thick.

Service

The Striker first entered service in 1976 with the Royal Artillery of the BAOR but was later transferred to the Royal Armoured Corps. It saw combat in 1991 during Operation Desert Storm and Enduring Freedom in 2003 where it managed to destroy an Iraqi T-55.

The FV102 Striker ended service in 2005 with the introduction of the Javelin missile which replaced the Swingfire missile.

Media

Skins
Images

Some screenshots of Striker medium range positions:

Videos

See also

Other vehicles of similar configuration and role

External links


Britain tank destroyers
Infantry tank derivatives  Archer · Gun Carrier (3-in)
Light tank derivatives  Alecto I
M10 Achilles  Achilles · Achilles (65 Rg.)
Centurion derivatives  FV4005 · Conway
ATGM  Swingfire · Striker
Other  Tortoise · ▄M109A1
Canada  QF 3.7 Ram · ADATS (M113)
South Africa  G6 · ZT3A2