
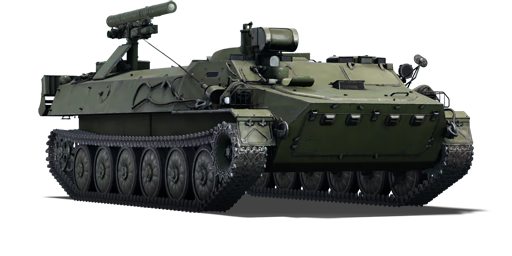
Shturm-S

From War Thunder Wiki
Jump to: navigation, search
Rank 7 USA
F-5C Pack
Shturm-S
ussr_9p149.png
GarageImage Shturm-S.jpg
Shturm-S
Research:160 000 Specs-Card-Exp.png
Purchase:450 000 Specs-Card-Lion.png
Show in game

Description

The 9P149 Shturm-S was a Soviet Self-Propelled Anti-Tank Guided Missile System designed with the intent of being able to effectively destroy heavily armoured western tanks on the battlefield. It was first introduced in the late 1970s and saw widespread use by the Soviet Union and its allies during the Cold War. One of its key features was its ability to engage targets at long ranges, up to 5 kilometres, with high accuracy and precision, which was a significant advantage over other anti-tank systems of its time. The 9P149 Shturm-S also had the capability to fire missiles from a concealed position, making it difficult for enemy forces to detect and counter. This made it a highly effective weapon in mostly defensive operations. The modernised 9P149M version incorporated thermal vision systems, as well as adding the capability to fire the new and improved 9M120 Ataka missile in addition to the 9M114 Shturm (though this ability is added in separate modifications in-game).

The 9P149 Shturm-S was introduced in Update 1.89 "Imperial Navy". This particular ATGM carrier relies purely on stealth, unlike the IT-1. It can engage targets, both aerial and ground, from insane ranges of up to 7 kilometres and deliver devastating blows. It should also be noted that it outranges every helicopter at its battle rating, meaning it can engage them with ease.

General info

Survivability and armour

ESS
Creation of a smoke screen in the direction of movement of the vehicle
Armourfront / side / back
Hull14 / 7 / 7
Turret0 / 0 / 0
Crew2 people
Visibility65 %

Armour type:

  • Rolled homogeneous armour
Armour Front Sides Rear Roof
Hull 14 mm (54°) Front Plate
7 mm (80°) Upper glacis
14+5 mm (38°) Lower glacis
7 mm (23°) Top
7 mm Bottom
15 mm Middle
7 mm Top/Bottom
7 mm
Cupola 7 mm (30°) 7 mm (30°) 7 mm (30°) 7 mm

Notes:

  • Suspension wheels are 10 mm thick while tracks are 15 mm thick.
The side armour of the carrier might as well not exist. It should always fight while using cover or distraction of some sort.

Pretty much every enemy tank in the game will be able to destroy the Shturm-S including rank I anti-air.

From the side or the roof, within 200 m the crew compartment can be penetrated by 7.62 mm. It also can be penetrated by HEAT overpressure, which is terrible. Artillery is also dangerous, as way too many close misses might ignite the ammo rack or knock out the crew.

Airstrikes are especially lethal to this tank, so much, that the vehicle might as well be without armour. In the case of a cannon air raid, sides should be presented, as there is a chance the aircraft will focus on engine compartment first, in the case of a rocket raid, front should be presented, as otherwise overpressure damage will destroy the Shturm-S instantly. Since there is no way to know which plane carries what in RB mode, it is better to face enemy aircraft regardless.

The front is more or less protected from .50 calibre, so, if necessary, it can be exposed towards an enemy who still has his HMG working, but it should not be relied on.

Despite having poor armour, Shturm-S technically can snipe right next to opponents and not be seen or hit because of its low profile.

There are very few areas on this tank that can be hit by a cannon round and survive. The entire front is essentially an instant kill zone, as even a scratch by APFSDS will cause enough spalling to obliterate both crew members, and it is extremely rare to only lose one. Very rarely, a HEAT shell falling straight to the middle might fail to completely knock out crew members, but the chance is also very slim.

The only place where Shturm-S can survive a side shot by a cannon is the engine room in the very middle. Thus it is very important to present the tank completely flat when flanked, as to make centre of mass shot seem more lucrative (for example, in AB, some people might not even bother aiming manually and just press "aim assist" and "fire", which results in a shot straight to the middle). After hitting the engine, enemies usually aim straight for the ammo rack, so it only works once.

Given that this vehicle only has 2 crew, susceptible to any overpressure damage with paper-thin armour and both crew members tend to get shot at the same time, generally, avoid everything. Use carrier's low profile and put a solid piece of dirt between you and the enemy and only fire and gain attention of enemies if the kill is guaranteed.

The ESS can be unlocked and used in conjunction with thermal scope to fight or retreat from obsolete tanks in open fields, but it will not save from tanks which also have thermal scopes (particularly in RB, where many people use it by default, but in AB ESS might still work, as not everyone use it there) or scouting ability (particularly in AB, as it is vastly easier to use and far stronger there). ESS is also useful when fighting late ATGM helicopters with laser lock-on feature, as it will break any automatic guidance and force their gunner to guide the missiles manually with thermal scope (which may take them too long before the Shturm-S manages to load an HE-VT ATGM and fire back) and does not allow already dead helicopters to get the last laugh by automatically guiding the ATGM in spite of being torn to pieces.

Mobility

Amphibious
The design allows you to swim and control movement in the water
Speedforward / back
AB67 / 12 km/h
RB and SB62 / 11 km/h
Number of gears11 forward
2 back
Weight11.8 t
Engine power
AB458 hp
RB and SB240 hp
Power-to-weight ratio
AB38.8 hp/t
RB and SB20.3 hp/t
Game Mode Max Speed (km/h) Weight (tons) Engine power (horsepower) Power-to-weight ratio (hp/ton)
Forward Reverse Stock Upgraded Stock Upgraded
Arcade 67 12 11.8 341 458 28.9 38.81
Realistic 62 11 212 240 17.97 20.34
Sometimes, swimming ability can compensate Shturm-S's mediocre mobility.

The mobility is best described as nippy but not fast. Compared to Soviet medium tanks of its BR, the Shturm-S is faster (at least in a straight line) but compared to other nations it is slower.

The mobility hindrance in higher BRs is much more noticeable for the Shturm-S, being 50% slower than MBTs such as the M1A1. The rear gear only goes up to -10 km/h. This reduces amount of sniping spots the carrier can reach before it gets countersniped.

The Shturm-S lacks neutral steering meaning that turning around can take some time.

The carrier can swim like most of the other Soviet light tanks.

Modifications and economy

Repair costBasic → Reference
AB4 400 → 5 865 Sl icon.png
RB5 038 → 6 715 Sl icon.png
SB5 336 → 7 112 Sl icon.png
Total cost of modifications130 000 Rp icon.png
229 000 Sl icon.png
Talisman cost2 400 Ge icon.png
Crew training130 000 Sl icon.png
Experts450 000 Sl icon.png
Aces2 000 Ge icon.png
Research Aces890 000 Rp icon.png
Reward for battleAB / RB / SB
160 / 210 / 250 % Sl icon.png
214 / 214 / 214 % Rp icon.png
Modifications
Mobility Protection Firepower
Mods new tank traks.png
Tracks
Research:
9 400 Rp icon.png
Cost:
15 000 Sl icon.png
370 Ge icon.png
Mods new tank suspension.png
Suspension
Research:
8 000 Rp icon.png
Cost:
13 000 Sl icon.png
310 Ge icon.png
Mods new tank break.png
Brake System
Research:
8 000 Rp icon.png
Cost:
13 000 Sl icon.png
310 Ge icon.png
Mods new tank filter.png
Filters
Research:
12 000 Rp icon.png
Cost:
19 000 Sl icon.png
470 Ge icon.png
Mods new tank transmission.png
Transmission
Research:
9 200 Rp icon.png
Cost:
15 000 Sl icon.png
360 Ge icon.png
Mods new tank engine.png
Engine
Research:
9 200 Rp icon.png
Cost:
15 000 Sl icon.png
360 Ge icon.png
Mods tank tool kit.png
Improved Parts
Research:
2 800 Rp icon.png
Cost:
15 000 Sl icon.png
370 Ge icon.png
Mods extinguisher.png
Improved FPE
Research:
2 400 Rp icon.png
Cost:
13 000 Sl icon.png
310 Ge icon.png
Mods tank reinforcement ussr.png
Crew Replenishment
Research:
12 000 Rp icon.png
Cost:
19 000 Sl icon.png
470 Ge icon.png
Mods engine smoke screen system.png
ESS
Research:
9 200 Rp icon.png
Cost:
15 000 Sl icon.png
360 Ge icon.png
Mods thermal sight.png
9P149M
Research:
9 200 Rp icon.png
Cost:
15 000 Sl icon.png
360 Ge icon.png
Mods new tank horizontal aiming.png
Horizontal Drive
Research:
9 400 Rp icon.png
Cost:
15 000 Sl icon.png
370 Ge icon.png
Mods tank ammo.png
130mm_9m120_ATGM_ammo_pack
Research:
8 000 Rp icon.png
Cost:
13 000 Sl icon.png
310 Ge icon.png
Mods tank ammo.png
130mm_9m120f_1_ATGM_ammo_pack
Research:
12 000 Rp icon.png
Cost:
19 000 Sl icon.png
470 Ge icon.png
Mods tank ammo.png
130mm_9m220o_ATGM_ammo_pack
Research:
9 200 Rp icon.png
Cost:
15 000 Sl icon.png
360 Ge icon.png

Armaments

Thermal imager
Allows to see thermal radiation in the infrared range day and night

Main armament

9M114 ATGM
Autoloader
Automatically feeds projectiles into the breech. The speed does not depend on the skills of the loader
Ammunition12 rounds
First-order11 rounds
Belt capacity1 rounds
Reload8.3 s
Fire rate8 shots/min
Vertical guidance-5° / 15°
Horizontal guidance-85° / 85°
Fire on the moveup to 6 km/h
Main article: 9M114 Shturm
9M114 Shturm ATGM Turret rotation speed (°/s) Reloading rate (seconds)
Mode Capacity Vertical Horizontal Stabilizer Stock Upgraded Full Expert Aced Autoloader
Arcade 12 -5°/+15° ±85° N/A 22.0 30.5 37.0 40.9 43.5 8.30
Realistic 14.9 17.5 21.3 23.5 25.0

Shturm-S uses ATGM launchers by picking them up with a special handle at its rear. Once the missile is fired, the handle simply discards them and picks up a new one from inside of the tank.

Due to overall Shturm-S fragility and awkwardness of aiming device placement, it is necessary to pay close attention to smallest details next to cover, as they might be more than just a decoration for Shturm-S.

The handle is put down if the vehicle speeds up too much (faster than 19 km/h), but if it was reloading while the tank was moving, it will pull the launcher out at the end of the reload, whether you want it or not. When launcher is pulled out, it is always pointing forward.

DO NOT hold "fire" button while reloading or waiting for launcher to pull out, because launcher has a tendency to malfunction if you don't wait fot at least 0.2 sec after it finished. This "malfunction" causes the missile to simply disappear.

Each missile type has great manoeuvrability, but the launch sequence is greatly complicated by the fact, that launcher (located in the very back of the tank) is offset from the actual guiding camera (located on the front-right of the tank), and missiles are launched at high speeds, causing them to often miss at close range. Since the launcher is pointing forward when pulled out, firing too early might also cause the missile to miss, depending on how much it needs to turn and compensate to get on course. Aim assist of arcade mode also has a tendency to aim lower than it should and often spontaneously breaks off because of this, so it should not be relied on for anything but AA duty.

The Shturm-S cannot properly fire or aim from medium tank hulldown spots, so it is inferior to IT-1 in that regard. In arcade mode and, at some spots, RB, tank can fire over obstacles by using a stepping stone of some sort, but it cannot really guide shots that way.

The vehicle can carry up to 12 of missiles. It is necessary to choose next ATGM type before firing the current one because Shturm-S can't change payload choice after firing and can't put the wrong launcher back.

When rearming on a capture point, the main type of ATGM is replenished first (the one on top-left of "ammo distribution" UI), so choose carefully. Rearming on a cap is rather slow with about 15 seconds for one missile, full rearm outside of cap in AB is about 35 seconds.

Missiles are vulnerable to jamming, so when fighting tanks with IRCM, it is necessary to also attack from the side, so that the missile doesn't get derailed.

The list of available ATGM in order of acquisition:

  • HEAT - Default ATGM, which has about 550 mm penetration. Launched at 230 m/s with high acceleration. Can deal with anything at the BR, but does only punctual damage like HEATFS. Tanks with heavy NERA or ERA amount will resist it and suffer less than fatal damage or no damage.
  • Tandem HEAT - ATGM with a double payload. Launched at 230 m/s with high acceleration. Extremely high post-penetration damage. Designed to annihilate ERA and other countermeasures and then destroy the tank in one hit. Each payload can penetrate about 800 mm of composite armour at a flat angle. Tandem warhead ignores ERA and penetration should be calculated as if it was not present, unless you hit the target at an extreme angle, launching the actual projectile into yet another ERA layer.
  • HE - A guided missile with a HE payload. Launched at about 130 m/s with poor acceleration. Can penetrate about 55 mm of armour, making it on par with the second strongest HE shells in terms of pure damage. Can be used to cause overpressure damage by hitting tracks or tank's roof, similarly to HE shells, but has negligible area of effect and is weak against ERA plating. Due to its low launch speed it is suitable for close range combat, particularly in AB. Outside of the tank's own BR, it can be used as a utility ammo to destroy NERA tanks, which the tandem HEAT might not be able to even scratch. This missile has enough explosive mass to damage ground, but it has no practical application outside of AB, since damage is very low.
  • Proximity HE - A guided missile specifically redesigned to destroy planes and helicopters. Launched at about 130 m/s with poor acceleration. In terms of damage, it differs from HE by having a slightly higher area of effect (enough to occasionally destroy light tanks standing right next to the target) but slightly weaker penetration (enough to sometimes fail to destroy targets on direct hit) and practically no damage to the ground. It has enough fuel to fly for about 7 km away. In reality, it is mostly equal to normal HE missile. This missile also has a proximity detonator, which activates after missile flies about 300 m away from the carrier and the ground, which helps with hitting aircraft despite not having radar or any other targeting devices. While detonator is set to explode next to the aircraft (about 5 m away) if possible, certain support helicopters can survive the explosion. The proximity detonator will not react to the tanks or the ground even if brought back down to ground level and does not seem to react to rockets and other missiles, unless it is fired straight into them (they often react to it first).

Ammunition

Penetration statistics
Ammunition Type of
warhead
Penetration @ 0° Angle of Attack (mm)
10 m 100 m 500 m 1,000 m 1,500 m 2,000 m
9M114 ATGM 560 560 560 560 560 560
9M120 ATGM (tandem) 800 800 800 800 800 800
9M120F-1 ATGM-HE 55 55 55 55 55 55
9M220O ATGM-VT 51 51 51 51 51 51
Missile details
Ammunition Type of
warhead
Velocity
(m/s)
Range
(m)
Projectile
mass (kg)
Fuse delay
(m)
Fuse sensitivity
(mm)
Explosive mass
(TNT equivalent) (kg)
Ricochet
0% 50% 100%
9M114 ATGM 550 5,000 31.4 0 0.01 3.93 80° 82° 90°
9M120 ATGM (tandem) 550 6,000 33.5 0.4 0.01 4.48 80° 82° 90°
9M120F-1 ATGM-HE 550 6,000 33.5 0.4 0.01 6.93 79° 80° 81°
Proximity-fused missile details
Ammunition Type of
warhead
Velocity
(m/s)
Range
(m)
Projectile
mass (kg)
Fuse delay
(m)
Fuse sensitivity
(mm)
Arming
distance (m)
Trigger
radius (m)
Explosive mass
(TNT equivalent) (kg)
Ricochet
0% 50% 100%
9M220O ATGM-VT 550 7,000 33.5 0 0.01 300 4 6.16 79° 80° 81°

Ammo racks

Full
ammo
1st
rack empty
2nd
rack empty
3rd
rack empty
4th
rack empty
5th
rack empty
6th
rack empty
7th
rack empty
8th
rack empty
9th
rack empty
10th
rack empty
11th
rack empty
12th
rack empty
Visual
discrepancy
12 12 (+0) 11 (+1) 10 (+2) (+3) (+4) (+5) (+6) (+7) (+8) (+9) (+10) (+11) No
Ammo racks of the Shturm-S

The missiles are automatically loaded via a mechanized ammo rack.

Usage in battles

Overview

The Shturm-S can be effective in battles if used correctly. Shturm-S commanders should make sure to use their advantages while playing to negate the weaknesses of the vehicle. For the Shturm-S, playing in a backline role behind cover at medium ranges is the best option and specific approaches depend on game mode.

RB Strategies

Players should use the thermal sights to spot enemies easily and ambush them while they are not looking. Use of cover is essential due to the total lack of armour on the Shturm, even a .50 cal machine gun can penetrate some points in the frontal armour. It is ill advised to push aggressively in the Shturm due to the ATGM launcher which will retract when moving. Additionally, engaging at long range may be difficult as the ATGMs can take some time to reach the target, meaning the target has plenty of time to move into cover. Using the Shturm at close range is suicidal. Luckily the ATGMs on the Shturm are quite satisfactory. The 9M120 ATGM has a tandem shaped warhead which negates ERA protection, and the 9M220O ATGM has a proximity fuse which can easily destroy helicopters. It is recommended to use these two ATGMs, taking mostly the 9M120 HEAT ATGM to destroy enemy armour, with a few of the 9M220O ATGM to deal with enemy helicopters.

AB Strategies and survival tips

Since Shturm-S is essentially countered by AB mechanics and every tank only needs to press "aim assist" and fire any weapon to destroy it, some extreme and outlandish tactics must be used.

Punishment for not following the harsh rules of AB is an instant countersnipe.

To understand, whether to even spawn Shturm-S or not, follow these questions:

  1. Can you even make it to the sniper point before being shot by a hypothetical Leopard I?
  2. Can you fire through or over obstacles at your sniping spot, and how many of them is there?
  3. Is it physically impossible to snipe you from any other side, but front (so that you can see it coming in third person view and dodge)?
  4. If it is possible to snipe you from a side, is your entire team on that side (just three tanks do not count)?
  5. Can you angle upwards at that sniper spot, so that you can snipe easier?
  6. Can you destroy CM-25, Wiesel 1A2, Dardo or M3A3 Bradley (if they are present) and do you know where they are?
  7. In case enemy team currently does endless air raids, do you have ATGM-VT?
Sniping with Shturm-S in AB can get really weird, as it have to use unorthodox tactics. Try to not limit your imagination and you might find another interesting spot to try out.

If you answered negatively to at least two questions, it is probably better to spawn something else according to the situation, as otherwise you will just get destroyed.(For proper hulldown camping or battle in town or forest IT-1 works better, for a heated brawl BMP-1 works just fine, etc.)

It is possible, that following the questionnaire, you were unable to find any use for Shturm-S. Do not worry, as it is possible to make it work by imitating a vertical ATGM tank and by using hill hulldown spots which seem lunatic at first, but work just fine for Shturm-S in Arcade.

These are the tips and thought processes that you can go through to make your life easier:

First of all, you have to deal with carrier's weaknesses, as Shturm-S can't take a hit and survive. It is ideal to fire at opponents when their marker is still dark red or just became bright red, as it means that they can only fire at the camera or, maybe, the launcher. When using HEAT warhead, an indirect shot of such kind is only possible if an enemy is at least 180 m away from Shturm-S, HE missile is somewhat slower and a 100 m or even 50 m shot might become possible, but it requires better user aim and won't work against certain tanks.

There are a few obvious choices to make using this mentality: you want to occupy a corridor in urban environment, that has some rubbish, slight uphill or tank carcasses in a way, so you can fire over them and enemies can't do anything about it, OR you want to occupy a hill, steep cliff or an angled rock, which will cover your entire hull and allow you to slide down when needed.

Secondly, you have to work on your hulldown technique. Since even a scratch to a corner of the carrier's front will obliterate it, you should ensure that no kinetic shell can land on the tank itself, it should be absolutely physically impossible.

By using all of the special precautions together, Shturm-S can use any regular sniping spot without being threatened at all. Never forget to angle, as otherwise you will get countersniped instantly.

Angle in a diamond shape and pull your right-front corner out of cover. Camera should be on the very front as you pull the tank up. Move up ONLY until any one enemy tank is highlighted in bright red, meaning that you have aim assist onto enemy tank's turret. This will ensure that only an enemy ATGM tank or chemical shells can destroy you. If you were following the rule of "impossibility of being shot from any side but the front" you should be able to notice any shells coming at you and back off before they connect with the camera. Kinetic shells, which fly at insane speed, will not destroy Shturm-S if they hit the camera, so you don't need to worry about them anymore.

Third step is learning new firing techniques. Since Shturm-S has to imitate vertical ATGM tanks in AB, you can use ANY cover, however ridiculous, as long as your tank can support vertical stance behind that hill, cliff, or whatever cover of your choice.

Once you have an enemy tank in you arcade mode LOS/aim assist range, go into binocular view, as it allows full 360 degree sight and is located much higher than sniper scope, allowing you to see the entire scenery freely and removing the need to expose the camera any further. Aim at an enemy tank that is located further than 180 m, press "fire" to aim AB marker at their turret or hull, exit binocular view, press fire again to launch missile at them. Do not touch anything after this to let the missile destroy them. Sometimes missile goes way too high, particularly when you try to curve shots over hills, in such case try to pull the camera a bit higher and aim at the turret neck, or even at the ground next to them, generally this should be enough.

A textbook example of using this technique:

As could be seen on the screenshots, no normal tank can destroy Shturm-S which is following the rules, even if they fire back. Do not forget to move down from the firing spot after firing, as otherwise you are just giving unseen opponents time to aim chemical shells or ATGM at you, which is not ideal. If you are being focused by artillery, you can retreat. Temporary retreat can be made even into a lake, since Shturm-S can swim.

It's not impossible to snipe from a faraway high ground in AB, but a lot of care and precautions should be taken as well.

Once you got tandem warheads, some bolder tactical moves can be taken, for example, you can camp in a semi-open spot, as long as you are out of a default aim assist range (1.5 km), as tandem HEAT can knock out many tanks unlike default missiles. This, however, is still not recommended to do without ESS, as any player with a rangefinder or any significant game experience will adjust the sniper scope manually and snipe you. To make it more feasible, try to acquire high ground as well.

The HE missile makes AB sniping even easier, as it is slow and will generally manage to curve into enemy tank roof by itself from 100 m, likely causing overpressure and destroying the target. It is also much easier to manually use at point blank ranges. Unfortunately, it is extremely ineffective against "non standard" soviet tanks, which you will often meet, such as T-55AM-1, Object 268, IS-7 and so on, and is bad against many American tanks, so at least 3 Tandem HEAT should always be carried and preloaded when moving around. HE-VT is similar to normal HE in that regard and can replace it completely. If not sure about ammunition balance, try to look at the enemy team tanks in score menu (tab), as it is generally possible to guess whether you can get away with simply loading full HE or almost full HEAT loadout will be necessary.

HE missile can be pretty good for close range combat unlike HEAT, but it requires some user skill and adjustment.

After a while it will become apparent, that aircraft are a great threat to the Shturm-S. Most of the times, fighters prefer to attack BMPs and other light tanks instead of the Shturm-S, but attackers and bombers usually go straight for it if they can, because the Shturm-S can have anti-air missiles and with them essentially becomes a SAM tank (a whole BR lower than any actual SAM tanks). If you see an enemy attacker, bomber, or combat helicopter spawning, it is adviced to immediately stop sniping, back off, hold aim assist on the enemy aircraft and fire whichever ATGMs you have at it until it explodes. ATGM-VT might react to enemy rockets or missiles, but is not extremely sensitive and can be guided around such countermeasures easily, so use it whenever possible, as it makes hitting moving aircraft easy. Taking out a group of 3 planes requires pre-firing first missile before they even spawn or to use ESS after a second hit, as otherwise you might not be able to reload before one of the fighters throws itself onto you. When fighting late game ATGM helicopters, it is best to use ESS and thermal scope immediately to break the laser lock and force the pilot to sit in the gunner seat and spend time aiming at you instead of properly dodging.

By fighting both ground and air, the Shturm-S can improve team chances of winning significantly. Even if you didn't do much personally and only took out 3 tanks, but crippled enemy air force by either shooting down high priority targets like B-57B or protecting allied bombers, you might just become the reason for your team winning. Since downing enemy aircraft gives airstrike points, it is possible to launch a strike craft back at the enemy team for each time they failed to bomb your teammates, putting a very serious strain on enemy top players, as it is difficult for them to steamroll weaker players when their airstrikes are constantly being cancelled and turned against them. When using an attacker a lot, make sure to also use ESS, as frustrated interceptors might just ditch your plane and go straight for the Shturm-S instead. If current battle uses planes for airstrikes, at a perfect skill level and with some luck the Shturm-S might be able to defeat 7 tanks and down 8 planes without using airstrikes at all and accumulate enough points to call a nuclear strike (15 bomber points), potentially ending the game in its favour regardless of what the team was doing. Remember, using attacker or fighter only detracts 2 or 1 points from the counter, but using a bomber resets it completely, so use attacker first, then use a bomber.

If you have to fight enemy tanks directly in AB, there are only three ways you can beat someone without dying yourself:

First of all, don't do it if you only have regular HEAT missile, you are unlikely to deal enough damage to survive.

Support: If you see that enemy team is piling up onto your teammate, pull up and fire at them. As long as nobody is looking at you, you should be fine. After this, back off or keep moving towards next cover, stop each 13 seconds to fire again just to make them question if it's even worth fighting you. Try to not gain attention of more than one tank at a time.

Direct combat with tanks that do not have autocannons: Fire Tandem warhead at the tank's cannon barrel, if you are lucky enough to actually hit it, they should back off to repair. Chase them and abuse the fact that launcher pulls out after reload regardless of your movement speed and execute the enemy tank with either Tandem or HE (whichever you prefer or need for current opponent). Remember to face the enemy tank when attacking, as launcher is always pointing forward when pulled out. In case if you prefer to use HE, it generally cannot break cannon barrels, but it is far easier to launch over terrain without direct camera assistance to reduce risks of dying to a random countersnipe.

Smoke attack: Only feasible for a spaded tank, but can be used even in general melee range. Only works if your engine is still intact. Before the enemy got a direct aim at you (the earlier, the better), use ESS and back off into it, trying to also move away from the firing line (between them and your original spot). Go into sniper aim and toggle thermal scope(night vision) on. Since thermal scope can see through ESS, the Shturm-S temporarily transforms from a goofy situational tank to an invisible death fog machine. Even some SPAA (like the Falcon) can be very stringent about their ammo count and firing habits, so as long as they don't know where exactly you are, they won't try to spray the entire fog wall just to find you. Calmly observe their behaviour and send an ATGM straight into their weak spots. Do not let enemy tanks drive literally next to you, as "absolute detection" will mark the Shturm-S even through the fog at ranges up to 50 m, leading to a likely counterattack. Remember, other tanks with thermal scopes can also see through ESS (but not always use it in AB), and you cannot use it to look into "normal" smoke screens. Do not use this tactic against light tanks, as a single "scout" will mark you for the entire enemy team through smoke and they will start firing in your general direction (obviously, the Shturm-S cannot survive this).

Proof of ESS combat trick feasibility, even in less than perfect situation:

Notable Enemies

There are many notable enemies for the Shturm-S, being basically any vehicle in the game armed with anything bigger than a rifle-calibre machine gun and being capable of hitting it. However, some threats are greater than others. Shturm-S commanders should watch out for:

ATGM tanks: They can destroy Shturm-S with overpressure and are far less likely to let you go, as they understand what you are capable of. Tanks with proximity ATGM like CM-25 are the most dangerous, as they can obliterate enemies by firing over their cover and there is nothing you can do about it, but to spot and destroy them first.

Artillery tanks: Even with all the precautions taken, these tanks can annihilate Shturm-S with a single poorly aimed HE-VT. Most of them reload longer than the Shturm-S and their initially loaded shell is usually a normal HE, so usually you have two chances to destroy most of them. If gained their full attention and failed to destroy them - get out of sight and drive as low as you can before they bothered to shell your position. Do not use ESS, it only makes it easier for them to track you.

Autocannon armed vehicles: These will easily shred the Shturm in seconds and should be avoided. Many SPAAs can also create a shell wall to prevent missiles from destroying their teammates or themselves.

Remember, they are always watching and waiting for your mistakes. One can never be too paranoid when using Shturm-S.

Vehicles with substantial composite armour: Most vehicles at and below the tier of the Shturm-S do not have composite armour capable of stopping its top ATGM, but many top tier tanks (which the Shturm-S will face often if used at a higher BR) such as the M1A2 or Challenger 2 are able to easily stop its HEAT ATGM with their thick turret armour. Shturm-S commanders should learn the weak spots of enemy tanks. For example, almost all american top tier battle tanks can be destroyed by HE missiles hitting the middle of their upper front plate (unless they have a jammer, then hitting them directly will be next to impossible in the first place) .

Sniper medium tanks (mostly in AB): Other snipers are also a serious threat, since they compete for a complete domination over map with you, and they are exceptionally allergic to ATGM tanks with high missile speed, such as Shturm-S, so they will never stop trying to snipe you, until they finally do. They are the main reason for the AB rule "Make it physically impossible to snipe you from the side".

Pros and cons

Pros:

  • Access to "Shturm" and "Ataka" ATGMs with a total of four different variants of missiles - HEAT, tandem HEAT, HE-frag, and proximity-fused HE-frag
  • Fast-flying, relatively easy to control missiles are great for long ranges and tricky shots alike
  • Very low profile - combined with good positioning, the vehicle can be invisible with only the launcher peeking over a hilltop or wall
  • Capable of travelling across water, although relatively slowly and with poor control
  • Can double as a SAM tank in AB, to a point it can single-handedly dominate the sky and even protect the bombers from interceptors if fires immediately

Cons:

  • Poor defence - the armour stops absolutely nothing but 7.62 mm MGs and may protect against 12.7 mm from a further range
  • Very vulnerable from the top, making it easy prey from the air - unless equipped with proximity HE ATGM (the last one available for unlock) for self-defence against air targets
  • Cannot change missile type mid-reload, nor after one is reloaded
  • Rearming is rather slow, and leaves you vulnerable
  • Relatively limited arc of fire; while the launcher can rotate quite a bit, either way, the guidance module sits at the front of the vehicle, and after firing at a target located to the sides of the vehicle, the missile will require some distance before flying straight - self-defence for close-range combat is difficult
  • Have to follow an extensive set of rules to be useful in AB
  • Missiles can be jammed, so although they are very useful even in rank VII, some enemies cannot be attacked directly

History

The MT-LB, also known as "Mnogotselevoy Tyagach Legky Bronirovanny" in Russian (which stands for "Multi-Purpose Towing Vehicle Light Armoured"), has been mass-produced since 1966. The vehicle was primarily used as an artillery tractor that acted as a means of transport of the gun crew and ammunition complements. However, as it happens with every well-designed platform, the carrier ultimately became a base for all kinds of armament sets. In the early 70s, the USSR began development of an anti-tank hypersonic missile system with a strike range of up to 5,000 metres for armoured targets. The system received the designation "Shturm" and was intended to be equipped on both air and ground units. In the end, it was the MT-LB that was chosen as the base for the former role. In 1979, the new ground combat vehicle was put into service under the designation 9P149 "Shturm-S".

- From Devblog

Media

Skins
Videos

See also

Links to the articles on the War Thunder Wiki that you think will be useful for the reader, for example:

  • reference to the series of the vehicles;
  • links to approximate analogues of other nations and research trees.

External links


USSR tank destroyers
SU-76M  SU-76M · SU-76M (5th Gv.Kav.Corps) · SU-85A
SU-57B  SU-57B · SU-76D
T-34 Derivatives  SU-122 · SU-85 · SU-85M · SU-100 · SU-122P
Heavy Tank Derivatives  SU-100Y · ISU-122 · ISU-122S · SU-152 · ISU-152 · Object 268
SU-100P and Derivatives  SU-100P · Object 120
Wheeled  YaG-10 (29-K)
Airborne  ASU-57 · ASU-85
Rocket  BM-8-24 · BM-13N · BM-31-12
ATGM  IT-1 · Shturm-S · Object 775 · Khrizantema-S
Artillery  2S1 · 2S3M
Other  SU-5-1 · ZiS-30 · SU-122-54
USA  SU-57