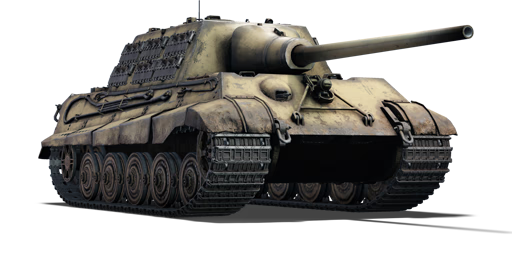
Jagdtiger

From War Thunder Wiki
Jump to: navigation, search
Rank VI | Premium | Golden Eagles
Challenger DS Pack
germ_panzerjager_tiger.png
GarageImage Jagdtiger.jpg
ArtImage Jagdtiger.png
Jagdtiger
AB RB SB
7.3 6.7 6.7
Research:35 000 Specs-Card-Exp.png
Purchase:210 000 Specs-Card-Lion.png
Show in game

Description

The Jagdpanzer VI Jagdtiger (Sd.Kfz. Index: Sd.Kfz. 186) is a rank IV German tank destroyer with a battle rating of 7.3 (AB) and 6.7 (RB/SB). It was introduced during the Closed Beta Test for Ground Forces before Update 1.41.

The Jagdtiger is a heavy tank destroyer, designed to take out targets from a distance, this is shown as in-game the tank truly shines at long range combat where manoeuvrability and weak spots don't become as much as a threat, but the biggest benefit for long-range firing is the 128 mm PaK44 L/55 main cannon, this gun can pierce over 200 mm of non-sloped armour at 2,000 m with APCBC rounds. The PaK44 was the largest anti-tank weapon in service during World War II, nothing rivalled its penetrating capability nor its combat range, and it was easily capable of taking out any fielded allied tank in a single hit. As it was essentially a modification of a naval gun, the ammunition was still 2-part (shot and charge) and could be fired with less charge for close range high explosive shells.

At mid-long range is invincible versus APHE & the majority of HESH ammunition, only APDS & HEAT can penetrate it frontally. Common enemies are the end of the line T-10M and the American M103 both of which can pierce any part of tank armour with ease. Fortunately, pure armour strength limits the amount of spalling.

General info

Survivability and armour

Smoke grenades
Creation of a smoke screen in front of the vehicle
Armourfront / side / back
Hull150 / 80 / 80
Turret250 / 80 / 80
Crew6 people
Visibility120 %

Armour type:

  • Rolled homogeneous armour
  • Cast homogeneous armour (Gun mantlet)
Armour Front (Slope angle) Sides (Slope angle) Rear (Slope angle) Roof
Hull 150 mm (49°) Front glacis
100 mm (49°) Bottom glacis
80 + 5 mm (26°) 80 mm (28-29°) 50 mm
Superstructure 250 mm (2-28°) 80 mm (26°) 80 mm 45 mm

Notes:

  • The frontal armour of the tank is almost impossible to defeat, only the sides and rear are vulnerable.
  • The lower glacis is pretty vulnerable, but a hulldown position can circumvent it.
  • The superstructure side is covered with tracks, which provides another 30 mm extra armour to the sides.

Mobility

Speedforward / back
AB46 / 13 km/h
RB and SB42 / 12 km/h
Number of gears8 forward
4 back
Weight75.2 t
Engine power
AB1 336 hp
RB and SB700 hp
Power-to-weight ratio
AB17.8 hp/t
RB and SB9.3 hp/t
Game Mode Max Speed (km/h) Weight (tons) Engine power (horsepower) Power-to-weight ratio (hp/ton)
Forward Reverse Stock Upgraded Stock Upgraded
Arcade 46 13 75.2 994 1,336 13.22 17.77
Realistic 42 12 619 700 8.23 9.31

Modifications and economy

Repair costBasic → Reference
AB4 397 → 5 707 Sl icon.png
RB4 412 → 5 726 Sl icon.png
SB6 315 → 8 196 Sl icon.png
Total cost of modifications61 400 Rp icon.png
102 400 Sl icon.png
Talisman cost1 800 Ge icon.png
Crew training61 000 Sl icon.png
Experts210 000 Sl icon.png
Aces890 Ge icon.png
Research Aces570 000 Rp icon.png
Reward for battleAB / RB / SB
140 / 200 / 250 % Sl icon.png
178 / 178 / 178 % Rp icon.png
Modifications
Mobility Protection Firepower
Mods new tank traks.png
Tracks
Research:
4 100 Rp icon.png
Cost:
6 800 Sl icon.png
185 Ge icon.png
Mods new tank suspension.png
Suspension
Research:
2 800 Rp icon.png
Cost:
4 700 Sl icon.png
125 Ge icon.png
Mods new tank break.png
Brake System
Research:
2 800 Rp icon.png
Cost:
4 700 Sl icon.png
125 Ge icon.png
Mods new tank filter.png
Filters
Research:
5 100 Rp icon.png
Cost:
8 500 Sl icon.png
230 Ge icon.png
Mods new tank transmission.png
Transmission
Research:
6 600 Rp icon.png
Cost:
11 000 Sl icon.png
300 Ge icon.png
Mods new tank engine.png
Engine
Research:
6 600 Rp icon.png
Cost:
11 000 Sl icon.png
300 Ge icon.png
Mods tank tool kit.png
Improved Parts
Research:
4 100 Rp icon.png
Cost:
6 800 Sl icon.png
185 Ge icon.png
Mods extinguisher.png
Improved FPE
Research:
2 800 Rp icon.png
Cost:
4 700 Sl icon.png
125 Ge icon.png
Mods tank reinforcement ger.png
Crew Replenishment
Research:
5 100 Rp icon.png
Cost:
8 500 Sl icon.png
230 Ge icon.png
Mods new tank horizontal aiming.png
Horizontal Drive
Research:
4 100 Rp icon.png
Cost:
6 800 Sl icon.png
185 Ge icon.png
Mods tank cannon.png
Adjustment of Fire
Research:
2 800 Rp icon.png
Cost:
4 700 Sl icon.png
125 Ge icon.png
Mods tank ammo.png
128mm_ger_APCBC_ammo_pack
Research:
2 800 Rp icon.png
Cost:
4 700 Sl icon.png
125 Ge icon.png
Mods new tank vertical aiming.png
Elevation Mechanism
Research:
5 100 Rp icon.png
Cost:
8 500 Sl icon.png
230 Ge icon.png
Mods smoke screen.png
Smoke grenade
Research:
6 600 Rp icon.png
Cost:
11 000 Sl icon.png
300 Ge icon.png

Armaments

Main armament

Ammunition40 rounds
Reloadbasic crew → aces
23.6 → 18.2 s
Vertical guidance-7° / 14°
Horizontal guidance-10° / 10°
Main article: PaK44 (128 mm)
128 mm PaK44 Turret rotation speed (°/s) Reloading rate (seconds)
Mode Capacity Vertical Horizontal Stabilizer Stock Upgraded Full Expert Aced Stock Full Expert Aced
Arcade 40 -7°/+14° ±10° N/A 4.4 6.1 7.4 8.2 8.7 23.66 20.93 19.29 18.20
Realistic 3.0 3.5 4.2 4.7 5.0

Ammunition

Penetration statistics
Ammunition Type of
warhead
Penetration @ 0° Angle of Attack (mm)
10 m 100 m 500 m 1,000 m 1,500 m 2,000 m
PzGr APC 252 249 237 222 208 195
Sprgr. L/5 HE 37 37 37 37 37 37
PzGr 43 APCBC 272 269 257 242 228 215
Shell details
Ammunition Type of
warhead
Velocity
(m/s)
Projectile
mass (kg)
Fuse delay
(m)
Fuse sensitivity
(mm)
Explosive mass
(TNT equivalent) (g)
Ricochet
0% 50% 100%
PzGr APC 930 26.35 1.2 19 786.5 48° 63° 71°
Sprgr. L/5 HE 750 28 0 0.1 3,700 79° 80° 81°
PzGr 43 APCBC 940 28.3 1.2 19 786.5 48° 63° 71°

Ammo racks

Ammo racks of the Jagdtiger
Full
ammo
Ammo part 1st
rack empty
2nd
rack empty
3rd
rack empty
4th
rack empty
5th
rack empty
6th
rack empty
Visual
discrepancy
40 Projectiles
Propellants
29 (+11)
33 (+7)
15 (+25)
27 (+13)
(+1)
19 (+21)
N/A
15 (+25)
N/A
11 (+29)
N/A
(+39)
No

Notes:

  • The Jagdtiger uses two-piece ammunition, composed of propellant bags (orange) and projectiles (yellow). Both have separate racks.
  • Projectiles and propellant bags are modeled individually and disappear after having been shot or loaded.
  • Sides empty: 11 (+29) shells.

Machine guns

Ammunition3 000 rounds
Belt capacity150 rounds
Reloadbasic crew → aces
10.4 → 8.0 s
Fire rate900 shots/min
Main article: MG34 (7.92 mm)
7.92 mm MG34
Mount Capacity (Belt) Fire rate Vertical Horizontal
Hull 3,000 (150) 900 -6°/+4° ±7°

Usage in battles

Inherent as any other tank destroyer: limit the avenues of approach for your enemies with either obstacles or distance and try to pick off targets one-on-one and not several at the same time. Despite its heavy armour, the Jagdtiger should retreat after every shot, if the opposition possesses weapons with penetration defeating 180 mm of armour, or else the lower plate will provide a big target. Make sure to take each corner with plenty of momentum though, if an enemy destroys the tracks or transmission during a turn, the remaining momentum will carry the Jagdtiger into a firing position or to safety.

Obviously, close-quarter-combat (CQC: Urban areas, cities, ravines, etc) should be avoided as they invite ambushes to the very weak side of Jagdtiger. Of course, narrow passageways can also be turned into choke points (see above).

Sitting at an uneasy battle rating, the Jagdtiger meets opponents with guns that can go through its armour much less regularly in Realistic and Simulator. However, the British 20-pounder, also quite common at this rank, has an APDS shell that can go through your armour easily at medium range. However, other than up-tiers or tank destroyers firing HEATFS, no conventional rounds can really go through your armour in RB/SB. However, in arcade, its higher BR will make it face more modern opponents.

Foes able to frontally penetrate the Jagdtiger in hull down position (hiding the lower glacis) are labelled in ☠red.

Due to the potency of the 128 mm APHE shell, specific modules must not be a target. A successful hit into the crew compartment will result in any tank exploding.

Specific enemies worth noting

RB/SB

  • IS-3: Shoot the pike, albeit it can be difficult to get through if it is angled straight forward. A trapshot is also quite possible, as long as you can richochet a shell of of the gun mantlet and into the turret.
  • IS-6: Shoot the right side of the turret beside the gun, where there are 2 "dots" and a relatively flat surface. You will be able to penetrate this area most of the time.
  • SU-122-54: Anywhere, except try to avoid the gun mantle. No noteworthy armour, but it has a dangerous gun.
  • T-44: The frontal chassis can be very trolly with its ricochets. Turret and lower glacis nearly guaranteed a penetration and knocking them out instantly.
  • T-54s & T-54 (1951): All can be penetrated through the turret front (left and right of gun mantlet) from closer than 500 m. Except for the T-54 (1947) the Jagdtiger may also shoot the chassis' armour plate if it is pointed straight toward the Jagdtiger. Or just shoot the cupola and let the 700 grams of TNT equivalent do the rest
  • M47: Pretty much anywhere.
  • Any M48A1: Lot's of sloped armour. Frontally the commander's cupola can be picked, the turret ring, or gun mantlet.
  • M60: Basically just a better M48. Shoot it as if it is an M48, especially the commander's cupola
  • T95: Albeit a rare sight, the few specimens encountered are driven by madmen, or masochist. Either way, both tend to have a good understanding of enemy weak points. Inside 500 m the T95's stock AP shell can penetrate the upper and lower frontal plate and the APCR can pierce the superstructure, but not the chassis. Fortunately, the raw armour strength limits shrapnel power and penetrated shots will do minor area damage in the spacious crew compartment. Damage can be avoided entirely by staying at distances exceeding 500 m.
    The T95's armour is in all due respect superior to the Jagdtiger, yet features two protruding weak spots: The two cupolas, hitting them is another issue though. Combat should be engaged in ranges less than 500 m, beyond that accuracy will not allow aiming for weak spots.
  • M103: So much sloped armour. Try to shoot into the turret trap (lower gun mantlet) or the turret ring.
  • Panther / Pershing / M46: Entire front is penetrable.
  • Tiger II (H): Right turret cheek to disable the turret for a safe reload. Alternatively, the lower glacis to get the transmission and a chance to knock out the entire crew.
  • Maus: Turret cheeks, multiple hits will be necessary. If possible a shot into either the fuel tanks or chassis ammo rack for the 12,8 cm cannon should destroy the behemoth with a single shot.
  • Jagdtiger: The lower plate is a good place to shoot. Make sure to hit at a good angle as the APBC can still bounce. Also, the flat parts of the superstructure when not angle work at close range.
  • Leopard: Shoot it anywhere. Don't miss.

Arcade

  • IS-4M: The drives hatch is hard to get through with the tiny hole behind the additional armour. More favourable is the lower plate, or the gun mantlet on his left side.
  • T-10M: Shoot the lower glacis when not angled, or shoot the cupolas with HE.

Pros and cons

Pros:

  • Shares the same hull as the Tiger II, so the upper glacis plate is still very tough
  • The front of the superstructure is very difficult to get through with anything less than APDS or HEAT
  • With its 6-man crew and thick armour, it's difficult to knock out this tank with a single shot
  • Totally and utterly impenetrable gun mantlet, even better than the T95's one
  • 128 mm PaK 44 cannon is an accurate cannon with a surprisingly short reload time. It takes 20 seconds to reload with a decent crew. That is not bad considering the size and weight of the projectile that this gun fires
  • PzGr 43 round has one of the highest penetrations of any APCBC round in the game
  • Both the stock PzGr and PzGr 43 shells have an equivalent TNT explosive mass of 786 g, ensuring devastating post-penetration damage
  • When hull down, the Jagdtiger is a true terror on the battlefield. Especially when there are few post-war tanks in the game

Cons:

  • Big target with a lot of ammunition in its hull. Shells that penetrate through the side can prove fatal
  • Despite having a better engine than the Tiger II (H), the Jagdtiger weighs 7 more tons. This leaves a lot to be desired when it comes to manoeuvrability and acceleration
  • 20-second reload can be disastrous if the first shot missed
  • Like most other tank destroyers, the Jagdtiger doesn't have a traversable turret. This makes dealing with flanking enemies a nightmare
  • Just like all the other Tiger II's, the lower glacis is an easy target if not hull down
  • Matchmaking can up-tier the Jagdtiger
  • Corners of the superstructure are vulnerable to high penetration shells such as the M103's 120 mm AP shell, T-10's 122 mm APHE shell, British 183 mm and 120 mm shells, and Jagdtiger's own 128 mm APHE shell
  • Armour is incredibly good, but can be penetrated easily by tanks with HEATFS rounds

History

Development

This monster of a tank destroyer was inspired by the successes of previous tank destroyers such as the StuG III and the Marder series. Their efficiency in a battle called for a request by Army General Staff to mount an enormous 128 mm gun on a self-propelled vehicle for infantry support in early 1942, but then Hitler changed it from its intended role to a tank destroyer. The 128 mm design was chosen as toolings already existed for the calibre, as it originated from a naval cannon design, which also was used the basis of an anti-aircraft gun. The 128 mm cannon also had a very high hit rate when compared to other formidable calibres like the 105 mm and 88 mm.

In early 1943, the armoured chassis that was to carry the 128 mm gun was to be either the Tiger I or Panther. However, early modelling showed that the integration of the 128 mm onto the Panther chassis was unsuitable. On October 20, 1943, the design was changed to use the Tiger II chassis and a wooden model was constructed for presentation to Hitler. Approved for further production, two prototypes were produced by Porsche and Henschel. Porsche version had an eight-wheel suspension system while the Henschel version had a nine-wheel overlapping suspension system similar to the Tiger II construction. The rest of the body was consistent to the current German tank destroyer designs, an armoured casemate structure was used to hold the new 128mm Pak 44 L/55 gun. The prototypes were completed and presented in February 1944, and were approved for service, earning the designation Jagdpanzer VI, but was later renamed to Jagdtiger. 150 of these Jagdtigers were ordered by the army, but only 88 (at most) were produced before the end of the war. Eleven of the Jagdtigers used the Porsche suspension system while the rest were using the Henschel suspension system.

What made the Jagdtiger very special was its enormous gun, the 128 mm Pak 44 L/55. At its introduction, no allied armour could withstand the shell it fires, and though the same lethality could be shared with the Tiger II's 88 mm Pak 43, it has a much greater effective range of over 3.5 kilometres (though a variant of the Jagdtiger was equipped with the 88 mm Pak 43 due to 128 mm gun shortages, this never entered service). The gun could penetrate an enemy tank hiding behind cover, such as a house, shooting right through the house and hitting the target on the other side. A disadvantage of the gun was its two-part ammunition, the shell and the propellant, which increases the loading time of the gun. The armour of the front of the Jagdtiger was 250 mm and 150 mm on the glacis plate. Like almost every casemate design, the Jagdtiger suffered from lack of turret traverse and must have the entire vehicle rotate when a target moves out of its traverse range. The Jagdtiger has the distinct title of the heaviest armoured fighting vehicle produced, weighing about 71 tons, but like most of Germany's heavy armoured vehicles late in the war, the Jagdtiger also suffered mechanical and mobility issues. The heavyweight caused it to be slow and was easy to break down if the vehicle had to rotate to aim the gun, due to the heavily strained transmission and suspensions. Also, the gun had to be locked down (cannot traverse) when not in use to avoid wearing out the mounting brackets, and a crew member had to exit the vehicle to unlock it before firing.

Combat usage

The Jagdtiger was first issued on September 1944 to the Western front in the hands of the 512th and 653rd Heavy Panzerjäger Battalions. Otto Carius, a Tiger Ace, commanded the 2nd Company of the 512th to defend against the Allied offensives. He comments that the "Jagdtigers could not be brought to their full potential on the battlefield due to many pressing issues". The two most pressing issues of the Jagdtiger was the mechanical failures and lack of crew training on the heavy beasts. The mechanical issues forced many Jagdtigers to be disabled and eventually destroyed by their own crew as they abandoned it. Only 20% of the Jagdtigers on the Western Front were lost in combat, the rest was due to the mechanical failures or out of fuel. Crew training was insufficient with the Jagdtiger and so was morale, Otto Carius noted that two Jagdtigers failed to fire on Allied armour more than a mile away in fear of an air attack, even though they were well concealed, and both broke down as they tried to withdraw from the fear of air attacks. One was disabled when it fell into a bomb crater and another was lost because of friendly fire from Volkssturm, as they had never seen a Jagdtiger before. In another instance, a lone Jagdtiger engaged an American tank platoon. When the tank platoon opened fire, the Jagdtiger withdrew not by backing up, but turned around due to inexperienced crew training, exposing the weaker side armour and was destroyed. Eventually, Otto Carius' company was surrounded in the Ruhr pocket and he ordered the guns of the surviving Jagdtigers destroyed and to surrender to the Americans. Of the ten tigers in Otto's 2nd Company of the 512th battalion, one was lost to friendly fire, another by combat, and the rest by breakdown or crew destruction. The total American armour kills reached was ten American tanks, making one Allied tank loss for each Jagdtiger loss.

Though Otto's memoir left a sour note on the Jagdtiger's combat effectiveness, it had some success. On January 17, 1945, two Jagdtigers engaged fortified positions near Auenheim with no loss. The next day, they engaged four bunkers at a distance of 1,000 m. The combat had 46 high-explosive and 10 armour-piercing shells fired on fortifications and tanks, the Jagdtigers were able to destroy a few Allied bunkers and tanks with no losses. Then in April 1945, 512th Battalion saw lots of action when the 1st company engaged Allied tanks and trucks on April 9th, destroying 11 tanks and over 30 other AFVs, the distance of engagement was more than 4,000 m and ended with only one Jagdtiger lost due to an air attack. The next few days, the 1st company proceeded to destroy five more Shermans before surrendering at Iserlohn. All activity of the 512th Battalion ended with the surrender of the last of the 2nd company April 15th in the same city.

The Jagdtiger's impact on the war for Germany was negligible. There were not enough of them to change the course of the situation for Germany, plus the kill-to-loss ratio makes its production waste of resources when much better models like the StuG were able to get even higher combat performances for a much more economical cost. It represents one of Germany's last attempts to model the belief that more armour and more firepower could equal success in a battlefield against a numerically superior enemy.

Survivors

Today, three Jagdtigers survive in museums. One is in Bovington Tank Museum in England, which is one of the 11 Porsche-suspension version and was captured in April 1945 by the British. Another is a Henschel-version at the National Armor & Cavalry Museum in Fort Benning, Georgia of America after being moved from the US Army Ordnance Museum, this was captured in March 1945. The last is in Kubinka Tank Museum in Russia, a Henschel-version that was captured on May 5, 1945, in Austria and is in the best mint condition of the three survivors.


Archive of the in-game description

The Jagdtiger was developed by the Krupp and Henschel companies in 1943–1944 and was based on the chassis of the Tiger II heavy tank. It became the most powerful tank destroyer in the Wehrmacht.

A massive stationary cabin was installed on an elongated, 260 mm-long Pz.Kpfw. VI Ausf. B tank's hull. Its frontal armour plate had a thickness of 250 mm, at an inclination of 15 degrees, making it virtually invulnerable to all of the enemy's tank and anti-tank guns. The immense weight of its 128 mm 12,8 cm PaK 44 L/55 gun required a special installation procedure using a special lift-turning mechanism mounted in the crew compartment.

This vehicle had two types of chassis: the Henschel type, with torsion bars, and the Porsche type, with double-axis carriages and spring balancers. Seven tanks were built using the Porsche suspension. Afterwards, in order to standardize parts with the Tiger II tank, only the Henschel suspension was used. The vertical surfaces of the first 9 tank destroyers were covered with an anti-magnetic Zimmerit paste.

Around 88 of these vehicles were produced between December 1944 and April 1944.

Jagdtiger tank destroyers were delivered to the 653rd and 512th heavy tank destroyers battalions. These battalions fought on the Western Front. Two of these self-propelled guns entered the service of the 501st Battalion of the Waffen-SS, and fought with troops of the Red Army in Austria, in May 1945.

The majority of losses suffered by the Jagdtiger were caused by mechanical failure or attacks by Allied aircraft. Some of the vehicles were blown up and abandoned by their crews after running out of ammunition or fuel.

The Jagdtiger's disadvantages included its massive weight, which had a negative effect on its mobility and made its chassis more susceptible to breakage. Also, the vehicle was much too difficult to manufacture.


Media

Skins
Videos

See also

Vehicles equipped with the same chassis
Other vehicles of similar configuration and role

External links


Germany tank destroyers
Pz. I Derivatives  Panzerjäger I
Pz. II Derivatives  15cm sIG 33 B Sfl
Pz. 38(t) Derivatives  Marder III · Marder III H · Jagdpanzer 38(t)
Pz. III Derivatives  StuG III A · StuG III F · StuG III G · StuH 42 G
Pz. IV Derivatives  Jagdpanzer IV · Panzer IV/70(A) · Panzer IV/70(V) · Dicker Max · Nashorn · Brummbär · VFW
Pz. V Derivatives  Jagdpanther G1 · Bfw. Jagdpanther G1
Pz. VI Derivatives  Sturer Emil · Elefant · Ferdinand · 38 cm Sturmmörser · Jagdtiger
Wheeled/Half-track  8,8 cm Flak 37 Sfl. · Sd.Kfz.251/9 · Sd.Kfz.251/10 · Sd.Kfz.251/22 · Sd.Kfz.234/3 · Sd.Kfz.234/4 · 15 cm Pz.W.42
ATGM Carrier  RakJPz 2 · RakJPz 2 (HOT) · Wiesel 1A2
Other  Waffenträger · M109G · JPz 4-5 · Raketenautomat · VT1-2