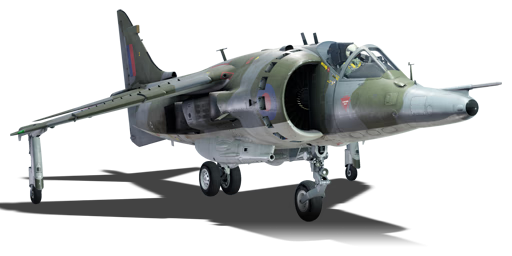
Harrier GR.3
| This page is about the British strike aircraft Harrier GR.3. For other versions, see Harrier (Family). |

Contents
Description
The Harrier GR.3 was a further development of the Harrier series of vertical/short takeoff and landing (V/STOL) jet fighters. It entered service with the Royal Air Force (RAF) in 1976 and was used in various combat operations, including the Falklands War in 1982. The Harrier GR.3 had a number of improvements over the earlier Harrier GR.1, such as a more powerful Pegasus Mk 103 engine, a nose-mounted Laser Rangefinder and Marked Target Spotter (Ferranti LRMTS) for use as a laser receiver, an AN/ALE-40 chaff/flare dispenser for increased survivability, provision for Sidewinder air-to-air missiles, and the addition of a Radar Warning Receiver. The Harrier GR.3 was stationed at several bases worldwide, such as RAF Wittering in England, RAF Gütersloh in Germany, and RAF Stanley in the Falkland Islands. The Harrier GR.3 was also capable of operating from austere and improvised airfields thanks to its V/STOL capability and rugged design. It could take off and land on short runways, roads, or even ships, using a combination of vectored thrust and reaction control systems. This gave it a tactical advantage over conventional jet fighters, which required long runways and extensive support facilities. The Harrier GR.3 proved its versatility and effectiveness during the Falklands War, where it flew from the decks of Royal Navy carriers and from a remote airstrip on Ascension Island. It flew 126 sorties with four losses due to enemy fire. A total of 102 Harrier GR.3s were produced or converted and served in the RAF until they were replaced by newer models in the early 1990s.
The Harrier GR.3 was introduced in Update "New Power". Like all members of the Harrier family, the Harrier GR.3 is a VTOL aircraft with thrust vectoring nozzles, which allow it to take off and land vertically. This version of the Harrier is much easier to operate in air-to-air combat than the Harrier GR.1, thanks to its AIM-9G air-to-air missiles and countermeasures. The Harrier GR.3 can operate at higher altitudes and utilize its Sidewinder missiles to target other aircraft from above, so it is not just confined to operating at low altitudes.
General info
Flight performance
| Characteristics | Max Speed (km/h at 0 m - sea level) |
Max altitude (metres) |
Turn time (seconds) |
Rate of climb (metres/second) |
Take-off run (metres) | |||
|---|---|---|---|---|---|---|---|---|
| AB | RB | AB | RB | AB | RB | |||
| Stock | 1,150 | 1,144 | 12192 | 32.5 | 33.7 | 69.5 | 67.8 | 550 |
| Upgraded | 1,168 | 1,159 | 31.5 | 32.0 | 106.1 | 87.0 | ||
Details
| Features | |||||
|---|---|---|---|---|---|
| Combat flaps | Take-off flaps | Landing flaps | Air brakes | Arrestor gear | Drogue chute |
| X | ✓ | ✓ | ✓ | X | X |
| Limits | ||||||
|---|---|---|---|---|---|---|
| Wings (km/h) | Gear (km/h) | Flaps (km/h) | Max Static G | |||
| Combat | Take-off | Landing | + | - | ||
| 1191 | 648 | N/A | 829 | 556 | ~14 | ~6 |
| Optimal velocities (km/h) | |||
|---|---|---|---|
| Ailerons | Rudder | Elevators | Radiator |
| < 648 | < 950 | < 790 | N/A |
Engine performance
| Engine | Aircraft mass | ||||||
|---|---|---|---|---|---|---|---|
| Engine name | Number | Basic Mass | Wing loading (full fuel) | ||||
| Rolls-Royce Pegasus Mk.103 | 1 | 5,918 kg | 439 kg/m2 | ||||
| Engine characteristics | Mass with fuel (no weapons load) | Max Takeoff Weight | |||||
| Weight (each) | Type | 10m fuel | 20m fuel | 30m fuel | 34m fuel | ||
| 1,640 kg | Vectored-thrust low-bypass turbofan | 6,605 kg | 7,292 kg | 7,978 kg | 8,253 kg | 12,679 kg | |
| Maximum engine thrust @ 0 m (RB / SB) | Thrust to weight ratio @ 0 m (WEP) | ||||||
| Condition | 100% | WEP | 10m fuel | 20m fuel | 30m fuel | 34m fuel | MTOW |
| Stationary | 9,071 kgf | 9,625 kgf | 1.46 | 1.32 | 1.21 | 1.17 | 0.76 |
| Optimal | 9,071 kgf (0 km/h) |
9,625 kgf (0 km/h) |
1.46 | 1.32 | 1.21 | 1.17 | 0.76 |
| The Pegasus engine loses a significant amount of thrust as your speed increases |
Survivability and armour
The Harrier GR.3 has no armour. The engine and all fuel tanks are packed in a tight cluster in the centre of the fuselage.
Modifications and economy
| Flight performance | Survivability | Weaponry | ||||||||||||||||||||||||
|---|---|---|---|---|---|---|---|---|---|---|---|---|---|---|---|---|---|---|---|---|---|---|---|---|---|---|
|
|
|
Your first priorities should be flares and then AIM-9Gs (if you are planning to use the Harrier in an air-to-air combat role). After that you can either focus on flight performance upgrade or ground attack loadouts depending on your preference.
Armaments
| Ballistic Computer | |||
|---|---|---|---|
| CCIP (Guns) | CCIP (Rockets) | CCIP (Bombs) | CCRP (Bombs) |
| |
|
|
|
Offensive armament
The Harrier GR.3 is armed with:
- A choice between two presets:
- 2 x 30 mm ADEN Mk.4 cannons, belly-mounted (130 rpg = 260 total)
- 2 x 30 mm ADEN Mk.4 cannons + 60 x countermeasures
Suspended armament
The Harrier GR.3 can be outfitted with the following ordnance:
| 1 | 2 | 3 | 4 | 5 |  | |
|---|---|---|---|---|---|---|
| 500 lb H.E. M.C. Mk.II bombs | 1 | 1, 2 | 1 | 1, 2 | 1 | |
| 1,000 lb H.E. M.C. Mk.13 bombs | 1, 2 | 1 | 1, 2 | |||
| 1,000 lb H.E. M.C. Mk.13 No.117 bombs | 1, 2 | 1 | 1, 2 | |||
| SNEB type 23 rockets | 18 | 36 | 36 | 18 | ||
| AIM-9G Sidewinder missiles | 1 | 1 |
| Default weapon presets | |
|---|---|
| |
Usage in battles
Despite originally being designed as a ground-attack aircraft, the Harrier GR.3 can be considered a multi-role aircraft that can focus on air-to-air combat, air to ground combat and air to sea combat. Its firepower and ordnance make it a competitive aircraft in all game modes. The roles can be divided into:
As fighter:
The Harrier has access to AIM-9G Sidewinder air to air missiles capable of taking down all enemy aircraft in the game. It should be noted that the AIM-9G is a rear-aspect lock-on missile, meaning the Harrier must be behind the enemy aircraft to be able to launch the missile. It is not recommended to use them against enemy helicopters neither, since the IR seeker requires a rear-aspect lock; thus the autocannons are way more effective.
When fighting enemy fighters, it is best to launch your AIM-9Gs from 2.5 to 3 km away as they are agile enough to be able to take down any enemy jet. It is also best to not engage in a turnfight as almost any aircraft is more manoeuvrable than you are making you an easy target for enemy guns and missiles.
When facing enemy bombers:
Enemy bombers are the easiest targets for the Harrier both in gun strafe and when using missiles as they lack agility when dogfighting against the Harrier and countermeasures such as flares to be able to counter the missiles. It is unlikely to face enemy bombers besides the Vautour IIA IDF/AF as most of them stay at 8.0. AI-controlled bombers are the exception.
When facing enemy attackers:
When facing player-controlled attackers (A-4E Early for example), the pilot must stay aware that, besides the Harrier superior mobility, they can outturn you as they will often fly at lower speeds than you, meaning their turn radius compared to yours will be much smaller. Most of the enemy planes that do CAS runs will often be enemy fighters (not labelled as attackers) but with ground ordnance, meaning they can or will be heavier than you, increasing drag and reducing agility when in a dogfight, use this as an advantage.
As an attacker/bomber:
The Harrier has access to a wide variety of ground ordnance capable of destroying enemy ground units and bases. It also has access to CCIP ballistics computer (refer to Ballistic Computer for explanation) meaning the pilot has access to ground ordnance crosshairs which will increase ordnance accuracy, both rockets and bombs. It is not recommended to fly as a bomber (in terms of altitude) but fly as a tree cutter (as close to the ground as possible). This is recommended to achieve multiple things: radar interference, max speed, reduce enemy visibility and awareness. It also makes bombing easier without the need of ballistics computer (although it is recommended to use it since it will not require any practice). Time fuze MUST BE ADDED to avoid assault fuze explosion, risking your plane to be hit by the explosion causing a death. Ground striking ordnance should be taken at pilot's discretion, but it is recommended to take the 5 x 1,000 lb bombs in order to take a whole base completely and still maintain high speeds. This bomb loadout and AAM are recommended if the pilot wants to engage enemy air targets upon taking an enemy base.
*Note: radar interference is mostly irrelevant in air realistic battles as the plane will still be highlighted and enemy pilots could use eye aiming. However, it will interfere with radar homing missiles (SARH missiles such as AIM-7E, R-3R, etc carried by F-4 Phantoms and MiG-21's) and will be your main line of defence when flying in simulator battles, you will be able to fly stealthily if flying in tree cutting tactic.
When in combined battles (ground realistic battles):
This is where the Harrier is able to shine as an attacker, primarily using VTOL and hovering mode to an advantage (will be explained more detailed later). There is multiple loadouts which can be used in order to make the Harrier a scary attacker.
Bomb payload:
This is often the most used payload for multiple reasons: has the biggest explosion radius compared to rockets, are more forgiving when missing by couple metres, can take multiple targets with a single bomb. The use of ballistics computer makes their aiming much easier than with eye aiming both in realistic and simulator battles. The 4 x 1,000 lb bombs are recommended as, if aimed correctly, will destroy one or multiple enemy targets with a single bomb, meaning you are able to get at least 2 kills (as bombs drop in pair)
Rocket payload:
This is the trickiest but most rewarding payload the Harrier can carry (rewarding as it is able to make much more kills than bombs). Tanks can be taken with one to three rocket salvos (launched in pairs, meaning with 2 to 6 rockets in total). This means you are able to get 18 kills (considering you take 6 rockets per tank) if you take the 108 x SNEB rocket payload.
VTOL trick:
Harrier can be used as a helicopter thanks to the VTOL capabilities, rockets are recommended if used like this. It is able to hide behind mountains, poke to attack and go back into cover as a helicopter would do. Handling this technique can be tricky and will require practice but is an alternate way of playing CAS.
Pros and cons
Pros:
- Exceptional thrust to weight ratio
- Extremely good acceleration, even without WEP
- Vertical Take-off and Landing capabilities
- At the expense of speed, can improve manoeuvrability significantly with the use of thrust vectoring nozzles
- AIM-9G missiles have long range and good turning capability
- Countermeasures and RWR available, unlike the Harrier GR.1
- CCIP available for accurate use of unguided weapons
- Has a Head-Up Display in the cockpit which provides flight information and weapon aiming functionality
Cons:
- Engine overheats extremely quickly at high throttle and WEP
- Below average top speed
- Poor energy retention; bleeds speed quickly in turns
- Rather light payload options for a strike aircraft
- ADEN Cannons have low velocity and under-fuselage placement makes it awkward to aim
History
Development
The Harrier GR.3 was an upgraded version of the Harrier GR.1, it featured the more powerful Pegasus 11 (also known as the Pegasus Mk.103) engine and avionics upgrades.[1] The most noticeable external change was a new longer nose featuring the Ferranti 106 Laser Ranger & Marked Target Seeker (LRMTS). The LRMTS was provided with target locations from the Harrier's Inertial Navigation and Attack System (INAS) and would accurately measure the distance to the target, feeding this data into the Harrier's Weapons Aiming Computer.[2] The LRMTS could also search for targets designated by a ground-based laser designator, and provide accurate target locations on the pilot's Heads Up Display (HUD).[3] The system was proven to offer significant increase in bombing accuracy. Another improvement on the Harrier GR.3 was the fitment of a Radar Warning Receiver in the aircraft's tail.[2]
Falklands War
Deployment
The Harrier GR.3's most noteworthy deployment was to the Falkland Islands during, and after, the 1982 Falklands War. When the war began on 2nd April 1982 with the Argentine invasion of the Falkland Islands, Britain was forced to rapidly assemble a task force to retake the islands, located some 8,000 miles away from the British mainland. The decommissioning of the aircraft carrier HMS Hermes was cancelled and along with HMS Invincible (itself in the process of being sold to Australia), it was rapidly prepared for deployment. The two aircraft carriers left Portsmouth Naval Base three days later (on 5th April), setting sail to Ascension Island (a small British island in the South Atlantic); which was the designated rendezvous point from where the task force would then sail to the Falklands. The two carriers were carrying Sea King helicopters and Sea Harrier FRS.1 fighters (12 Sea Harriers on Hermes and 8 on Invincible).
It was thought that the Sea Harriers would have a very high attrition rate (with all of them expected to be lost within the first few days of the war) and so reinforcements would be needed.[4] With the task force having left Ascension Island on the 18th April, and now en route to the Falklands, getting the additional aircraft to it would be a major logistical challenge. In need of transport, the British Government requisitioned the Atlantic Conveyor, a civilian container ship, and rapidly modified it to carry aircraft.[4] The Atlantic Conveyor set sail for Ascension Island on 25th April, carrying six Wessex and five Chinook helicopters. Meanwhile, eight additional Sea Harriers were obtained from a training squadron, and ten RAF Harrier GR.3s were re-assigned from their squadron to the task force.[5] The additional aircraft would have to be flown to Ascension Island in order to join the Atlantic Conveyor and be transported the rest of the way to the Falklands.
Over the 30th April - 2nd May the eight Sea Harriers completed the >4,000 mile flight to Ascension Island (via Banjul, Gambia). They were followed by the ten GR.3s, which flew directly to Ascension Island through 3rd May - 6th May; nine of the GR.3's completed the journey, with one turning back due to engine trouble.[5] Once at Ascension Island the Harriers were serviced and loaded onto the Atlantic Conveyor; the Harrier's VTOL capabilities were put to good use with each one taking off from the island's air base, flying to the Atlantic Conveyor, and landing vertically on the ship's deck. All the Sea Harriers and six of the GR.3s were loaded onto the Atlantic Conveyor, with three of the GR.3s being left behind to provide air defence for RAF Wideawake (the UK base on Ascension Island).[5] Having been originally designed for use purely as ground-attack aircraft, the Harrier GR.3s on the Atlantic Conveyor and stationed at Wideawake were hastily modified to allow them to partake in air-to-air combat; support was added for AIM-9G/AIM-9L Sidewinders and AN/ALE-40 flare dispensers were added in the underside of the rear fuselage.[6] The Atlantic Conveyor set sail for the Falkland Islands, arriving in the area on 18th May.[4]
Arrival in the Falklands
Once the Atlantic Conveyor had reached the task force the Harriers were prepared for flight. Over the next two days, the Sea Harriers and Harrier GR.3s took off vertically from the ship's deck and flew to their assigned aircraft carriers; the Sea Harriers were split between the two carriers (with four going to Hermes, and four to Invincible), while all six of the GR.3s were sent to Hermes. By the end of 20th May, all Harriers had safely arrived at their assigned carriers.[5] The Atlantic conveyor stayed with the task force, still carrying a large number of helicopter and other supplies. On the 25th May the Atlantic Conveyor unloaded its first Chinook helicopter (the now-famous "Bravo November") and shortly afterwards was hit by two Exocet missiles, killing twelve crew members and causing an uncontrollable fire. The Atlantic Conveyor was abandoned and sank a few days later with the loss of all remaining helicopters and supplies onboard.[7]
Once in the Falklands, the Harrier GR.3s primarily focussed on ground attack missions, it was originally expected that they would be forced to take over the fleet air defence role when the Sea Harriers were lost, however the Sea Harrier proved remarkably effective, with only six being lost during the conflict (all due to accidents or ground fire). Not being designed for naval use, the Harrier GR.3's INAS proved unusable during ship-borne operations, due to an inability for it to be properly calibrated while on a moving platform.[1][4] On the 21st of May British forces had carried out an amphibious landing at Port San Carlos (located on the west coast of East Falkland), and by 2nd of June they had managed to construct a temporary airstrip.[8] Although the runway was only 260 m long it was enough for the VTOL-capable Harriers and Sea Harriers operate on.[8][6] As well as allowing the Harriers to operate from a location closer to the battle, operating from Port San Carlos allowed the GR.3s to make full advantage of their advanced INAS systems for ground attack missions.
Additional Harrier GR.3s deployed
With the Harriers performing well in the Falklands, the British worked to deploy additional GR.3s to the conflict. Over the 24th - 26th May three RAF Phantom FGR.2s were deployed to Ascension Island to take over air defence duties from the three Harrier GR.3s stationed there.[9] Then over 29th May - 2nd of June, six additional GR.3s were flown the >4,000 mile journey from the UK to Ascension Island, bringing the total number of GR.3s on the island to nine.[9] On the 1st June two GR.3s flew the 3,800 mile trip from Ascension Island to HMS Hermes, landing after nearly eight and a half hours of continuous flight.[9] This process was repeated on the 8th June, bringing the total number of GR.3s in the Falklands to ten. After this, the four remaining serviceable GR.3s on Ascension Island were flown to the Contender Bezant (another requisitioned civilian cargo ship); they landed vertically on the ship's deck and were transported to the island in the same manner as those on the Atlantic Conveyor. They arrived at the Falklands on 10th June, however they were not unloaded until 7th July, after the war had ended (on 14th June).[9]
The four Harriers which flew directly to the Falklands were unique in that they had their starboard (right-hand side) ADEN gun pod replaced with the "Blue Eric" electronic countermeasure pod to provide self-defence against enemy radars.[6][10] The pod was developed incredibly quickly, going from initial concept to first prototype in seven days, and having ten examples having been produced and ready for combat in fifteen days (from initial concept).[11] The Blue Eric pod was essentially a simplified Marconi "Sky Shadow" ECM pod fitted into the shell of a Harrier ADEN gun pod.[6][11]
End of the war and No. 1453 Flight RAF

Argentina surrendered on 14th June 1982, bringing an end to the Falklands War after 74 days of fighting. The Harriers performed far better than originally expected in the Falklands; the 28 Sea Harrier FRS.1s completed 1,435 sorties, achieving 20 confirmed (and 3 probable) kills against Argentine aircraft, with only 6 losses. The 10 Harrier GR.3s which saw combat completed 126 sorties with 4 losses. All Harrier/Sea Harrier losses in the conflict were due to ground fire or accidents, with no losses in air-to-air combat.
Following the end of the war, there was a need to defend the islands against any possible future attack. The long term plan was to deploy Phantom FGR.2s to the defend the Islands; however the runway at Port Stanley Airport (the main airport on the islands) had been damaged from multiple British attacks while it was in use by Argentine forces, and was also too short to allow for Phantom operations.[12] After the conflict ended the RAF took control of Port Stanley Airport, renaming it to RAF Stanley. They began the process of clearing unexploded mines/ordnance, repairing the runway, and converting it into a temporary RAF base. With the runway repair and extension set to take several months, the Harrier GR.3s were once again called upon for air defence duties. A detachment of six GR.3s were stationed at RAF Stanley on 4th July 1982.[12] Each armed with two AIM-9L Sidewinders, these Harriers became No. 1453 Flight RAF and were responsible for defending the islands from air attack.

The runway repairs and extension were completed on 27th August 1982[12] and over the 18th - 22nd October 1982 six Phantom FGR.2s arrived on the Falklands Islands (having previously flown to Ascension Island).[9] With the Phantoms taking over as the main air defence of the Falklands, the role of the Harrier GR.3s shifted to providing back-up air defence when needed, as well as being prepared for a ground attack role in the event of another invasion. The No. 1453 Flight Harriers remained stationed at RAF Stanley until the RAF's new purpose-built base RAF Mount Pleasant opened in 1985.
Other Deployments
Harrier GR.3s spent a large amount of their life deployed to West Germany. In the event of a war, the airfields in West Germany would have been highly vulnerable to Soviet attack, so the Harriers were often stationed away from established airfields, using their VTOL capabilities to operate off of small areas of rough ground.[13] Harrier GR.3s also saw deployments to Norway and Belize.[13]
Devblog
In the late 1950's, the Bristol company was conducting work on developing an engine featuring innovative thrust vectoring technology. Hawker, impressed with the new engine, began closely working with Bristol to develop an aircraft which could successfully harness the full potential of the Pegasus thrust vectoring engine. The basic idea was to design an aircraft with V/STOL capabilities. From that point, the project became known as the P.1127.
In the early 1960s, a growing interest for V/STOL strike aircraft could be observed among most NATO member states. This resulted in an agreement between the US, Great Britain and West Germany in 1961 to order nine modified versions of the P.1127 - the first versions of which were test flown in the previous year - as evaluators. At the same time, the British evaluation aircraft received the designation Kestrel FGA.1.
Despite suffering setbacks with the P.1154 - a supersonic version of the aircraft developed by Hawker in parallel - evaluations of the Kestrel continued as planned during the early 1960's and concluded in November of 1965. After the P.1154 was ultimately cancelled, the RAF, pleased with the evaluation results of the Kestrel, put up a requirement to modify the Kestrel and placed an order for six pre-production aircraft, designated P.1127 (RAF). Following its maiden flight in August of 1966, the RAF extended the purchase order to 60 production aircraft, now receiving the official designation Harrier GR.1.
The Harrier GR.1 undertook its maiden flight in December 1967 and officially entered service with the RAF in April of 1969. Being involved early on with the aircraft's development, the US also expressed interest in procuring the Harrier. This ultimately resulted in a partnership agreement between Hawker Siddeley and McDonnell Douglas in the late 1960's for a large delivery of Harriers to the USMC in the early 1970's. In US service, the aircraft would receive the designation "AV-8 Harrier".
The Harrier was initially deployed with British forces in West Germany in the early 1970's. However, the Harrier saw the peak of its service career during the Falkland War in 1982, flying both ground attack as well as combat air patrol missions (modification Sea Harrier FRS.1) with great success, thus earning itself a high reputation.
Apart from British and American service, variants of the Harrier were also operated by Spain, Thailand and India. In total, around 270 Harriers were produced across all variants with the last being decommissioned from active service in the early 2000's. The original Harrier was subsequently succeeded by a further developed variant - the Harrier II - but more importantly, it had successfully proven the viability of V/STOL aircraft, thus generating a sustained interest in such designs which can still be seen today.
Media
- Skins
See also
External links
- [Devblog] Jump Jets arrive in War Thunder: Meet the Harrier
- Official data sheet - more details about the performance
References
- Citations
- ↑ 1.0 1.1 Goebel 2019
- ↑ 2.0 2.1 Fozard 1978
- ↑ First Report on Farnborough 1980
- ↑ 4.0 4.1 4.2 4.3 Posey 2002
- ↑ 5.0 5.1 5.2 5.3 Beer n.d. 1
- ↑ 6.0 6.1 6.2 6.3 Imperial War Museum 2010
- ↑ Newdick 2020
- ↑ 8.0 8.1 Think Defence n.d. 1
- ↑ 9.0 9.1 9.2 9.3 9.4 Beer n.d. 2
- ↑ Greenall n.d.
- ↑ 11.0 11.1 Falklands Campaign: Electronic Warfare Story Revealed
- ↑ 12.0 12.1 12.2 Think Defence n.d. 2
- ↑ 13.0 13.1 RAF Museum n.d.
- Bibliography
- Beer, M. (n.d. 1). A Close Run Thing – The Harrier Deployments to the South Atlantic. Retrieved from Victor XM175
- Beer, M. (n.d. 2). F4s – and more Harrier GR3s Head South. Retrieved from Victor XM175
- Falklands Campaign: Electronic Warfare Story Revealed. (1984). Aircraft Engineering and Aerospace Technology, Vol. 56 No. 12, 13-14.
- First Report on Farnborough. (1980). Aircraft Engineering and Aerospace Technology, Vol. 52 No. 8, 11-17.
- Fozard, J. (1978). The British Aerospace Harrier Case Study in Aircraft Design. American Institute of Aeronautics & Astronautics.
- Goebel, G. (2019, August 01). First-Generation Harriers / Sea Harrier. Retrieved from AirVectors
- Greenall, N. (n.d.). Falklands War Harriers and Sea Hrriers. Retrieved from Harrier Special Interest Group
- Imperial War Museum. (2010). BAe Harrier GR.3. Retrieved from Imperial War Museum
- Posey, C. (2002, September). Air War in the Falklands. Retrieved from Air & Space Magazine
- RAF Museum. (n.d.). Hawker Siddeley Harrier GR3. Retrieved from Royal Air Force Museum
- The Amazing Tale Of Bravo November, The British Chinook Helicopter That Refused To Die. (2020, November 23). Retrieved from The Drive
- Think Defence. (n.d. 1). The San Carlos Forward Operating Base. Retrieved from ThinkDefence
- Think Defence. (n.d. 2). Post Conflict and RAF Stanley. Retrieved from ThinkDefence
| Hawker Aircraft Limited | |
|---|---|
| Biplane fighters | |
| Fury | Fury Mk I · Fury Mk II |
| Nimrod | Nimrod Mk I · Nimrod Mk II |
| Scout plane | Osprey Mk IV |
| Piston fighters | |
| Hurricane | Hurricane Mk I/L · Hurricane Mk.I/L FAA M · Sea Hurricane Mk IB · Sea Hurricane Mk IC · Hurricane Mk IIB/Trop · Hurricane Mk IV |
| Typhoon | Typhoon Mk Ia · Typhoon Mk Ib · Typhoon Mk Ib/L |
| Tempest | Tempest Mk V · Tempest Mk V (Vickers P) · Tempest Mk II |
| Fury | Sea Fury FB 11 |
| Jet fighters | |
| Hunter | Hunter F.1 · Hunter F.6 · Hunter FGA.9 |
| Sea Hawk | Sea Hawk FGA.6 |
| Harrier | Harrier GR.1 · Harrier GR.3 |
| Export | ▄Hurricane Mk I/L · ▂Hurricane Mk IIB |
| ◄Sea Hawk Mk.100 · ◘Hunter F.6 · ◌Hunter F.58 · J34 · AV-8A · AV-8C | |
| Captured | ▀Tempest Mk V |
| See Also | Fokker |
| Britain jet aircraft | |
|---|---|
| Blackburn | Buccaneer S.1 · Buccaneer S.2 · Buccaneer S.2B |
| British Aerospace | Harrier GR.7 · Sea Harrier FRS.1 (e) · Sea Harrier FRS.1 · Sea Harrier FA 2 |
| British Aircraft Corporation | Strikemaster Mk.88 |
| English Electric | Canberra B Mk 2 · Canberra B (I) Mk 6 · Lightning F.6 · Lightning F.53 |
| Gloster | Meteor F Mk 3 · Sea Meteor F Mk 3 · Meteor F Mk 4 G.41F · Meteor F Mk 4 G.41G · Meteor F Mk 8 G.41K · Meteor F Mk.8 Reaper |
| Javelin F.(A.W.) Mk.9 | |
| de Havilland | Vampire F.B.5 · Venom FB.4 · Sea Venom FAW 20 · Sea Vixen F.A.W. Mk.2 |
| Hawker | Sea Hawk FGA.6 · Hunter F.1 · Hunter F.6 · Hunter FGA.9 · Harrier GR.1 · Harrier GR.3 |
| Panavia | Tornado GR.1 · Tornado F.3 · Tornado F.3 Late |
| SEPECAT | Jaguar GR.1 · Jaguar GR.1A · Jaguar IS |
| Supermarine | Attacker FB 1 · Attacker FB.2 · Scimitar F Mk.1 · Swift F.1 · Swift F.7 |
| Foreign | Phantom FG.1 (USA) · Phantom FGR.2 (USA) · F-4J(UK) Phantom II (USA) |
| South Africa | ▄JAS39C |
| India | ▄MiG-21 Bison |
