Difference between revisions of "RBT-5"
(Added a description how to effectively use the TT-250 in-game from personal experience and testing. i will continue writing on it (im not done) (Tag: Visual edit) |
(→Usage in battles: fully finished writing a usage guide on the RBT-5 TT-250 Torpedo's. it's complete now and ready for publishing on the Wiki) (Tag: Visual edit) |
||
| Line 208: | Line 208: | ||
* [[B1 bis]]: A heavily armoured tank for its BR, but do not panic when you see it. Don't fire at a distance unless you are directly aiming at its side armour. The best option is to try and get as close to it as possible (point-blank range is ideal) and shoot straight at its side. However sometimes due to a variety of reasons the player might be unable to flank it and has to face it frontally. If that is the case, shoot the rather vertical driver's compartment and there's a great chance of penetration, killing the driver and the commander (which is also the gunner for the turret). Or, shoot between the two guns on the turret to kill the commander/gunner. Or, shoot at the near-vertical part of the curved gun mantlet of the big gun. | * [[B1 bis]]: A heavily armoured tank for its BR, but do not panic when you see it. Don't fire at a distance unless you are directly aiming at its side armour. The best option is to try and get as close to it as possible (point-blank range is ideal) and shoot straight at its side. However sometimes due to a variety of reasons the player might be unable to flank it and has to face it frontally. If that is the case, shoot the rather vertical driver's compartment and there's a great chance of penetration, killing the driver and the commander (which is also the gunner for the turret). Or, shoot between the two guns on the turret to kill the commander/gunner. Or, shoot at the near-vertical part of the curved gun mantlet of the big gun. | ||
| − | '''TT-250 usage''' | + | '''TT-250 usage:''' |
The RBT-5 carries 2 tank torpedo's that are powerful enough to destroy any vehicle it lands a hit on or even near some medium, light or SPAA tanks. but aiming them is pretty difficult and requires great precision: in order to be as accurate as possible always rely on your rangefinder, because getting a as precise measurements will ensure your hit that will result a instant elimination of the enemy. due to the starting angle of 9° the starting range of the Torpedo's is 350 meters, which limits you to be able to fire at targets closer than 350 meters. which will require you to make use of your main 45mm 20-K gun to neutralize them. You can use the TT-250 on various way's. | The RBT-5 carries 2 tank torpedo's that are powerful enough to destroy any vehicle it lands a hit on or even near some medium, light or SPAA tanks. but aiming them is pretty difficult and requires great precision: in order to be as accurate as possible always rely on your rangefinder, because getting a as precise measurements will ensure your hit that will result a instant elimination of the enemy. due to the starting angle of 9° the starting range of the Torpedo's is 350 meters, which limits you to be able to fire at targets closer than 350 meters. which will require you to make use of your main 45mm 20-K gun to neutralize them. You can use the TT-250 on various way's. | ||
| − | <u>To start</u> | + | <u>To start.</u> You can use the TT-250 to snipe still standing targets, the TT-250 has a astounding effective fire range of 1,800 meters which is more than enough to neutralize targets in the Tier I and II range. If you have spotted a target, start range finding right away. after you get its approximate range, fire your first torpedo and watch. after your Torpedo lands and misses <s>or destroys the target.</s> Adapt your second torpedo to a more precise measurement from what you saw in your first torpedo, usually still standing targets don't understand what that explosion was and mostly think it was a artillery or a bomb of a plane: and won't move. so fire away your second torpedo and most of the times that will overpressure or directly hit the target and eliminate them. |
| − | <u>secondly</u> | + | <u>secondly</u> You can use the TT-250 to blind fire the enemies, at the start of a match or when the enemies are capturing the point. First you need to know of each map how far the distance is of your spawn to the enemies, after you have figured that out you can fire away the 2 torpedo's a bit from each other. and it can effectively land you a elimination of the enemies at their spawn. the second way of blind firing is firing when the enemy is capturing a point, simply set the distance to the range that is displayed on the point and fire away. It can sometimes land you a kill or take down the enemies tracks. |
| − | ''It is suggested to stay near a captured point so you may resupply your Torpedo's'' | + | <u>thirdly.</u> there is a way to aim at targets closer than 350 meters, by driving against a wall backwards. you gain the ability to shoot right in front of you, this is especially useful if you try to destroy a enemy by surprise if they drive by. Is especially handy in top-tier. |
| + | |||
| + | ''It is suggested to stay near a captured point so you may resupply your Torpedo's'' for more usage, the resupply takes 15 seconds each | ||
| + | |||
| + | '''Enemies worth noting for TT-250:''' | ||
| + | |||
| + | * [[Maus]], [[E-100]]: The most heaviest tanks in war thunder, these tanks have a strong enough armor that even direct hits won't do much against them. The only way being to hit the roof of both the Maus and E-100, because the armor there is small enough for the TT-250 to overpressure the heavy tanks. so its best to attack them only at long range, as the torpedo's will be falling from above. And keep you're distance from them if you ever encounter them while playing with the RBT-5 on 7.7 | ||
=== Pros and cons === | === Pros and cons === | ||
Revision as of 15:31, 7 November 2022
| This page is about the gift Soviet light tank RBT-5. For the regular version, see BT-5. |

Contents
Description
The RBT-5 is a premium gift rank I Soviet light tank with a battle rating of 1.3 (AB/RB/SB). It was available as a prize during the 2015 Thunder League as a giveaway prize for watching the Twitch stream, later every Dog-Tag owner who voted for Team Dislike earned one due to the "Champion" prize. It can now only be obtained via the War Thunder Market.
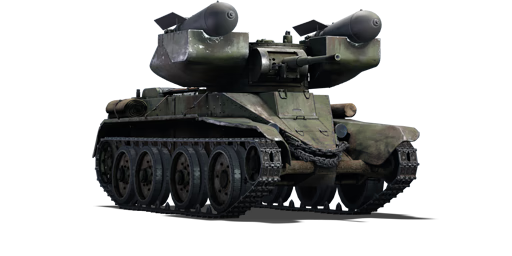
The RBT-5 is a regular BT-5 with mounts on the side of the turret to hold two 250 kg TT-250 "tank torpedo" rockets. These large calibre rockets are hard to aim as they're angled upwards but can destroy almost anything it hits.
This tank is quite unique. It has virtually no armour, weights only 11,5 tons and has a massive 400 HP engine (442 HP fully upgraded), giving it up to a 38 HP/Ton ratio. This paired with excellent Christie suspension allows it to drive like a race car among tanks. Gun is an adequate 45 mm 20-K cannon with decent penetration and quick reload.
Do remember: the RBT-5's two rockets are quite apart from each other, and that should be taken into account when aiming. The first rocket to be fired is the one on the left side of the turret.
General info
Survivability and armour
Armour type:
- Rolled homogeneous armour
| Armour | Front | Sides | Rear | Roof |
|---|---|---|---|---|
| Hull | 13 mm (62°) Front glacis 20 mm (18°) Driver port 30 mm (62°) Lower glacis 40 mm (13°) Plate joint |
15 mm (1°) | 13 mm (0-59°) | 10 mm |
| Turret | 20 mm (11-43°) Gun mantlet 15 mm Turret front |
15 + 15 mm | 15 mm | 10 mm |
Notes
- Tracks and suspension wheel are both 15 mm thick.
- Rocket mounts provide additional spaced armour of 15 mm on the turret sides.
Mobility
| Game Mode | Max Speed (km/h) | Weight (tons) | Engine power (horsepower) | Power-to-weight ratio (hp/ton) | |||
|---|---|---|---|---|---|---|---|
| Forward | Reverse | Stock | Upgraded | Stock | Upgraded | ||
| Arcade | 57 | 12 | 12.1 | 566 | 763 | 46.78 | 63.06 |
| Realistic | 51 | 10 | 323 | 400 | 26.69 | 33.06 | |
Modifications and economy
| Mobility | Protection | Firepower | ||||||||||||||||||||
|---|---|---|---|---|---|---|---|---|---|---|---|---|---|---|---|---|---|---|---|---|---|---|
|
|
|
Armaments
Main armament
| 45 mm 20-K | Turret rotation speed (°/s) | Reloading rate (seconds) | |||||||||||
|---|---|---|---|---|---|---|---|---|---|---|---|---|---|
| Mode | Capacity | Vertical | Horizontal | Stabilizer | Stock | Upgraded | Full | Expert | Aced | Stock | Full | Expert | Aced |
| Arcade | 86 | -8°/+25° | ±180° | N/A | 15.2 | 21.1 | 25.6 | 28.3 | 30.1 | 3.77 | 3.33 | 3.07 | 2.90 |
| Realistic | 9.5 | 11.2 | 13.6 | 15.0 | 16.0 | ||||||||
Ammunition
| Penetration statistics | |||||||
|---|---|---|---|---|---|---|---|
| Ammunition | Type of warhead |
Penetration @ 0° Angle of Attack (mm) | |||||
| 10 m | 100 m | 500 m | 1,000 m | 1,500 m | 2,000 m | ||
| BR-240 | APHEBC | 70 | 67 | 58 | 47 | 39 | 32 |
| BR-240SP | AP | 73 | 70 | 60 | 50 | 41 | 34 |
| Shell details | |||||||||
|---|---|---|---|---|---|---|---|---|---|
| Ammunition | Type of warhead |
Velocity (m/s) |
Projectile Mass (kg) |
Fuse delay (m) |
Fuse sensitivity (mm) |
Explosive Mass (TNT equivalent) (g) |
Ricochet | ||
| 0% | 50% | 100% | |||||||
| BR-240 | APHEBC | 760 | 1.43 | 1.2 | 9 | 29.26 | 48° | 63° | 71° |
| BR-240SP | AP | 757 | 1.43 | N/A | N/A | N/A | 47° | 60° | 65° |
Ammo racks

| Full ammo |
1st rack empty |
2nd rack empty |
3rd rack empty |
4th rack empty |
5th rack empty |
6th rack empty |
Visual discrepancy |
|---|---|---|---|---|---|---|---|
| 86 | 72 (+14) | 57 (+29) | 43 (+43) | 29 (+57) | 15 (+71) | 1 (+85) | No |
Note:
- Turret empty: 29 (+57) shells
Additional armament
| TT-250 tank torpedo | ||||
|---|---|---|---|---|
| Capacity | Vertical | Horizontal | Range | |
| 2 | +9°/+50° | N/A | 350 - 1,800 m | |
Ammunition
| Penetration statistics | |||||||
|---|---|---|---|---|---|---|---|
| Ammunition | Type of warhead |
Penetration @ 0° Angle of Attack (mm) | |||||
| 10 m | 100 m | 500 m | 1,000 m | 1,500 m | 2,000 m | ||
| TT-250 | Rocket | 83 | 83 | 83 | 83 | 83 | 83 |
| Shell details | ||||||||||
|---|---|---|---|---|---|---|---|---|---|---|
| Ammunition | Type of warhead |
Velocity (m/s) |
Range (m) |
Projectile Mass (kg) |
Fuse delay (m) |
Fuse sensitivity (mm) |
Explosive Mass (TNT equivalent) (kg) |
Ricochet | ||
| 0% | 50% | 100% | ||||||||
| TT-250 | Rocket | 135 | 6,500 | 250 | 0 | 0.1 | 130 | 79° | 80° | 81° |
Machine guns
| 7.62 mm DT | ||||
|---|---|---|---|---|
| Mount | Capacity (Belt) | Fire rate | Vertical | Horizontal |
| Coaxial | 1,890 (63) | 600 | N/A | N/A |
Usage in battles
The RBT-5 is really flexible when it comes to usage, as it has great mobility and firepower, which is pretty much all you need for a good tank. Given its great 53 km/h top speed, it is good to use the RBT-5 as a point-capping tank at the start of the match. It is better to travel on-road to fully utilise its speed to get to the point before the enemies do. Another good tactic is to manoeuvre to the flank of the frontline/point and attack from the side. Its speed makes it possible to go the furthest with the shortest time, surprising the enemies.
Once capped, the player can either quickly ambush behind a nearby cover waiting for the enemy to re-cap it, or just drive around the battlefield and help the teammates. Its 70 mm penetration and 29 g TNT will knock out pretty much anything around its BR with a single shot. If not, the 3 seconds reload allows it to finish them off easily. A sudden, close encounter is a hard test to the player's skills because the RBT-5 isn't very good at turning as its tracks are quite long and narrow. Its turret traverse of around 11 deg/sec is certainly not the best. Thus those two factors can sometimes cause the death of the RBT-5 so the player must respond fast and accurate.
Enemies worth noting:
- Pz.IIs: Although not as fast as the RBT-5, the Pz.IIs still have an average speed of around 40km/h. Also, they are equipped with a deadly 20 mm autocannon that will punch holes on the RBT-5 with ease, and their rate of fire can quickly kill multiple crew. The RBT-5 has thin armour protecting only 3 crew, making it extremely vulnerable to those autocannons.
- Sd.Kfz.234 series: These wheeled vehicles all have scary on-road speeds of more than 60 km/h, so in any map, with roads connecting to the points they can always get there first and set up an ambush. However, these vehicles are wheeled meaning they cannot turn in place, they are rather sluggish when trying to turn, and they have either slow turret traverse or no turret at all so the player can use this to their advantage. Wiggle/circle around them to avoid their guns and force them to turn, then aim carefully and immobile them. Note that the DT machine gun on the RBT-5 only has 10 mm penetration at most, making it almost impossible to go through their armour and kill any crew, so don't think of destroying these wheeled tanks with the MG.
- M8 LAC, M3 Stuarts: These vehicles are equally fast, and the M8 can outrun the RBT-5 if it's travelling on road, allowing them to get to the point before the RBT-5 does. Therefore if America is on the other side the player might want to change their tactic and not to rush the point since low tier battles are always filled with fast tanks. The M8 has a roof-mounted .50 cal MG which easily tears the RBT-5's armour apart and kills the crew inside. Also, most of them have a vertical stabiliser that works at low speed, so avoid firing on the move with them.
- B1 bis: A heavily armoured tank for its BR, but do not panic when you see it. Don't fire at a distance unless you are directly aiming at its side armour. The best option is to try and get as close to it as possible (point-blank range is ideal) and shoot straight at its side. However sometimes due to a variety of reasons the player might be unable to flank it and has to face it frontally. If that is the case, shoot the rather vertical driver's compartment and there's a great chance of penetration, killing the driver and the commander (which is also the gunner for the turret). Or, shoot between the two guns on the turret to kill the commander/gunner. Or, shoot at the near-vertical part of the curved gun mantlet of the big gun.
TT-250 usage:
The RBT-5 carries 2 tank torpedo's that are powerful enough to destroy any vehicle it lands a hit on or even near some medium, light or SPAA tanks. but aiming them is pretty difficult and requires great precision: in order to be as accurate as possible always rely on your rangefinder, because getting a as precise measurements will ensure your hit that will result a instant elimination of the enemy. due to the starting angle of 9° the starting range of the Torpedo's is 350 meters, which limits you to be able to fire at targets closer than 350 meters. which will require you to make use of your main 45mm 20-K gun to neutralize them. You can use the TT-250 on various way's.
To start. You can use the TT-250 to snipe still standing targets, the TT-250 has a astounding effective fire range of 1,800 meters which is more than enough to neutralize targets in the Tier I and II range. If you have spotted a target, start range finding right away. after you get its approximate range, fire your first torpedo and watch. after your Torpedo lands and misses or destroys the target. Adapt your second torpedo to a more precise measurement from what you saw in your first torpedo, usually still standing targets don't understand what that explosion was and mostly think it was a artillery or a bomb of a plane: and won't move. so fire away your second torpedo and most of the times that will overpressure or directly hit the target and eliminate them.
secondly You can use the TT-250 to blind fire the enemies, at the start of a match or when the enemies are capturing the point. First you need to know of each map how far the distance is of your spawn to the enemies, after you have figured that out you can fire away the 2 torpedo's a bit from each other. and it can effectively land you a elimination of the enemies at their spawn. the second way of blind firing is firing when the enemy is capturing a point, simply set the distance to the range that is displayed on the point and fire away. It can sometimes land you a kill or take down the enemies tracks.
thirdly. there is a way to aim at targets closer than 350 meters, by driving against a wall backwards. you gain the ability to shoot right in front of you, this is especially useful if you try to destroy a enemy by surprise if they drive by. Is especially handy in top-tier.
It is suggested to stay near a captured point so you may resupply your Torpedo's for more usage, the resupply takes 15 seconds each
Enemies worth noting for TT-250:
- Maus, E-100: The most heaviest tanks in war thunder, these tanks have a strong enough armor that even direct hits won't do much against them. The only way being to hit the roof of both the Maus and E-100, because the armor there is small enough for the TT-250 to overpressure the heavy tanks. so its best to attack them only at long range, as the torpedo's will be falling from above. And keep you're distance from them if you ever encounter them while playing with the RBT-5 on 7.7
Pros and cons
Pros:
- 45 mm 20-K gun offers great penetration
- 20-K gun offers a good rate of fire
- The BR-240 APHEBC rounds deal the best damage and spalling at its rank, allowing for impressive post-penetration damage
- Fast tank, with good acceleration and good overall mobility
- Front armour, although very thin, may bounce shells thanks to the decent sloping of the glacis
- Very powerful rockets, can even instantly destroy a Maus, allowing the RBT-5 to handle even formidable foes
Cons:
- Equipped with only 2 rockets
- Rockets are set at a fixed angle which further complicates aiming, does not allow for zeroing targets
- Armour can only cope with rifle calibre rounds, could also deflect a few heavy machine gun rounds
- Very vulnerable to quick-firing autocannons like the German 20 mm or the TShN
- Terrible crew arrangement, a well-placed, penetrating shot will automatically take out the crew
- Rockets may overshoot at close range, due to the affixed nature of the mounting
- If the rockets get shot it can cause your tank to ammunition explode
History
Media
- Skins
- Videos
See also
Links to the articles on the War Thunder Wiki that you think will be useful for the reader, for example:
- reference to the series of the vehicles;
- links to approximate analogues of other nations and research trees.
External links
Paste links to sources and external resources, such as:
- topic on the official game forum;
- other literature.
| Kharkov Design Bureau for Mechanical Engineering named after A. A. Morozov | |
|---|---|
| Light Tanks | |
| BT-5 | BT-5 · RBT-5 |
| BT-7 | BT-7 · BT-7M · BT-7A (F-32) |
| Medium Tanks | |
| T-34-76 | T-34 (Prototype) · T-34 (1940) · T-34 (1941) · T-34 (1st Gv.T.Br.) · T-34 (1942) · T-34E STZ · T-34E |
| T-34-57 | T-34-57 · T-34-57 (1943) |
| T-34-85 | T-34-85 (D-5T) · T-34-85 · T-34-85E |
| T-34-100 | T-34-100 |
| T-44 | T-44 · T-44-100 · T-44-122 |
| Main Battle Tanks | |
| T-54 | T-54 (1947) · T-54 (1949) · T-54 (1951) |
| T-64 | T-64A (1971) · T-64B |
| Export/Captured | |
| T-34 | ▀T 34 747 (r) · ␗T-34 (1943) · ␗Т-34-85 (S-53) |
| See Also | Uralmashzavod · Uralvagonzavod |
| USSR light tanks | |
|---|---|
| T-26 | T-26 · T-26 (1st Gv.T.Br.) · T-26-4 · T-26E |
| BT | BT-5 · RBT-5 · BT-7 · BT-7 TD · BT-7M · BT-7A (F-32) |
| T-50 | T-126 · T-50 |
| T-70 | T-70 · T-80 |
| PT-76 | PT-76B · PT-76-57 · Object 906 |
| BMP | BMP-1 · BMP-2 · BMP-2M · BMP-3 |
| BMD | BMD-4 |
| 2S25 | 2S25 · 2S25M |
| Wheeled | BA-11 · BTR-80A |
| Other | T-60 · Object 685 · 2S38 |
| China | ▂Type 62 |
| USSR premium ground vehicles | |
|---|---|
| Light tanks | BA-11 · RBT-5 · BT-7A (F-32) · T-26 (1st Gv.T.Br.) · T-26E · T-126 · PT-76-57 · 2S38 |
| Medium tanks | T-34 (Prototype) · T-34 (1st Gv.T.Br.) · T-34E · T-34-57 (1943) · T-34-85E · T-34-100 · T-44-122 · TO-55 · T-55AM-1 · T-72AV (TURMS-T) · T-80UD |
| ▂M3 Medium · ▂M4A2 · ▂T-III · ▂T-V · ▂МК-IX "Valentine" | |
| Heavy tanks | SMK · T-35 · ▂MK-II "Matilda" · KV-1E · KV-2 (1940) · KV-2 (ZiS-6) · KV-122 · KV-220 · IS-2 "Revenge" · Object 248 · IS-6 · T-10A |
| Tank destroyers | BM-8-24 · BM-13N · BM-31-12 |
| SU-57 · SU-76D · SU-76M (5th Gv.Kav.Corps) · SU-85A · SU-100Y · SU-122P · Object 120 | |
| SPAA | ▂Phòng không T-34 · ZUT-37 |
