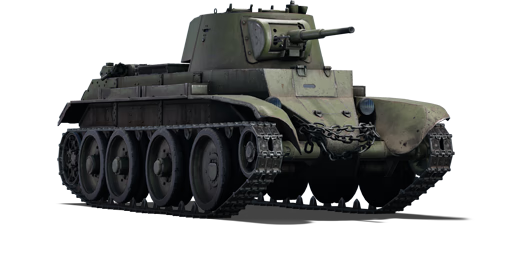
BT-7

From War Thunder Wiki
Jump to: navigation, search
RANK 4 FRANCE
Somua SM PACK
This page is about the Soviet light tank BT-7. For other versions, see BT-7 (Family).
BT-7
ussr_bt_7_1937.png
GarageImage BT-7.jpg
ArtImage BT-7.png
BT-7
AB RB SB
1.3 1.3 1.3
Class:
Research:2 900 Specs-Card-Exp.png
Purchase:700 Specs-Card-Lion.png
Show in game

Description

The BT-7 mod. 1937 was a Soviet light tank, developed from the previous BT-5 light tank. Both designs shared the same 45 mm 20-K cannon aswell as coaxial DT machine gun. Unlike the BT-5, the BT-7s hull was welded and the shape of hull at front was also redesigned. The frontal armour protection was slightly increased from 13 to 20 mm of armour. New short-pitch tracks were installed and Mikulin M-17T engine which was a licensed copy of German BMW VI V-12 engine was used instead of the M-5-400 found in BT-5 and earlier BT series tanks. New turret turret featuring sloped armour was also adopted. The BT-7 was used during Winter War and Continuation war with Finland aswell as during the early stages of Operation Barbarossa. Their numbers greatly reduced due to combat losses after 1941, the BTs served for the remainder of war. One example in running condition is preserved to this day.

The BT-7 was introduced during the Closed Beta Test for Ground Forces before Update 1.41. The BT-7 features a very powerful gun on a highly mobile chassis, at the cost of no valuable armour. The tank commanders should utilize the speed of the BT to flank their enemies and shoot them from sides and then quickly change position and perform another ambush as the vehicle itself is very lightly armoured and any hit is fatal.

General info

Survivability and armour

Armourfront / side / back
Hull20 / 15 / 13
Turret15 / 15 / 13
Crew3 people
Visibility84 %
BT-7 Firing its cannon

The armour is well angled at certain points like the front, however being as thin as it is, don't count on it to protect you very well. With 20 mm armour on the front and with all that inclination on the armour panels, this vehicle had decent protection. With 5 mm less armour on the turret, that's the vulnerability of the tank, especially on the turret's backside, where the ammo is stored. However, you only get 3 crew members in the vehicle, making the tank vulnerable to any "crew knocked out" scenarios. One strong point for the vehicle is that you have speed, and the trade-off of speed vs. armour can come in handy especially travelling around 59 km/h (It's very hard to reach 60 km/h) ensures any enemy SPG will be very unlikely to hit close to you.

Armour type:

  • Rolled homogeneous armour
Armour Front Sides Rear Roof
Hull 15 mm (61°) Upper front glacis
20 mm (18°) Driver's hatch
20 mm (5-52°) Lower front glacis
20 mm Driver compartment
15 + 4 mm Fighting & engine compartments
10 mm (55°) Upper glacis
13 mm (15°) Centre plate
13 mm (58°) Lower glacis
10 mm
4 mm Engine vents
Turret 15 mm (7-53°) Gun mantlet
15 mm (13°) Turret front
15 mm (13°) Front
13 mm (13°) Bustle
13 mm (15°) 10 mm

Notes

  • Tracks, torsion bars and suspension wheels are 15 mm thick.
  • Belly armour is 6 mm thick.
  • Mudguards and storage boxes are 4 mm thick.
  • There is a 4 mm internal wall separating the crew compartment from the engine compartment.

Mobility

Speedforward / back
AB55 / 11 km/h
RB and SB50 / 10 km/h
Number of gears4 forward
1 back
Weight13.7 t
Engine power
AB763 hp
RB and SB400 hp
Power-to-weight ratio
AB55.7 hp/t
RB and SB29.2 hp/t
BT-7 driving through "Advance To The Rhine"
Game Mode Max Speed (km/h) Weight (tons) Engine power (horsepower) Power-to-weight ratio (hp/ton)
Forward Reverse Stock Upgraded Stock Upgraded
Arcade 55 11 13.7 620 763 45.26 55.69
Realistic 50 10 354 400 25.84 29.2

It is a very fast tank with relatively thin armour. It can be useful to flank and hit the side armour of enemy tanks, taking advantage of its very high speed. With its speed and low weight, this tank will drift in turns. For maximum control in turns, reduce throttle beforehand and only tip/nudge the turn-keys. It needs some time to get used to, however, it can prepare you for the T-34's break-turns.

Your speed can be your best defence, so move fast and try to zig-zag a bit to make yourself a more difficult target for tanks farther away (not too much though, or you'll bleed off too much speed).

Off-road behaviour is good and the drifts aren't as extreme as on city roads. Top speed is not really reduced as well, making the BT-7 one of the fastest early tanks due to its relatively wide tracks, something both the Light tank M2 and Panzer II miss.

Like its predecessor the BT-5, the BT-7 has competitive mobility, easily being able to reach capture points before most other tanks or get to competitive camping spots before anyone else, the 400 hp engine gives the BT-7 a good power-to-weight ratio, which also allows the BT-7 to scale hills and smaller obstacles with relative ease.

Modifications and economy

Repair costBasic → Reference
AB100 → 128 Sl icon.png
RB96 → 123 Sl icon.png
SB112 → 144 Sl icon.png
Total cost of modifications2 970 Rp icon.png
890 Sl icon.png
Talisman cost190 Ge icon.png
Crew training200 Sl icon.png
Experts1 000 Sl icon.png
Aces20 Ge icon.png
Research Aces96 000 Rp icon.png
Reward for battleAB / RB / SB
10 / 10 / 20 % Sl icon.png
100 / 100 / 100 % Rp icon.png
Modifications
Mobility Protection Firepower
Mods new tank traks.png
Tracks
Research:
150 Rp icon.png
Cost:
45 Sl icon.png
40 Ge icon.png
Mods new tank suspension.png
Suspension
Research:
165 Rp icon.png
Cost:
50 Sl icon.png
45 Ge icon.png
Mods new tank break.png
Brake System
Research:
165 Rp icon.png
Cost:
50 Sl icon.png
45 Ge icon.png
Mods new tank filter.png
Filters
Research:
250 Rp icon.png
Cost:
75 Sl icon.png
70 Ge icon.png
Mods new tank transmission.png
Transmission
Research:
320 Rp icon.png
Cost:
95 Sl icon.png
85 Ge icon.png
Mods new tank engine.png
Engine
Research:
320 Rp icon.png
Cost:
95 Sl icon.png
85 Ge icon.png
Mods tank tool kit.png
Improved Parts
Research:
150 Rp icon.png
Cost:
45 Sl icon.png
40 Ge icon.png
Mods extinguisher.png
Improved FPE
Research:
165 Rp icon.png
Cost:
50 Sl icon.png
45 Ge icon.png
Mods tank reinforcement ussr.png
Crew Replenishment
Research:
250 Rp icon.png
Cost:
75 Sl icon.png
70 Ge icon.png
Mods new tank horizontal aiming.png
Horizontal Drive
Research:
150 Rp icon.png
Cost:
45 Sl icon.png
40 Ge icon.png
Mods tank ammo.png
45mm_AP_1942_ammo_pack
Research:
150 Rp icon.png
Cost:
45 Sl icon.png
40 Ge icon.png
Mods tank cannon.png
Adjustment of Fire
Research:
165 Rp icon.png
Cost:
50 Sl icon.png
45 Ge icon.png
Mods new tank vertical aiming.png
Elevation Mechanism
Research:
250 Rp icon.png
Cost:
75 Sl icon.png
70 Ge icon.png
Mods art support.png
Artillery Support
Research:
320 Rp icon.png
Cost:
95 Sl icon.png
85 Ge icon.png

Armaments

Main armament

Ammunition188 rounds
Reloadbasic crew → aces
3.8 → 2.9 s
Vertical guidance-6° / 25°
Main article: 20-K (45 mm)

The 20-K is the typical Soviet rank I gun. Players should get used to it since it will be your main armament up until rank II. The APHEBC round has a good amount of HE filler, meaning penetrating shells will do good damage, sometimes even knocking out enemies with a single shot. At much longer ranges, shells begin to lose penetration and accuracy but on most common low tier maps this is not a problem due to the smaller map sizes.

45 mm 20-K Turret rotation speed (°/s) Reloading rate (seconds)
Mode Capacity Vertical Horizontal Stabilizer Stock Upgraded Full Expert Aced Stock Full Expert Aced
Arcade 188 -6°/+25° ±180° N/A 15.23 21.08 25.60 28.31 30.12 3.77 3.33 3.07 2.90
Realistic 9.52 11.20 13.60 15.04 16.00

Ammunition

Penetration statistics
Ammunition Type of
warhead
Penetration @ 0° Angle of Attack (mm)
10 m 100 m 500 m 1,000 m 1,500 m 2,000 m
BR-240 APHEBC 70 67 58 47 39 32
BR-240SP APBC 73 70 60 50 41 34
Shell details
Ammunition Type of
warhead
Velocity
(m/s)
Projectile
mass (kg)
Fuse delay
(m)
Fuse sensitivity
(mm)
Explosive mass
(TNT equivalent) (g)
Ricochet
0% 50% 100%
BR-240 APHEBC 760 1.43 1.2 9 29.26 48° 63° 71°
BR-240SP APBC 757 1.43 - - - 47° 60° 65°

Ammo racks

Ammo racks of the BT-7
Full
ammo
1st
rack empty
2nd
rack empty
3rd
rack empty
4th
rack empty
5th
rack empty
6th
rack empty
7th
rack empty
188 174 (+14) 162 (+26) 147 (+41) 135 (+53) 123 (+65) 108 (+80) 89 (+99)
8th
rack empty
9th
rack empty
10th
rack empty
11th
rack empty
12th
rack empty
13th
rack empty
Visual
discrepancy
73 (+115) 57 (+131) 41 (+147) 25 (+163) 13 (+175) (+187) No

Notes:

  • Racks disappear after you've fired all shells in the rack.
  • Turret empty: 147 (+41) shells.
  • Turret and side racks empty: 89 (+99) shells.

Machine guns

Ammunition2 394 rounds
Belt capacity63 rounds
Reloadbasic crew → aces
10.4 → 8.0 s
Fire rate600 shots/min
Main article: DT (7.62 mm)
7.62 mm DT
Mount Capacity (Belt) Fire rate Vertical Horizontal
Coaxial 2,394 (63) 600 - -

Usage in battles

There are two common schools of thought when driving the BT-7, firstly rushing a capture point using your better than average mobility to get there before other friendly or enemy tanks. This tactic can help to gain points early in the game and perhaps even a few kills as enemy tanks try to take the point that you captured, but your fairly thin armour will leave you at risk of being crippled and destroyed by enemy fire unless you retreat to cover or get back up from friendly vehicles. The second school of thought is not to charge right into the combat, but wait a while to see how the battle develops - observe where and how many enemy tanks go, maybe fire a few shots from a distance. Use your great mobility to get to the best positions and flank the enemy, from these positions you could snipe into the main battler area to damage and kill enemy vehicles. You could then decide to use the BT-7's mobility to charge at lonely opponents, which at close range have no chance of keeping their guns pointed at you as you can essentially drive circles around them. Keep in mind that charging into more than 1 opponent is usually a quick end as it is very hard to not get hit by either of them at the same time. There is basically paper armour on BT-7 to stop anything other than machine-gun fire, overall speed is key, being mobile and changing your position often will be a great way to avoid enemy fire and potential revenge kill attempts.

If you lose one of your 3 crew members it would be advisable to head to a friendly capture point to use your crew replenishment as your vehicle needs 2 members to operate, and having a 'spare' crew member can come in handy.

Enemies worth noting:

  • Pz.IIs, Flakpanzer I - Although not as fast as the BT-7, the Pz.IIs still have an average speed of around 40 km/h. Also, they are equipped with a deadly 20 mm autocannon that will punch holes on the BT-7 with ease, and their rate of fire can quickly kill multiple crew. The BT-7 has thin armour protecting only 3 crew, making it extremely vulnerable to those autocannons. Try to finish them before they shoot at you.
  • Sd.Kfz.234 series - These wheeled vehicles all have scary on-road speeds of more than 60 km/h, so in any map, with roads connecting to the points they can always get there first and set up an ambush. However, these vehicles are wheeled meaning they cannot turn in place, they are rather sluggish when trying to turn, and they have either slow turret traverse or no turret at all, so the player can use this to their advantage. Wiggle/circle around them to avoid their guns and force them to turn, then aim carefully and immobilise them. Note that the DT machine gun on the BT-7 only has 10 mm penetration at most, making it almost impossible to go through their armour and kill any crew, so don't think of destroying these wheeled vehicles with the MG.
  • M8 Greyhound, M3 Stuarts - These vehicles can be equally fast, and the M8 can outrun the BT-7 if it's travelling on road, allowing them to get to the point before the BT-7 does. Therefore, if America is on the other side the player might want to change their tactics and not rush the point since low tier battles are always filled with fast tanks. The M8 has a roof-mounted .50 cal MG which easily tears the BT-7's armour apart and kills the crew inside. Also, most of them have a vertical stabiliser that works at low speed, so avoid firing on the move with them.
  • B1 bis - A heavily armoured tank for its BR, but do not panic when you see it. Don't fire at a distance unless you are directly aiming at its side armour. The best option is to try and get as close to it as possible (point-blank range is ideal) and shoot straight at its side. However sometimes due to a variety of reasons the player might be unable to flank it and has to face it frontally. If that is the case, shoot the rather vertical driver's compartment and there's a great chance of penetration, killing the driver and the commander (which is also the gunner for the turret). Or, shoot between the two guns on the turret to kill the commander/gunner. Or, shoot at the near-vertical part of the curved gun mantlet of the big hull-mounted gun.

Pros and cons

Pros:

  • Deadly firepower at its BR: high penetration of up to 70 mm, with the 29 g TNT it can frontally knock out most tanks like Pz.II, Chi-Ha or M3 Stuart; its firepower is effective even in high tier battles if aiming at the right spot
  • One of the fastest tanks in the game, great acceleration and overall mobility makes it a nice point-capturer, flanker and climber- can outrun the commonly seen M3 Stuart on road
  • 3-4 seconds reload time is quick enough to destroy opponents it cannot knock out with one hit, like Pz.IV C and LVT(A) series
  • Adequate reverse speed of -10 km/h allows it to quickly retreat from danger when there is no time to turn around
  • Small and low profile allows it to easily hide behind cover or bushes

Cons:

  • Poor survivability: non-existent armour on all sides plus the closely packed crew makes it vulnerable to autocannons (Pz.II, Flakpanzer I), heavy MG (M13 MGMC) and even solid shells
  • Turret and hull traverse is rather slow, meaning it may not be able to keep track of fast targets- this is also a disadvantage in a close-quarters duel, as other light tanks like M3 Stuart can turn way faster
  • Although fast, it is still slower than the Sd.Kfz.234 series on road.
  • Gun depression of only -6 degrees (worse than previous BT-5) means it cannot effectively fight in hills
  • Fuel tanks and ammo are scattered inside and are prone to detonation upon being hit

History

Development

The success of the BT light tanks in Soviet service prompted additional upgrades and other developmental projects done on the design to increase its service life. The development led to the final model of the BT light tank series, the BT-7. The tank differed from the older BT-5 tank with a welded hull, redesigned hull front, and a new engine in the Model 1935 version. The Model 1937 version of the BT-7 added a redesigned turret that featured sloping armour.

The tank initially had a canted-ellipse shaped turret mounting the main gun and coaxial machine guns with the focus of allowing the tank to mount different tanks without changing the whole design, which led to the development of two main kinds of BT-7s, the normal variant with a 45 mm 20K gun for anti-armour and an artillery variant called the BT-7A which mounted a 76.2 mm KT-26 howitzer for anti-infantry. The tank was redesigned before it entered production by using the BT-5 turret instead with the main gun and coaxial machine gun still attached, though the concept of swapping to different guns was still in development for the tank. A radio was also installed on the turret as well. The tank had a three-man crew, the commander/gunner and loader in the turret, and the driver in the front. Production started in 1935 but was redesigned in 1937 with a new conical turret that allowed more ammunition to be stored and a machine gun on the rear of the turret. The BT-7 mod. 1937 also had improvements on the drive wheels, gearbox, and tracks by 1938. The BT-7 went on to be produced from 1935 to 1940 for a total unit production of between 2,700 to 5,300 tanks.

Combat usage

The BT-7 served alongside its older counterpart BT-5 tanks. The BT light tanks were meant to be cavalry tanks, and at the time of their introduction, they were considered some of the finest tanks against other countries' tanks. They had great mobility of all available tanks, and its 45 mm gun could perform very well in combat. The only drawbacks of the design were its light armour and its gasoline engine, which caused the design to be rather flammable to improvised incendiary weapons. The BT-7's most notable combat service came against the Japanese at Khalkhin Gol. The tactics of Soviet Marshal Georgi Zhukov and the performance of his BT-5 and BT-7 tanks led to a decisive victory. It was during this battle that the BT tanks' tendency to catch fire was found, but its performance was positive against the inferior Japanese armoured forces.

The BT-7 next combat use was during the opening stages of Operation Barbarossa when Nazi Germany invades the Soviet Union. The superior German tanks Panzer III and Panzer IV was able to easily take out these lightly armoured tanks. Reports note that about 2,000 BT-7 tanks were lost in the first 12 months alone against the German forces, with hundreds broken down from low maintenance and were abandoned. Despite their inferiority, the Soviets continued to produce and field them among armour and mechanized units to boost their operational capacity, though most were kept away from the front lines due to their inadequacy. The BT-7 would finally see its service again in the Soviet invasion of Japanese-controlled Manchuria. The Soviets fielded the BT-7 and other tanks in its inventory against the inferior Japanese forces in Manchuria, where it proved very effective against the more lightly armoured Japanese tanks employed. The BT series were all retired after the end of World War II due to their obsolete design as an inter-war period tank design.

Legacy

Perhaps the most important impact of the BT light tanks series was that it kick-started the development of the T-34 medium tank, which would go on as the most-produced tank of World War II. A new design team was formed in 1937 at the KhPZ factory, where they built prototypes utilizing more armour and a heavier gun onto the design, which was called the A-32 and was approved for production as the T-34 tank. The BT tanks also serve as the basis of support vehicles such as the BT-7A artillery tan, BT-7TU command tank, OP-7 flamethrower tank, and even the TT-BT-7 remote-controlled tank. An attempt in 1940 also had the BT-7 up-armoured with hinged homogeneous armour, which added five tons to the design weight. These vehicles are not known to have seen service in combat units.

Msg-info.png The BT-7 also holds the record for the furthest jump in a tank, at 42 metres, set in 1936.


Archive of the in-game description

In the second half of 1937, the BT-7 tank was mass-produced with a conical turret, a three-speed gearbox and strengthened suspension. In comparison to the BT-7 Mod. 1935, the tank's weaponry became more powerful due to the inclusion of a DT machine gun in the turret. Its ammunition capacity was increased by 44 and totalled 188 rounds in the battle vehicles and 145 rounds in the command vehicles equipped with a radio set. Some of the tanks were equipped with an anti-aircraft gun.

The unit command vehicles were equipped with a 71-TK-1 radio set with a hand-rail antenna, and later with a rod antenna. To allow the vehicle to fire its cannon and coaxial machine gun at night, it was equipped with two special projector headlights. Over the course of its modernisation, the thickness of its frontal hull armour reached 22 mm. The turret's armour was also strengthened using vertically sloping armour plates. Its combat-loaded weight grew to 13,925 kg. Factory No. 183 alone manufactured 4,727 tanks of this series.

The BT-7 underwent its trial by fire in the Khalkhyn Gol river region as part of the 6th and 11th tank brigades. In the process, the latter undertook a hurried 500 km trek to the scene of the conflict. On the whole, the tanks gained a good reputation, but their drawbacks were noted as well: they were difficult to drive, which meant they required highly trained drivers, and they had insufficient armour and poor communication equipment. All these flaws were confirmed in the Poland Campaign of September 1939 and in the Winter War with Finland.

With appropriate tactics and a well-trained crew, the BT-7 could successfully oppose all types of German tanks at the beginning of the war, being inferior to them only in armour.

BT-7 tanks participated in combat operations on the Soviet-German front right up until 1944, and in 1945 they served in the war with Japan. A few captured tanks served in the Finnish army until the beginning of the 50s.


Media

Skins
Videos

See also

Related development

External links

Paste links to sources and external resources, such as:

  • topic on the official game forum;
  • other literature.


Kharkov Design Bureau for Mechanical Engineering named after A. A. Morozov
Light Tanks 
BT-5  BT-5 · RBT-5
BT-7  BT-7 · BT-7M · BT-7A (F-32)
Medium Tanks 
T-34-76  T-34 (Prototype) · T-34 (1940) · T-34 (1941) · T-34 (1st Gv.T.Br.) · T-34 (1942) · T-34E STZ · T-34E
T-34-57  T-34-57 · T-34-57 (1943)
T-34-85  T-34-85 (D-5T) · T-34-85 · T-34-85E
T-34-100  T-34-100
T-44  T-44 · T-44-100 · T-44-122
Main Battle Tanks 
T-54  T-54 (1947) · T-54 (1949) · T-54 (1951)
T-64  T-64A (1971) · T-64B
Export/Captured 
T-34  ▀T 34 747 (r) · ␗T-34 (1943) · ␗Т-34-85 (S-53)
See Also  Uralmashzavod · Uralvagonzavod

USSR light tanks
T-26  T-26 · T-26 (1st Gv.T.Br.) · T-26-4 · T-26E
BT  BT-5 · RBT-5 · BT-7 · BT-7 TD · BT-7M · BT-7A (F-32)
T-50  T-126 · T-50
T-70  T-70 · T-80
PT-76  PT-76B · PT-76-57 · Object 906
BMP  BMP-1 · BMP-2 · BMP-2M · BMP-3
BMD  BMD-4
2S25  2S25 · 2S25M
Wheeled  BA-11 · BTR-80A
Other  T-60 · Object 685 · 2S38
China  ▂Type 62