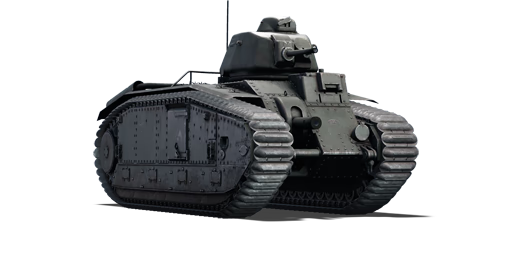
B1 bis

From War Thunder Wiki
Jump to: navigation, search
RANK 4 FRANCE
Somua SM PACK
This page is about the French heavy tank B1 bis. For the premium version, see B1 ter.
B1 bis
fr_b1_bis.png
GarageImage B1 bis.jpg
ArtImage B1 bis.png
B1 bis
AB RB SB
2.3 2.3 2.3
Class:
Research:7 900 Specs-Card-Exp.png
Purchase:10 000 Specs-Card-Lion.png
Show in game

Description

The Char de bataille B1 bis was an upgraded variant of the Chat B1 with upgraded armour, a new turret and a longer barrel for its 47mm gun. The B1 Bis was the most produced variant of the tank with 369 units delivered from a total order of 1144 units, the rest of the tanks could not be delivered due to the capitulation of France. A number of fixes and slight modifications were made to the tank throughout the production, like the replacement of its radio with an improved ER55 and changes to the ammo loadout of the tank.

It was introduced in Update 1.75 "La Résistance". With arguably the best armour at its BR, this tank is a beast in long-range engagements since it is hard to penetrate at distances. While not having the best armament, it should do the job taking care of these dangerous early SPGs and light tanks. The "bis" suffix is a French way of marking an improved version. The tank features very powerful armour for its BR, being almost impossible to penetrate in the front by light tanks and early medium tanks, however as all heavy tanks it suffers from poor mobility and the tank has two guns, a quick-firing 47mm cannon and its main cannon being a 75mm hull fixed cannon, this means that it cant be rotated since it is fixed to the hull, to aim it, you have to move your entire tank.

General info

Survivability and armour

Armourfront / side / back
Hull60 / 55 / 50
Turret56 / 56 / 56
Crew4 people
Visibility106 %

In order to effectively use this tank's armour, there is a few things to consider. First of all, there are a lot of shot traps, the main ones being the turret ring and the hull gun mount, in order to minimize your enemies' chance to hit these weak spots, stay away from them. Second, even if your armour is very strong for the BR, do not completely rely on it by sitting around in an open field: you will eventually get hit where it hurts. The third thing to consider is your small and thick turret: hide that big clumsy hull behind a hill and pop out only your hard "head", take a shot, fall back, reload, repeat. If something goes wrong (i.e. getting shot in the turret ring), there is usually enough men left to take the job left by their dead "camarade". Do not bother getting spotted: it is your job to stay in the enemies' sights while your lighter teammates do what they ought to. In some situations, it can even be used as a breakthrough tank, rely on your own experience to guess when it is time to do so.

This tank will get penetrated by some seemingly harmless vehicles, such as the Stuarts or even a Pz.II. Any tank with more than 55 mm penetration will be able to pierce your hull side at close range with minimal angle. Thus it is crucial to always angle the hull.

When fighting the B1 bis, due to the extremely heavy frontal armour, one should try to use mobility to flank the B1. However, if that isn't possible, you'll want to try and hit the "mailslot" of the turret ring. It may be a tricky shot, but there's only ~40 mm of armour there.

Armour type:

  • Rolled homogeneous armour (hull, 47 mm gun mantlet)
  • Cast homogeneous armour (turret, 75 mm gun mantlet)
Armour Front (Slope angle) Sides Rear Roof
Hull 60 mm (7-62°) Front glacis
60 mm (32-48°) Lower glacis
55 mm Center Mass
55 + 55 mm Border
50 mm (1-47°) 25 mm (77-89°)
Turret 56 mm (0-46°) Turret front
56 mm (1-85°) Gun mantlet
56 mm (0-49°) Machine gun cover
56 mm (2-19°) 56 mm (18-19°) 30 mm (62-89°)
Cupola 48 mm (cylindrical) 30 mm (spherical)

Notes:

  • Suspension wheels are 15 mm thick while tracks are 20 mm thick.
  • Lower turret ring armour 40 mm thick, while upper turret ring armour is 25 + 40 mm thick.
  • Belly armour is 20 mm thick.

Mobility

Speedforward / back
AB30 / 4 km/h
RB and SB28 / 4 km/h
Number of gears5 forward
1 back
Weight31.1 t
Engine power
AB586 hp
RB and SB307 hp
Power-to-weight ratio
AB18.8 hp/t
RB and SB9.9 hp/t
Game Mode Max Speed (km/h) Weight (tons) Engine power (horsepower) Power-to-weight ratio (hp/ton)
Forward Reverse Stock Upgraded Stock Upgraded
Arcade 30 4 31.1 396 586 12.73 18.84
Realistic 28 4 272 307 8.75 9.87

This tank's mobility won't allow you to position fast enough. Taking time is the only way to get where you want safely. Since this tank is pretty long and narrow, do not engage in cramped spaces since you will not be allowed to manoeuvre as you wish. Your reverse speed won't allow you to retreat if things get bad around you, stay behind the frontlines, making good use of your armour. Interestingly, the B1 has neutral steering which very much helps to aim the hull-mounted 75 mm gun or to angle the hull quickly.

Modifications and economy

Repair costBasic → Reference
AB706 → 873 Sl icon.png
RB700 → 865 Sl icon.png
SB875 → 1 082 Sl icon.png
Total cost of modifications6 880 Rp icon.png
6 750 Sl icon.png
Talisman cost530 Ge icon.png
Crew training3 000 Sl icon.png
Experts10 000 Sl icon.png
Aces115 Ge icon.png
Research Aces160 000 Rp icon.png
Reward for battleAB / RB / SB
30 / 40 / 50 % Sl icon.png
112 / 112 / 112 % Rp icon.png
Modifications
Mobility Protection Firepower
Mods new tank traks.png
Tracks
Research:
460 Rp icon.png
Cost:
450 Sl icon.png
65 Ge icon.png
Mods new tank suspension.png
Suspension
Research:
390 Rp icon.png
Cost:
380 Sl icon.png
55 Ge icon.png
Mods new tank break.png
Brake System
Research:
390 Rp icon.png
Cost:
380 Sl icon.png
55 Ge icon.png
Mods new tank filter.png
Filters
Research:
580 Rp icon.png
Cost:
560 Sl icon.png
85 Ge icon.png
Mods new tank transmission.png
Transmission
Research:
1 100 Rp icon.png
Cost:
1 100 Sl icon.png
160 Ge icon.png
Mods new tank engine.png
Engine
Research:
1 100 Rp icon.png
Cost:
1 100 Sl icon.png
160 Ge icon.png
Mods tank tool kit.png
Improved Parts
Research:
460 Rp icon.png
Cost:
450 Sl icon.png
65 Ge icon.png
Mods extinguisher.png
Improved FPE
Research:
390 Rp icon.png
Cost:
380 Sl icon.png
55 Ge icon.png
Mods tank reinforcement fr.png
Crew Replenishment
Research:
580 Rp icon.png
Cost:
560 Sl icon.png
85 Ge icon.png
Mods new tank horizontal aiming.png
Horizontal Drive
Research:
460 Rp icon.png
Cost:
450 Sl icon.png
65 Ge icon.png
Mods tank cannon.png
Adjustment of Fire
Research:
390 Rp icon.png
Cost:
380 Sl icon.png
55 Ge icon.png
Mods new tank vertical aiming.png
Elevation Mechanism
Research:
580 Rp icon.png
Cost:
560 Sl icon.png
85 Ge icon.png

Armaments

Main armament

Shoulder stabilizer
Reduces the swing of the gun in one plane while moving
Ammunition50 rounds
Reloadbasic crew → aces
5.2 → 4.0 s
Vertical guidance-15° / 18°
Main article: SA35 L/32 (47 mm)

With the same gun as most other Rank 2 French tanks, the B1 bis will never be recognized for having a fearsome armament: penetration rates are even lower than most reserve tanks. Although this turreted armament is only good at firing light targets such as SPGs (e.g. SU-76M, Marder III) and light tanks (e.g. M5A1, T-50), heavier targets (e.g. Pz.IV F2, Cromwell) can still be penetrated with careful aiming and thorough knowledge on weak spots. The AP shell does a good job at breaking gun barrels and tracks, allowing the B1 bis to disarm/immobile an opponent prior to a flanking kill. The reload rate is average for its calibre but rather fast at this BR. Elevation and depression angles are very good but turret slewing rate is a bit slow: this tank has been designed to be hull-down.

47 mm SA35 L/32 Turret rotation speed (°/s) Reloading rate (seconds)
Mode Capacity Vertical Horizontal Stabilizer Stock Upgraded Full Expert Aced Stock Full Expert Aced
Arcade 50 -15°/+18° ±180° Shoulder 8.1 11.2 13.6 15.0 16.0 5.20 4.60 4.24 4.00
Realistic 6.0 7.0 8.5 9.4 10.0

Ammunition

Penetration statistics
Ammunition Type of
warhead
Penetration @ 0° Angle of Attack (mm)
10 m 100 m 500 m 1,000 m 1,500 m 2,000 m
Mle1935 APC 62 59 47 36 27 20
Mle1935 HE HE 6 6 5 4 4 4
Shell details
Ammunition Type of
warhead
Velocity
(m/s)
Projectile
mass (kg)
Fuse delay
(m)
Fuse sensitivity
(mm)
Explosive mass
(TNT equivalent) (g)
Ricochet
0% 50% 100%
Mle1935 APC 660 1.62 - - - 48° 63° 71°
Mle1935 HE HE 590 1.41 0.1 0.1 143 79° 80° 81°

Ammo racks

Ammo racks of the B1 bis
Full
ammo
1st
rack
empty
2nd
rack
empty
3rd
rack
empty
4th
rack
empty
5th
rack
empty
6th
rack
empty
7th
rack
empty
Visual
discrepancy
50 39 (+11) 27 (+23) 25 (+25) 23 (+27) 21 (+29) 11 (+39) (+49) No

Note:

  • As they are modeled by sets of 2 to 4, shells disappear from the rack only after you've fired all shells in the set.


Additional armament

Ammunition74 rounds
Reloadbasic crew → aces
11.1 → 8.6 s
Vertical guidance-15° / 25°
Horizontal guidance-1° / 1°
Main article: SA35 L/17 (75 mm)

The hull-mounted 75 mm gun may be useless for most of the time, since to maximise its armour effectiveness the B1 has to angle a lot, and given the hull-mounted gun's extremely limited horizontal traverse it can hardly aim at anything while the hull is angling. It also has a very curved trajectory, slow projectile velocity and poor penetration, leading to a challenging usability. However this gun does have a very impressive -20° depression angle which is more than enough to deal with any slopes. Its post-penetration effect is also significantly better than the turreted 47 mm thanks to the 90 g TNT filling. Therefore, it should only be used as a close range defence device. Exposing your 75 mm gun for long range engagements not only makes you vulnerable, it is also mostly ineffective.

75 mm SA35 L/17 Turret rotation speed (°/s) Reloading rate (seconds)
Mode Capacity Vertical Horizontal Stabilizer Stock Upgraded Full Expert Aced Stock Full Expert Aced
Arcade 74 -15°/+25° ±1° N/A 3.2 4.5 5.4 6.0 6.4 11.1 9.8 9.1 8.6
Realistic 2.4 2.8 3.4 3.8 4.0

Ammunition

Penetration statistics
Ammunition Type of
warhead
Penetration @ 0° Angle of Attack (mm)
10 m 100 m 500 m 1,000 m 1,500 m 2,000 m
Mle1910M APHE 58 57 50 43 37 32
Mle1915 HE 11 11 11 11 11 11
Shell details
Ammunition Type of
warhead
Velocity
(m/s)
Projectile
mass (kg)
Fuse delay
(m)
Fuse sensitivity
(mm)
Explosive mass
(TNT equivalent) (g)
Ricochet
0% 50% 100%
Mle1910M APHE 470 6.4 1.2 14 90 47° 60° 65°
Mle1915 HE 500 5.55 0 0.1 740 79° 80° 81°

Ammo racks

Full
ammo
1st
rack empty
2nd
rack empty
3rd
rack empty
4th
rack empty
5th
rack empty
6th
rack empty
7th
rack empty
8th
rack empty
9th
rack empty
10th
rack empty
11th
rack empty
12th
rack empty
13th
rack empty
14th
rack empty
15th
rack empty
Visual
discrepancy
74 68 (+6) 64 (+10) 62 (+12) 60 (+14) 56 (+18) 53 (+21) 38 (+36) 36 (+38) 25 (+49) 23 (+51) 21 (+53) 14 (+60) (+65) (+71) (+73) No
Ammo racks of the B1 bis

Note:

  • As they are modeled by sets of 2 to 4, shells disappear from the rack only after you've fired all shells in the set.


Machine guns

Ammunition5 100 rounds
Belt capacity150 rounds
Reloadbasic crew → aces
6.5 → 5.0 s
Fire rate551 shots/min
Main article: MAC 31 (7.5 mm)
7.5 mm MAC 31
Mount Capacity (Belt) Fire rate Vertical Horizontal
Coaxial 5,100 (150) 551 N/A N/A

The small calibre of the MAC 31 machine gun makes it largely ineffective against all armoured vehicles but the ones with an open compartment. It still can be used to ping targets as a rangefinding help or to mow down minor obstacles blocking your line of sight.

Usage in battles

The Char B1, upon playing it for the first time will be slow in both acceleration, max speed and turret rotation speed. The hull gun takes more work to aim than that of the turret because of the limited firing arc it has. In order to aim it to any reasonable extent, the entire tank must be turned. However, careful use of it will reward a skilled tanker with devastating firepower compared to other Tier I tanks, with its high penetration and explosive filler. The best way to play the B1 bis is to hold down a position, preferably hull down (as its turret is thick and small, it will ricochet most shots it will take). Playing the B1 bis well, there are only 3 ways to get knocked out:

  • Being outflanked by a light tank
  • The enemy has been lucky enough to get a shot through a shot trap
  • Meeting a dangerous gun

Enemies worth noting:

  • M3/M5 Stuart - These agile light tanks can be a dangerous threat to the clumsy B1. The Stuarts have good acceleration, great top speed regardless of the terrain, and fast hull traverse, allowing them to sneak up or charge at a B1 without getting hit. When they are close, their 37 mm cannons can easily penetrate your hull cannon mount, turret sides and hull sides, and their fast reload can knock out your crews one by one. To counter them, angle your hull for about 45 degrees, this way their small calibre shells tend to ricochet and will have a hard time to penetrate you. If they circle you, turn your hull and reverse at the same time to avoid them flanking, and if possible gain some separation. Target their hull, as their frontal turret is mostly covered by a curved gun mantlet which can cause non-penetrations.
  • T-50/T-126 - These light tanks have a thick and well-sloped armour will prevent you from piercing them anywhere on the front hull save for extreme circumstances when they are nose-down to you (i.e. in a ditch). These tanks also receive high-penetration 45 mm guns which can fire the potent APHEBC shot, or even APCR, and these will cut through your armour with relative ease. Your only chances of damaging them frontally are to disable their tracks and then gun, or get lucky and penetrate the turret front, which is theoretically possible to do so, but the weak nature of the B1's guns plus the curved nature of their turrets means that doing so outside of close range isn't advisable. Leave these to stronger teammates to deal with.
  • Matilda III - This is perhaps one of the greatest threats to your existence. The only other infantry tank to serve at the same time as the B1 Bis, The Matilda boasts a near-solid 70+ mm of armour frontally, has 75 mm of armour all over the turret and 70 mm of side armour covered with side skirts. Only the rear hull (55 mm) is penetrable, and in any case the B1 is slow and sluggish, meaning that the Matilda, if not too crippled, can still ruin your day. The worst thing of all this, however, is that the Matilda boasts the 2-pounder; while not the best choice for its BR, it can still pierce your armour with relative ease if you haven't angled, meaning that a 1-vs-1 fight will almost certainly see the Matilda win hands-down. If you do see one in combat, floor the gas and start praying really hard that a friendly with a big gun also saw him.
  • Churchill I - This is greatest threat you can face within your BR range and must be evaded at all costs. The Churchill's raw armour values make it 100% impervious to both of your guns, and its 2-pounder gun can penetrate your armour with ease. The rear plate of 50.8 mm is not a true weak spot, since there are two overlapping 50 mm plates at the rear. Even if you penetrate the first one, the transmission will absorb any shot, and the Churchill can turn its turret and return fire. The only way to penetrate a Churchill I is to fire directly through the small gap in the front mantlet, but this is a very tough shot to achieve.

Against the B1 bis:

Light tank/SPAA: this is usually the type of vehicle that the B1 "bully" the most as some of their low penetrations simply do not allow them to punch through the B1's armour from any angle. However, apart from some reserve tanks, light tanks and SPAA may have shells with over 65 mm penetration, and that is enough to deal with a B1. First of all you must use your good mobility and get as close as possible, preferably when the B1 is busy dealing with other teammates so you can take your time to place every shell accurately. When fighting the B1 frontally, aim for the curved hull cannon mount, it will knock out the hull gunner. Or go for the near-vertical driver's port below the turret, it will knock out the driver and commander who is also the turret gunner. For tanks with extremely low penetration (e.g. early Japanese tanks) you cannot even penetrate the rear at point blank range. If this is the case, you can target the turret ring which is only ~40 mm thick. Just make sure that your shells impact the armour with as little angle as possible since popular small-calibre shells tend to ricochet on angled armour. Certain SPAA with access to high-penetration belts (e.g. Flakpanzer 38) can also complete the above tasks.

Medium tank: medium vehicles may not be able to quickly sneak up next to a B1, but they usually come with a better cannon or better shells. Aim at the above areas, but watch out for the B1's guns, as you cannot move as fast a light tanks to get away. Angle your armour when needed, the B1's hull and turret gun will struggle against angled armour. If your penetration is over 55 mm you can try shooting at its side. Shoot anywhere and it will disable some crew or the engine. The tracks of the B1 bis are quite hard to break with a few shots since medium tanks' cannons at this tier are still of small calibres, so it is better to focus on scoring successful penetrations.

Heavy tank: if your heavy vehicle sees a B1 bis, then it usually suggests that the B1 is fighting in an uptier, as there are not many heavy tanks with lower BR. As such, a typical low-tier heavy vehicle like Matilda, Churchill I or even the Gun Carrier (3-in) all have superior armour to a B1. You can confidently sit face to face with a B1 and no need to hurry to aim. Given that these early heavy tanks still have quite small cannons, the weak spots remain the same. Wiggle your hull while you reload, the B1 still has some chance to penetrate your weak spots in return.

Tank destroyer: tank destroyers around the B1 bis's BR will already have destructive firepower, so they will be the main force to counter B1 bis. For example, the LVT(A)(4) (ZiS-2) and ZiS-30's 57 mm guns can frontally penetrate a B1 anywhere, even through the sloped upper front plate. Tank destroyers with weaker guns (e.g. SU-76M) might scramble a bit, but their shorter cannons usually mean more explosives inside the shells, the B1's interior is not spacious so there is always a good chance to knock it out. However do be very careful, only go out to fire when the B1 is distracted, as its 2 cannons will not struggle to destroy a weakly protected tank destroyer with a salvo.

Pros and cons

Pros:

  • Overall good armour
    • Very heavy frontal armour for its rank
    • Strong turret from the front
    • Good at sidescraping (thick sides)
    • Nearly impenetrable hull when angled
    • Armour is quite thick and curvy at the driver's port area
    • The MAC 31's large drum can sometimes absorb shell fragments or smaller shells
  • Decent firepower
    • One of the best in-game depression (-18°, turret gun)
    • Has 2 main armaments
    • A rare feature on French tanks: it has APHE ammunition
    • MAC 31 coaxial MG
    • Turret gun has a shoulder stabiliser, which makes stop-and-shoot tactics effective

Cons:

  • Armour has many shot traps, easing the task of killing it
    • Fuel tank behind the grille lights up very often when penetrated
    • Large turret ring is weak (25-40 mm poorly sloped)
    • Hull gun mount is a weak spot and can be penetrated by most guns of the tier
    • Crew is cramped
    • Turret rear is only 38 mm thick
    • Has a tall and "thin" cupola
    • Literally has an hallway full of ammo in the back
  • Guns feel lacking
    • Lacking penetration from both of its guns
    • Abysmal traverse on 75 mm gun (~1° left to right)
    • Slow reload on the 75 mm
    • Only stock ammo choices
    • APHE shell won't detonate when shooting at light targets (25 mm or less armour)
    • Hull gun is hard to master (not beginner-friendly)
  • Mobility is subpar
    • Not very mobile due to weight
    • Slow hull turning rate
    • Poor reverse speed

History

Intended originally as a heavy infantry-support tank, the first prototype of the Char B dates back to January, 1929. Testing and altered design requirements led to the Char B1, which entered army service in late 1935. In total 35 of this earlier model had been built, but by the onset of war had been replaced in service. The successor B1 bis had heavier armour, a bigger engine, and a more powerful gun in a new turret (same as the Somua S35). Sophisticated and powerful for its time, it suffered from the one-man turret, poor communications, slow speed, a small operational radius, and difficulties in achieving mass production. The driver aimed and fired the bow-mounted howitzer and MG, which due to a lack of lateral traverse, had to be aimed by turning the tank. The complex steering system that enabled this, through a hydrostatically controlled auxiliary differential, proved particularly prone to breakdowns.

In May 1940, 243 B1 bis were deployed in combat units, out of 368 built. They formed the main striking force of France's four armoured divisions, with two battalions in each division, as well as five other independent tank companies (10 tanks per company).

In the 1940 Battle for France, only the German 88 mm guns could reliably defeat the B1 bis. Most were lost due to breakdown or fuel shortage.

161 B1 bis were captured by Germany, who replaced the 75 mm with a flamethrower in 60 of them, which served in France, Holland (including at Arnhem), the Balkans and Crimea. Another 16 were converted to self-propelled 105 mm howitzers. The Free French 13th Dragoons employed a squadron of 17 recaptured B1 bis in combat in 1945.

Media

Skins
Videos

See also

Vehicles equipped with the same chassis
Other vehicles of similar configuration and role

External links


France heavy tanks
B1  B1 bis · B1 ter
2C  2C · 2C bis
ARL-44  ARL-44 (ACL-1)
AMX-50  Somua SM · AMX-50 Surbaissé · AMX-50 Surblindé
USA  ▄M4A3E2