T-34-85 (S-53) (China)

From War Thunder Wiki
Jump to: navigation, search
Rank IV USSR | Premium | Golden Eagles
Tu-1 Pack
This page is about the medium tank T-34-85 (S-53) (China). For other versions, see T-34 (Family).
␗Т-34-85 (S-53)
cn_t_34_85_d_5t.png
GarageImage T-34-85 (S-53) (China).jpg
␗Т-34-85 (S-53)
AB RB SB
5.7 5.7 5.7
Class:
Research:54 000 Specs-Card-Exp.png
Purchase:185 000 Specs-Card-Lion.png
Show in game

Description

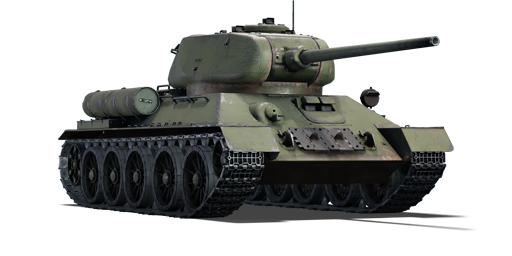
The T-34-85 (S-53) Model 1944 is a remodelling of the late-production T-34-85 variant with the introduction of an 85 mm Zavod imeni Stalina (ZiS) S-53 tank gun. Being the sixth variant of the T-34 medium tank family, it features an easier-to-reload ZiS S-53 tank gun, a radio relocated from the hull into a turret with an improved layout, and an improved gunner's sight. The T-34-85 (S-53) arrived in China as part of a Soviet military assistance package. With the start of the Korean War, China received 300 T-34-85 medium tanks, along with many trucks and other support vehicles. A total of more than 2,000 military vehicles, as well as three large and medium-sized repair factories and various ammunition, were transferred to China. The T-34-85 (S-53) was the main armoured backbone of the Chinese People's Volunteer Army during the Korean War, performing various missions ranging from tank-to-tank combat to infantry support.

Introduced in Update 1.91 "Night Vision", the T-34-85's firepower is significantly increased over the previous T-34 (1943), thanks to the ZiS S-53 tank gun. The sloped armour provides adequate protection, but players should not rely on it to exchange fire with enemy tanks because most adversaries at this rank will easily penetrate the tank. It lacks a turret-roof-mounted heavy machine gun as compared to American tanks. However, this is included in the T-34-85 Gai (improved) version of the T-34-85 (S-53).

General info

Survivability and armour

Armourfront / side / back
Hull45 / 45 / 45
Turret90 / 75 / 52
Crew5 people
Visibility100 %

The armour layout of the T-34-85 (S-53) is virtually identical to the T-34-85. The hull armour, while well angled, is very thin for its rank and can be penetrated by nearly any tank cannon. Creative use of angling can still lead to the occasional bounce. The 90 mm thick turret is also thin for its rank, but the good sloping on the sides can also lead to bounces with some luck.

The T-34-85 has very poor survivability due to the fact that all 5 crew members are packed close to each other. A hull penetration will likely knock out all of them. However, inexperienced players that face this tank will often shoot the lower hull part of the driver hatch, which is infamous for being surprisingly resilient.

Any enemy vehicle around the T-34-85's BR bracket can destroy it if it can get a solid shot on the hull armour. Beware when exposing hull when coming out to take a shot on an enemy, someone is bound to be watching for the T-34-85 and they won't be afraid to plant a shell into the 45 mm hull armour.

Armour type:

  • Rolled homogeneous armour (Hull, Turret roof)
  • Cast homogeneous armour (Turret, Cupola, Driver's hatch, Machine gun port)
Armour Front (Slope angle) Sides Rear Roof
Hull 45 mm (60°) Front glacis
45 mm (60°) Lower glacis
75 mm (60°) Driver's hatch
65 mm (30°) Machine gun port
45 mm (39-40°) Top
45 mm Bottom
45 mm (47-49°) Top
45 mm (46°) Bottom
20 mm
Turret 90 mm (1-69°) Turret front
90 + 40 mm (8-61°) Gun mantlet
75 mm (19-22°) Front 2/3rd
52 mm (13-19°) Rear 1/3rd
52 mm (9°) 20 mm
Cupola 90 mm 90 mm 90 mm 20 mm

Notes:

  • The gun mantlet has 90 mm in front with additional 40 mm plates on the sides of the gun.
  • Suspensions wheels are 20 mm thick and tracks are 18 mm thick

Mobility

Speedforward / back
AB62 / 10 km/h
RB and SB55 / 9 km/h
Number of gears5 forward
1 back
Weight32.2 t
Engine power
AB954 hp
RB and SB500 hp
Power-to-weight ratio
AB29.6 hp/t
RB and SB15.5 hp/t
Game Mode Max Speed (km/h) Weight (tons) Engine power (horsepower) Power-to-weight ratio (hp/ton)
Forward Reverse Stock AoA Stock Upgraded Stock Upgraded
Arcade 62 10 32 0.2 775 954 24.22 29.63
Realistic 55 9 442 500 13.81 15.53

The T-34-85 (S-53) has excellent mobility for a medium tank, as expected of a T-34. It can reach high speeds both on and off-road thanks to its wide tracks. The reverse speed is not exactly great, but it is significantly better than those of comparable Shermans, Panthers, and early T-34s (76 mm, 57 mm variants).

Modifications and economy

Repair costBasic → Reference
AB2 545 → 3 473 Sl icon.png
RB3 025 → 4 129 Sl icon.png
SB3 787 → 5 169 Sl icon.png
Total cost of modifications46 800 Rp icon.png
85 200 Sl icon.png
Talisman cost1 500 Ge icon.png
Crew training52 000 Sl icon.png
Experts185 000 Sl icon.png
Aces710 Ge icon.png
Research Aces480 000 Rp icon.png
Reward for battleAB / RB / SB
100 / 160 / 190 % Sl icon.png
166 / 166 / 166 % Rp icon.png
Modifications
Mobility Protection Firepower
Mods new tank traks.png
Tracks
Research:
2 400 Rp icon.png
Cost:
4 400 Sl icon.png
145 Ge icon.png
Mods new tank suspension.png
Suspension
Research:
2 600 Rp icon.png
Cost:
4 700 Sl icon.png
155 Ge icon.png
Mods new tank break.png
Brake System
Research:
2 600 Rp icon.png
Cost:
4 700 Sl icon.png
155 Ge icon.png
Mods new tank filter.png
Filters
Research:
2 900 Rp icon.png
Cost:
5 300 Sl icon.png
175 Ge icon.png
Mods new tank transmission.png
Transmission
Research:
3 800 Rp icon.png
Cost:
6 900 Sl icon.png
230 Ge icon.png
Mods new tank engine.png
Engine
Research:
3 800 Rp icon.png
Cost:
6 900 Sl icon.png
230 Ge icon.png
Mods tank tool kit.png
Improved Parts
Research:
2 400 Rp icon.png
Cost:
4 400 Sl icon.png
145 Ge icon.png
Mods extinguisher.png
Improved FPE
Research:
2 600 Rp icon.png
Cost:
4 700 Sl icon.png
155 Ge icon.png
Mods tank reinforcement cn.png
Crew Replenishment
Research:
2 900 Rp icon.png
Cost:
5 300 Sl icon.png
175 Ge icon.png
Mods tank additional armor.png
Add-on Armor
Research:
3 800 Rp icon.png
Cost:
6 900 Sl icon.png
230 Ge icon.png
Mods new tank horizontal aiming.png
Horizontal Drive
Research:
2 400 Rp icon.png
Cost:
4 400 Sl icon.png
145 Ge icon.png
Mods tank ammo.png
85mm_APHE_ammo_pack
Research:
2 400 Rp icon.png
Cost:
4 400 Sl icon.png
145 Ge icon.png
Mods tank cannon.png
Adjustment of Fire
Research:
2 600 Rp icon.png
Cost:
4 700 Sl icon.png
155 Ge icon.png
Mods new tank vertical aiming.png
Elevation Mechanism
Research:
2 900 Rp icon.png
Cost:
5 300 Sl icon.png
175 Ge icon.png
Mods tank ammo.png
85mm_APCR_ammo_pack
Research:
2 900 Rp icon.png
Cost:
5 300 Sl icon.png
175 Ge icon.png
Mods art support.png
Artillery Support
Research:
3 800 Rp icon.png
Cost:
6 900 Sl icon.png
230 Ge icon.png

Armaments

Main armament

Ammunition60 rounds
First-order16 rounds
Reloadbasic crew → aces
9.6 → 7.4 s
Vertical guidance-5° / 22°
Main article: ZIS-S-53 (85 mm)

The T-34-85 (S-53) (China) is equipped with the fantastic ZiS-S-53 cannon, which penetrates about 145 mm in close range engagements with the stock BR-365K round. This might not be enough to fight Tiger IIs frontally, but it works perfectly with other tanks which are less armoured, or you can engage them from the side. The gun depression is like on many other Soviet vehicles quite poor, with only 5° there are no hull-down manoeuvres possible.

85 mm ZIS-S-53 Turret rotation speed (°/s) Reloading rate (seconds)
Mode Capacity Vertical Horizontal Stabilizer Stock Upgraded Full Expert Aced Stock Full Expert Aced
Arcade 60 -5°/+22° ±180° N/A 23.80 32.94 40.00 44.24 47.06 9.62 8.51 7.84 7.40
Realistic 14.88 17.50 21.25 23.50 25.00

Ammunition

The stock round is the BR-365K which has 148 mm of penetration on close range. The APHE round has a very good post-penetration damage with its explosive filler. It's a decent stock shell that can take out most enemies with a single shot.

The second round, the BR-365A, only has about 135 mm penetration point-blank, in exchange for improved penetration against sloped armour. This makes it more effective than the BR365K when shooting angled M4A3E2 Jumbos and Panthers. It also has a larger explosive filler, increasing substantively the post-penetration damage, resulting in a higher probability to knock enemies out with a single shot.

The BR-365P APCR shot is also available, penetrating about 195 mm of RHA when at close range. Keep in mind that it does not perform well against sloped armour and has very poor post-penetration damage. You should only use it as a last resort when you're absolutely certain that it can penetrate and that your other shells won't work.

The O-365K HE shell, with its large explosive filler, performs pretty well against trucks, half-tracks and other unarmoured targets. Carry some HE shells just in case, as this tank lacks a large-calibre machine gun to deal with soft targets.

Penetration statistics
Ammunition Type of
warhead
Penetration @ 0° Angle of Attack (mm)
10 m 100 m 500 m 1,000 m 1,500 m 2,000 m
BR-365K APHE 148 143 126 106 90 77
BR-365A APHEBC 135 133 124 114 104 95
BR-365P APCR 195 187 154 122 96 76
O-365K HE 19 18 17 16 15 14
Shell details
Ammunition Type of
warhead
Velocity
(m/s)
Projectile
mass (kg)
Fuse delay
(m)
Fuse sensitivity
(mm)
Explosive mass
(TNT equivalent) (g)
Ricochet
0% 50% 100%
BR-365K APHE 792 9.2 1.2 14 77 47° 60° 65°
BR-365A APHEBC 792 9.2 1.2 14 164 48° 63° 71°
BR-365P APCR 1,050 4.99 - - - 66° 70° 72°
O-365K HE 785 9.54 0.2 0.1 741 79° 80° 81°

Ammo racks

Ammo racks of the T-34-85
Full
ammo
1st
rack empty
2nd
rack empty
3rd
rack empty
4th
rack empty
5th
rack empty
6th
rack empty
60 57 (+3) 55 (+5) 54 (+6) 48 (+12) 43 (+17) 37 (+23)
7th
rack empty
8th
rack empty
9th
rack empty
10th
rack empty
11th
rack empty
Visual
discrepancy
31 (+29) 25 (+35) 19 (+41) 17 (+43) (+59) No

Notes:

  • Shells are modelled individually and disappear after having been shot or loaded.
  • Rack 11 is a first stage ammo rack. It totals 16 shells and gets filled first when loading up the tank.
  • This rack is also emptied early: the rack depletion order at full capacity is: 11 - 1 - 2 - etc. until 10.
  • If you pack 17 (+43) shells, it will keep the hull empty of ammo.
  • Simply not firing when the gun is loaded will move ammo from racks 1 to 10 into rack 11. Firing will interrupt the restocking of the ready racks.

Machine guns

Ammunition1 890 rounds
Belt capacity63 rounds
Reloadbasic crew → aces
10.4 → 8.0 s
Fire rate600 shots/min
Main article: DT (7.62 mm)

The MG on the T-34-85, the 7.62 mm DT, is quite ineffective in most scenarios due to its poor penetration. It can only disable completely exposed crews on vehicles like M16. When it comes to lightly armoured tanks (e.g. M18, Sd.kfz.234/2) this MG will struggle to pierce even their thin armour plates.

7.62 mm DT
Mount Capacity (Belt) Fire rate Vertical Horizontal
Coaxial 1,890 (63) 600 N/A N/A

Usage in battles

While the T-34-85 is a fairly well-rounded tank, its poor armour and high speed mean that one should play it more like a light tank than a medium. The gun is very lethal but the penetration is not particularly good, so it is better to flank and go for side shots, which can instantly knock out all but the largest and most spacious opponents. During frontal engagements, Tiger Is should be shot in the flat portions of the hull (avoiding the driver's port), Panthers should be shot in the turret (in the less curved portion of the mantlet) or possibly in the lower glacis, and non-Jumbo Shermans can generally be shot anywhere. The Tiger II (P) is only vulnerable in a small portion of the turret cheeks and the Tiger II (H) is essentially frontally immune, so for these kinds of targets, circle around to get a good shot at the hull sides and let the slope modifiers take care of the rest. Watch out for American tanks like the M4A3 (76) W and T25, as they have vertical stabilizers and can often shoot first if they are aware of you.

In AB, you should play this tank like any other T-34. Push because you have a pretty well-rounded tank and will generally be able to adapt to whatever situation that develops. The AB meta generally favours more heavily armed and armoured tanks due to the presence of markers, making flanking and ambushes more difficult, so play carefully and take advantage of your high mobility.

In RB, play this tank offensively yet carefully. Use your speed and keep up with your teammates, or alternatively play it like a light tank and go on long flanks. Be aware of other enemy flankers like the infamous M18 Hellcat or R3 T20 FA-HS which you may encounter. Ambushing enemies works particularly well in this tank due to the high mobility, decent gun, and low profile (especially when compared to other tanks like the Sherman and panther series).

In SB, play this tank very cautiously because the optics aren't that good and most of the time you will face tanks from pretty far distances. Panthers generally have better optics than you so try to avoid encounters with Panthers or Tigers.

Enemies worth noting:

Panther A/D, Tiger II (P) - The Panthers are one of the most common tanks around BR 5.7, and they pose a great threat with their deadly long 75 mm cannon, thick frontal armour and adequate speed. You want to avoid engaging them at long range as the T-34 has only x3.5 scope magnification, making long-range shooting super hard. Engage the Panthers within 500 m and avoid shooting their frontal hull. Their biggest weak spot is the gun mantlet, which is only 100 mm thick and has a flat part in the middle. That is where you want to aim at, the T-34's APHE has sufficient damage to instantly destroy the Panther even from its turret. The second weak spot is the sides, which more often than not instantly destroys the vehicle. Generally, APHE is enough to deal with the Panthers, and no APCR is needed. The APHE shell loves to chew through the Panther's thin side armour, even if it's angled. For the Tiger II P, aim at the vertical area of the frontal turret which is also 100 mm. The best tactic is still to flank it, however.

Tiger H1/E - The Tiger's weak spots are the opposite with the Panthers. Their hull is unsloped and rather thin, while the gun mantlet is weirdly shaped and can absorb quite some shells. The best engaging range remains the same, within 500 m. If the Tiger is angling, aim at the turret ring to disable the gunner and destroy the turret traverse, or aim at the hull side below the side skirt, which is only 60 mm. If it is not angling, aim between the driver's vision port and the MG for an instant kill. Avoid shooting at these two parts as they tend to bounce/absorb shells. For the Tiger E, don't shoot at the lower glacis as there will be add-on tracks installed there, making it harder to penetrate.

Ho-Ri - In a frontal engagement, APCR is required as the APHE shells don't have enough penetration. With APCR loaded, aim at the further sides of the fighting compartment, away from the gun, because the further from the gun, the thinner the armour gets, with the thinnest part being around 160 mm unsloped. Penetrating there will knock out its loader, gunner or commander, or detonate the ammo. Of course, the best way is still side-shooting with APHE.

Panzer IV/70(V), Jagdpanzer 38(t) - These small tank destroyers with their well-angled frontal armour can be quite a problem from a distance. With APHE, you can disable their transmission by shooting at their lower glacis. Now if you can, flank them. The 85 mm APHE does a great job at penetrating sloped, thin armour, so you don't have to get to their absolute sides. For the Pz IV/70, you can also aim at the downward part of the gun mantlet since the shell might ricochet downwards into the hull, knocking out every crew member. The Jagdpanzer 38(t) doesn't have this problem, so side-shooting is required to destroy it effectively.

M4A3E2 Jumbo - This is another common enemy. It is recommended to use the BR-365A, the one with less penetration but more explosive filler. The reason is that it is better at penetrating sloped armour, which the Jumbo has. With that shell, you can easily destroy an M4A3E2 who's not angling. If it is, aim at the hull side just above the tracks, or load APCR and shoot straight at its gun mantlet. Against a 75 mm M4A3E2, you can relax a bit as it will struggle to penetrate your armour, but your cupola is a rather large weak spot and a shot through there can knock out the T-34. Be more careful with the M4A3E2 76 W, as they can easily pierce through your armour.

Pros and cons

Pros:

  • Good gun with adequate penetration and post-penetration damage
  • 56 km/h top speed and great manoeuvrability allows it to reposition easily
  • 5-man crew increases survivability
  • Access to APCR to effectively penetrate tough tanks up close (M4A3E2s, Tigers & Panthers)
  • Has two types of AP for players to choose: BR-365K with a higher penetration but less TNT, and BR-365A with a lesser penetration but plenty of TNT
  • Similar playstyle with the previous T-34s which is rather beginner-friendly
  • Fast turret traverse to easily deal with targets from multiple directions
  • Sloped hull and round frontal turret might bounce small calibre shells

Cons:

  • Armour is extremely thin, providing very limited protection against common guns (American 76 mm, British 17-pdr, German 75 mm & 88 mm, etc.)
  • Crew members are closely packed, a well-aimed shot tends to knock them out all at once
  • 5 degrees gun depression is below average
  • Large turret profile makes it easier to get spotted and shot
  • No large-calibre machine gun

History

Aid from Soviet Union

In October 1950, the Chinese People's Volunteer Army began to fight in North Korea. The 13th Corps of the Volunteer Army, which was the first troop to go abroad to fight, and the following 9th Corps were mainly made up of infantry units. In October 1950, the 6th Guards Mechanized Army of the Soviet Transbaikal Military Region formed 10 tank and self-propelled gun regiments, each of which was equipped with 30 T-34s, 6 IS-2s, and 4 ISU-122s. In November, these 10 regiments entered China and handed over their equipment to help the PLA in forming 3 tank divisions, 3 independent tank regiments, and 1 tank training base. This was the first time that the Chinese People's Volunteer Army ever had access to Soviet-made medium tanks and self-propelled guns.

On March 31, 1951, the Volunteer Army Armored Corps forming the first echelon entered North Korea with the 1st and 2nd Regiment of the 1st Tank Division, the 3rd Regiment of the Tank 2nd Division, with an air defense battalion and one engineer battalion affiliated to these armoured units. A tank division in the early days of the Volunteer Army's entry into North Korea was made up of: 2 armoured regiments, 1 motorized infantry regiment, 1 reconnaissance battalion, an air defense battalion, and an engineer battalion. Each tank regiment consisted of 30 medium tanks, 6 heavy tanks, and 4 self-propelled guns.

Fight for freedom and independence

As the United Nation's armed forces had overwhelming air superiority over the Volunteer Army, these T-34/85 tanks generally adopted ambush tactics, and have repeatedly achieved significant victories over their rivals. The most legendary battle happened to the No. 215 T-34/85 tank commanded by Yang Aru, which destroyed 5 US M26 "Pershing" tanks in a roll! The only head-on confrontation between the Volunteer Army Armored Corps and the UN tanks took place on the Cheorwon Front in October, 1951. The Second Tank Regiment destroyed 9 Thai M24 light tanks at the 190.8th Heights without any casualties of their own. Throughout the entire war, the Chinese T-34/85 tanks destroyed 79 UN armoured vehicles and 432 emplacements (such as pillboxes and machine gun nests) with little casualties, which supported the infantry combat and contributed a lot to the victory.

The T-34/85 medium tanks and their domestic modification (the T-34/85 Gai) were in service in the PLA Army field troops until the 1990s, and there were still a small number of T-34/85 serving the Marine Corps in 2000. The No. 215 tank commanded by Yang Aru was awarded the title of "People's Heroic Tank" and is currently on public display in the Beijing Military Museum.

Media

Skins

See also

Other T-34-85 variants

External links

Paste links to sources and external resources, such as:

  • topic on the official game forum;
  • other literature.


Kharkov Design Bureau for Mechanical Engineering named after A. A. Morozov
Light Tanks 
BT-5  BT-5 · RBT-5
BT-7  BT-7 · BT-7M · BT-7A (F-32)
Medium Tanks 
T-34-76  T-34 (Prototype) · T-34 (1940) · T-34 (1941) · T-34 (1st Gv.T.Br.) · T-34 (1942) · T-34E STZ · T-34E
T-34-57  T-34-57 · T-34-57 (1943)
T-34-85  T-34-85 (D-5T) · T-34-85 · T-34-85E
T-34-100  T-34-100
T-44  T-44 · T-44-100 · T-44-122
Main Battle Tanks 
T-54  T-54 (1947) · T-54 (1949) · T-54 (1951)
T-64  T-64A (1971) · T-64B
Export/Captured 
T-34  ▀T 34 747 (r) · ␗T-34 (1943) · ␗Т-34-85 (S-53)
See Also  Uralmashzavod · Uralvagonzavod

China medium tanks
ZTZ59  Type 59 · ZTZ59A · ZTZ59D1
ZTZ69  Type 69 · Type 69-IIa · T-69 II G
ZTZ88/96  ZTZ88A · ZTZ88B
  ZTZ96 · ZTZ96A · ZTZ96A (P)
ZTZ99  ZTZ99-II · ZTZ99-III
ZTZ99A  ZTZ99A · WZ1001(E) LCT
Export series  MBT2000 · VT-4A1
ROC  CM11
Other  Т-34-85 Gai · Object 122MT "MC"
Japan  ␗Chi-Ha · ␗Chi-Ha Kai
USA  ␗M4A4 · ␗M4A4 (1st PTG) · ␗M4A1 (75) W · ␗M48A1 · ␗M60A3 TTS
USSR  ␗T-34 (1943) · ␗Т-34-85 (S-53) · T-34-85 No.215 · Т-62 №545