BT-7M

From War Thunder Wiki
Jump to: navigation, search
Rank 6 USA
F-5C Pack
This page is about the Soviet light tank BT-7M. For other versions, see BT-7 (Family).
BT-7M
ussr_bt_7_m.png
GarageImage BT-7M.jpg
ArtImage BT-7M.png
BT-7M
AB RB SB
2.0 2.0 2.0
Class:
Research:5 900 Specs-Card-Exp.png
Purchase:6 300 Specs-Card-Lion.png
Show in game

Description

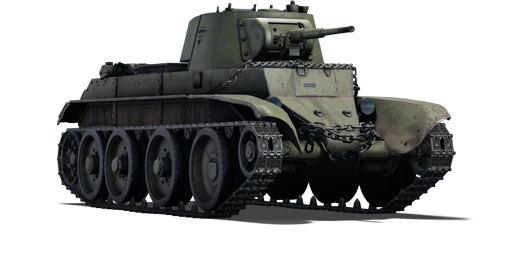
The BT-7M was a Soviet light tank, developed from the previous BT-5 light tank. Both designs shared the same 45 mm 20-K cannon aswell as coaxial DT machine gun. Unlike the BT-5, the BT-7s hull was welded and the shape of hull at front was also redesigned. The frontal armour protection was slightly increased from 13 to 20 mm of armour. New turret turret featuring sloped armour was also adopted. Unlike BT-7, the BT-7M features diesel powered V-2 engine giving it more horsepower, range and better acceleration unlike the gasoline powered BT-7.

BT-7M was introduced in Update "Ixwa Strike". A variant of the BT-7 featuring a more powerful 500 hp diesel engine, the BT-7M accelerates far faster than its predecessors, allowing it to quickly find flanking spots, get to capture points or escape out of situations. Unfortunately, as it has a higher BR, it faces far more enemies that can easily penetrate it, and the 45 mm cannon starts to struggle against more armoured vehicles like the M4A3 (105) or the Matilda III.

General info

Survivability and armour

Armourfront / side / back
Hull20 / 15 / 13
Turret15 / 15 / 13
Crew3 people
Visibility84 %

The armour of the BT-7M features notable improvements over the preceding BT-7. The frontal hull and the frontal half of the side hull are now 20 mm, which makes it more effective at deflecting rounds when angled and/or at a distance. Vehicles such as M16 MGMC and Flakpanzer 38 now might be somewhat less threatening due to your increased hull armour. The turret, however, keeps the same armour, which is 13-15 mm all-round. This is inadequate to stop HMG bullets and any AP or even HE shells at any distance. It can only resist rifle-calibre bullets from vehicles like Light AA Mk I. Overall, despite the thickened hull, the BT-7M is still protected in a light tank style and should not risk taking any hits.

The post-penetration survivability is just as poor as for other BT models. The 3 crew members are closely packed, with the gunner and commander right next to each other in the turret, and the driver directly in front of them. Any penetrating shot, regardless of explosive or solid, will have no issue taking out most/all of them. The weak armour also leads to the crew being vulnerable to overpressure damage. Vehicles with large-calibre HE shells like the Sturmpanzer II and M4A3 (105) will easily destroy the BT-7M with a single HE shell. The only positive aspect is the large fuel tanks at the rear hull sides, outside the engine. These fuel tanks protect the engine by absorbing poorly aimed shots although they might be set aflame, thus keeping the BT-7M driveable for a few more seconds.

Armour type:

  • Rolled homogeneous armour (hull, turret)
Armour Front (Slope angle) Sides Rear Roof
Hull 20 mm (18°) Upper plate
15 mm (61°) Middle plate
20 mm Lower plate
20 mm Forward
15 mm + 4 mm Rearward
10-13 mm 10 mm Roof
4 mm Radiator grilles
Turret 15 mm Turret front
15 mm Gun mantlet
15 mm Forward
13 mm Rearward
13 mm 10 mm

Notes:

  • Suspension wheels, tracks and torsion bars are 15 mm thick.
  • Belly armour is 6 mm thick.

Mobility

Speedforward / back
AB69 / 12 km/h
RB and SB63 / 11 km/h
Number of gears3 forward
1 back
Weight14.7 t
Engine power
AB954 hp
RB and SB500 hp
Power-to-weight ratio
AB64.9 hp/t
RB and SB34.0 hp/t

The BT-7M's mobility is just as classic as on other BT tanks. Although it is heavier than the earlier BT, at 14.2 tons, it is now driven by a powerful engine with a whopping 500 hp, giving it a high power-to-weight ratio. This allows it to pick up speed extremely fast and reach its top speed relatively easy. On hard surfaces like dirt or concrete, it can easily hit ~50 km/h, while on softer terrain it usually reaches ~40 km/h. This makes the BT-7M one of the fastest tracked vehicles in game, allowing it to get to any position quickly.

The reverse speed, at -11 km/h, is just enough to reverse you back into cover if you did not peek out far enough, if too far it will still be dangerously slow. The hull traverse is somewhat sluggish when the tank is stationary, often needing a short forward/backward jerk before turning. It does not lose a significant amount of speed when turning at high speed.

Game Mode Max Speed (km/h) Weight (tons) Engine power (horsepower) Power-to-weight ratio (hp/ton)
Forward Reverse Stock Upgraded Stock Upgraded
Arcade 69 12 14.7 775 954 52.72 64.9
Realistic 63 11 442 500 30.07 34.01

Modifications and economy

Repair costBasic → Reference
AB249 → 320 Sl icon.png
RB286 → 368 Sl icon.png
SB359 → 462 Sl icon.png
Total cost of modifications5 940 Rp icon.png
4 500 Sl icon.png
Talisman cost410 Ge icon.png
Crew training1 800 Sl icon.png
Experts6 300 Sl icon.png
Aces75 Ge icon.png
Research Aces135 000 Rp icon.png
Reward for battleAB / RB / SB
20 / 20 / 30 % Sl icon.png
106 / 106 / 106 % Rp icon.png
Modifications
Mobility Protection Firepower
Mods new tank traks.png
Tracks
Research:
300 Rp icon.png
Cost:
230 Sl icon.png
55 Ge icon.png
Mods new tank suspension.png
Suspension
Research:
330 Rp icon.png
Cost:
250 Sl icon.png
60 Ge icon.png
Mods new tank break.png
Brake System
Research:
330 Rp icon.png
Cost:
250 Sl icon.png
60 Ge icon.png
Mods new tank filter.png
Filters
Research:
500 Rp icon.png
Cost:
380 Sl icon.png
90 Ge icon.png
Mods new tank transmission.png
Transmission
Research:
640 Rp icon.png
Cost:
480 Sl icon.png
115 Ge icon.png
Mods new tank engine.png
Engine
Research:
640 Rp icon.png
Cost:
480 Sl icon.png
115 Ge icon.png
Mods tank tool kit.png
Improved Parts
Research:
300 Rp icon.png
Cost:
230 Sl icon.png
55 Ge icon.png
Mods extinguisher.png
Improved FPE
Research:
330 Rp icon.png
Cost:
250 Sl icon.png
60 Ge icon.png
Mods tank reinforcement ussr.png
Crew Replenishment
Research:
500 Rp icon.png
Cost:
380 Sl icon.png
90 Ge icon.png
Mods new tank horizontal aiming.png
Horizontal Drive
Research:
300 Rp icon.png
Cost:
230 Sl icon.png
55 Ge icon.png
Mods tank ammo.png
45mm_AP_1942_ammo_pack
Research:
300 Rp icon.png
Cost:
230 Sl icon.png
55 Ge icon.png
Mods tank cannon.png
Adjustment of Fire
Research:
330 Rp icon.png
Cost:
250 Sl icon.png
60 Ge icon.png
Mods new tank vertical aiming.png
Elevation Mechanism
Research:
500 Rp icon.png
Cost:
380 Sl icon.png
90 Ge icon.png
Mods art support.png
Artillery Support
Research:
640 Rp icon.png
Cost:
480 Sl icon.png
115 Ge icon.png

Armaments

Main armament

Ammunition188 rounds
Reloadbasic crew → aces
3.8 → 2.9 s
Vertical guidance-5° / 20°
Main article: 20-K (45 mm)

The BT-7M is equipped with the common 45 mm 20-K cannon found on most early war Soviet tanks. The cannon is very beginner friendly, as it has a rather fast reload speed of ~3 seconds, allowing you to quickly fire more shots if the first shot failed to knock out the target. The velocity is adequate and the trajectory not too curved, meaning distant/moving targets are too worth a try.

The gun depression of -5° is worse than that of the BT-5 so now you will not be able to perform hull-down at certain spots, or you must expose more of your hull to do so. But since the BT-7M is not a large tank, it can still use this gun depression in some hilly terrains. The turret rotation can be a bit slow especially when you need to target tanks at different directions, but traversing the hull will generally help.

Note: you do not have a shoulder stabiliser like some other early WW2 tanks, so if you suddenly encounter an enemy while driving at high speed it might be a good idea to just keep driving until you are in cover, instead of instinctively breaking to a stop and try to aim. Most vertically stabilised tanks like the Pz.II will certainly complete the targeting process before you and shoot before you do which can be fatal.

45 mm 20-K Turret rotation speed (°/s) Reloading rate (seconds)
Mode Capacity Vertical Horizontal Stabilizer Stock Upgraded Full Expert Aced Stock Full Expert Aced
Arcade 188 -5°/+20° ±180° N/A 15.2 21.1 25.6 28.3 30.1 3.77 3.33 3.07 2.90
Realistic 9.5 11.2 13.6 15.0 16.0

Ammunition

  • BR-240; APHEBC: The default round is an excellent APHEBC shell with a maximum penetration of 70 mm, although not the best for similar calibres it can still frontally penetrate almost all light and medium tanks effortlessly. It packs 29 g explosive filler meaning its explosion shrapnel are usually enough to knock out most if not all crew inside common tanks like the Pz.III, Chi-Ha, Crusader, etc. Against larger tanks like LVT(A)(1), more shots might be required to finish the target.
  • BR-240SP; AP: The researchable solid AP trades the explosive filler with ~3 mm more penetration, which is not an impressive improvement. This is usually not the ideal round, since most of the targets can be penetrated by the APHEBC just fine, and the ones that cannot be penetrated will also be tough for the solid AP. The only chance might be when you take the BT-7M in an uptier battle and face targets with armour thickness between 70 and 73 mm. For example, with add-on armour the frontal hull of the Pz.IV F2 becomes 50 + 20 = 70 mm. The APHEBC, with 70 mm maximum penetration, can struggle if not being completely unable to penetrate at point blank range, but the AP can go though it easier with its extra 3 mm penetration.

Penetration statistics
Ammunition Type of
warhead
Penetration @ 0° Angle of Attack (mm)
10 m 100 m 500 m 1,000 m 1,500 m 2,000 m
BR-240 APHEBC 70 67 58 47 39 32
BR-240SP APBC 73 70 60 50 41 34
Shell details
Ammunition Type of
warhead
Velocity
(m/s)
Projectile
mass (kg)
Fuse delay
(m)
Fuse sensitivity
(mm)
Explosive mass
(TNT equivalent) (g)
Ricochet
0% 50% 100%
BR-240 APHEBC 760 1.43 1.2 9 29.26 48° 63° 71°
BR-240SP APBC 757 1.43 - - - 47° 60° 65°

Ammo racks

Ammo racks of the BT-7 (identical).
Full
ammo
1st
rack empty
2nd
rack empty
3rd
rack empty
4th
rack empty
5th
rack empty
6th
rack empty
7th
rack empty
188 174 (+14) 162 (+26) 147 (+41) 135 (+53) 123 (+65) 108 (+80) 89 (+99)
8th
rack empty
9th
rack empty
10th
rack empty
11th
rack empty
12th
rack empty
13th
rack empty
Visual
discrepancy
73 (+115) 57 (+131) 41 (+147) 25 (+163) 13 (+175) (+187) No

Notes:

  • Racks disappear after you've fired all shells in the rack.
  • Turret empty: 147 (+41) shells.
  • Turret and side racks empty: 89 (+99) shells.

Machine guns

Ammunition1 890 rounds
Belt capacity63 rounds
Reloadbasic crew → aces
10.4 → 8.0 s
Fire rate600 shots/min
Main article: DT (7.62 mm)
7.62 mm DT
Mount Capacity (Belt) Fire rate Vertical Horizontal
Coaxial 1,890 (63) 600 N/A N/A

Usage in battles

The BT-7M is a great tank to rush to capture points at the very start of a match. Its speed and agility can get you to the point in time, even well before the enemies arrive. When you are close to the point be careful and prepare to perform a hard break to target potential enemy vehicles or have some cover options in mind to get behind them as fast as possible. If you do see enemy light tanks arriving at the same time as you, try destroying them as soon as possible, as leaving them alive can create more problems if they get away successfully. The BT-7M's 45 mm APHEBC should have no issue penetrating and knocking out almost all fast vehicles with a single shot.

After capturing a point or two, you can either push forward, relocate to help any teammate or ambush next to the point. If you want to push forward, remember to not push so far that no teammates can see you or give support fire. The BT-7M does not have the armour to take hits if you are too far into enemy territory, nor does it have the reverse/traverse speed to quickly get you out of there. It is better to push to a spot that is not too far from the middle of the map so you can retreat quickly if anything dangerous happens.

The BT-7M has excellent speed for it to freely manoeuvre around the battlefield. It is therefore great assistance to run between points and fight enemy vehicles trying to capture points. But be careful to not choose routes that are too exposed to the enemy side to ensure your survival. As you drive between different areas on the map, you must constantly scan around using binoculars as well as 3rd person views to look out for enemy vehicles.

When ambushing next to a friendly point and waiting for enemies to come, it is better to choose a spot at the side or even the back of the area where enemies will appear. This way the enemies are less likely to notice you, as quite some people simply drive into the capture zone without looking around that much. If you have other vehicles in the lineup or have backups for the BT-7M, you can be a bit lost and let the enemy contest the point, then destroy them and recapture the point to gain more XP and SL. When engaging from the side, target their engine or drivers to immobilise them first, then use your quick reload and knock out their turret crew. If you shoot the gunner first they can still get away requiring the BT-7M to drive out of its ambush area into the dangerous battlefield to hunt them down. However, if the BT-7M is your last vehicle or if your team only has a tiny bit of tickets remaining, do not risk letting the enemy contest the point since if the point is no longer under your team's control you will need to recapture it, which means spending longer time in the danger zone with more enemies potentially on the way, thus decreasing your chance of surviving. Therefore, it is better to finish them off before they reach the circle.

Enemies worth noting:

  • B1 bis/ter - The BT-7M is at a higher BR than the BT-5 which means you will encounter the B1 heavy tanks. These are really well-protected tanks with armour enough to resist most shells, and firepower enough to take out most opponents. However, they are extremely slow, with an average speed of ~20 km/h they are unable to drive around quickly, meaning you can predict their locations without much effort. The best tactic is to flank, get close and hit them from their sides/rear. The side of the B1 bis is large and flat and is only 55 mm thick. Your APHEBC can easily penetrate it when it is not angling. Aim for the forward half of the hull to disable its driver/gunner, or the back half to destroy its engine/transmission. Multiple shots might be required to get the job done as the shells may be absorbed by the engine, fuel tank, or the empty space inside. In a frontal engagement aim for the turret ring which is only 40 mm, or the cupola which is 48 mm, or the driver's optics to the right and above the hull gun which is 60 mm. Shots through these places can knock out its driver or gunner/commander. As for the B1 ter, the side is covered by a slightly angled add-on armour plate making it significantly harder to penetrate. The frontal hull is also thickened to 70 mm, becoming immune to your APHEBC shell. Thus it is best to engage a B1 ter from the rear. Shoot its engine and set it aflame 3 times so it runs out of fire extinguishers. In the meantime the B1 will rotate its turret towards you, so shoot the turret side/rear to stop it from returning fire. For both B1, don't forget to avoid the 2 cannons at the same time. The turreted 47 mm is stabilised and has enough penetration, shrapnel and gun depression to target and penetrate the BT-7M. The 75 mm hull gun also has enough penetration and a large amount of HE filler to knock out the BT-7M.
  • AS 42, Flakpanzer 38 - Although SPAAs are a great threat overall, these two are particularly threatening because they are fast, small, and equipped with powerful autocannons. Even without the use of HVAP shells, they can easily penetrate the BT-7M's armour within normal combat range, and their high rate of fire allows them to spray numerous shells towards the BT-7M to take down any surviving crewmen, thus greatly reducing the survivability of the BT-7. The armour on these two SPAAs is also very weak, meaning that the BT-7M's APHEBC shells might over-penetrate without detonating, causing minimal damage. The BT-7 has one machine gun whose rate of fire is not very fast, making it all the more challenging to deal with small, fast targets with exposed crew members like those. In many cases, these spaces will only expose their gunners when scraping back and forth, and it is very difficult to accurately hit objects the size of a human torso. If you miss a shot and they seem ready to fire, immediately retreat or seek cover.

Pros and cons

Pros:

  • Has a wonderful top speed on any terrain, faster than some other light tanks like the Pz.II
  • The 45 mm gun is beginner-friendly: fast rate of fire, adequate penetration, and good explosive damage
  • The powerful 500 hp engine makes it exceptionally nimble
  • Is narrow and short, making it harder to get spotted and hit
  • Thickened frontal hull armour makes it more sturdy against machine guns and autocannons

Cons:

  • Higher BR means more tough enemies like the B1 bis
  • Armour remains unreliable against common tanks like the Chi-Ha Kai or the Pz.III E
  • Only 3 closely sat crew members, prone to be taken out together
  • Oversteers at high speed, leading to it spinning out and/or drifting and losing its speed
  • Still not as fast as wheeled vehicles like Sd.Kfz.234/2 on road

History

The BT-7M was an improved version of the Soviet BT-7 light tank developed before the Second World War. The main improvement was in terms of the powerplant, and at the time it was built no other tank in the world could reach the same speeds.[1]

Development

Development of a version of the BT-7 light tank began in the Soviet Union in 1938 with the construction of four prototypes at the Kharkov Locomotive Plant called the BT-8, which used a V12 diesel engine which was developed from the Hispano-Suiza 12Y aircraft engine. After the BT-8 was tested against the BT-7 it was determined to continue its development which resulted in the production version, designated BT-7M.[1][2]

Design

The BT-7M had a 500 horsepower V12 engine chosen partly due to greater fuel efficiency. The hull was reinforced with braces and some of the fuel storage was removed due to the higher fuel efficiency of the engine. The BT-7M's engine also proved to be much safer in that it caught on fire much less often when hit by enemy fire. The BT-7M was proven to have a top speed of 62 km/h on tracks and 86 km/h with just wheels. Other than these changes, the BT-7M was fairly similar to the regular BT-7.[1][2]

Production and Service

The BT-7M entered production in 1939, replacing all earlier BT-7 variants on production lines. It was the last BT-7 variant produced with production lasting until 1941. Approximately 788 BT-7M tanks were built during that time period, being superseded on production lines by the T-34 medium tank. The BT-7M did end up seeing some combat during the Great Patriotic War.[1][2]

Media

Skins
Videos

See also

Links to the articles on the War Thunder Wiki that you think will be useful for the reader, for example:

  • reference to the series of the vehicles;
  • links to approximate analogues of other nations and research trees.

External links

Paste links to sources and external resources, such as:

  • topic on the official game forum;
  • other literature.

References


Kharkov Design Bureau for Mechanical Engineering named after A. A. Morozov
Light Tanks 
BT-5  BT-5 · RBT-5
BT-7  BT-7 · BT-7M · BT-7A (F-32)
Medium Tanks 
T-34-76  T-34 (Prototype) · T-34 (1940) · T-34 (1941) · T-34 (1st Gv.T.Br.) · T-34 (1942) · T-34E STZ · T-34E
T-34-57  T-34-57 · T-34-57 (1943)
T-34-85  T-34-85 (D-5T) · T-34-85 · T-34-85E
T-34-100  T-34-100
T-44  T-44 · T-44-100 · T-44-122
Main Battle Tanks 
T-54  T-54 (1947) · T-54 (1949) · T-54 (1951)
T-64  T-64A (1971) · T-64B
Export/Captured 
T-34  ▀T 34 747 (r) · ␗T-34 (1943) · ␗Т-34-85 (S-53)
See Also  Uralmashzavod · Uralvagonzavod

USSR light tanks
T-26  T-26 · T-26 (1st Gv.T.Br.) · T-26-4 · T-26E
BT  BT-5 · RBT-5 · BT-7 · BT-7 TD · BT-7M · BT-7A (F-32)
T-50  T-126 · T-50
T-70  T-70 · T-80
PT-76  PT-76B · PT-76-57 · Object 906
BMP  BMP-1 · BMP-2 · BMP-2M · BMP-3
BMD  BMD-4
2S25  2S25 · 2S25M
Wheeled  BA-11 · BTR-80A
Other  T-60 · Object 685 · 2S38
China  ▂Type 62